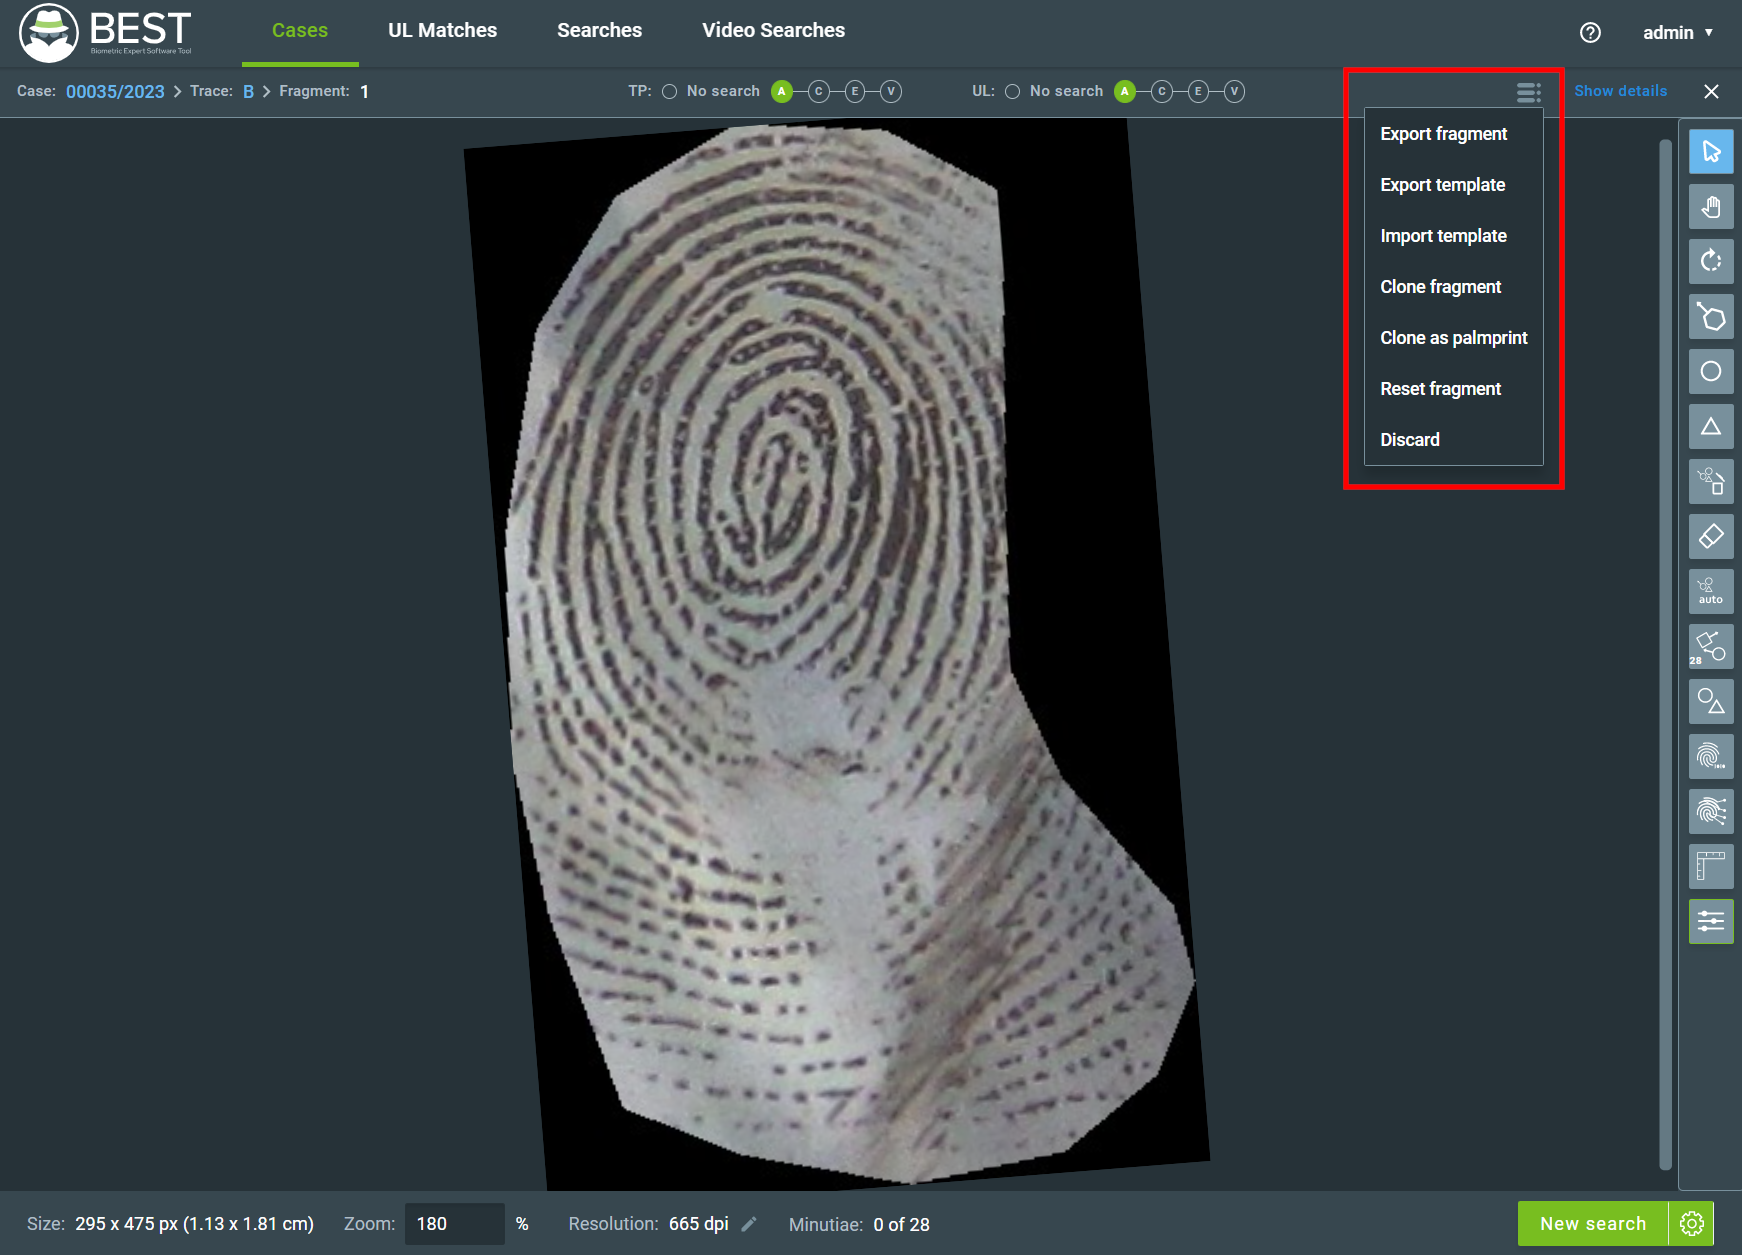
1. Introduction
GBS BEST (Biometric Expert Software Tool) is an application designed for helping forensic experts in criminal investigations and case management. It provides tools for quality enhancement, comparison, and automated identification of biometric images in a clean and intuitive interface.
This manual is updated for BEST version 1.6.4.
1.1. Access and Authentication
You should access BEST with a browser, and we recommend Google Chrome. The URL for access is specific to each deployment.
Note
If necessary, contact the Griaule Support Team to obtain the correct URL.
Authentication is required to access the application. The credentials needed by BEST are username and password.

Note
At the bottom of the screen there is an option to change the user interface language. This option is also available at the settings after login.
1.2. Two-factor Authentication (2FA)
When two-factor authentication (2FA) is turned on, the first time you try to log in, after entering your username and password, you’ll be shown a QR Code that must be registered in Google Authenticator.
Note
Google Authenticator is a time-based code generator that is available as an application for Android and iOS smartphones.
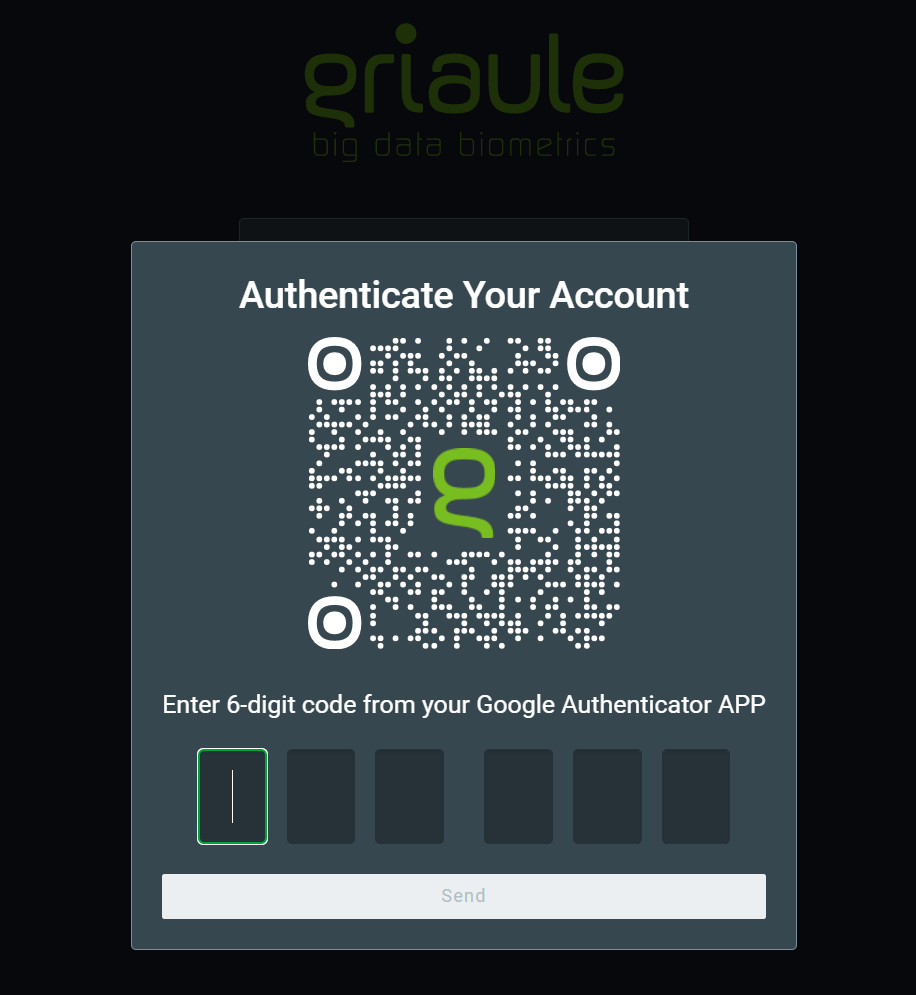
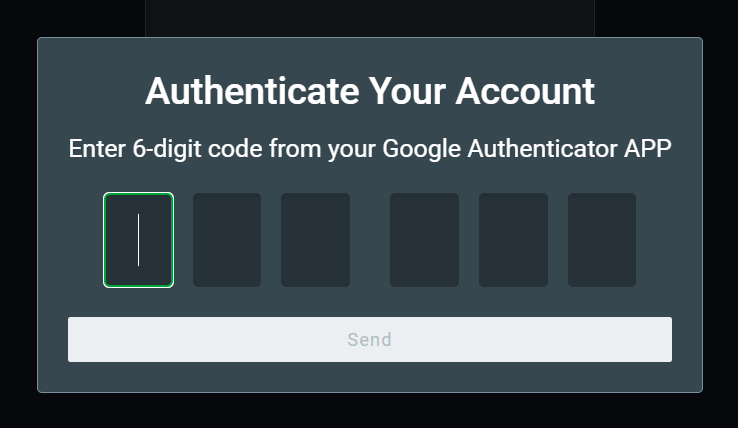
After successfully registering the QR Code in Google Authenticator, enter the unique time-sensitive 6-digit code and click on Send.
You will only need to register the QR Code once. But for each subsequent login, you will be asked to enter the 6-digit code generated by Google Authenticator.
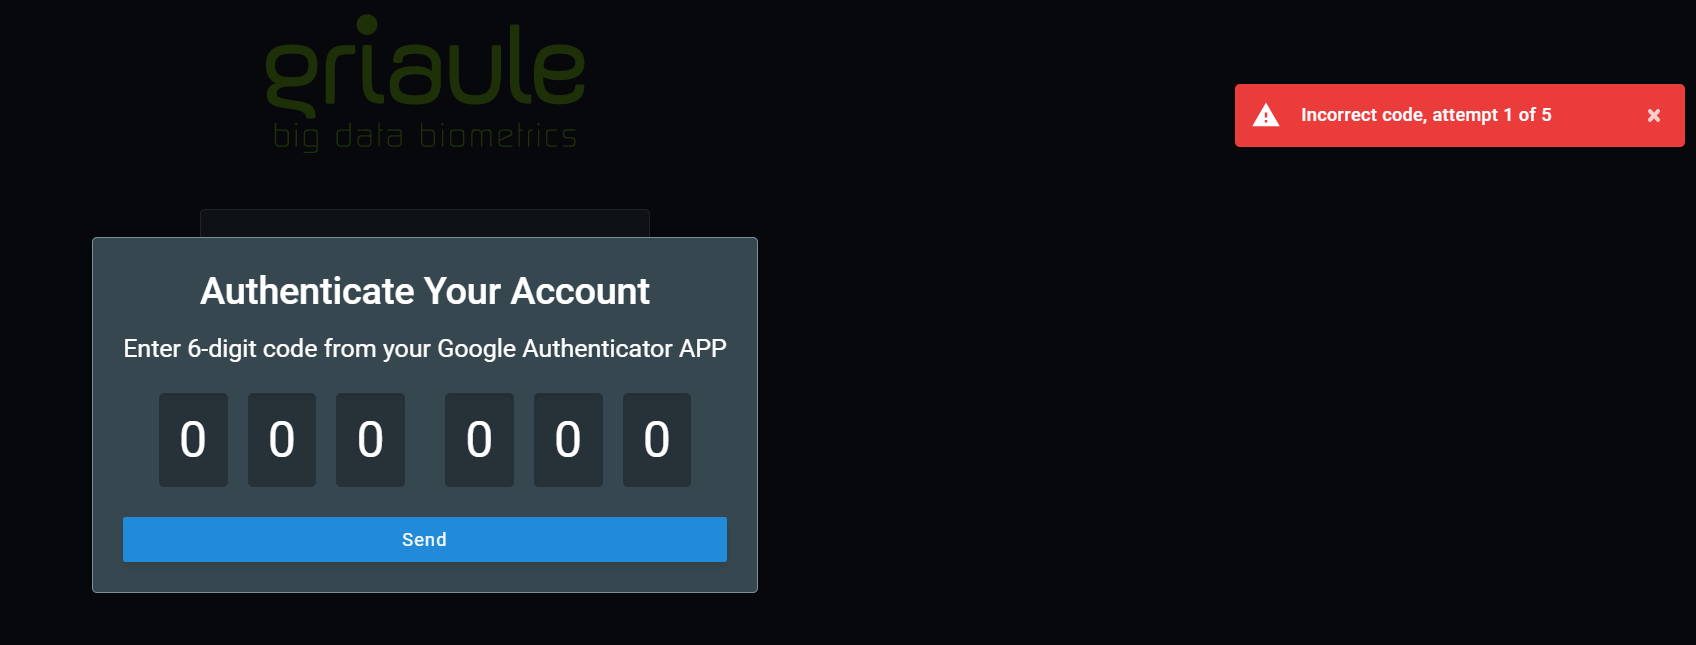
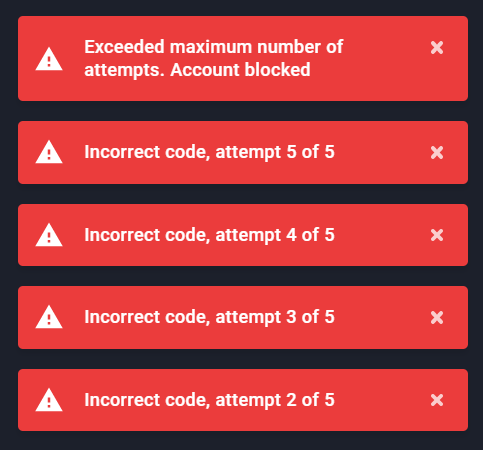
There is a limited number of unsuccessful login attempts a user can make. Every time an incorrect code is entered, an error message will be shown:
If you reach the maximum amount of unsuccessful login attempts, your account will be automatically blocked.
Warning
If your account is blocked, contact your system administrator.
1.3. Simultaneous Login and Browser Enrollment
Only one session per user is allowed. It is not possible to log in with the same profile more than once in the application. If an user is already logged in and another access happens using the same username and password, the user with the oldest session will be warned and logged out in their next action.
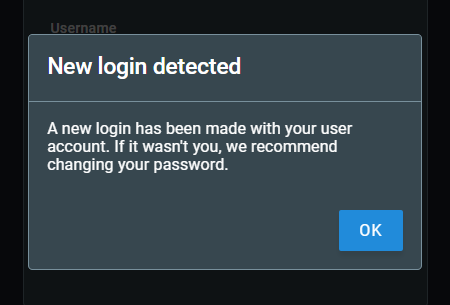
Also, only one browser may be used at a time. When trying to log in using a different browser, the user will be informed that it is necessary to authenticate the new browser. The authentication of a new browser will revoke the access from the previous one.
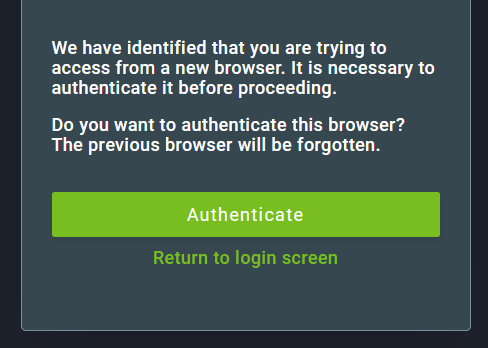
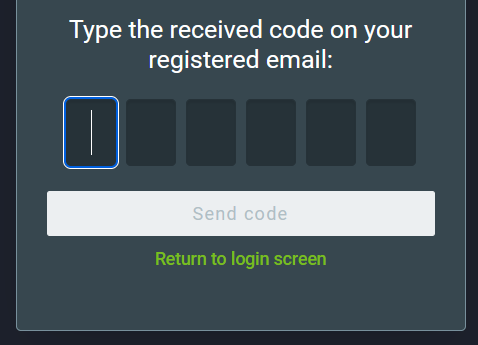
To authenticate a new browser, click on Authenticate and then enter the verification code that will be sent to the email linked to the user account.
If the authentication is successful, a notification will appear on the upper-right corner of the screen after logging in.

1.4. Change or Reset your Password
For security reasons, you can change your password or reset it if you forget it.
1.4.1. Change your Password
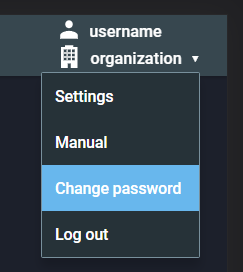
To change your password, after logging in, hover over your username on the upper-right corner of the screen and click on Change password.
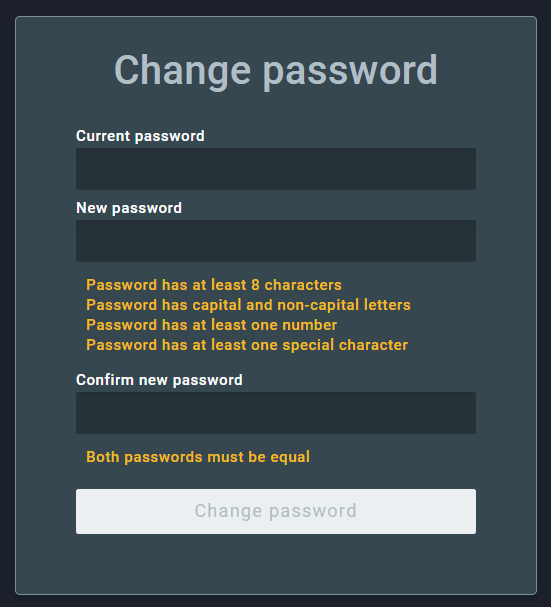
Then, enter the current password and the new password two times. Make sure to meet the password requirements, they are listed under the new password field and will turn green when met. Finally, to confirm the change, click on Change password.
1.4.2. Reset your Password
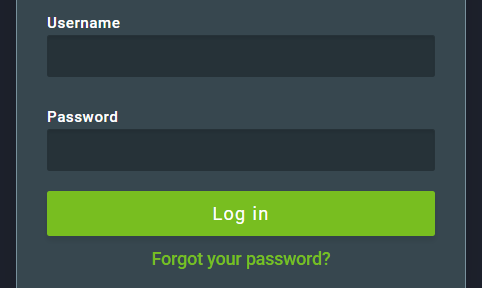
To reset your password, on the login screen, click on Forgot your password?:
Then, enter the profile username and click on Send.
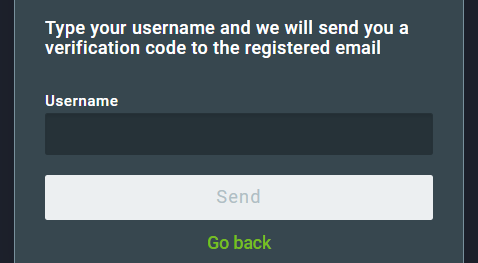
An email containing a verification code will be sent to the email address linked to that profile. Enter the verification code and click on Send code.
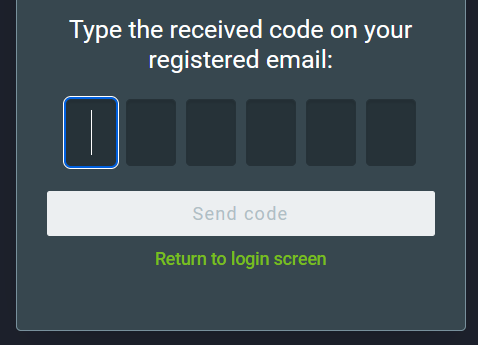
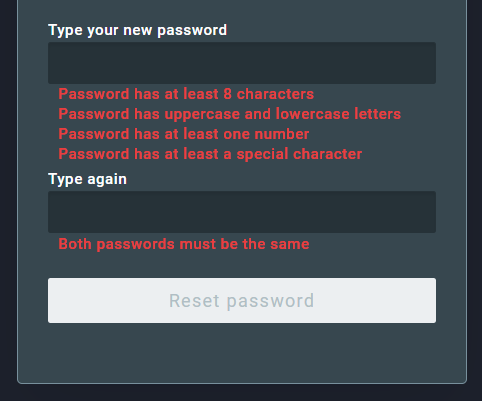
If the code is correct, you will be able to create a new password. Enter the new password two times. Make sure to meet the password requirements, they are listed under the new password field and will turn green when met. Finally, to confirm the reset, click on Reset password.
2. User Interface
When you log in, the list of cases is displayed.
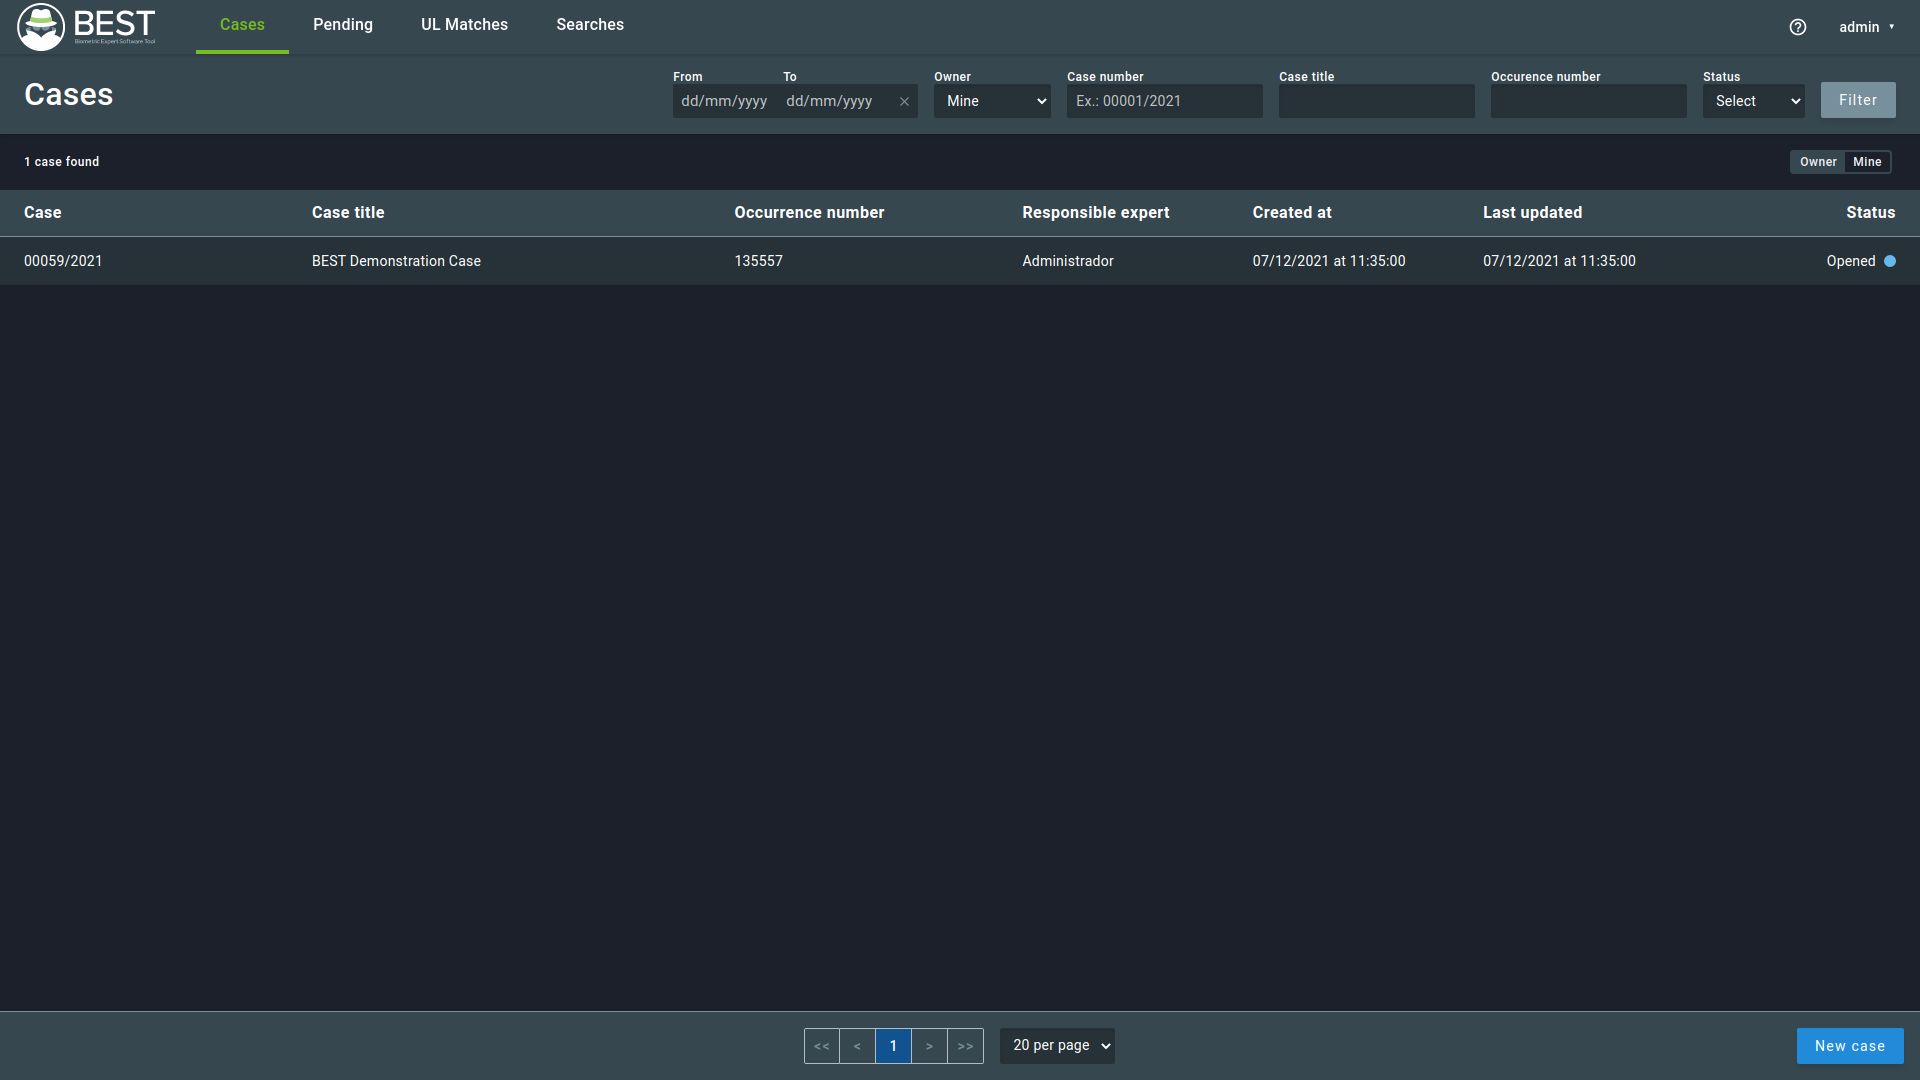
BEST shows newer cases first. You can select the number of displayed cases per page and navigate through them with the controls at the bottom of the screen.
The top menu allows you to choose whether to list new Cases, cases Pending review, Unsolved Latent (UL) Matches, or Searches.
2.1. Tutorial
If its your first time logging in BEST, it will display a tutorial to present some features and guide you through the software.
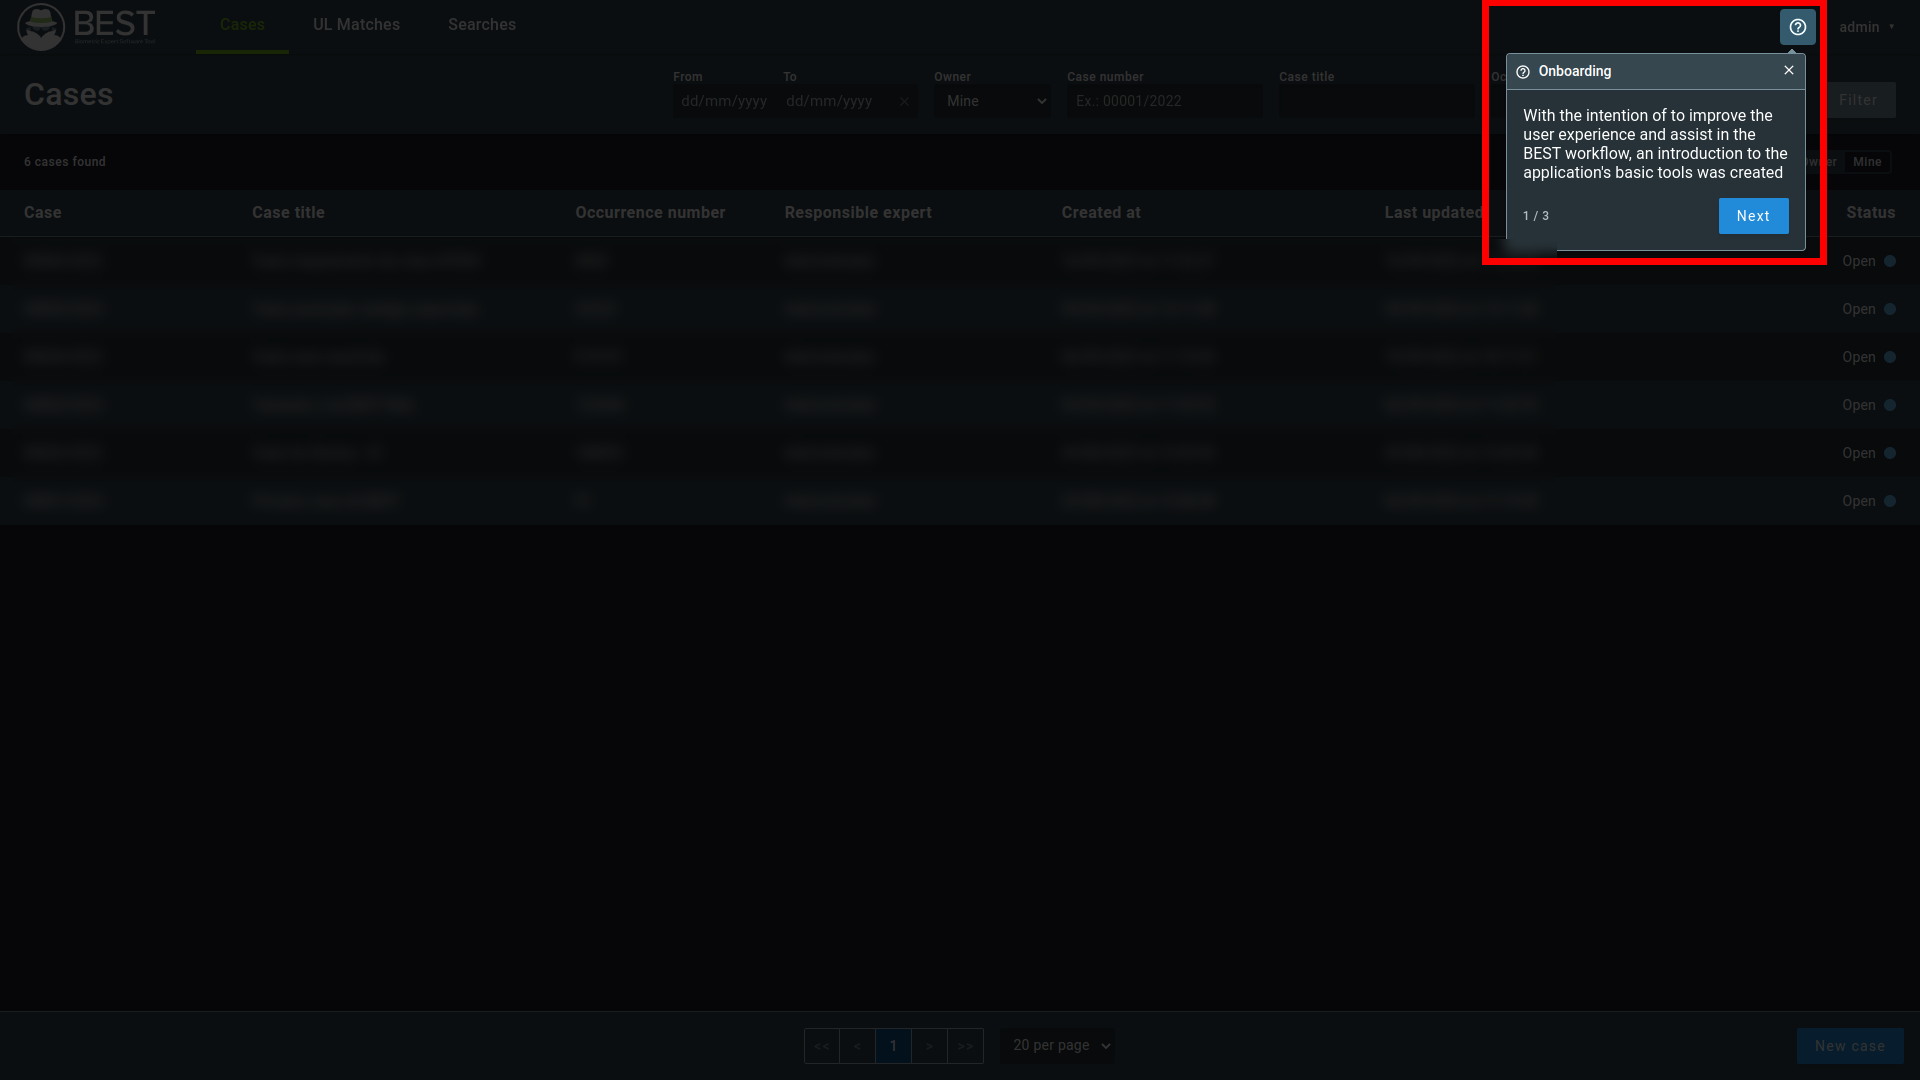

You can use the keyboard arrows to navigate to previous and next and can cancel the Tutorial pressing the Escape key (ESC). This feature is available in the following pages:
- Case List Page
- Case Page
- Traces Page
- Fragment Page
- Search Comparison Page
- Report Page
- Report Edition Page
Whether you want to re-access this feature, you can click in the help symbol at the top right of the page to start the Tutorial for that page.
2.2. Filtering Options
You can filter the list results in any tab through the filtering options. Each tab has its own filter properties, as shown below:
After applying the desired filters, they will be displayed on the right side. To undo the filtering, click on “Clear filters”.
2.2.1. Cases List Filters
Date – Restricts the list to a date interval. There are also shortcuts for one day (today), last week, and last month.
Status – Status of the transaction. Restricts the list to open, resolved, or cancelled cases.
Openedcases are identified by a blue dot.Resolvedcases are identified by a green dot.Cancelledcases are identified by a red dot.
Owner – Restricts the list of cases according to ownership:
Mine- Cases created by the current user.Participant- Cases in which the current user is a participant expert.All- All cases created.
Case Number
Case Title
Occurrence Number
2.2.2. Pending List Filters
Date – Restricts the list to a date interval. There are also shortcuts for one day (today), last week, and last month.
Search Type – Restricts the list to one of following search operations:
LT TP- Latent against the Tenprint database.LT UL- Latent against the Unsolved Latents database.TP UL- Tenprint against the Unsolved Latents database.
Case, trace, or fragment code.
See also
The Pending tab may not appear if Double Blind is not activated.
2.2.3. UL Matches List Filters
- Date – Restricts the search to a date interval. There are also shortcuts for one day (today), last week, and last month.
- Case or fragment code.
- Occurrence number.
- Crime type.
- Score of the biometric match.
2.2.4. Searches List Filters
Date – Restricts the search to a date interval. There are also shortcuts for one day (today), last week, and last month.
Cases – Restricts the list according to ownership:
Mine- Cases created by the current user.Participant- Cases in which the current user is a participant expert.All- All cases created.
Case, trace, or fragment code.
Status – Status of the fragment search. HIT, NO HIT, or Searching.
HIT- An expert tagged the search as a HIT (identified by a green dot).NO HIT- An expert tagged the search as a NO HIT (identified by a red dot).Searching- The search is still in progress, or the search result was not reviewed by an expert yet (identified by a blue dot).
3. Creating a Case
To create a new case, go to the Cases tab and click on the New Case button. A new window will appear, allowing you to fill in information about the case.
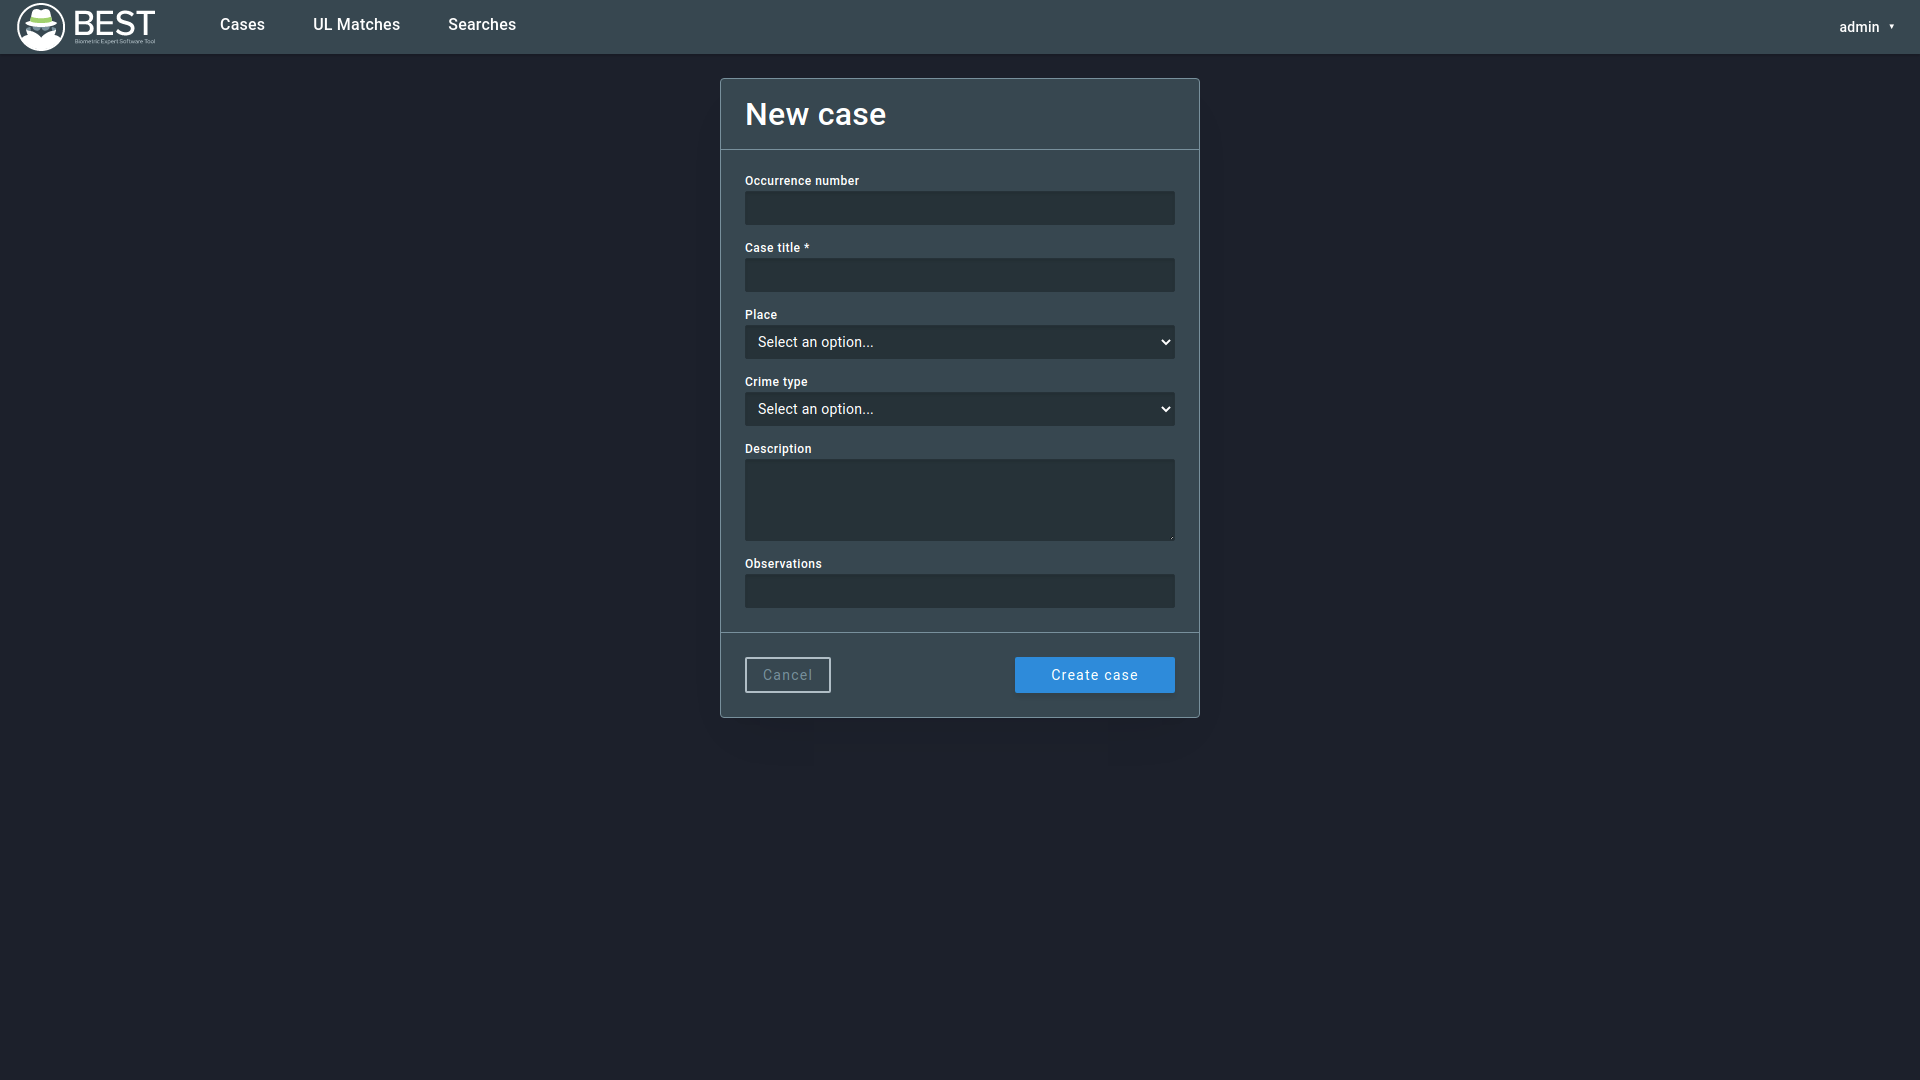
After filling in the required information, click Create case.
4. Cases
You can view any case by clicking on it in the Cases list. This will show the trace, fragments and reports for the selected case.
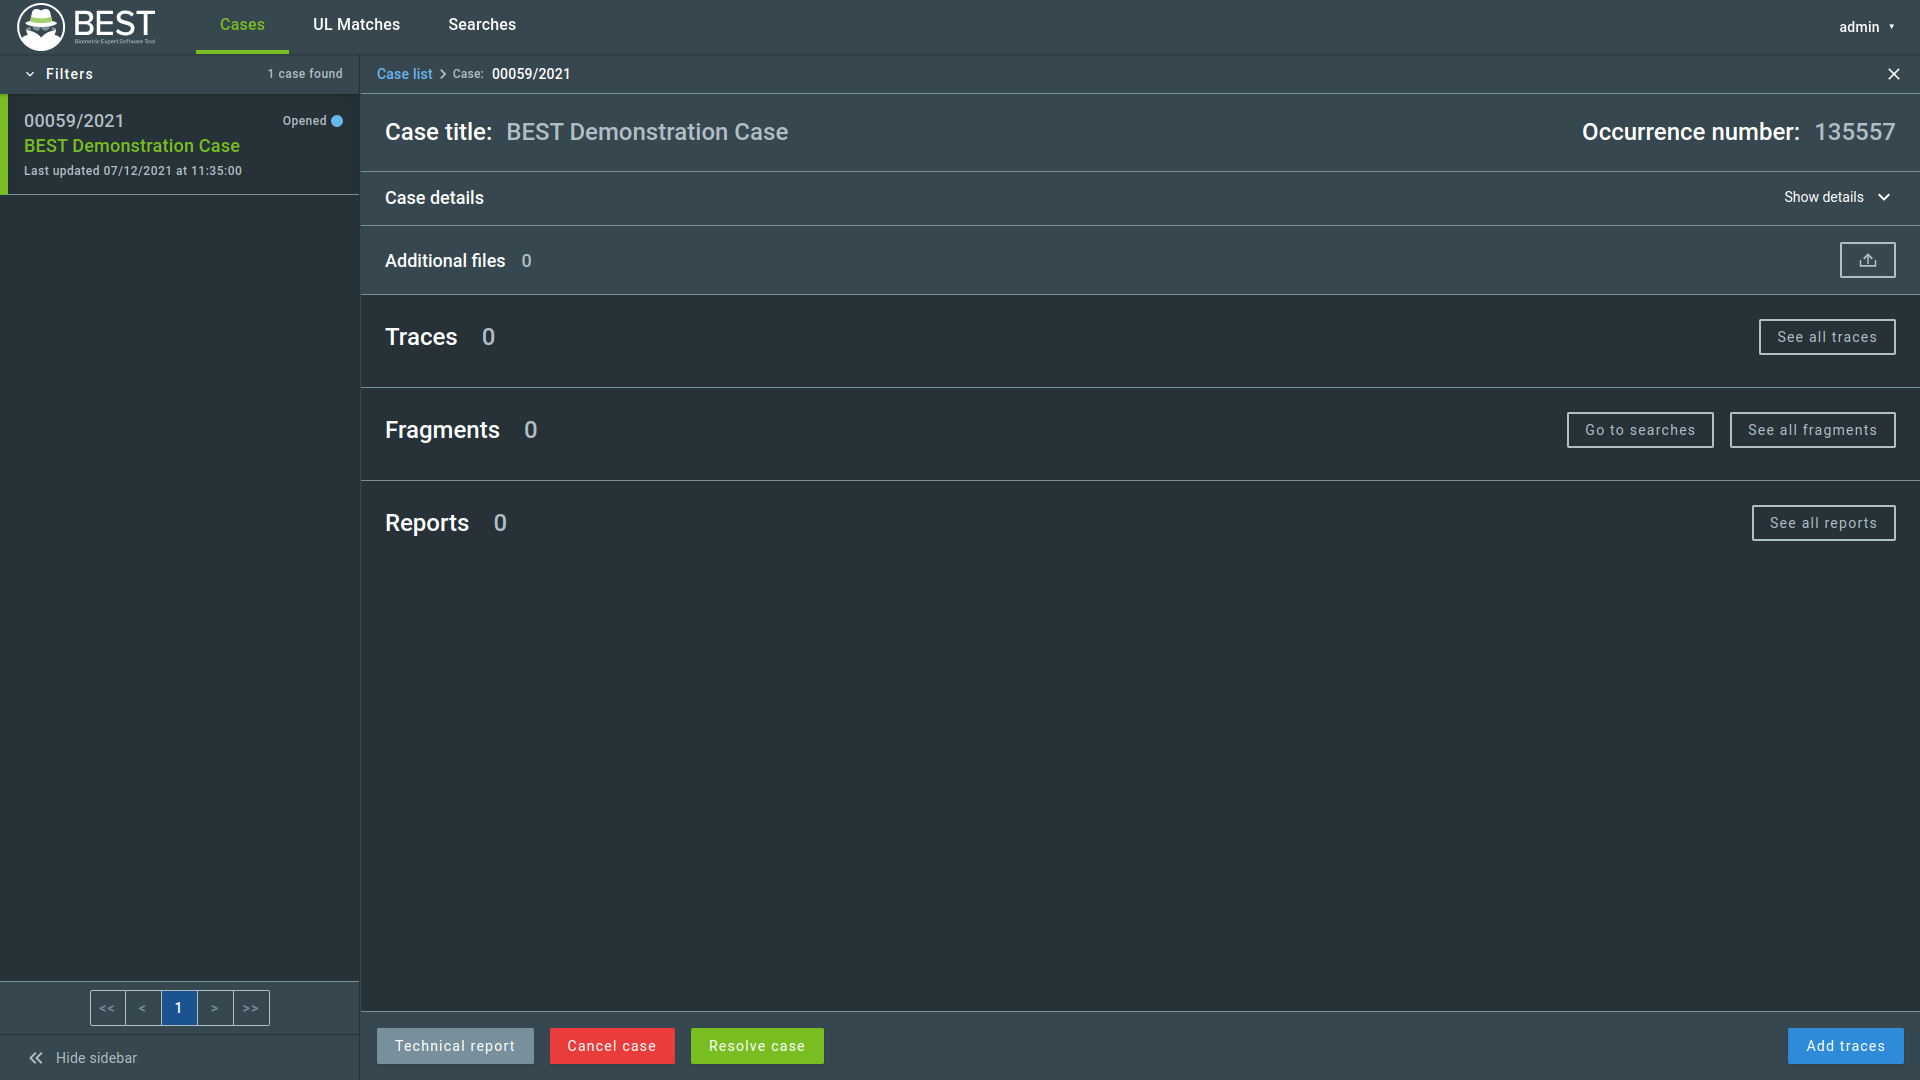
You can also expand the detailed information through the Show details button.
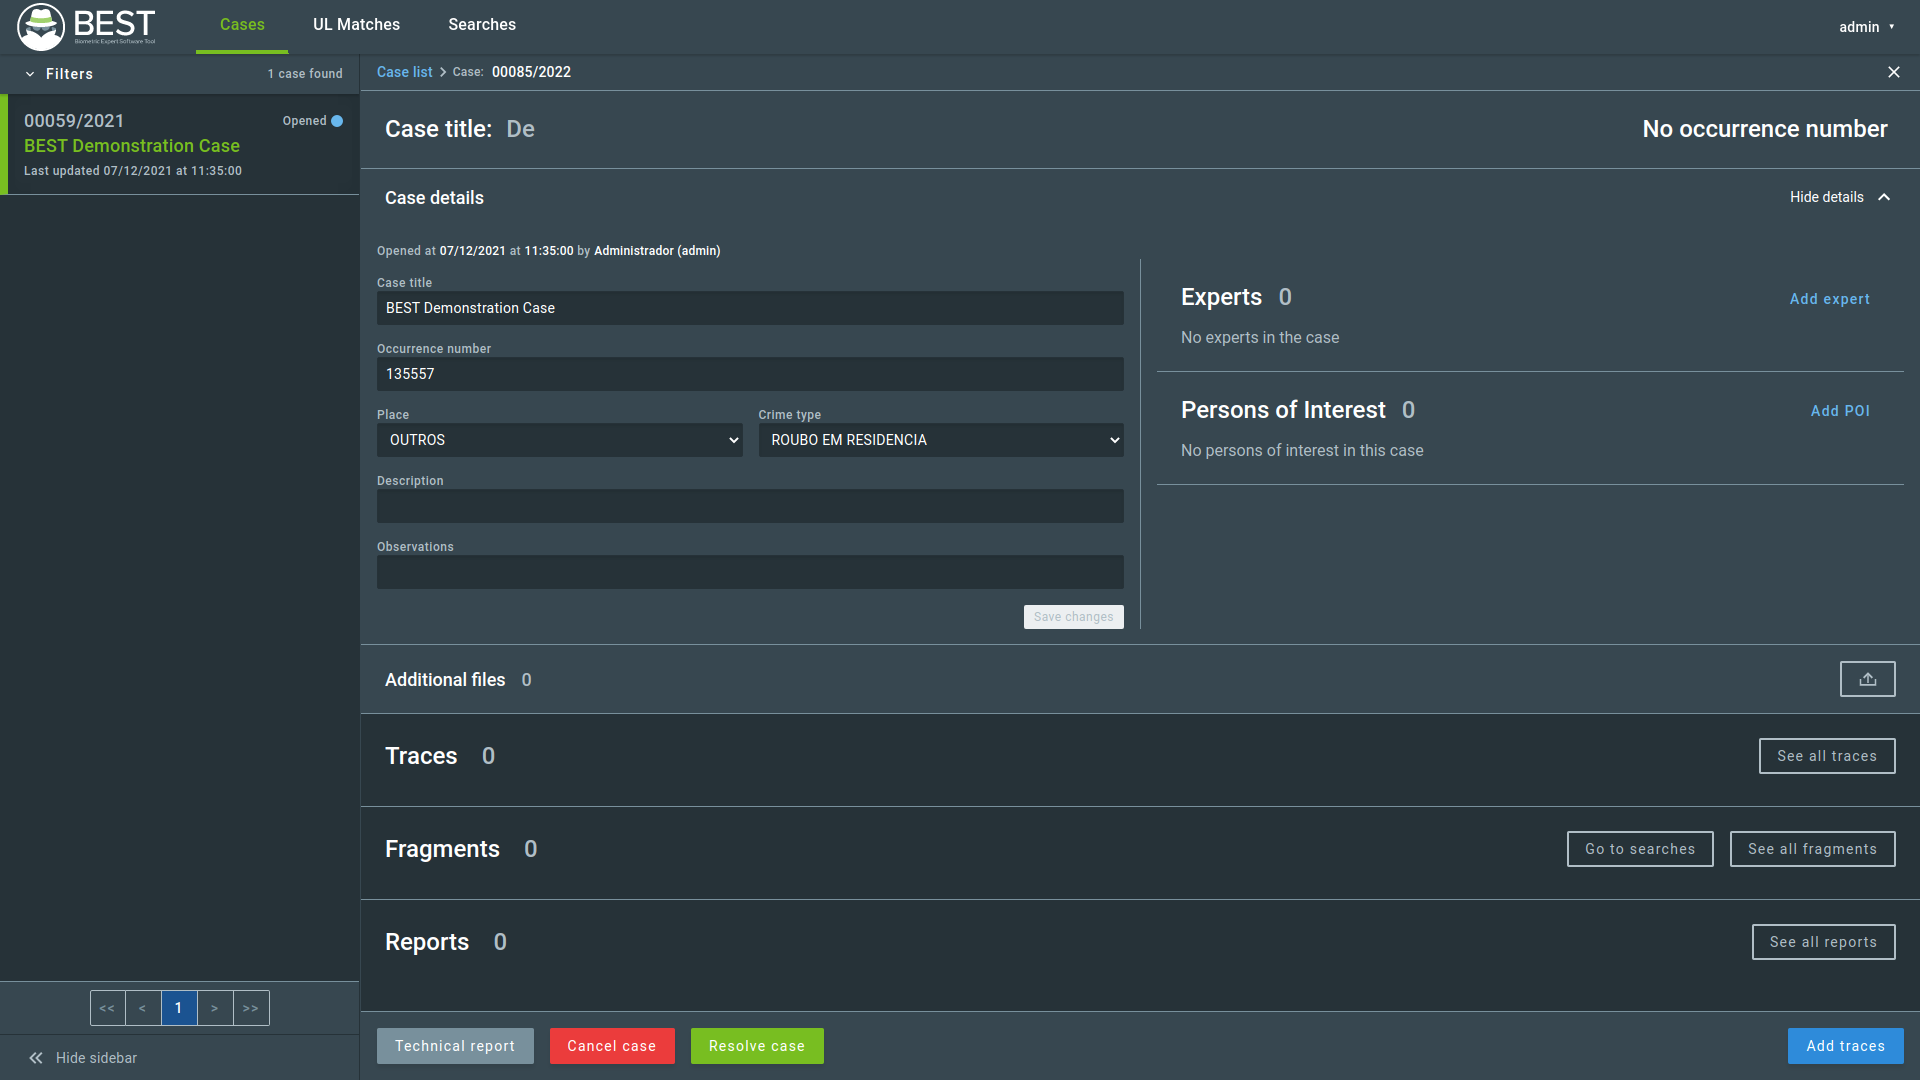
While viewing the case details, the Cases list will be kept in the sidebar for navigation. In this page, the list filters can be accessed through the Filters button above the sidebar.
You can hide the sidebar by clicking the << Hide Sidebar button.
4.1. Adding Experts
Initially, the only participant expert is the user who created the case. It is possible to add other users as participant experts using the Experts section of the Case menu.
In the Cases tab, clicking on Add expert will open the Add Expert window.
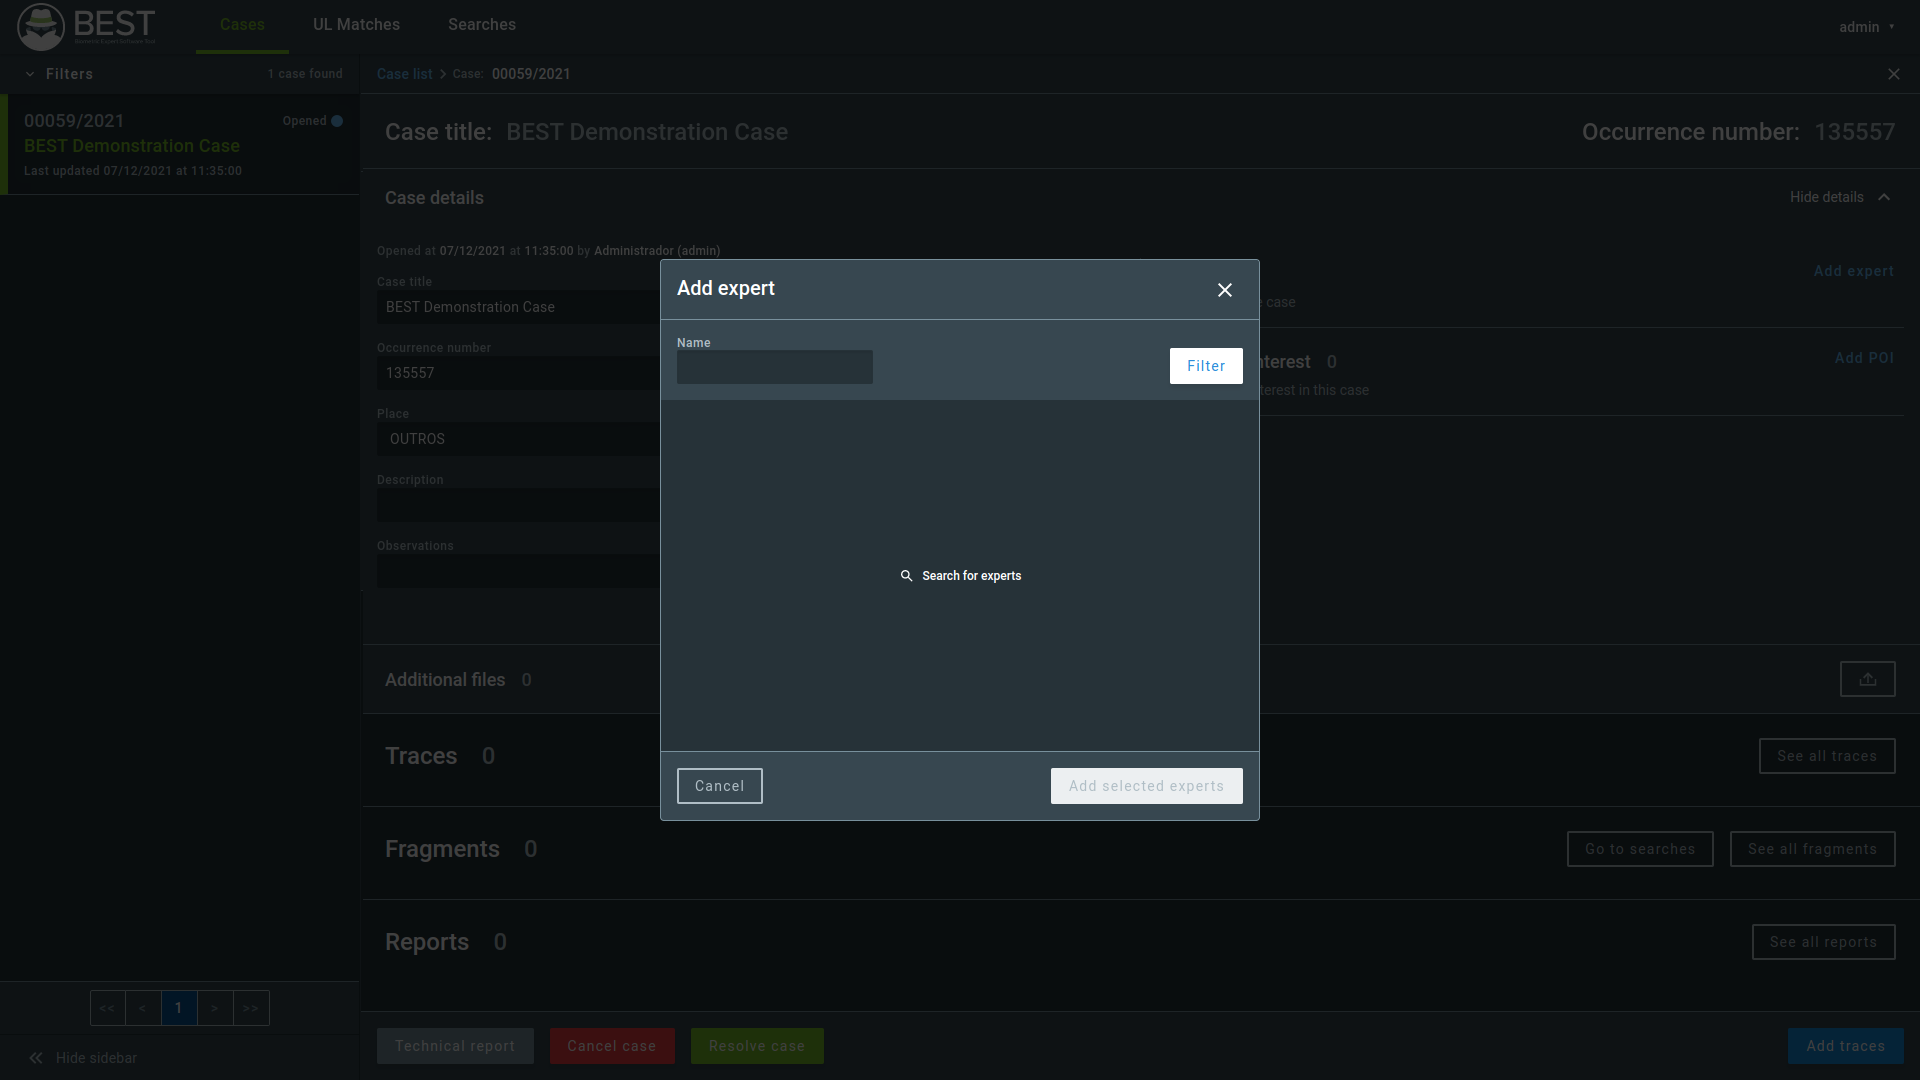
Fill in the expert’s name and click on the filter button to list matching experts. Select the desired experts by checking the boxes on the Select column, and then click the Add selected experts button.
The selected experts will appear in the Experts panel, and all experts are added with the profile role Viewer. Viewer is the default role assigned to any participant expert. To change the role of an expert, select it and click the Change to editor button. You can use the same procedure to modify an assigned Editor role back to Viewer. If an expert assigned as Editor is selected, the Change to Editor button becomes Change to Viewer.

To remove an expert, hover the mouse over the desired expert, click on the x, and confirm the action.
4.2. Adding a Person of Interest
You can add Persons of Interest (POI) from the Persons of Interest panel in the Case tab by clicking on the Add POI button. It will open the Add POI window.
To add a POI, select the field and value that will be used to search for it in the database, and click the Filter button. Next, select the desired people by checking their boxes on the Select column. You can, optionally, add a description for the chosen person. After you have selected all the people, click the Add selected POIs button.
Caution
The current selection will be cleared if the search parameters are changed.
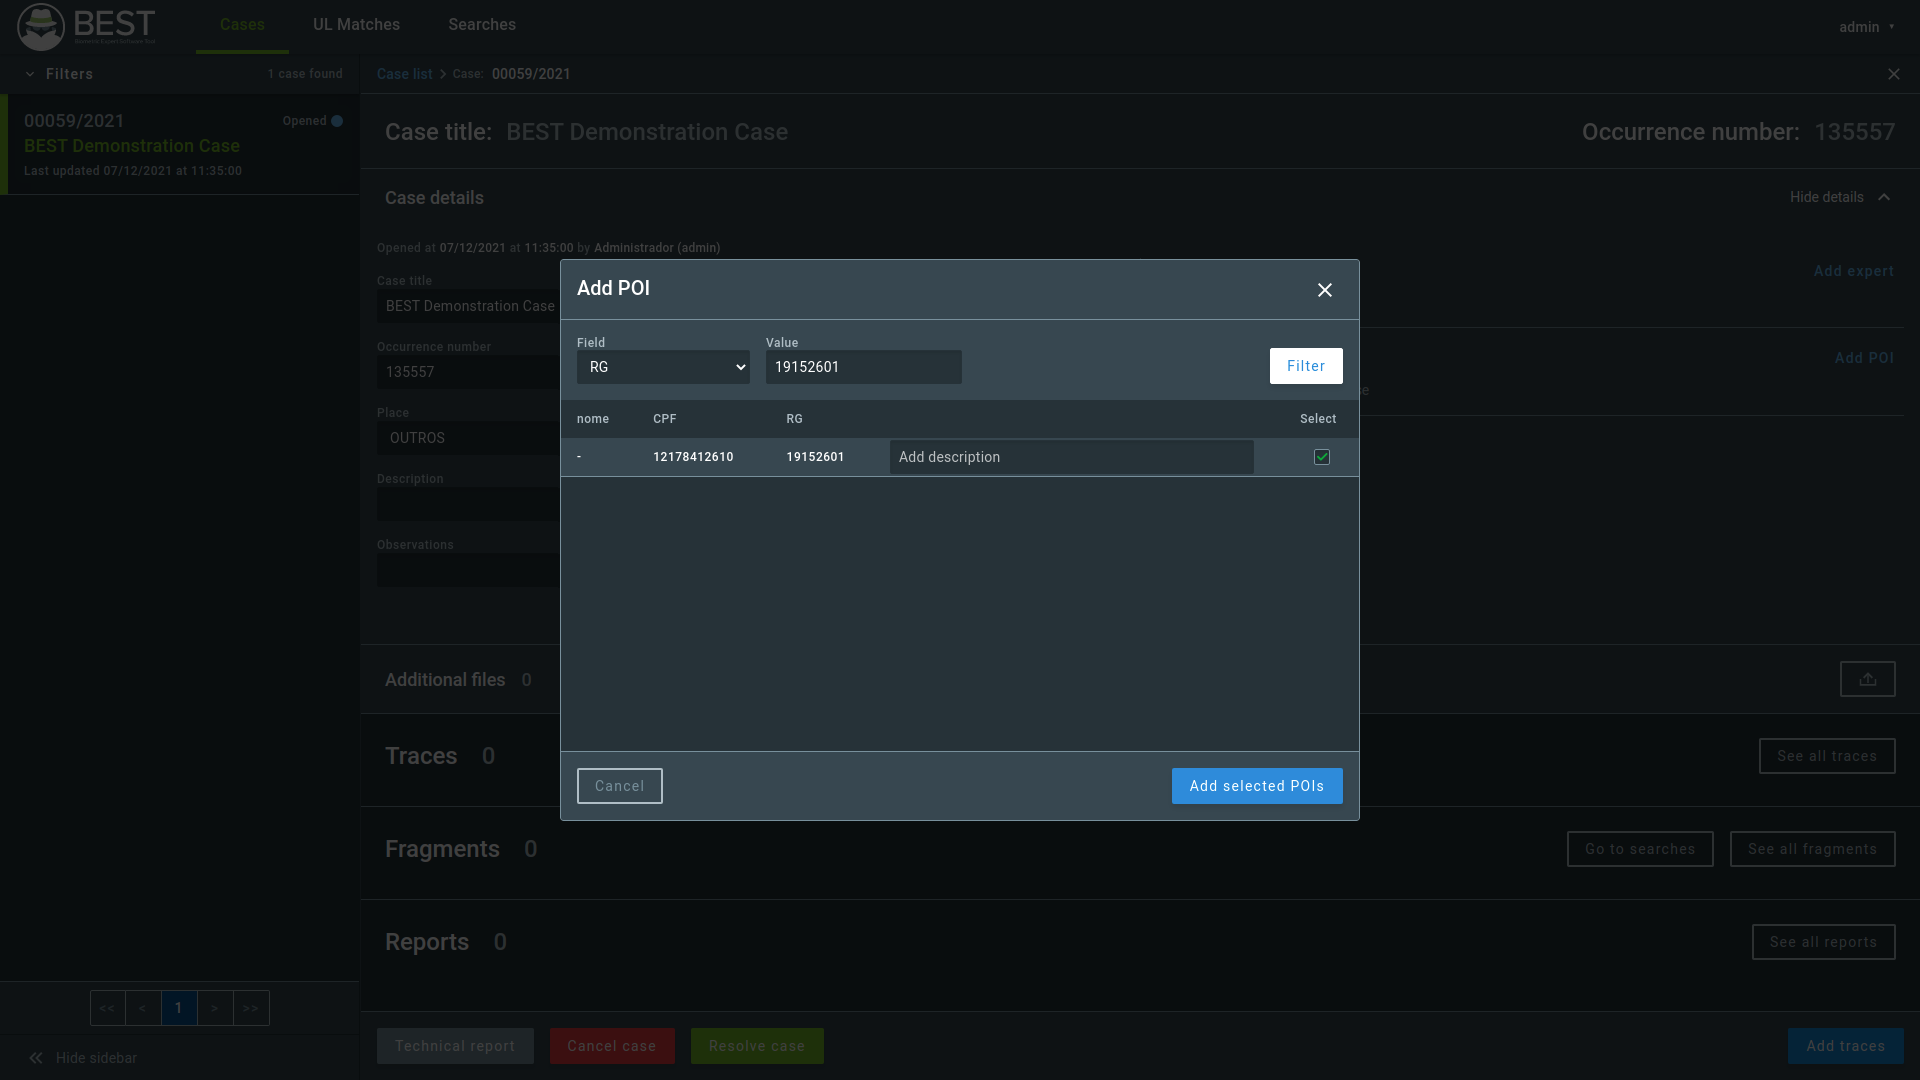
The selected Persons of Interest will appear in the panel. To remove a POI, hover the mouse over the desired POI, click on the x, and confirm the removal.

Attention
When POIs are added to cases that have video traces, BEST Video will conduct the search of fragments extracted from videos considering only the POIs, not the entire database.
4.3. Adding Additional Files
You can also add other files to the case. The file types supported are:
- DOC
- DOCX
- XLS
- XLSX
- Image extensions (.png, .jpeg, .tiff, and others)
To upload additional files, click in the upload button. A panel will appear where you can upload the files.
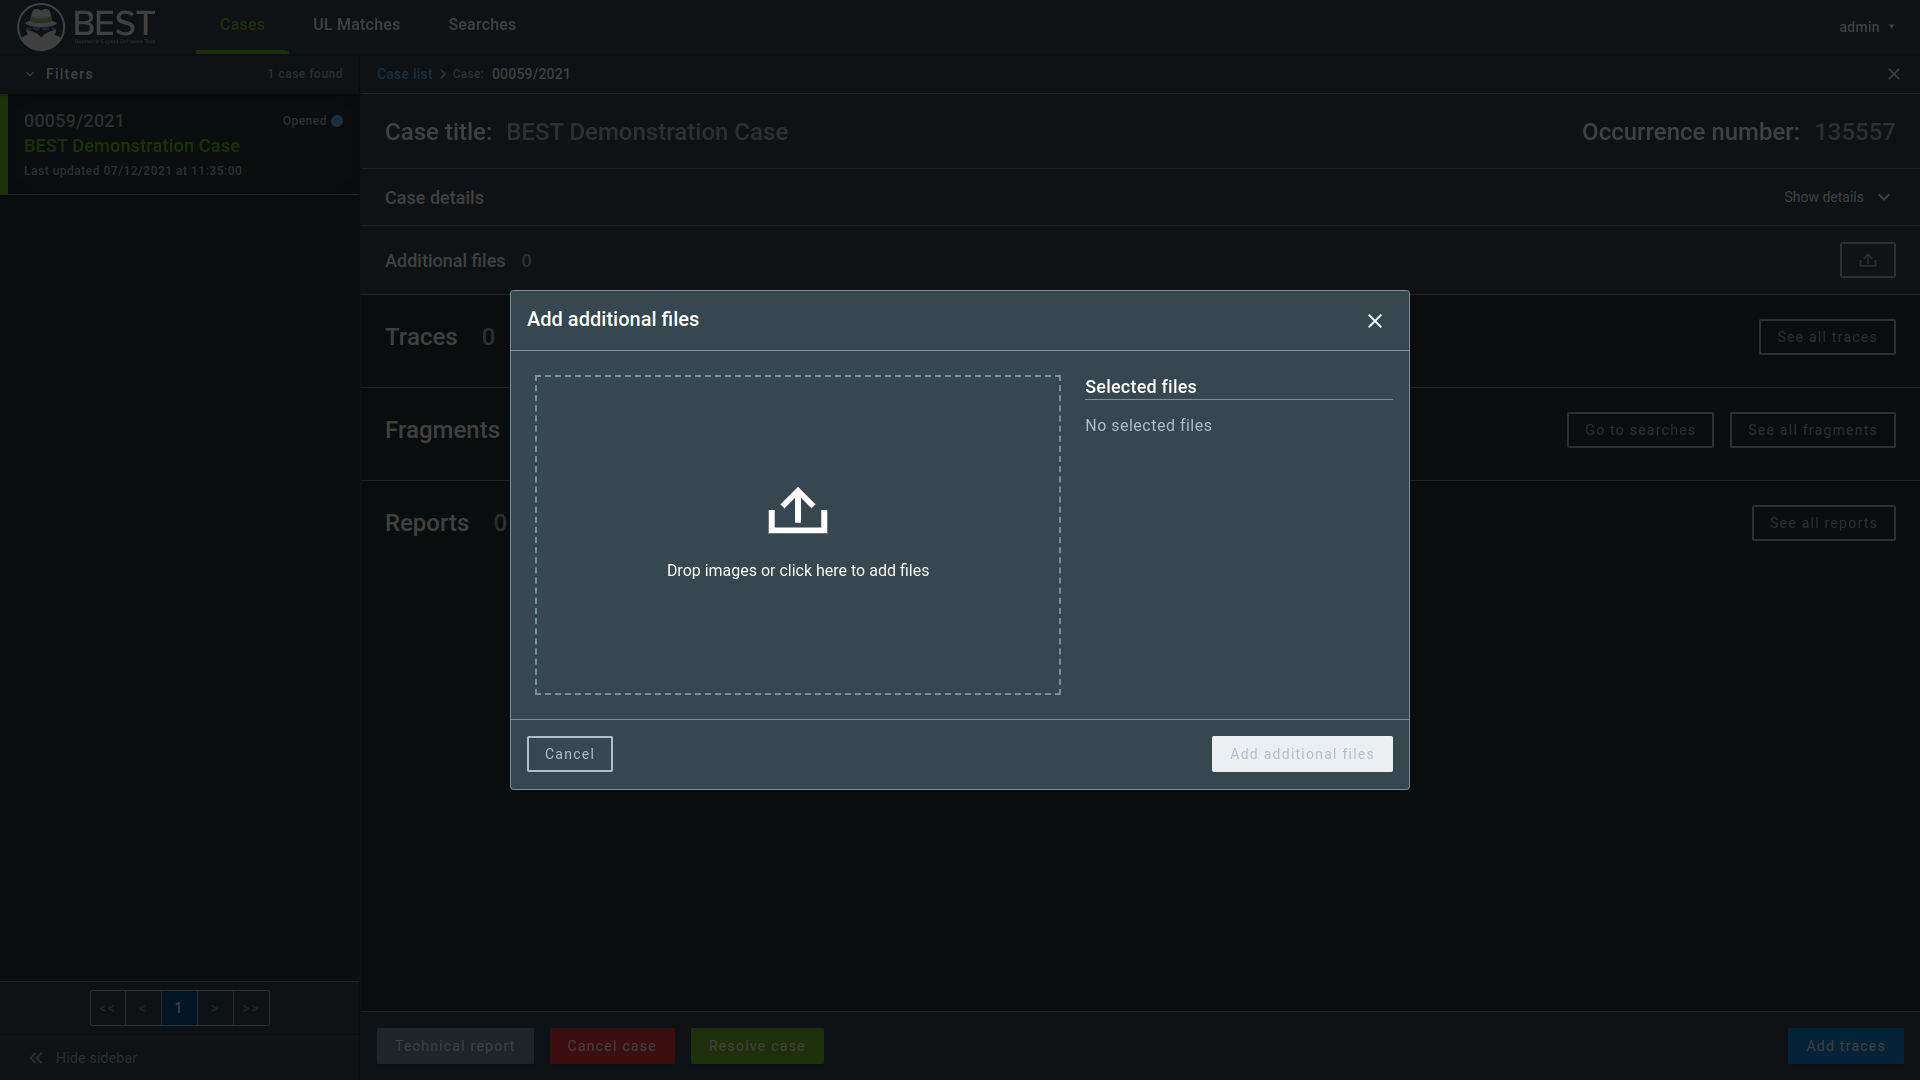
After added, click the Add additional files button to complete the operation. The files will be displayed in the case screen.

5. Traces
A trace can be any image evidence or video related to the case, containing fragments or not.
Note
Video support may be turned off for your environment. Check with your system administrator whether this feature is available or not.
The supported image formats are:
- .jpeg
- .png
- .bmp
- .wsq
The supported video formats are:
- .avi
- .mp4
- .mpeg
- .ogv
- .ts
- .webm
- .3gp
- .3g2
- .movi
Note
The video searches in BEST follow a different workflow and do not require manual fragment extraction. Also, video searches are only available for face fragments.
For further information on video searches, see the Video Searches section.
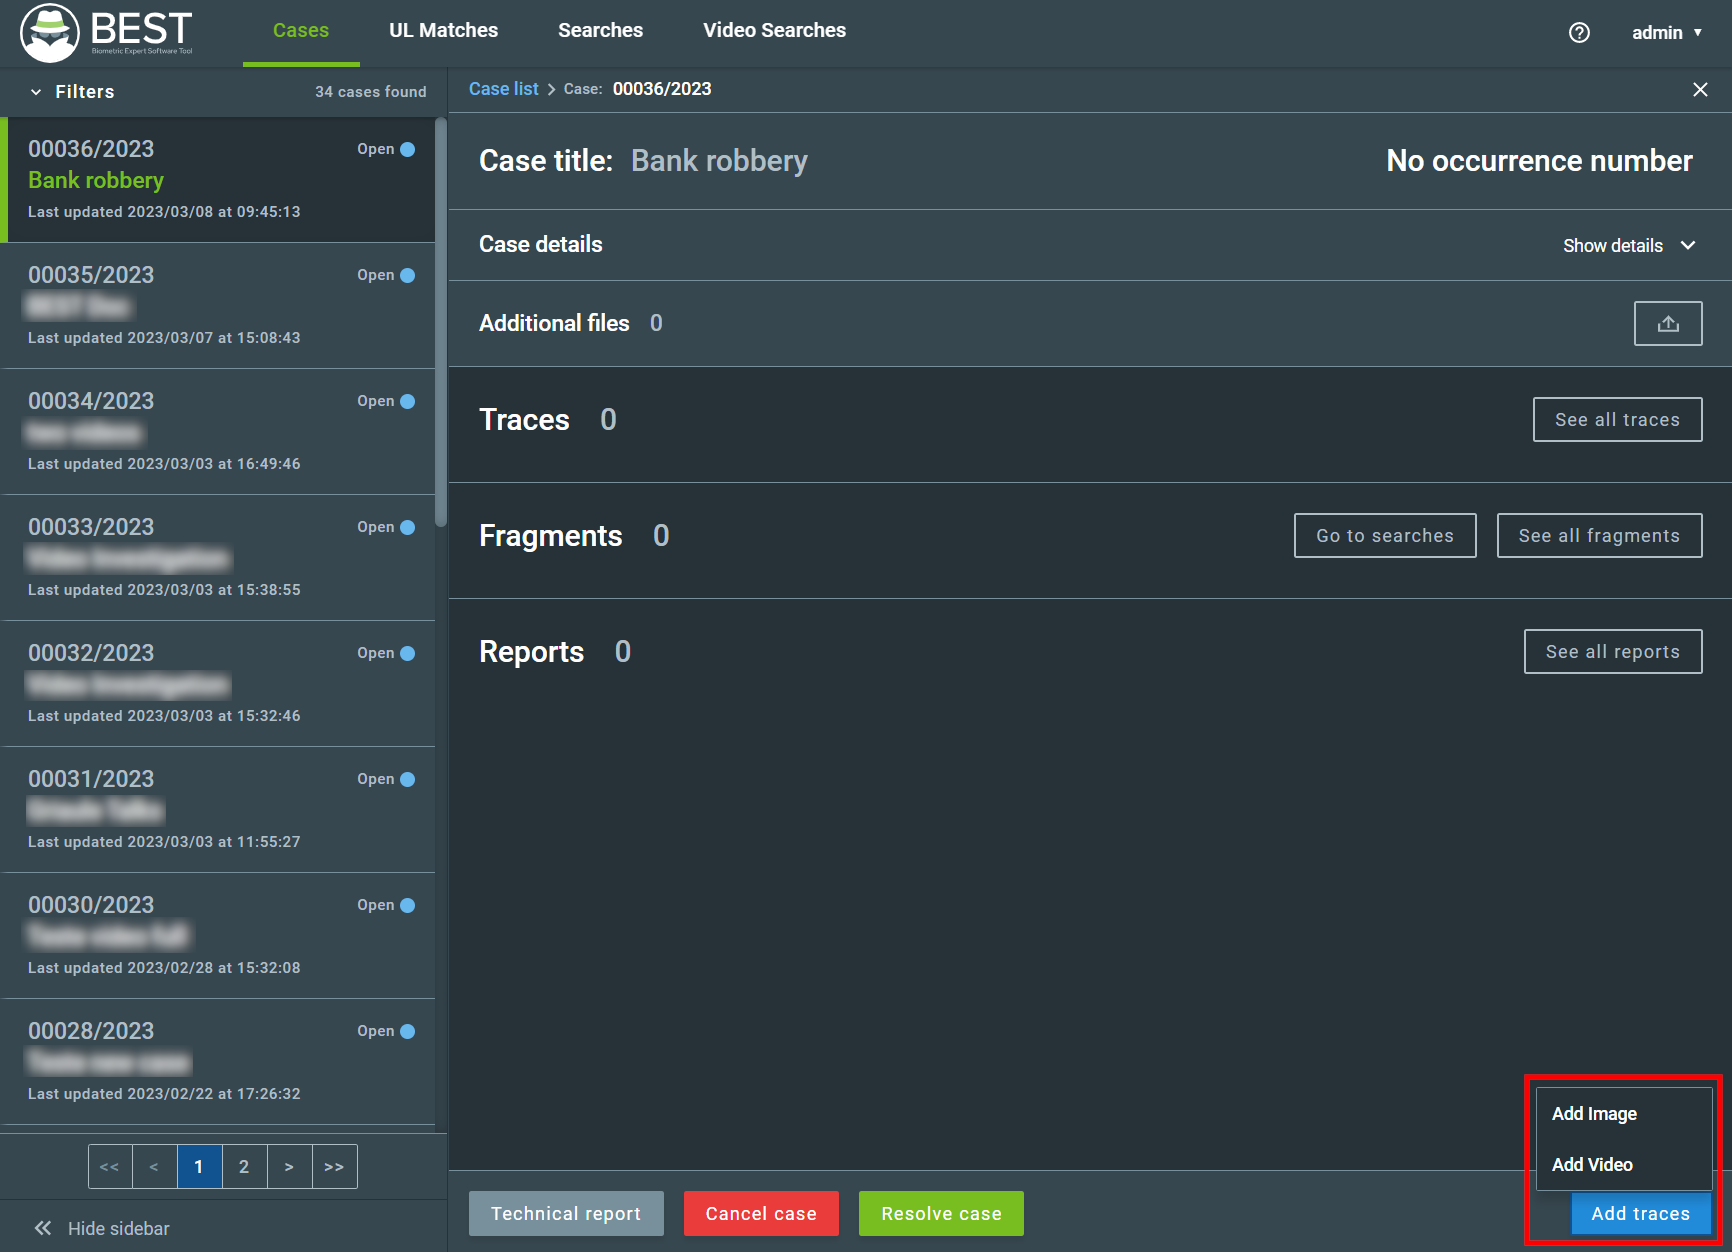
You can insert traces by clicking the Add traces button in the Cases screen and then selecting if the trace is an image or video.
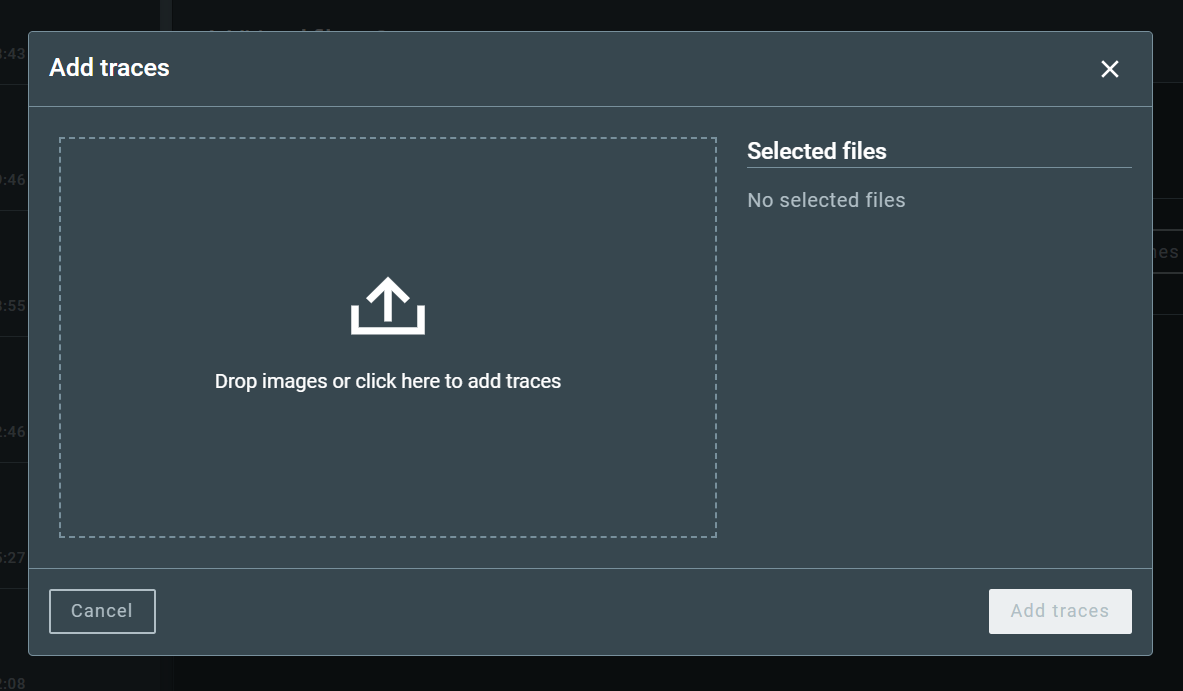
To add new traces, drop the images to the designated area or click the panel to upload the images, then click the Add traces button.
Hover over the added trace and click on Inspect or double-click the trace to open the trace edition page, where you can enter information about the trace, extract fragments, and edit the image.

This screen will display the selected traces, the editing tools, and the trace details.
Attention
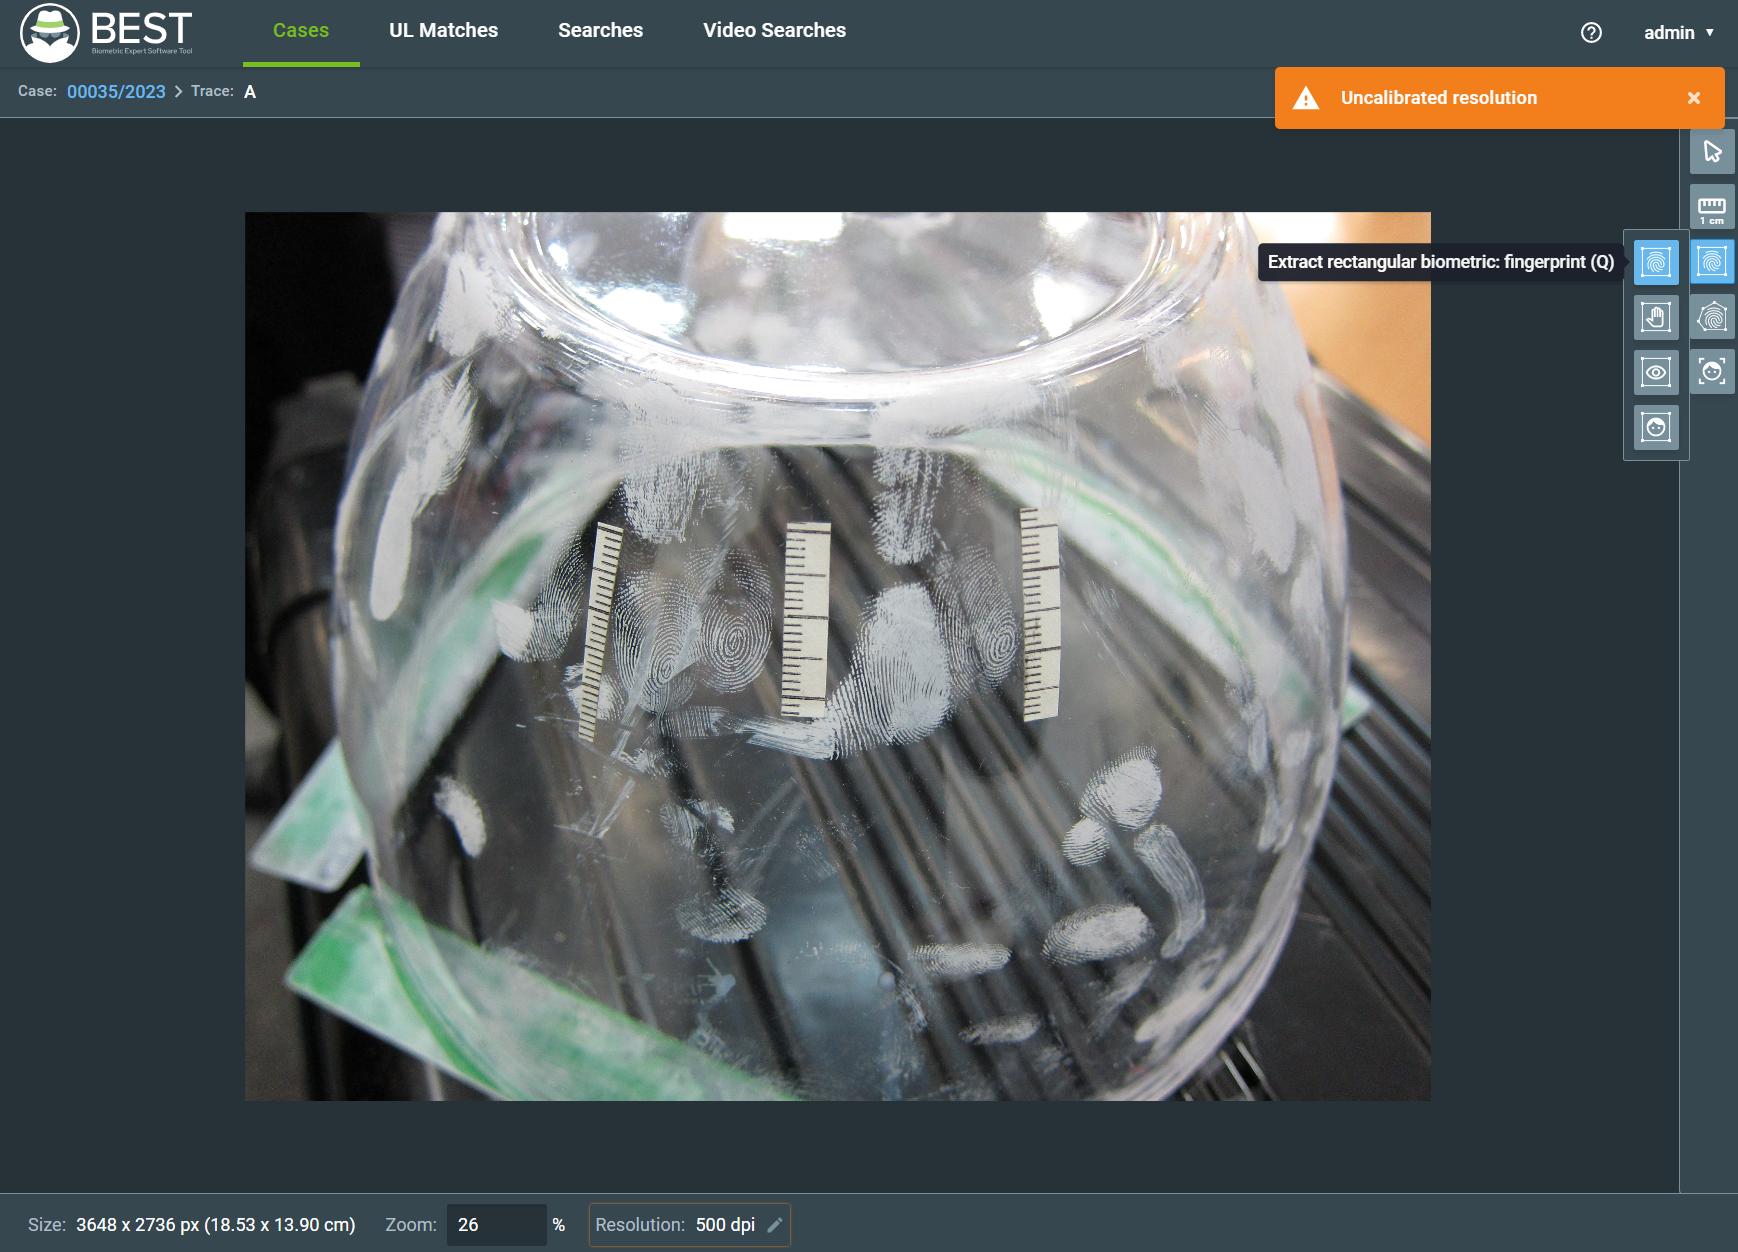
The first time you try to extract a fingerprint or palmprint fragment from a trace, a message will be shown indicating the trace resolution is uncalibrated, and the resolution indicator below the image will be highlighted. It is of utmost importance to execute the correct calibration when extracting a fingerprint or palmprint fragment.
To learn how to calibrate the resolution, check section Set Resolution Tool.
5.1. Modifying Trace Details
Click the show details button at the upper right corner of the trace editing screen and you will be able to insert the following information about the trace:
- Name – Label attributed to the material specifically for this case. It is possible for a trace to be present in different cases under different names.
- Material – Describes the material of the surface from which the latent image was collected (e.g., metal, paper, glass).
- Surface – Describes the surface from which the latent image was collected (e.g., smooth, wrinkled, absorbent).
- Comments – Any additional comments by the experts.
- Description – Notes that help identifying the trace in the case context.

After filling in the fields, click the Save changes button.
5.2. Extraction Tools
When a trace is selected, you will have access to several tools to extract fragments in that trace. The tools are located on the right menu, as shown in the image below. Note that some tools are blocked until you calibrate the image resolution.
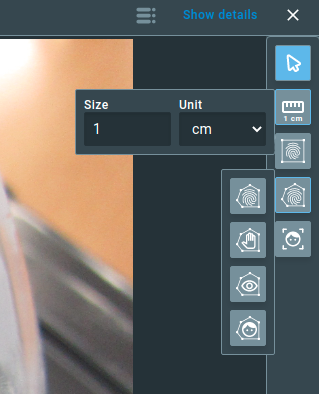
A fragment is a part of the trace that contains the biometric data that will be used for searching within the database. Setting the correct resolution before extracting the fragment is mandatory, because it can affect the matching results.
To learn how to calibrate the resolution, check section Set Resolution Tool.
5.2.1. Select Fragment Tool
You can use this tool to select an already extracted fragment. When a fragment is selected, buttons are displayed at the top, allowing you to Inspect or Remove the fragment.
Inspecting a fragment will lead you to the Fragment editing screen.
Attention
You cannot remove a fragment while it is being searched or if the fragment has been marked as HIT or NO HIT.
5.2.2. Set Resolution Tool
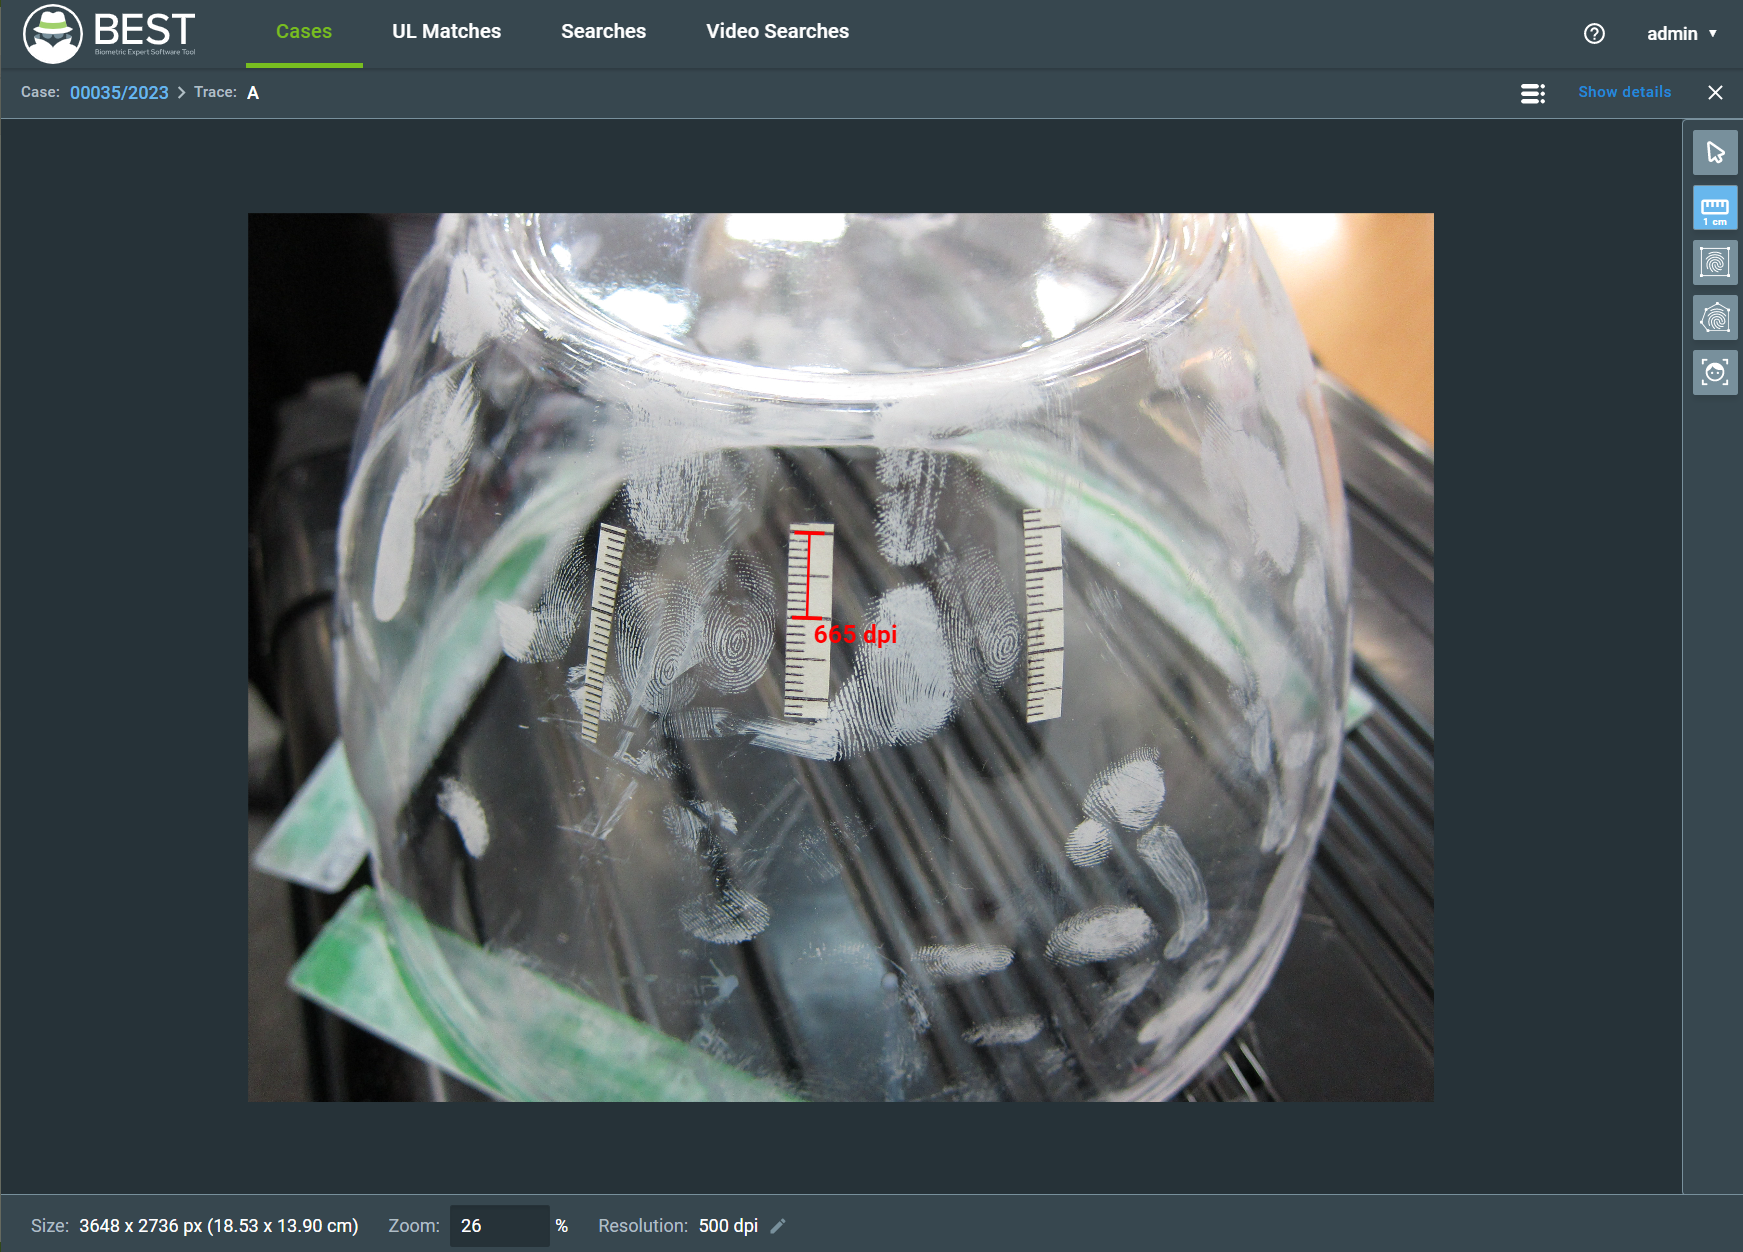
To calibrate the resolution, select the ruler icon on the right menu and set the reference measure that will be used to define the resolution in inches, millimeters or centimeters.
Traces that contain fragments usually present a real ruler to help on identifying the size of a fragment. This ruler can be used as reference to set the resolution by clicking and dragging over it until the drawn line is of the size you set as reference measure. If there is no real ruler in the picture, you can use any other known measure to set the resolution through the same method.
After doing that, BEST will automatically calculate the resolution and present under the image. You can also manually set the resolution by clicking the Resolution indicator.
Danger
Setting the correct resolution for a trace is a mandatory process before extracting fragments and it can heavily affect the matching results.
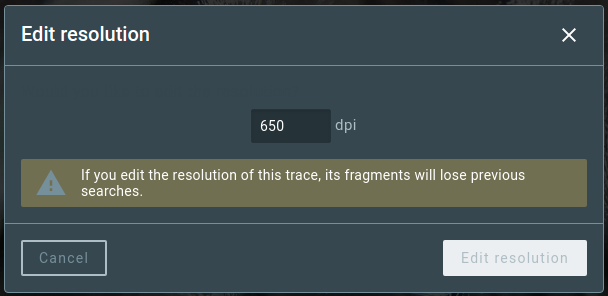
If you already performed a search for any fragment extracted from the trace, a warning window will be displayed when trying to edit the trace’s resolution.
5.2.3. Fragment Extraction Tools
To create a fragment, select one of the cropping tools based on shape and biometric modality: Extract Rectangular Fragment or Extract Polygon Fragment. These tools have different modes for fingerprint, palmprint, iris, or face. Hovering the tool icon on the right menu will show the different options for the selected shape.
Warning
The selected biometric modality defines the reference database used for comparison.
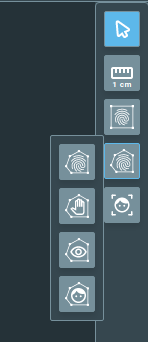
The process of fragment extraction is similar for all modalities, with either the rectangle or polygon extraction tool. After selecting the tool, you should delineate the fragment area.
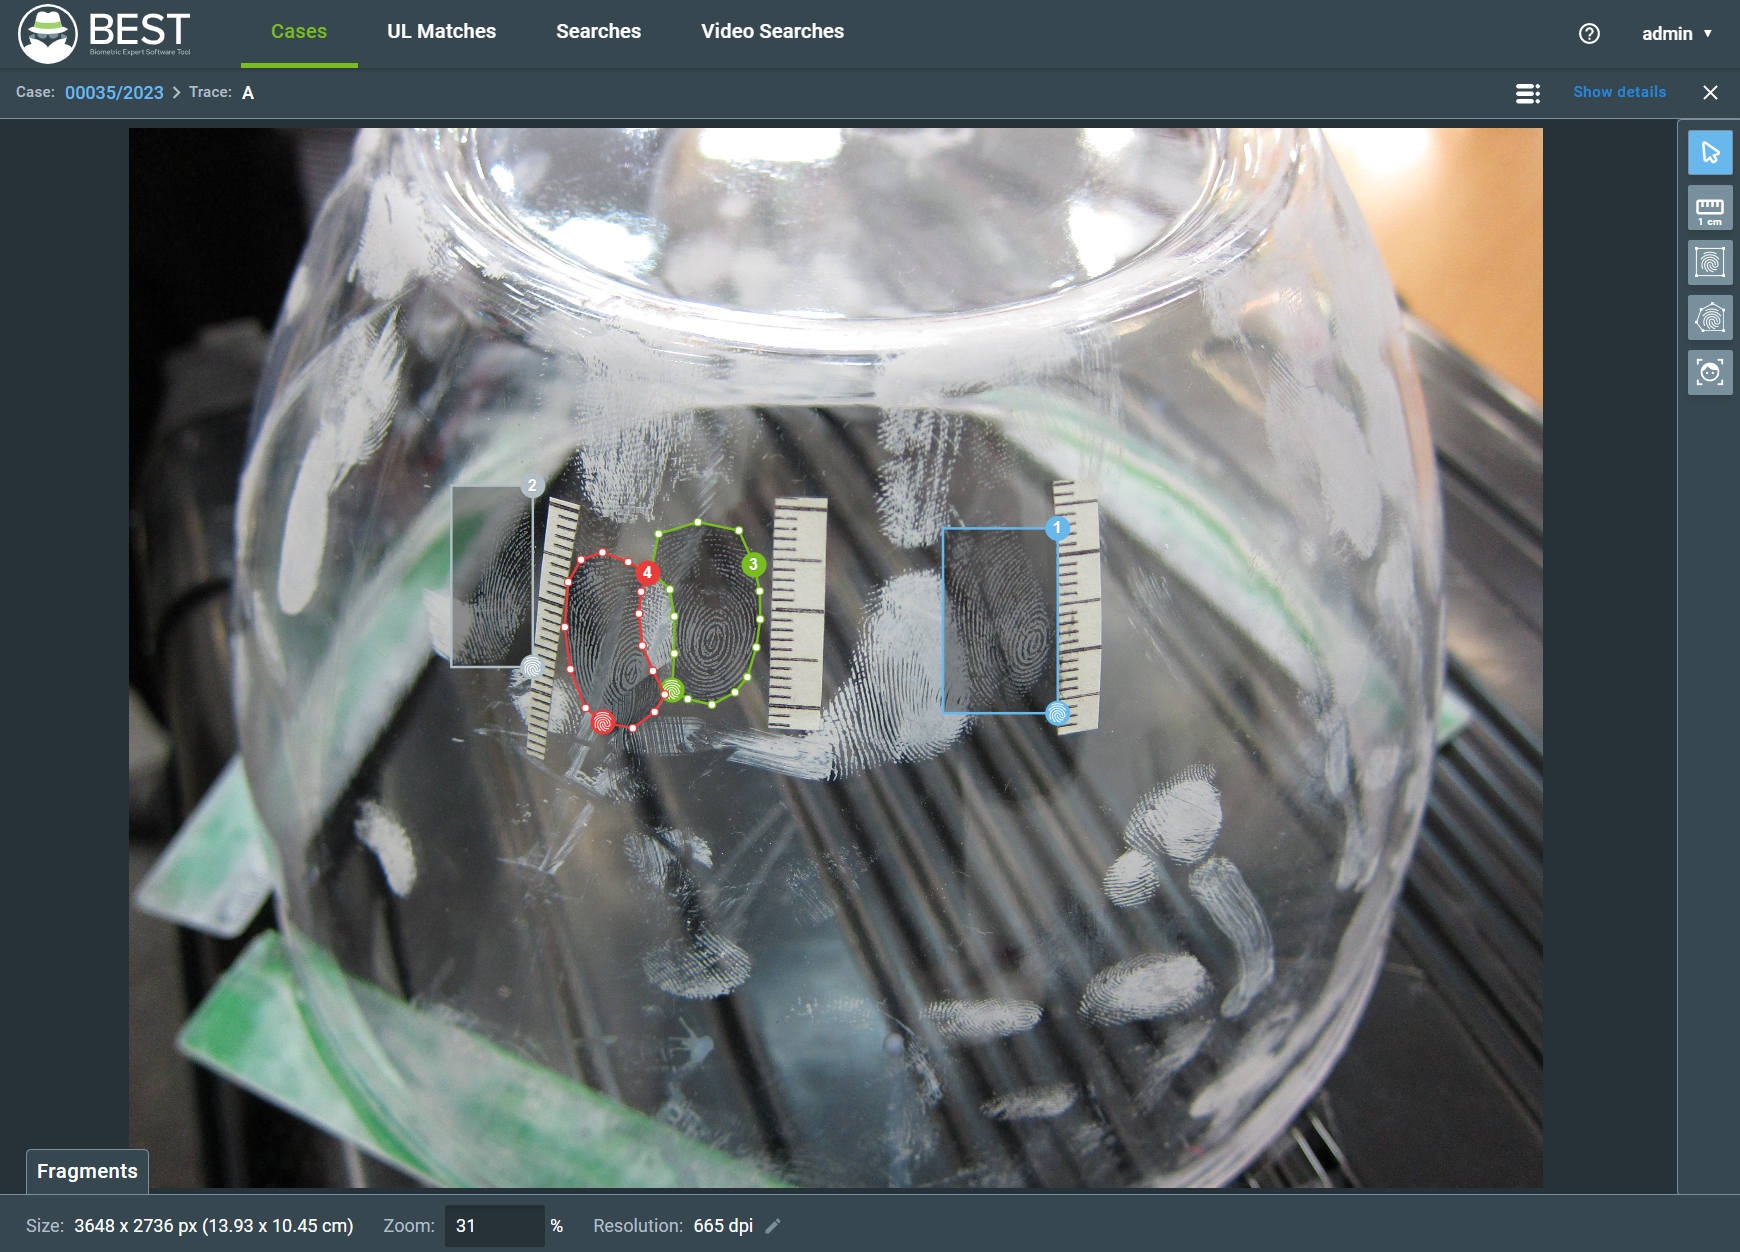
The fragment border will appear in different colors according to its search status.
- Blue (Fragment #1) – Search In progress
- Grey (Fragment #2) – No Search
- Green (Fragment #3) – HIT
- Red (Fragment #4) – NO HIT
5.2.4. Face Recognition Tool
You can use the face recognition tool to let BEST auto-extract face images from a trace. There are two ways to extract a face, by the Fragment Extraction Tools or doing the auto-extract with the Face Recognition tool. The face fragment have only the following tools:
And the search process is the same as described in the section Performing Searches on Fragments, returning a percentage score of similarity instead of an integer value.
5.3. Export Trace
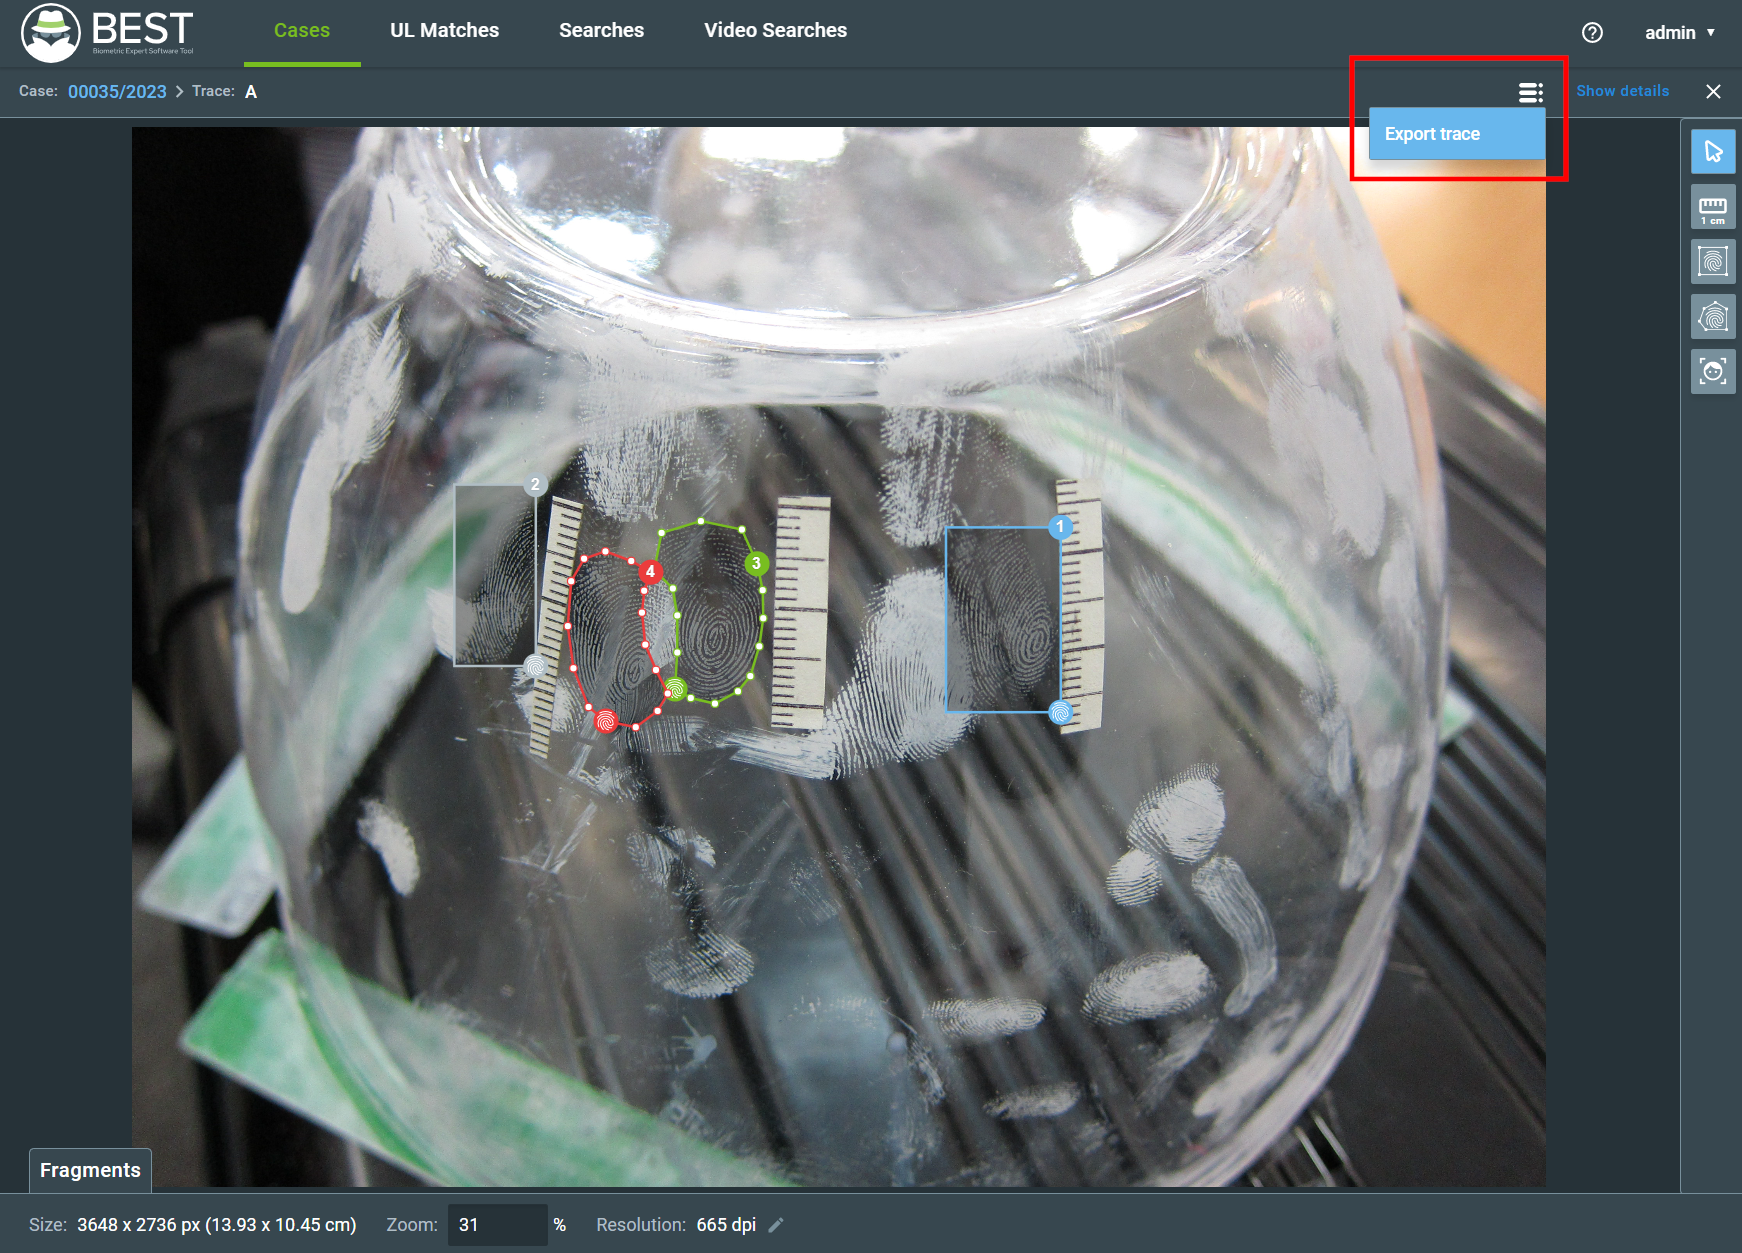
You can export the trace file hovering the mouse in the dropdown menu and clicking the Export Trace button, as indicated in the image. Doing so will start the trace file download.
6. Fragment
6.1. Editing Fragments
To edit a fragment, double-click the trace or, using the Select Fragment tool, click the fragment and the Inspect button.
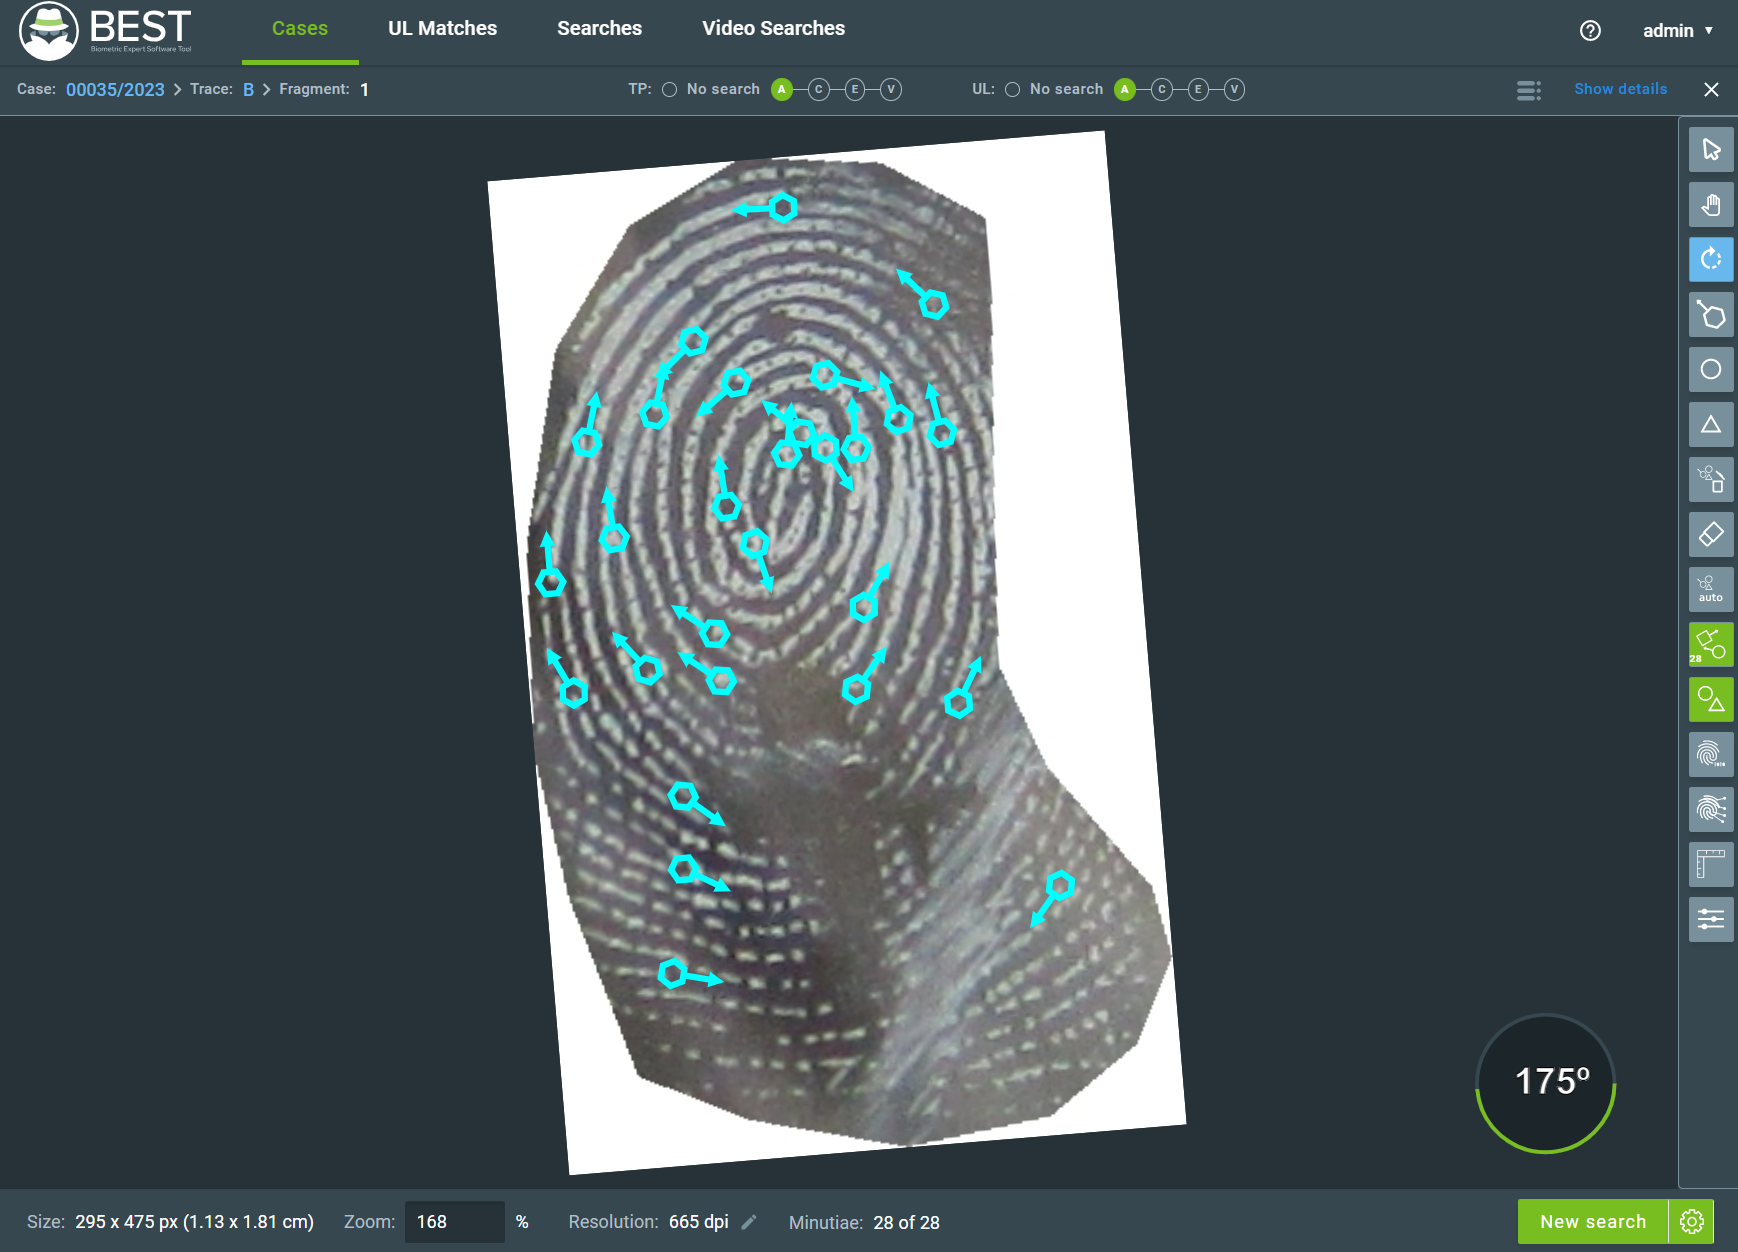
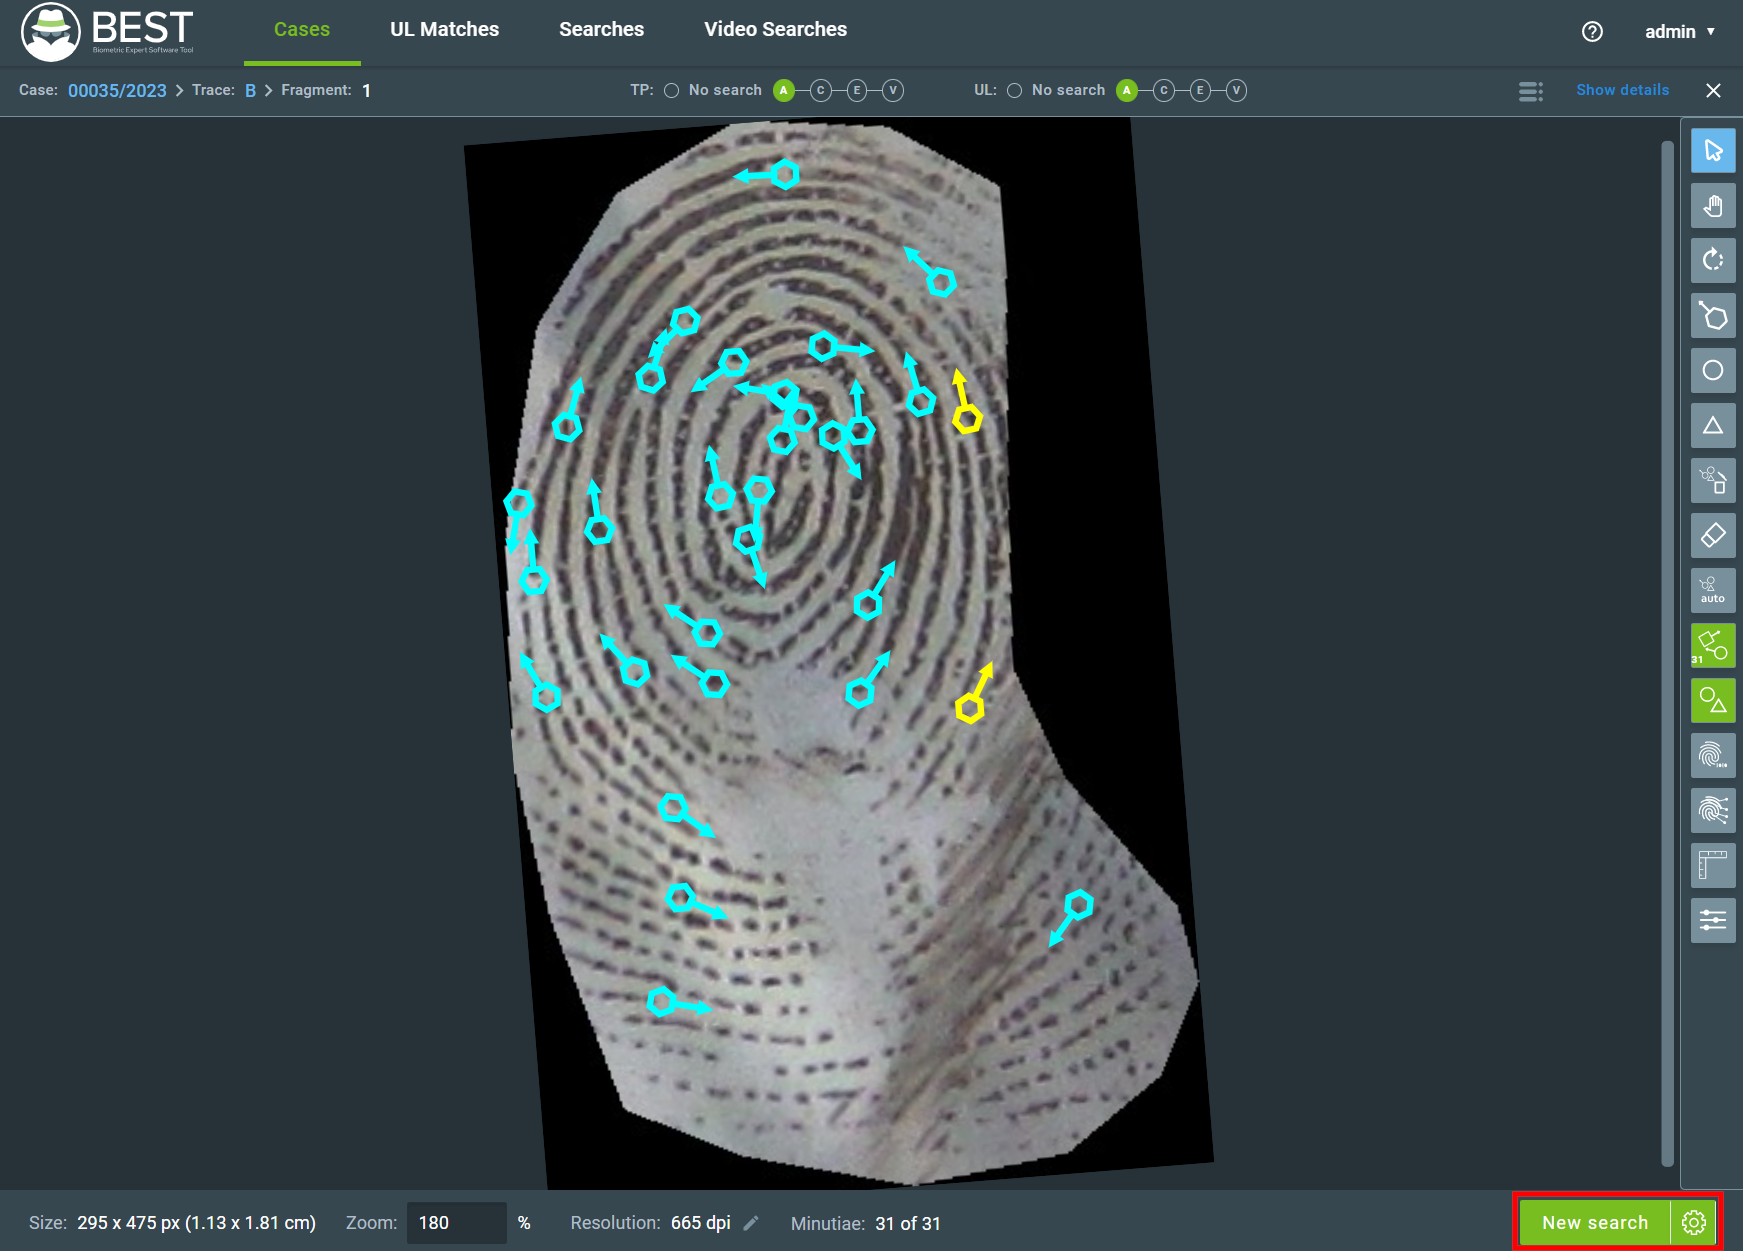
The fragment page will appear and start the automatic minutiae extraction process. When finished, BEST will display the extracted minutiae confidence level (on a 0-100% scale) indicated by a color code:
- Red - Minutia with confidence below 30%.
- Yellow - Minutia with confidence between 30% and 60%.
- Cyan - Minutia with confidence higher than 60%.
See also
The automatic extraction can be disabled by default. If you want to force the automatic extraction, check the Extract Minutiae Automatically section.
The following sections describe the tools available for fragment edition.
6.1.1. Select
The Select tool allows you to pan and zoom the image.
6.1.2. Move Minutiae
The Move Minutiae tool allows the user to move any single minutia or singularity. When this tool is selected, it is possible to move the minutia by clicking, holding, and dragging it to the desired position before releasing it.
It also allows the user to change the orientation of a minutia by clicking the orientation arrow and dragging to the desired position.
6.1.3. Rotate Image
Select the Rotate Image Tool to rotate the fragment, then click the image and drag it in the desired rotation direction. When turning, an indicator with the rotated angle will appear at the lower right corner of the image.
6.1.4. Create Minutia
There are three tools for creating minutia and singularities. The first tool, represented by the hexagon icon, creates Neutral, Termination, and Bifurcation minutiae. The second one, represented by the circle icon, creates cores. The third tool, represented by the triangle icon, creates deltas.
Note
Neutral minutia have no type defined and can represent any bifurcation or termination.
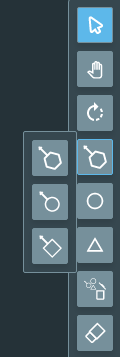
To add a core or a delta, select the appropriate tool and left-click the desired position to create the singularity. You can move the singularity afterward using the Move Minutiae tool.
To create a neutral, termination, or bifurcation minutia, select the desired type in the menu, click on the desired position, and hold and drag the cursor to define its orientation. Release the mouse button to create the minutia.
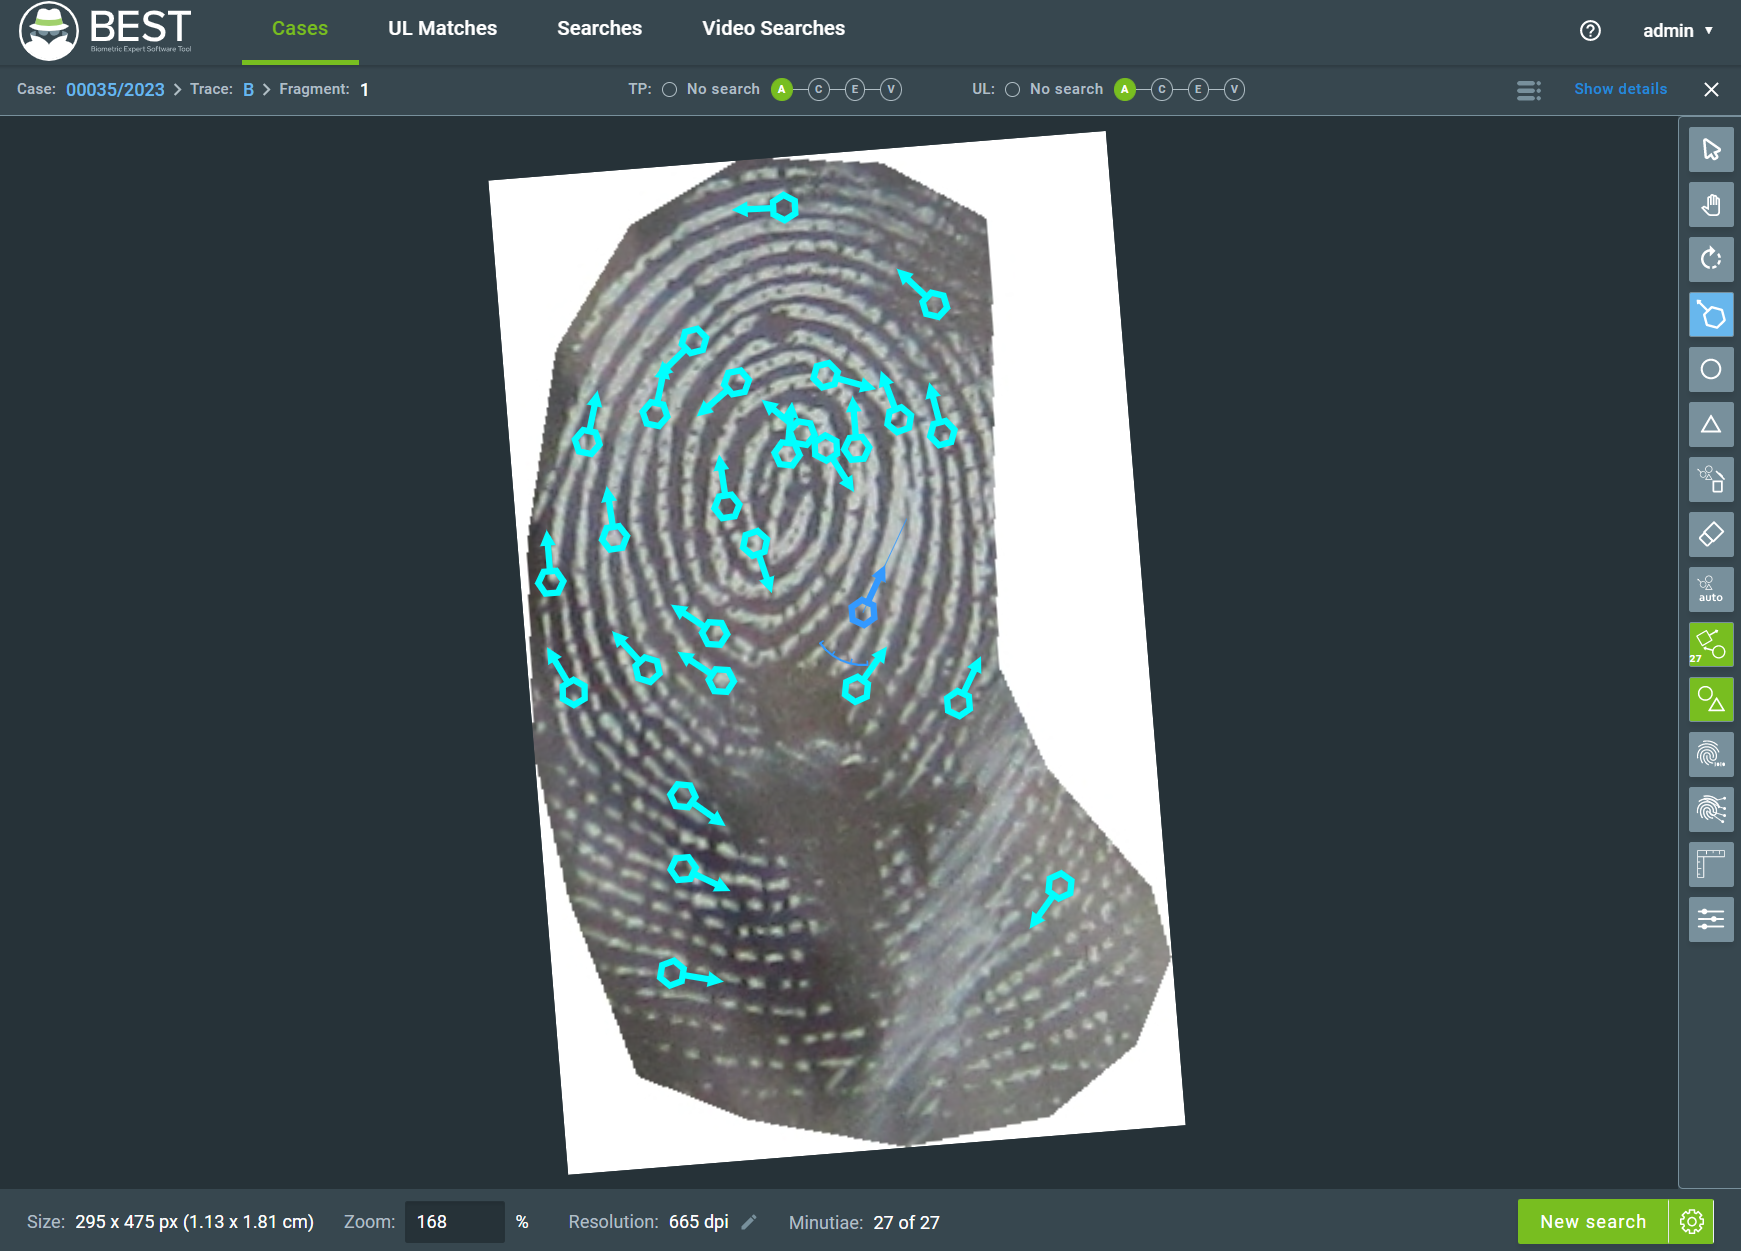
6.1.5. Erase Minutiae
There are two ways to erase the minutiae in BEST. Individually selecting which minutia you want to remove or by removing all minutiae. The tools are shown in the figure below. The first one is the Erase All Minutiae tool and the second one is the Erase Minutiae tool.

Selecting the Erase Minutiae tool will change to removal mode, indicated by the cursor shape turning into an eraser. In this mode, clicking any minutia will remove it from the fragment.
It’s also possible to delete multiple minutiae by clicking and dragging the cursor over the minutiae to be removed.
Whenever creating or deleting minutia, you can undo your last action by pressing CTRL+Z.
To erase all minutiae, select the Erase All Minutiae tool. When selected, a confirmation pop-up will be displayed. All minutiae and singularities, both auto-extracted and user-added, will be erased if confirmed.

See also
If you want to redo the automatic extraction, check the Extract Minutiae Automatically section.
6.1.6. Extract Minutiae Automatically
After you select a fragment and enter the fragment editing screen for the first time, the system will auto-extract the minutiae. This tool allows you to perform another extraction if needed. A dialog box will open when re-extracting minutiae, asking whether BEST should keep the manually inserted or edited minutiae along the ones automatically extracted by the system.

Note
The new extraction takes filters applied to the image in consideration when detecting minutia.
6.1.7. Show/hide Minutiae
You can use this tool to toggle the visibility of minutiae. The default mode of this tool is “on.” To change the display mode, click on the icon. A small number will be displayed in the lower left corner indicating the quantity of minutiae in the fragment.
Tip
Hovering the tool will display a box with a slider to select the quantity of minutiae shown. The minutiae will be hidden from the lower confidence ones to the best confidence ones.

6.1.8. Show/hide Cores and Deltas
You can use this tool to toggle the visibility of cores and deltas. The default mode of this tool is “on.” To change the display mode, click on the icon.

6.1.9. Auxiliary Image: Binarized
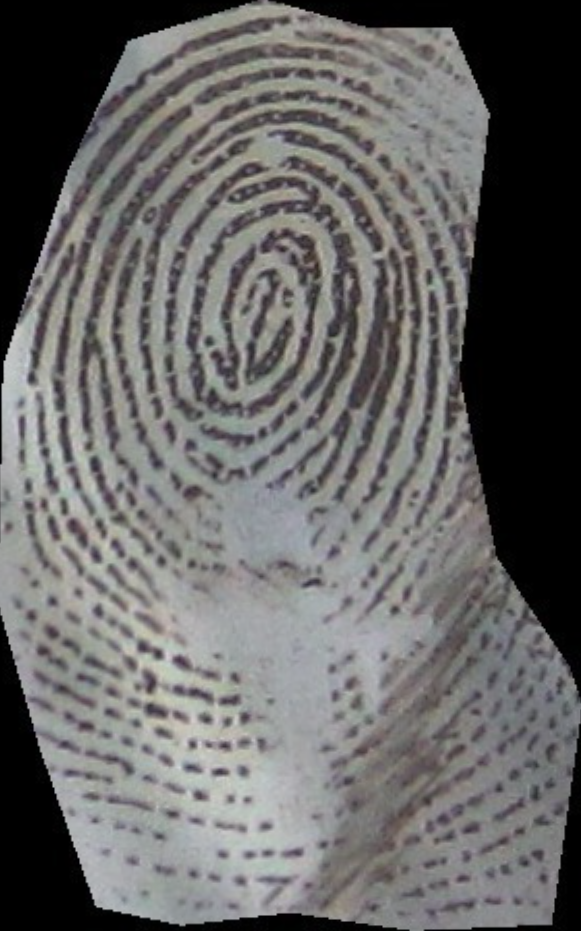
You can use the Binarized tool to enhance the ridge and furrows of the fragment and help you identify the minutiae over the image. When you apply the Binarized tool, the ridges detected will become blackened, and furrows or areas where no print is found will become completely white. A comparison between an image and its binarized version is shown below.

6.1.10. Auxiliary Image: Ridge Lines
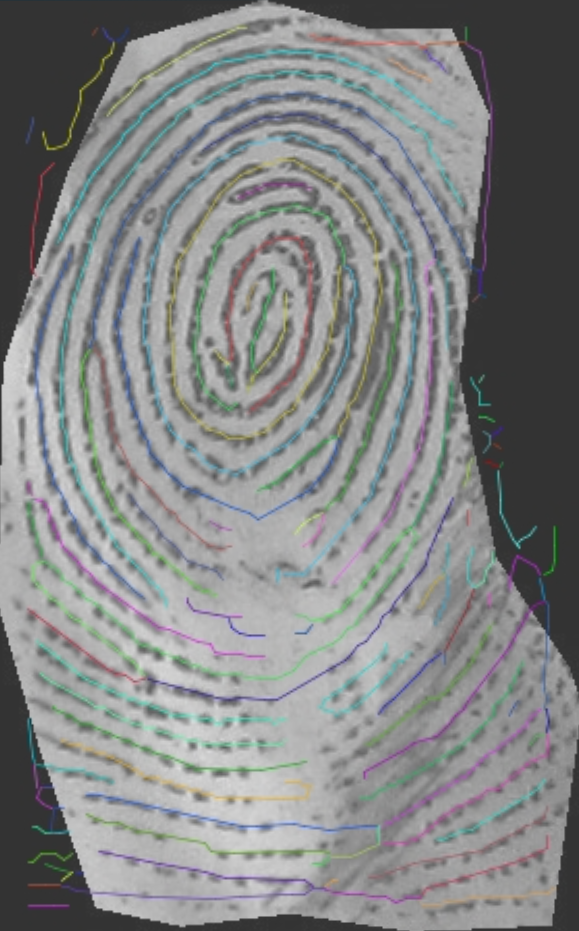
Ridge Lines is an auxiliary tool that will overlap a thin colored line over the ridge for its extension. Every ridge detected will have a different color scheme to help to distinguish one ridge from another. As shown in the images below:

6.1.11. Show/hide Ruler
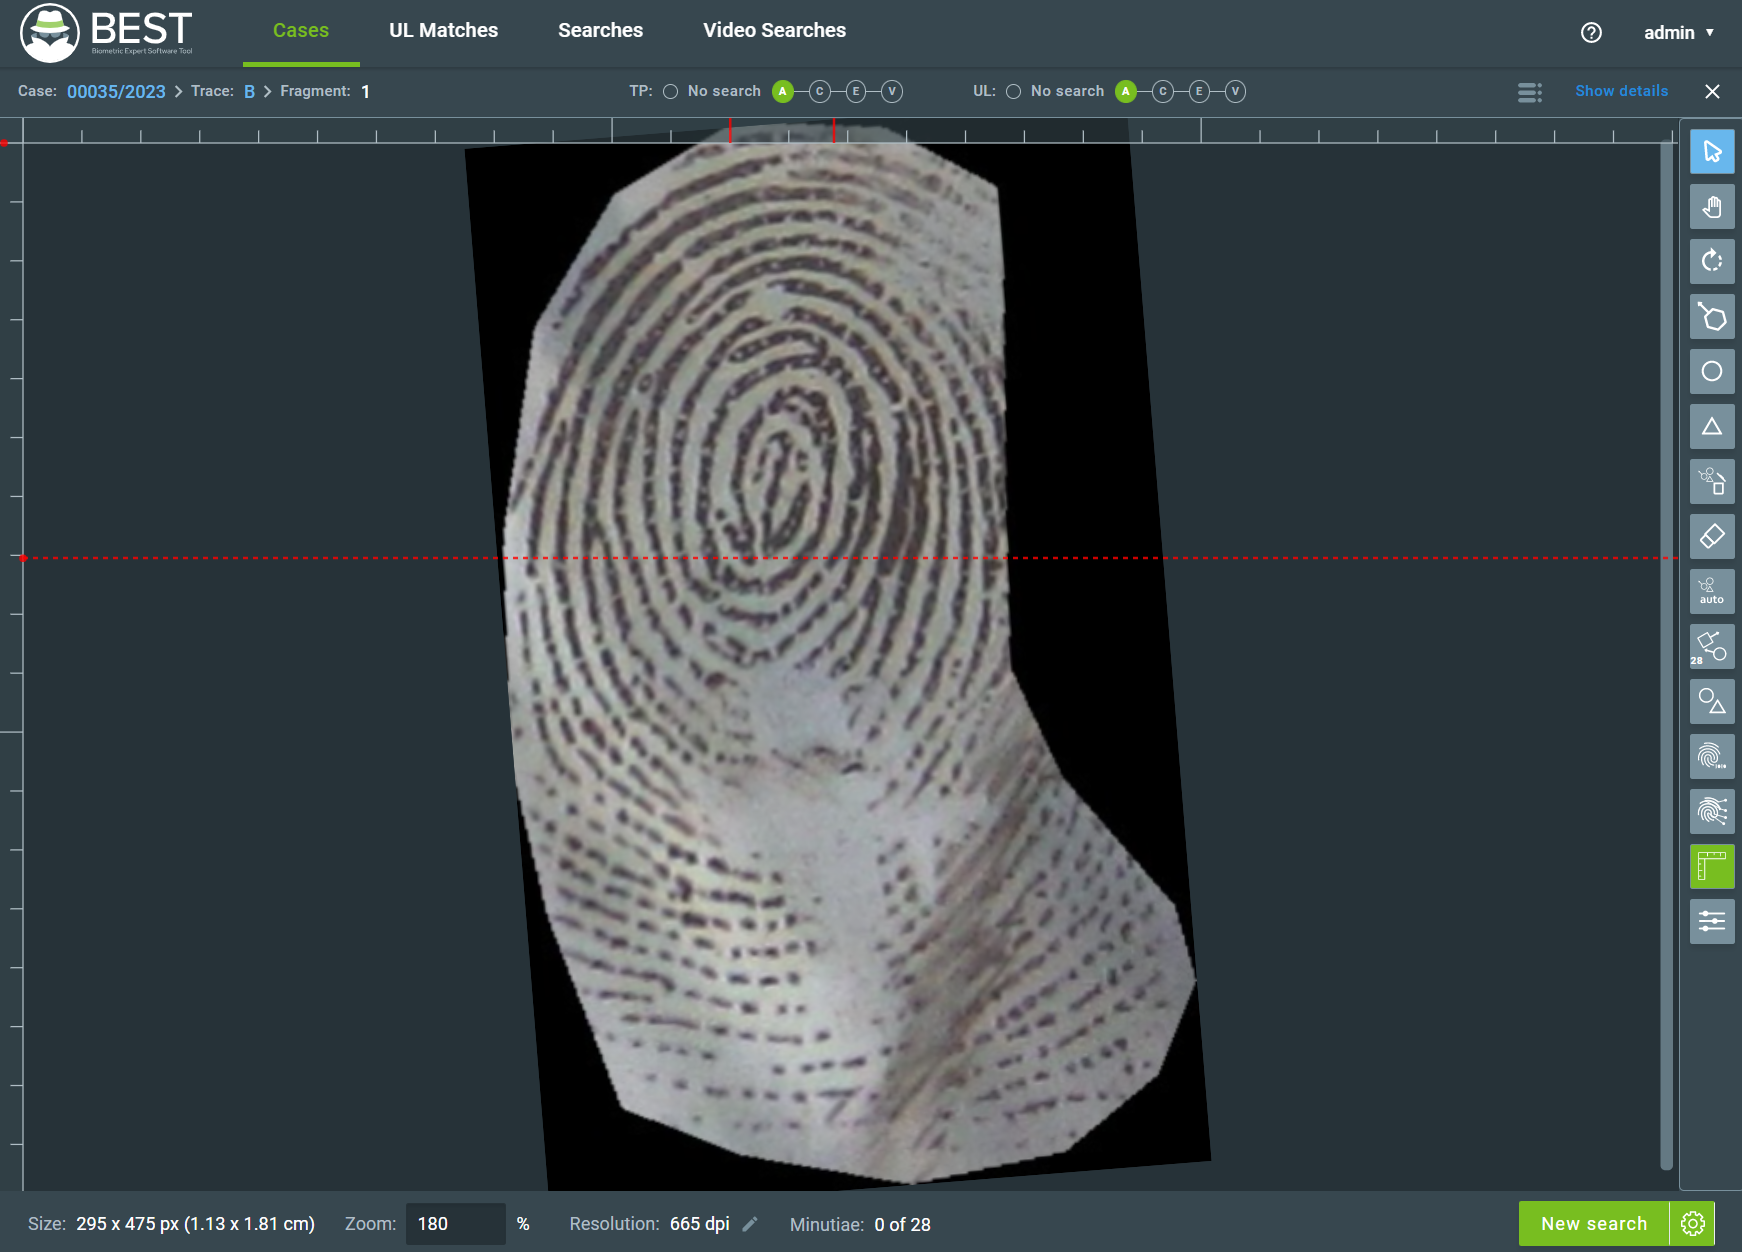
This tool toggles the display of a ruler on the top and left sides of the fragment window. A dotted line will be shown when you hover the cursor on the ruler area. The line will be vertical when hovering on the upper ruler and horizontal when hovering on the left ruler. You can create a mark by clicking a point in the ruler bar. Toggling off the bar will clean the marks.
6.1.12. Filter
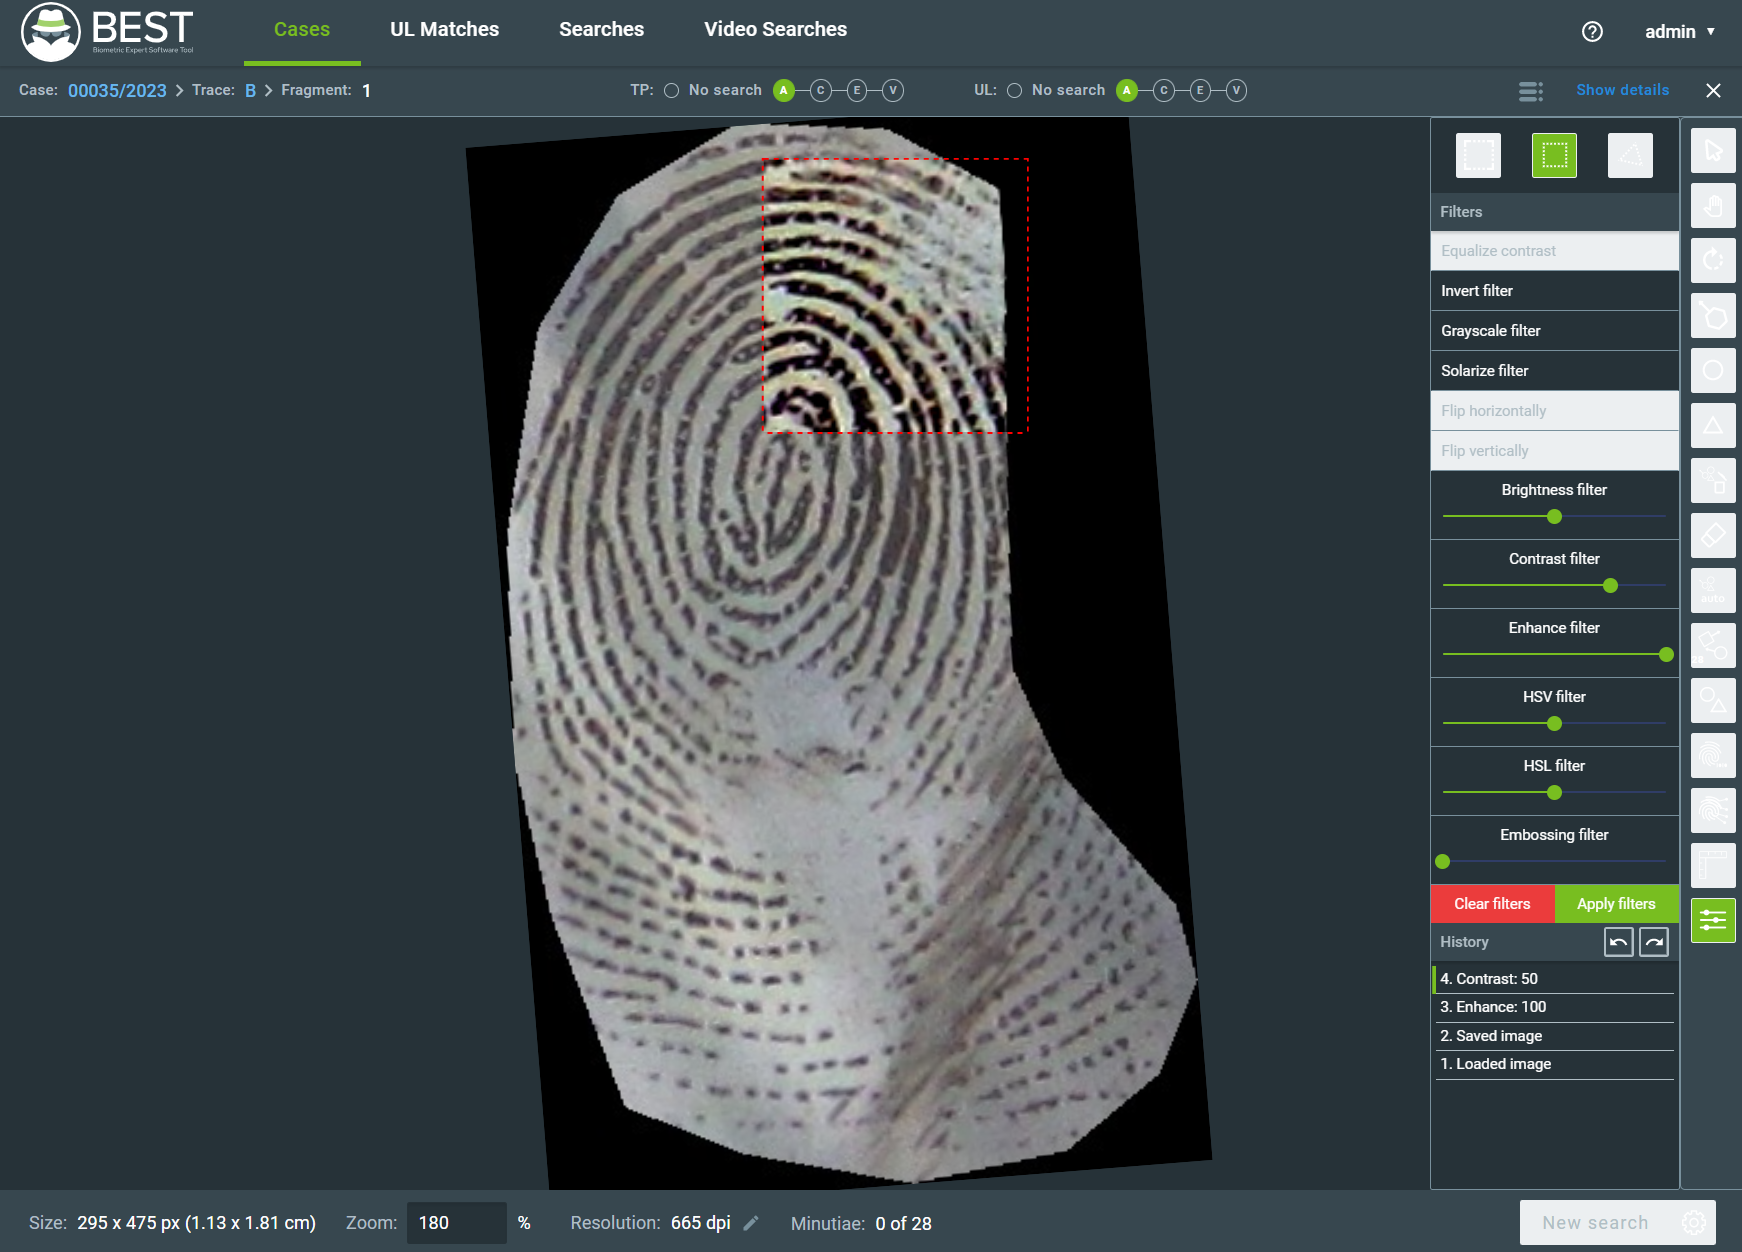
Selecting the filters tool will open a panel with various options. The three buttons on the top are used to define the area to be filtered: Filter Whole Image, Filter Rectangular Region, and Filter Polygonal Region. You can use them to determine the area where the filters will be applied.

The available filters and some sliders to control the image edition properties are presented under the region selection buttons. The image below shows an example of a rectangular section where the contrast and enhancement filters were applied.
Caution
Whenever using multiple filters, the selection order directly affects the result of the image edition. The new filter will always be applied on the image already filtered by the previous ones.
Filter results will only be saved in the image if you click the Apply filters button. Undo and Redo buttons will also be available to navigate through the edition history of the fragment.
7. Performing Searches on Fragments
After extracting the minutiae from the fragment, it is possible to submit a search to GBDS. GBDS will then search over all individuals in the biometric database and return a list of candidates according to the matching score. The number of candidates returned from each search is configurable.
To perform a search, click the New search button at the bottom of the fragment screen.
Note
The search operation is performed as an asynchronous task, so it is possible to continue using BEST while the search is in progress.
7.1. Search Configurations
Before performing a search operation, you may configure some search parameters. To open the search configuration tab, click on the gear symbol next to the New search button. The following window will open:
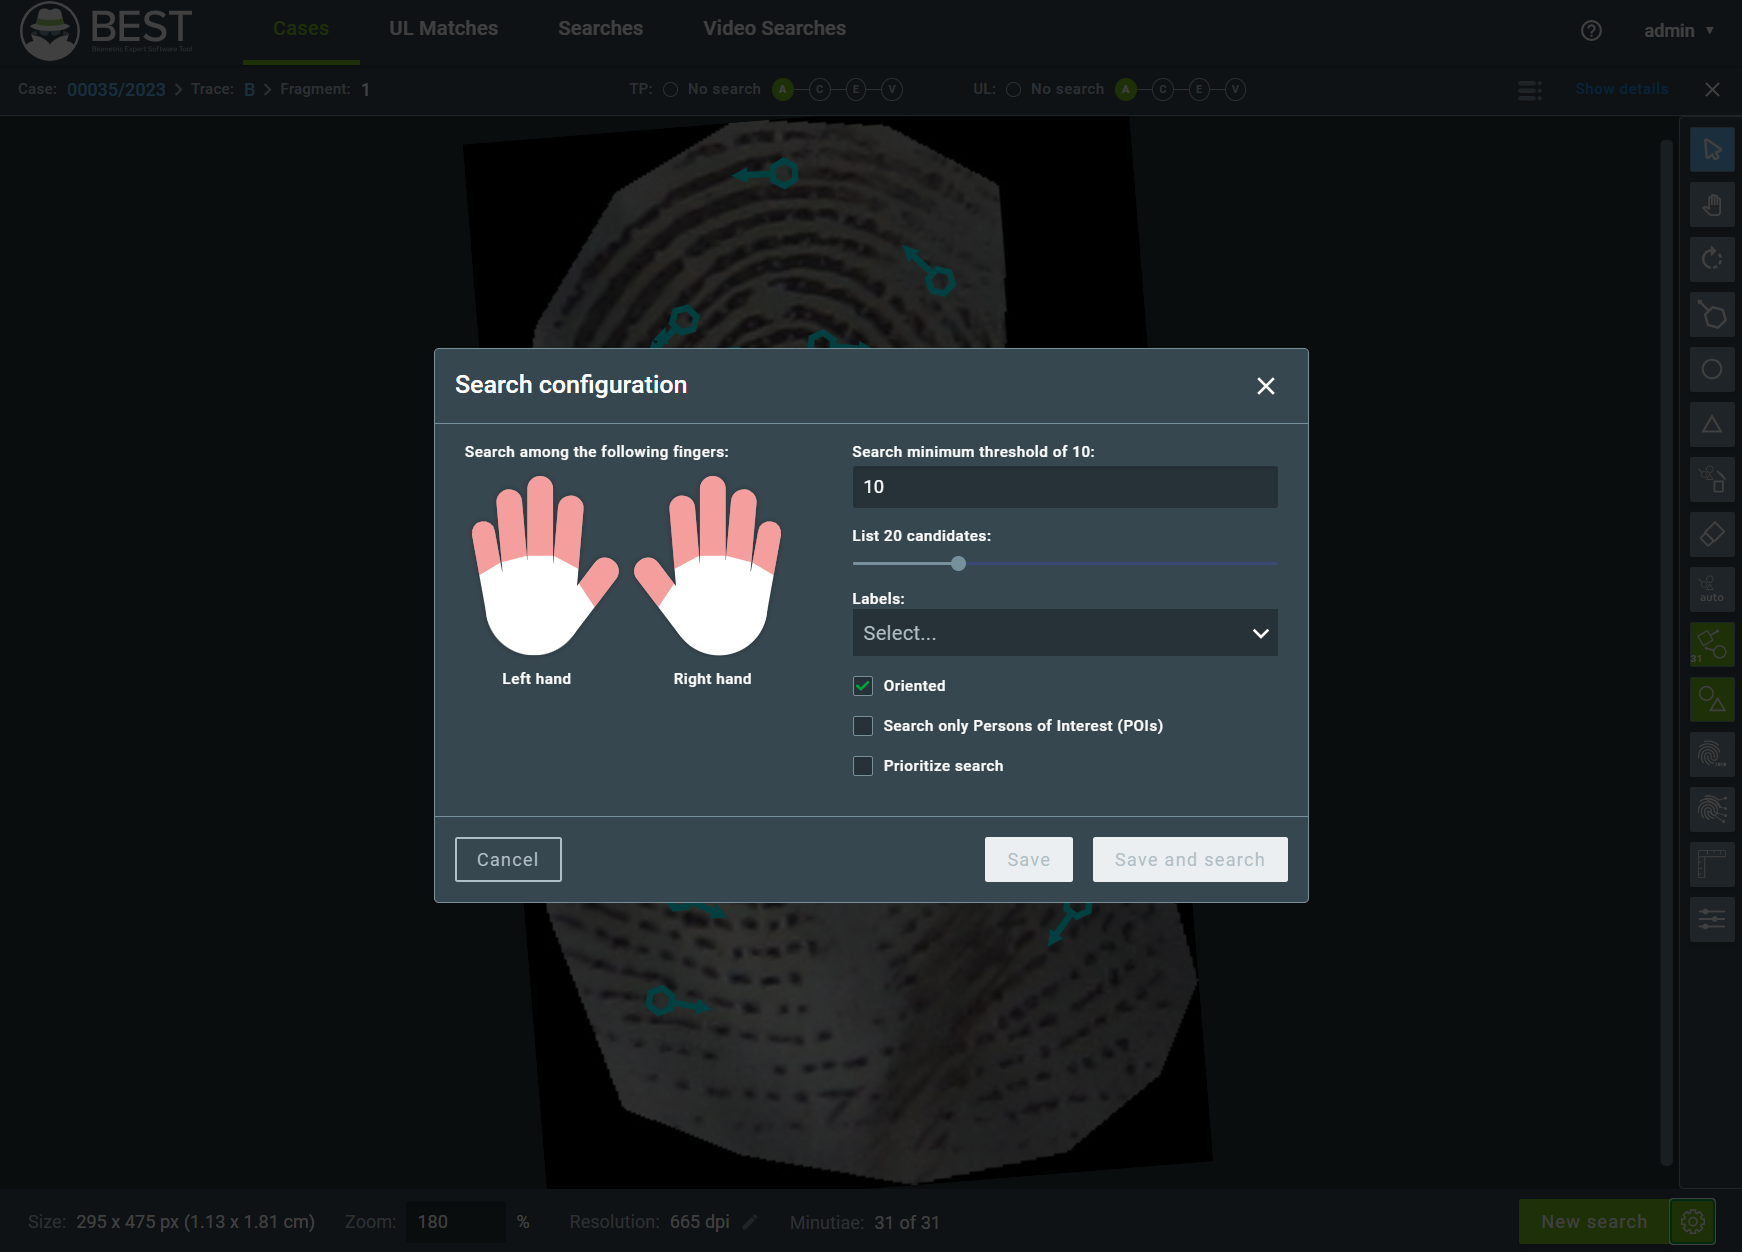
In this window, you can:
Limit the fingers GBDS will compare to by clicking on the finger.
The fragment will only be compared to the fingers highlighted in red.
Define the score threshold of the search.
Only comparisons with matching score equal or greater than this value will be returned as candidates.
Select the maximum size of the candidate list.
Defines the maximum number of candidates returned for TP (Tenprint) and UL (Unsolved Latents) searches.
Restrict the search by a label.
Restrict the search only for candidates with the selected label. You can select one or more label.
Note
When selecting more than one label, it will restrict as an “or” operator, e.g., label_1 OR label_2 OR …. OR label_n.
Define whether the search is oriented or not.
If this parameter is selected, GBDS will only consider matches with a rotation of at most 60° on any direction. If not selected, the maximum rotation angle will be considered 180° on any direction.
Select whether to limit the search to the Persons of Interest.
Prioritize the search, submitting the search to a higher priority queue.
7.2. Submitting the Search
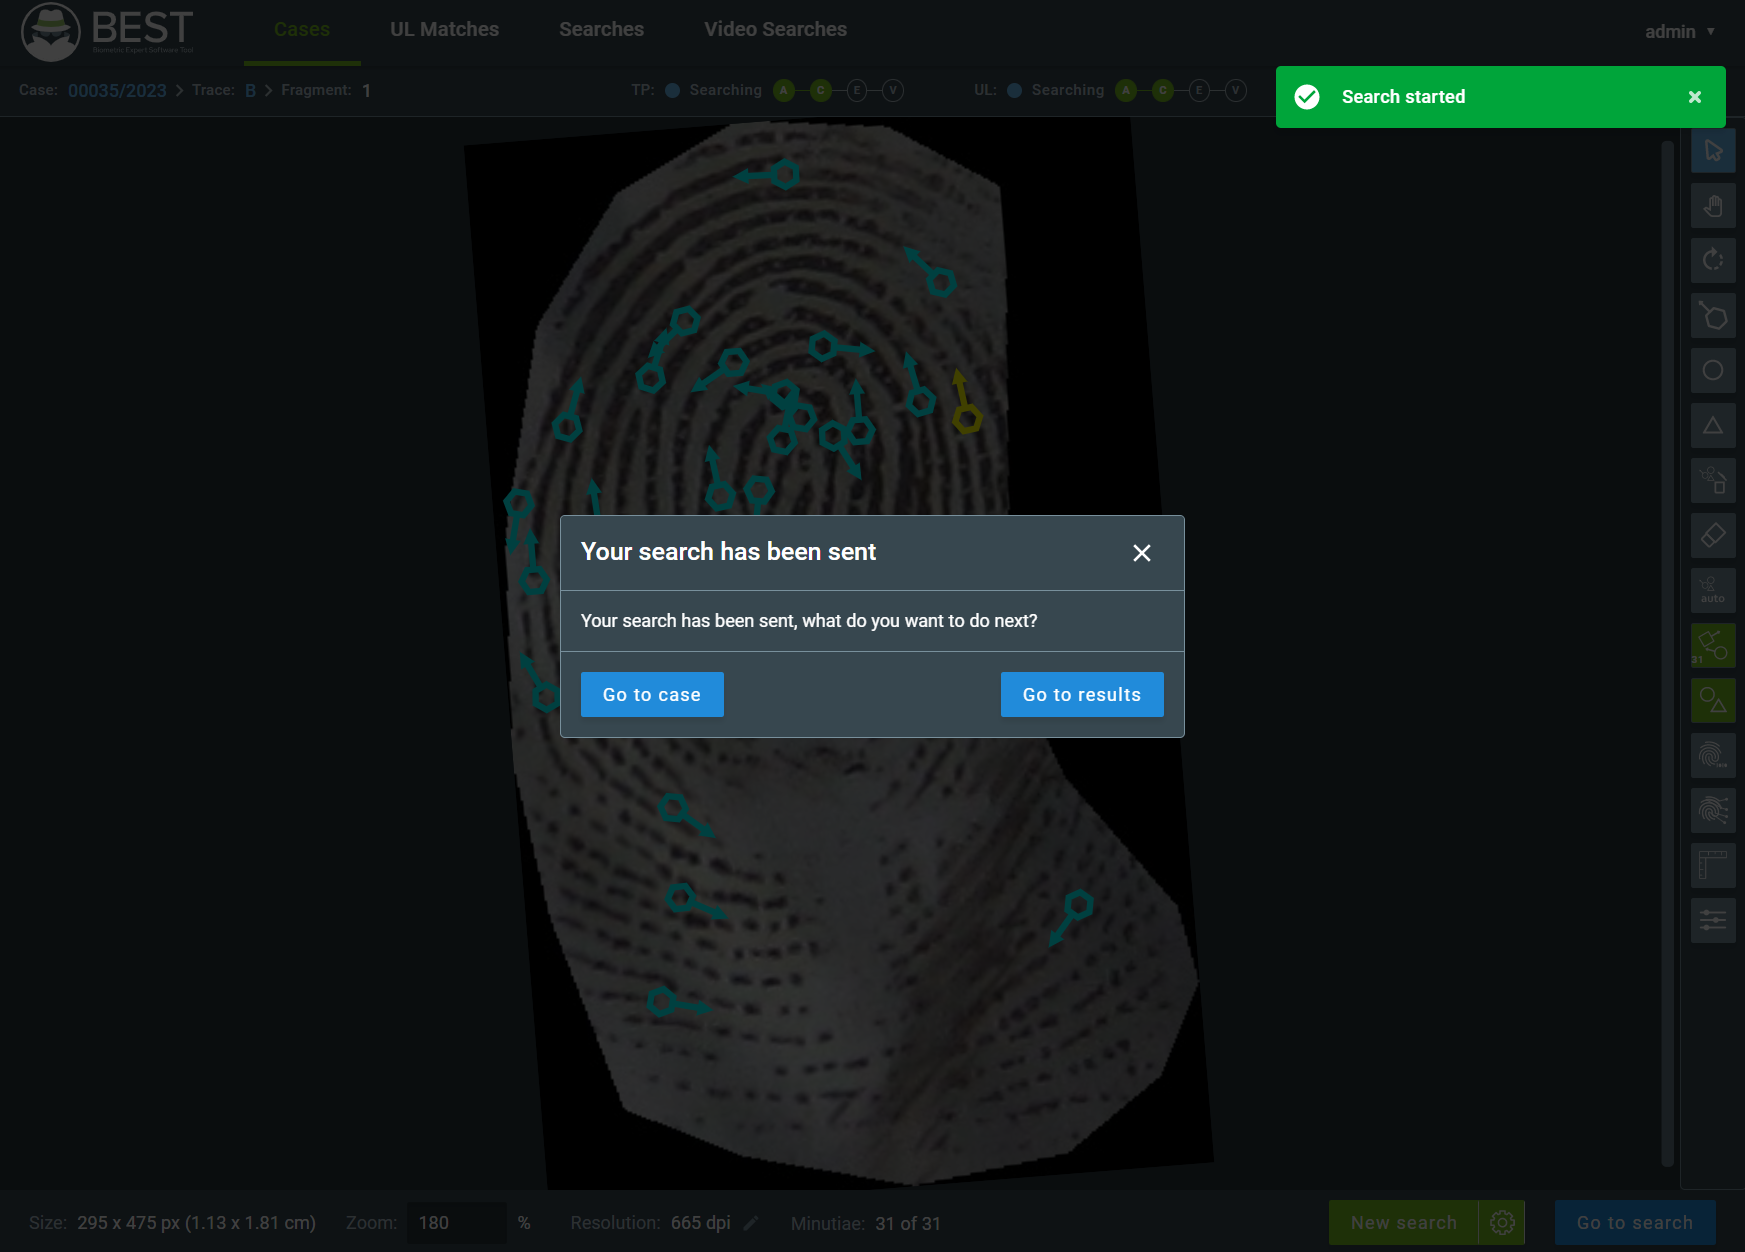
When submitting the search, a pop-up will appear confirming the start of the search and presenting options to go to results or return to the case.
Important
Note that the search operation is executed as an asynchronous operation in GBDS. This way, all searches are enqueued according to the submission order and can take some time to be processed. After submitting the search, you are free to continue using BEST, and, once the search is finished, you can access the results through the Go to results button.
You can verify the result status in the Searches tab.
7.3. Marking Hit or No Hit
When viewing the search result, the fragment will be presented on the left and the reference candidate on the right. The list of candidates will be shown under the reference image and you can navigate through the candidates by clicking on the list. You can also check the possible UL (Unsolved Latents) candidates through the UL tab.
Tip
You can transition between the TP/UL candidates using the up and down keyboard arrows.
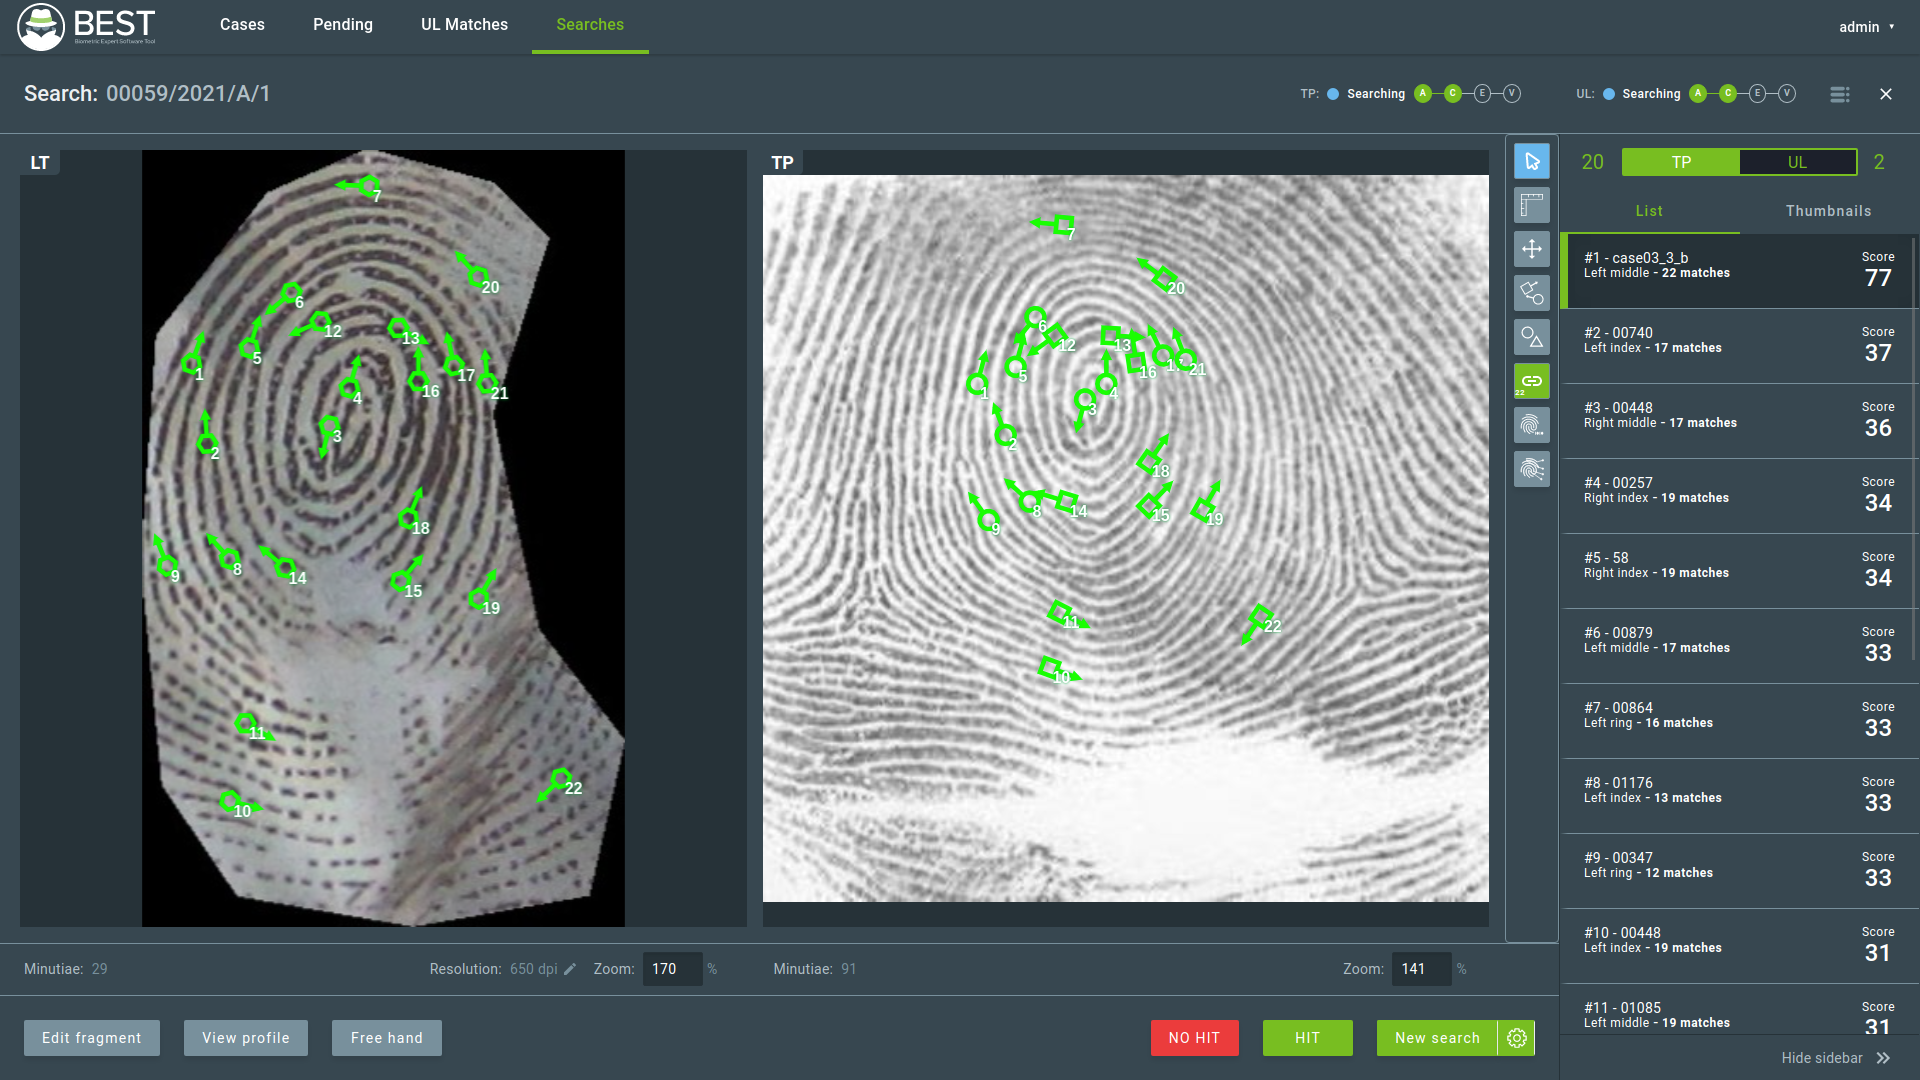
After analyzing the images, if there is a biometric match, you can establish a correlation between the fragment and the reference biometric. This operation is called HIT. A NO HIT verdict is when none of the returned candidates can be considered a biometric match.
The HIT and NO HIT operations can only be performed once for each database, and must be performed individually for TP and UL. Clicking either HIT or NO HIT will pop-up a confirmation window.


Upon a NO HIT confirmation, if the fragment is a fingerprint or palmprint latent, it will become a UL. An expert can define a HIT for a UL at any time if there is a match.
7.4. Free Hand
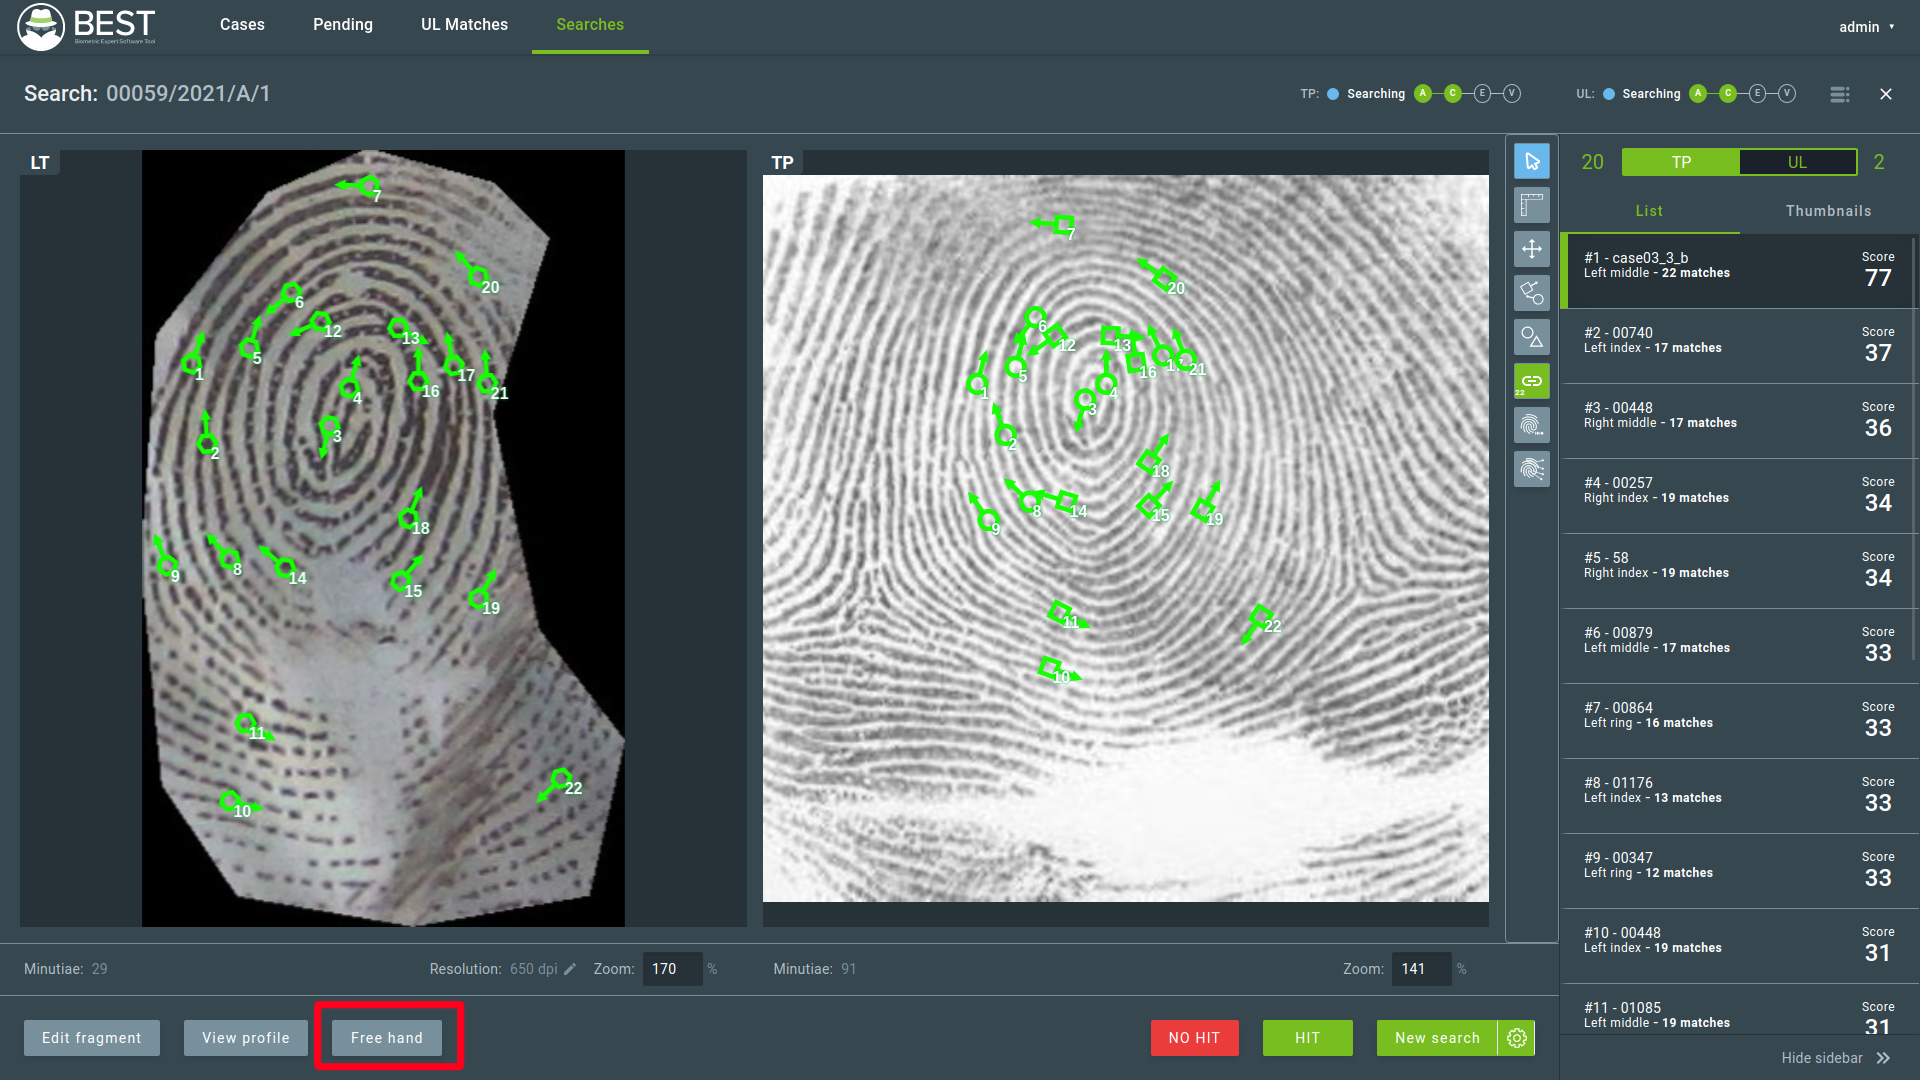
Free Hand is an edition mode that allows you to modify the matches and minutiae from both images when viewing the search result. To access this mode, click the Free hand button in the search comparison screen.
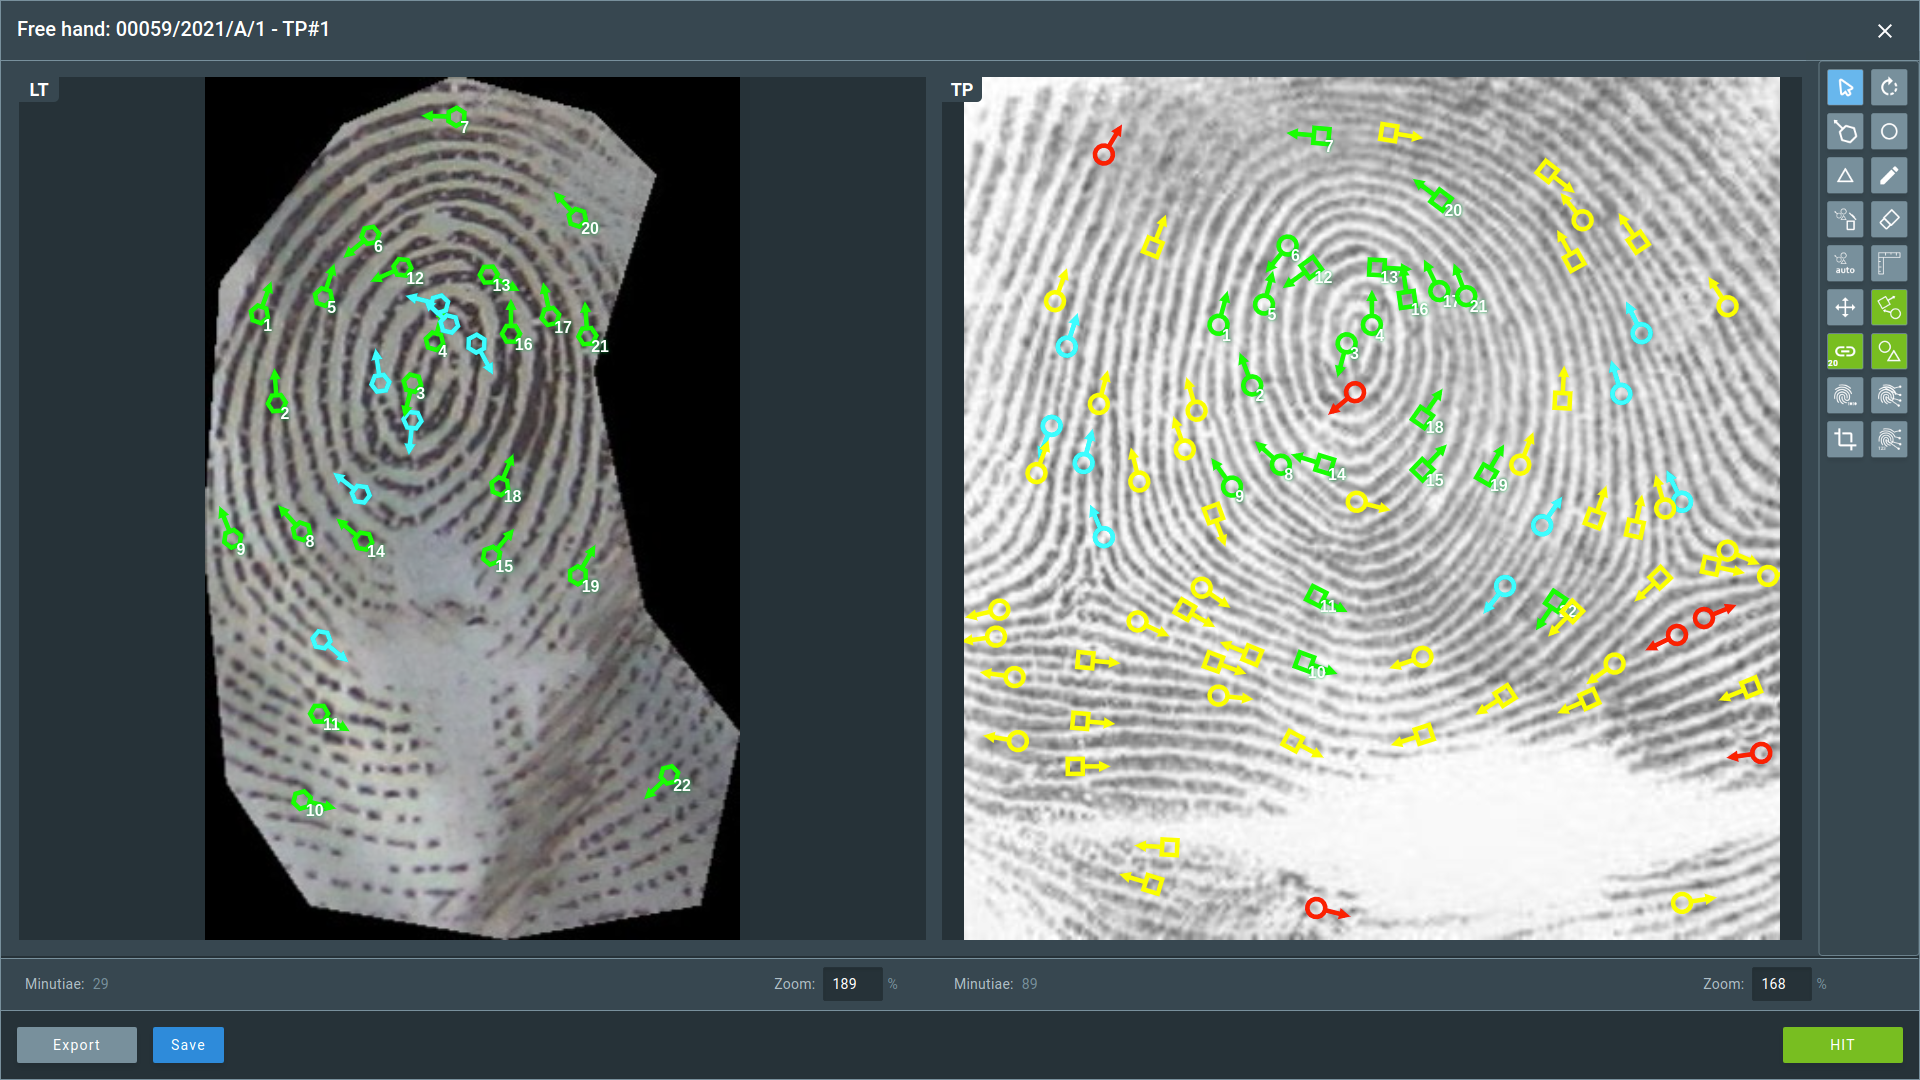
You can use the Free Hand mode to mark new minutiae, exclude wrong minutiae, create new matches, and access other tools to improve the reliability of the HIT action. After performing the changes, you can mark the fragment as a HIT in this window.
Important
Changing minutiae on Free Hand mode will not change the minutiae of the fragment. However, the report generated by a hit decision at Free Hand will be displayed with the alterations made.
Important
Any changes in the fragment or reference images done through the Free Hand mode are exclusive to the comparison and will not be kept in the database for future searches.
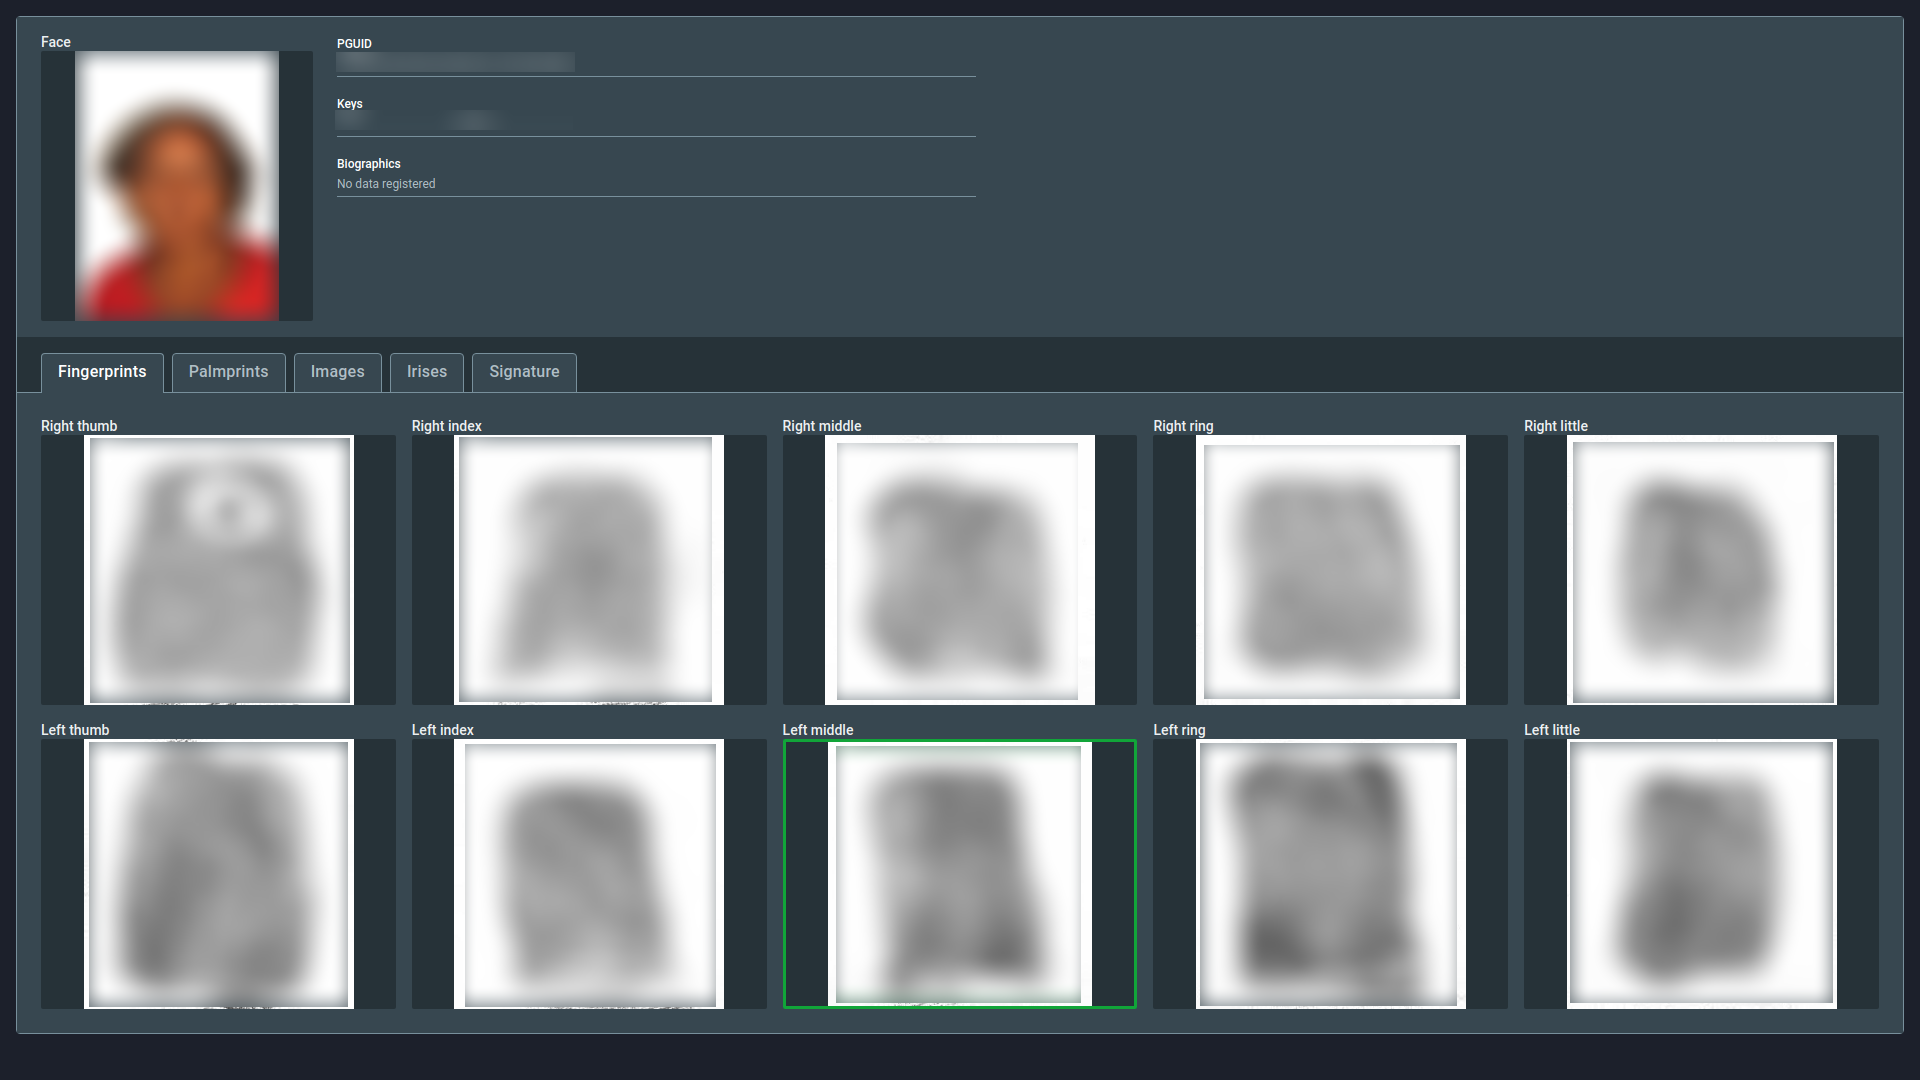
7.5. View Profile
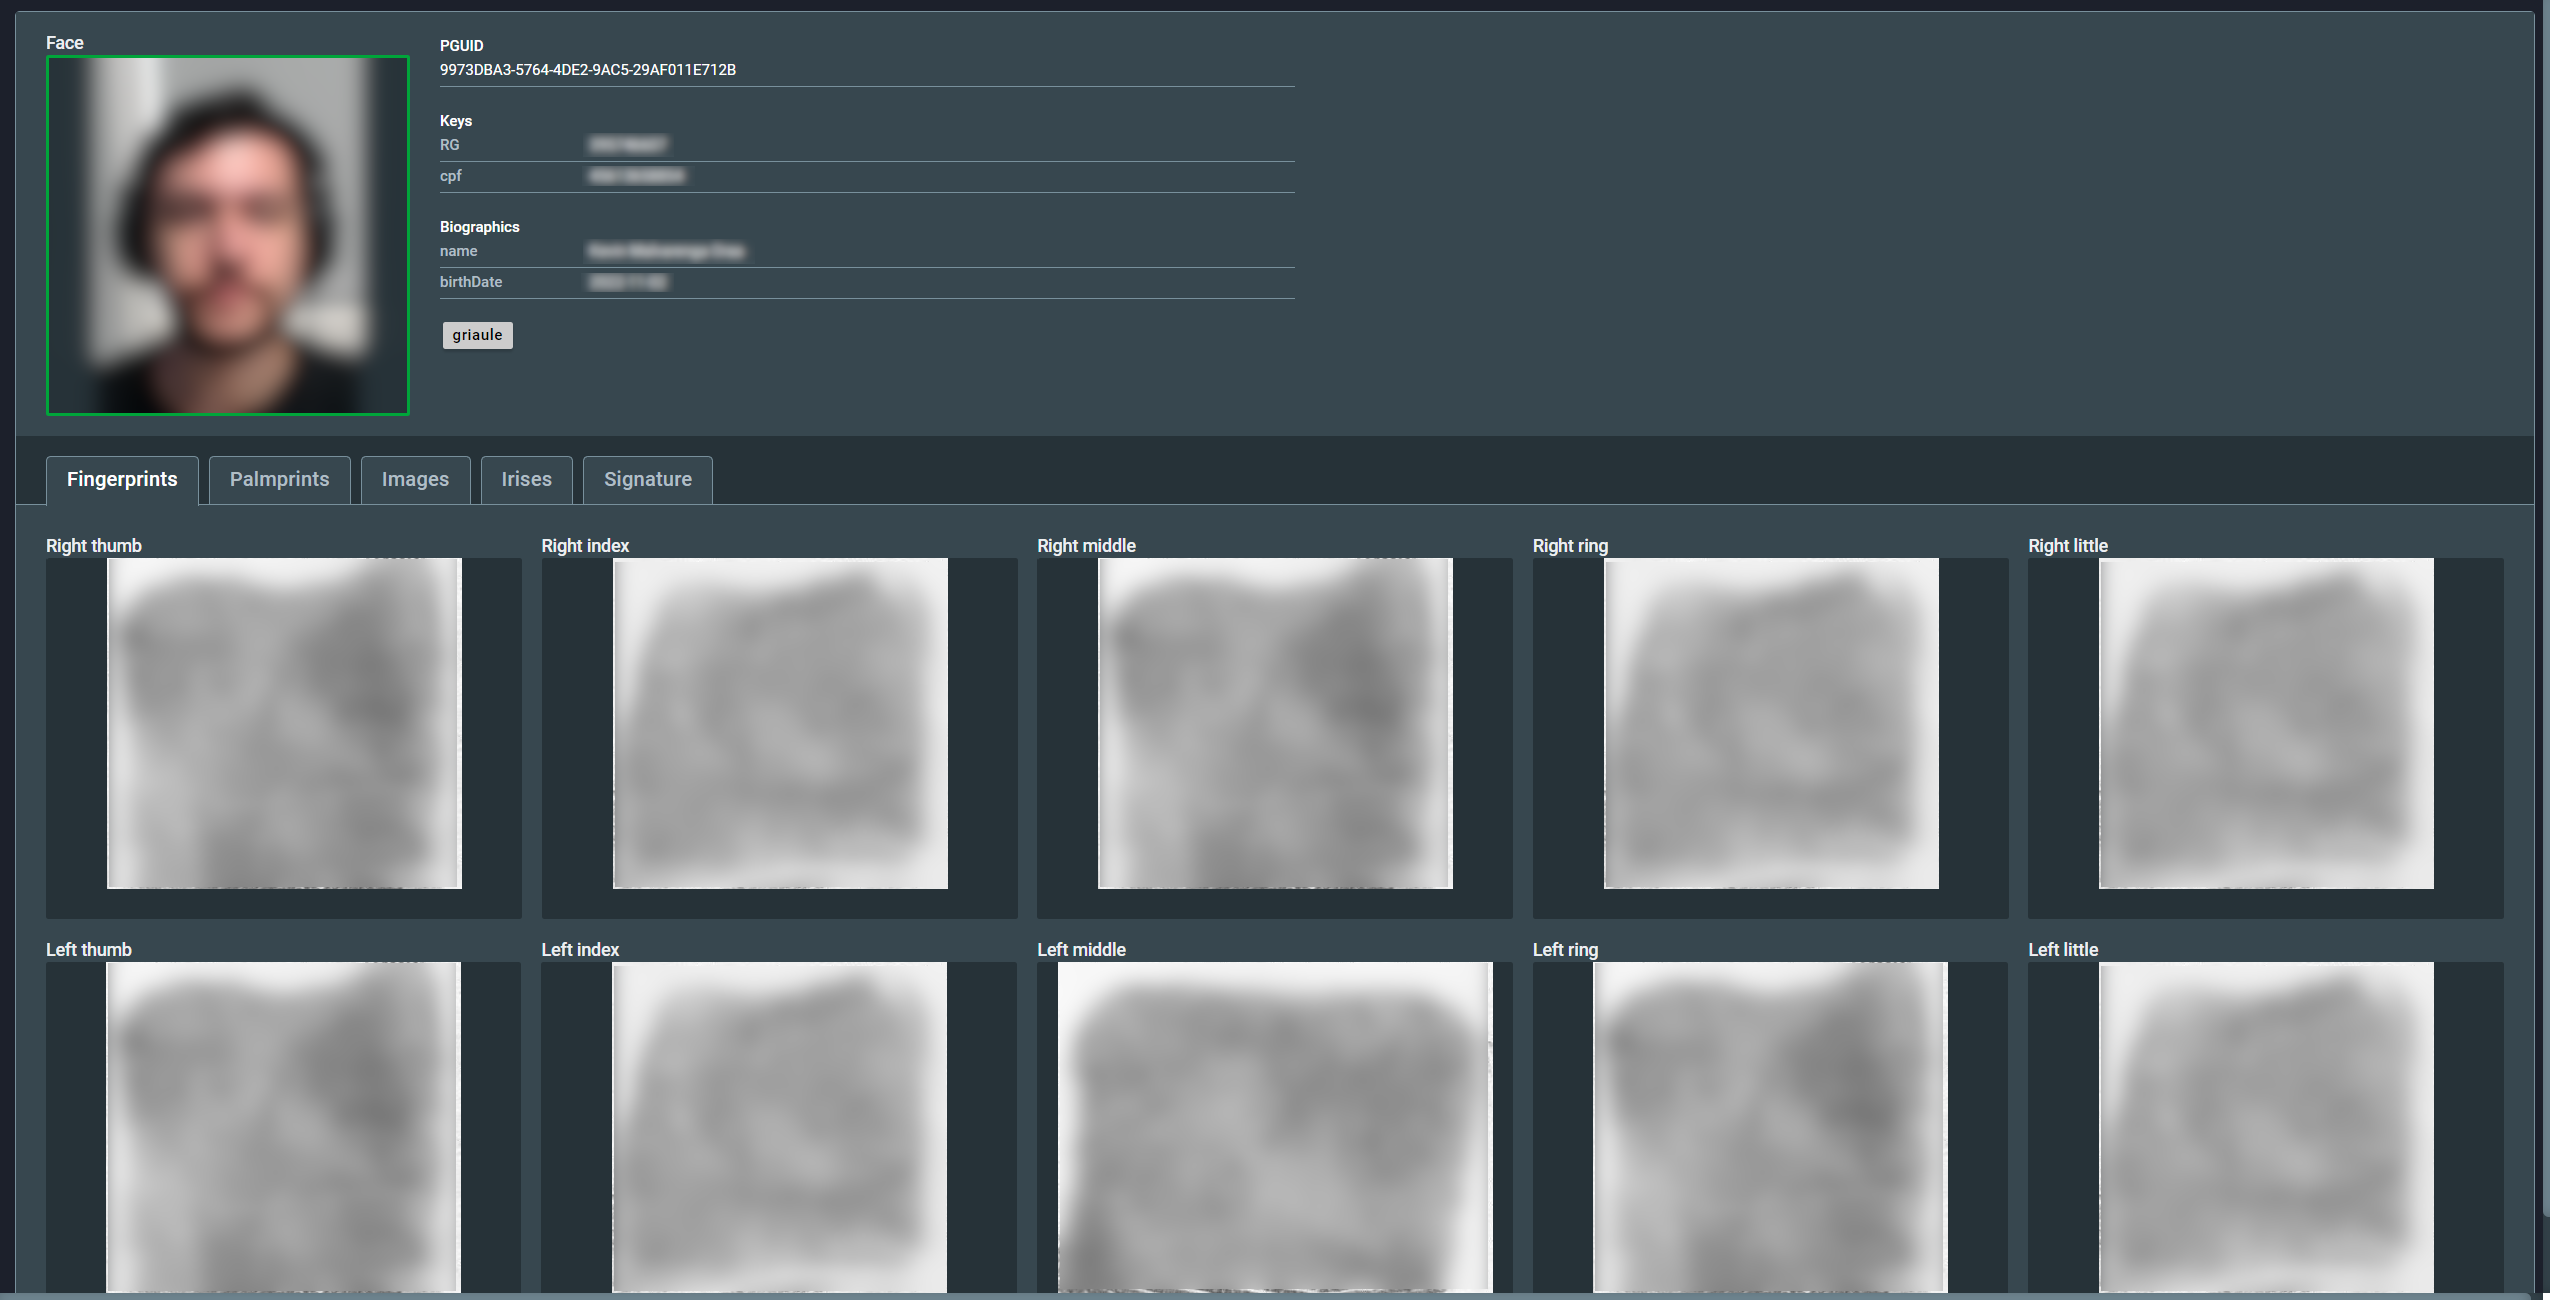
View profile is a function that allows you to see the candidate’s complete profile. To access this mode, click the View Profile button in the search comparison screen. A new tab will open with the candidate profile. The matched fingerprint will be highlighted, as shown in the image.
8. Video Searches
Note
Video support may be turned off for your environment. Check with your system administrator whether it’s available or not.
As mentioned before, it’s possible to perform face searches on video files through BEST. To do so, you must first submit a video file as a case trace (see section Traces for further information).
Note
You can insert multiple video files as a single trace and the searches will be performed individually.
After the video trace is created, it will be available for inspection in the case page.
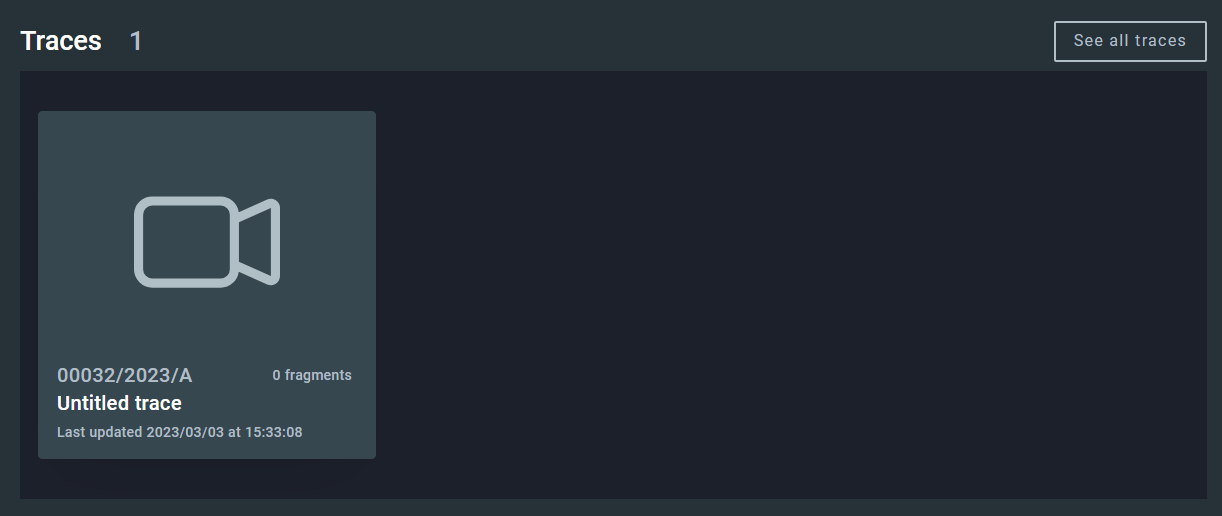
By hovering over the trace and clicking on the Inspect button you will be redirected to the Trace Videos page where you can see the videos linked to the trace and submit them for search.
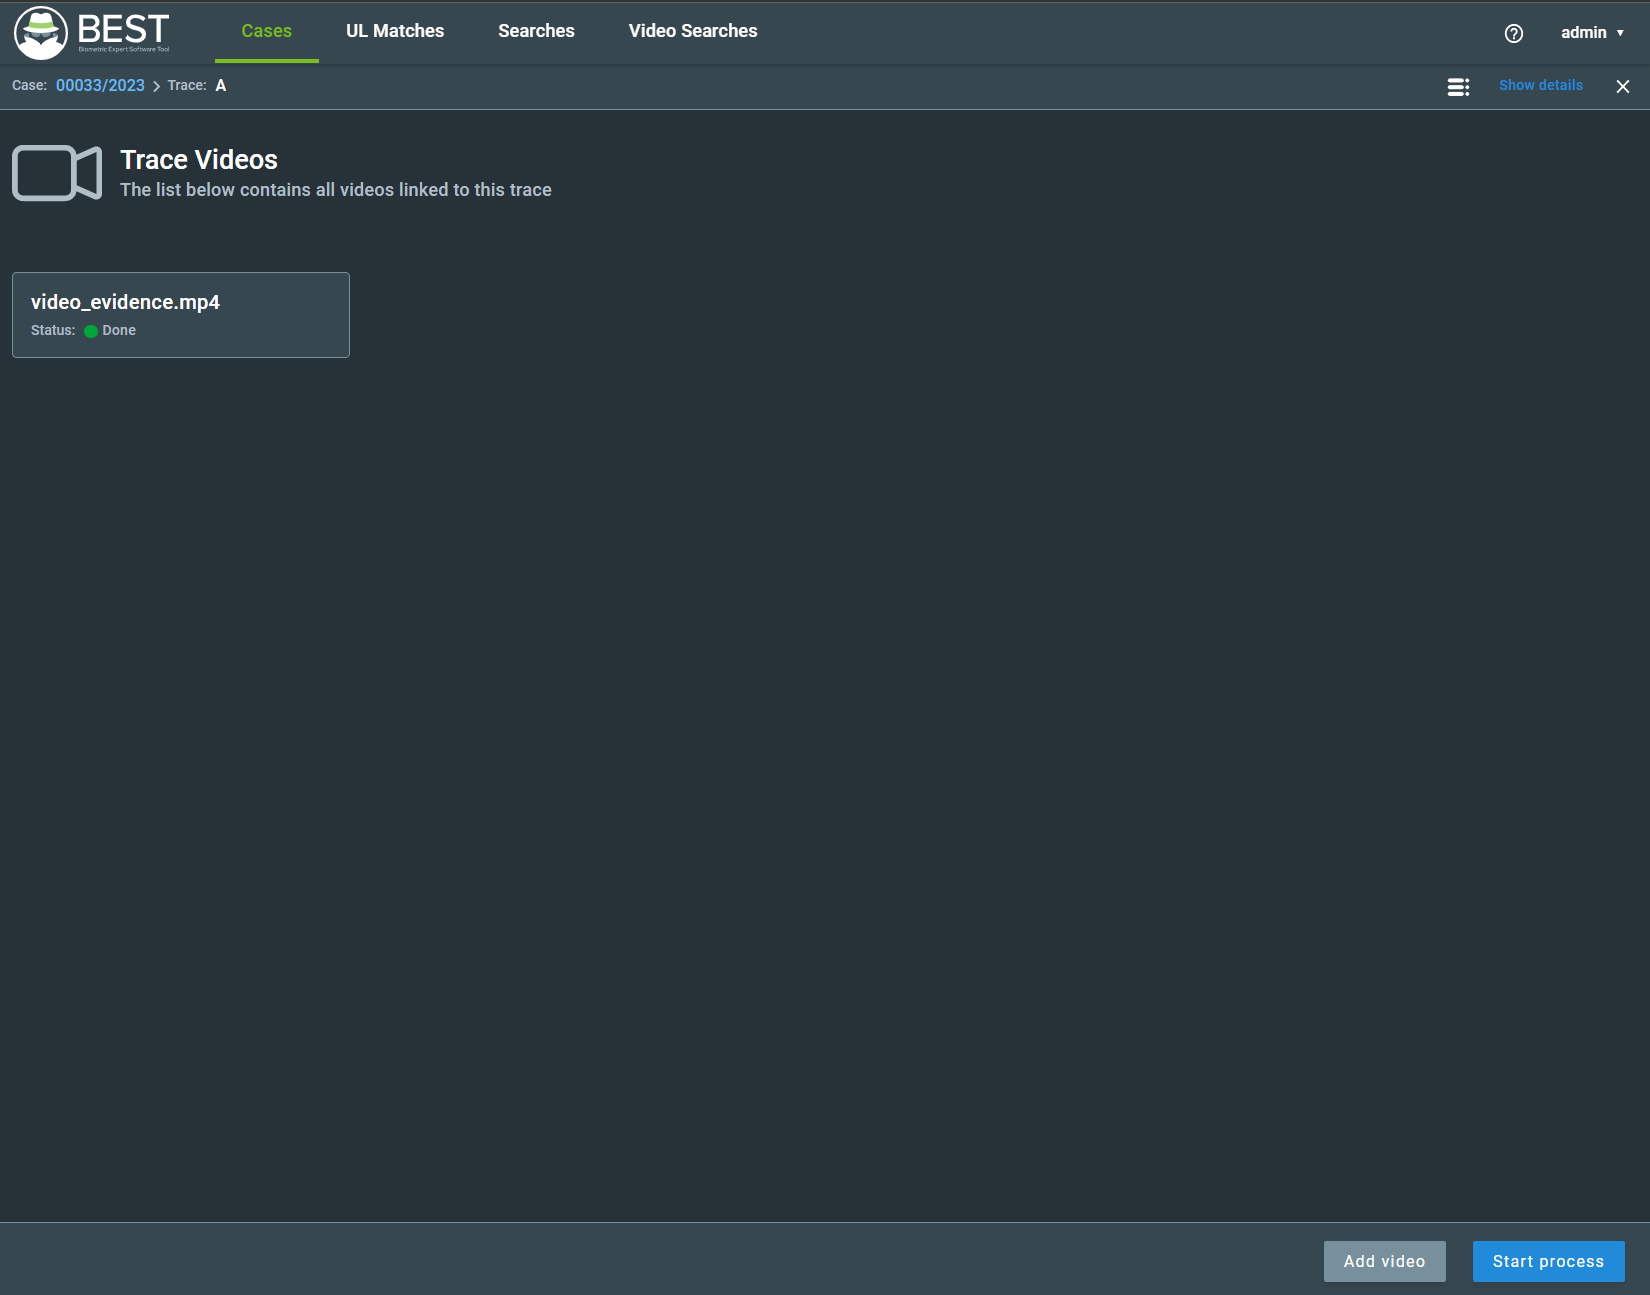
To submit a video for search, click the Start Process button.

Attention
When POIs are added to cases that have video traces, BEST Video will conduct the search of fragments extracted from videos considering only the POIs, not the entire database.
Attention
All video searches submitted to GBDS enter a single queue for processing. In systems with multiple users, it may take a long time to process a request. You can follow the processing status of a video trace in the Trace Videos page, by checking it in the lower bar on the same position of the Start Process button.
When a video search is finished, the Start Process button in the Trace Videos page will change to Search Results. By clicking this button, you will be redirected to the Video Searches tab where you can see all the fragments extracted from the video trace.
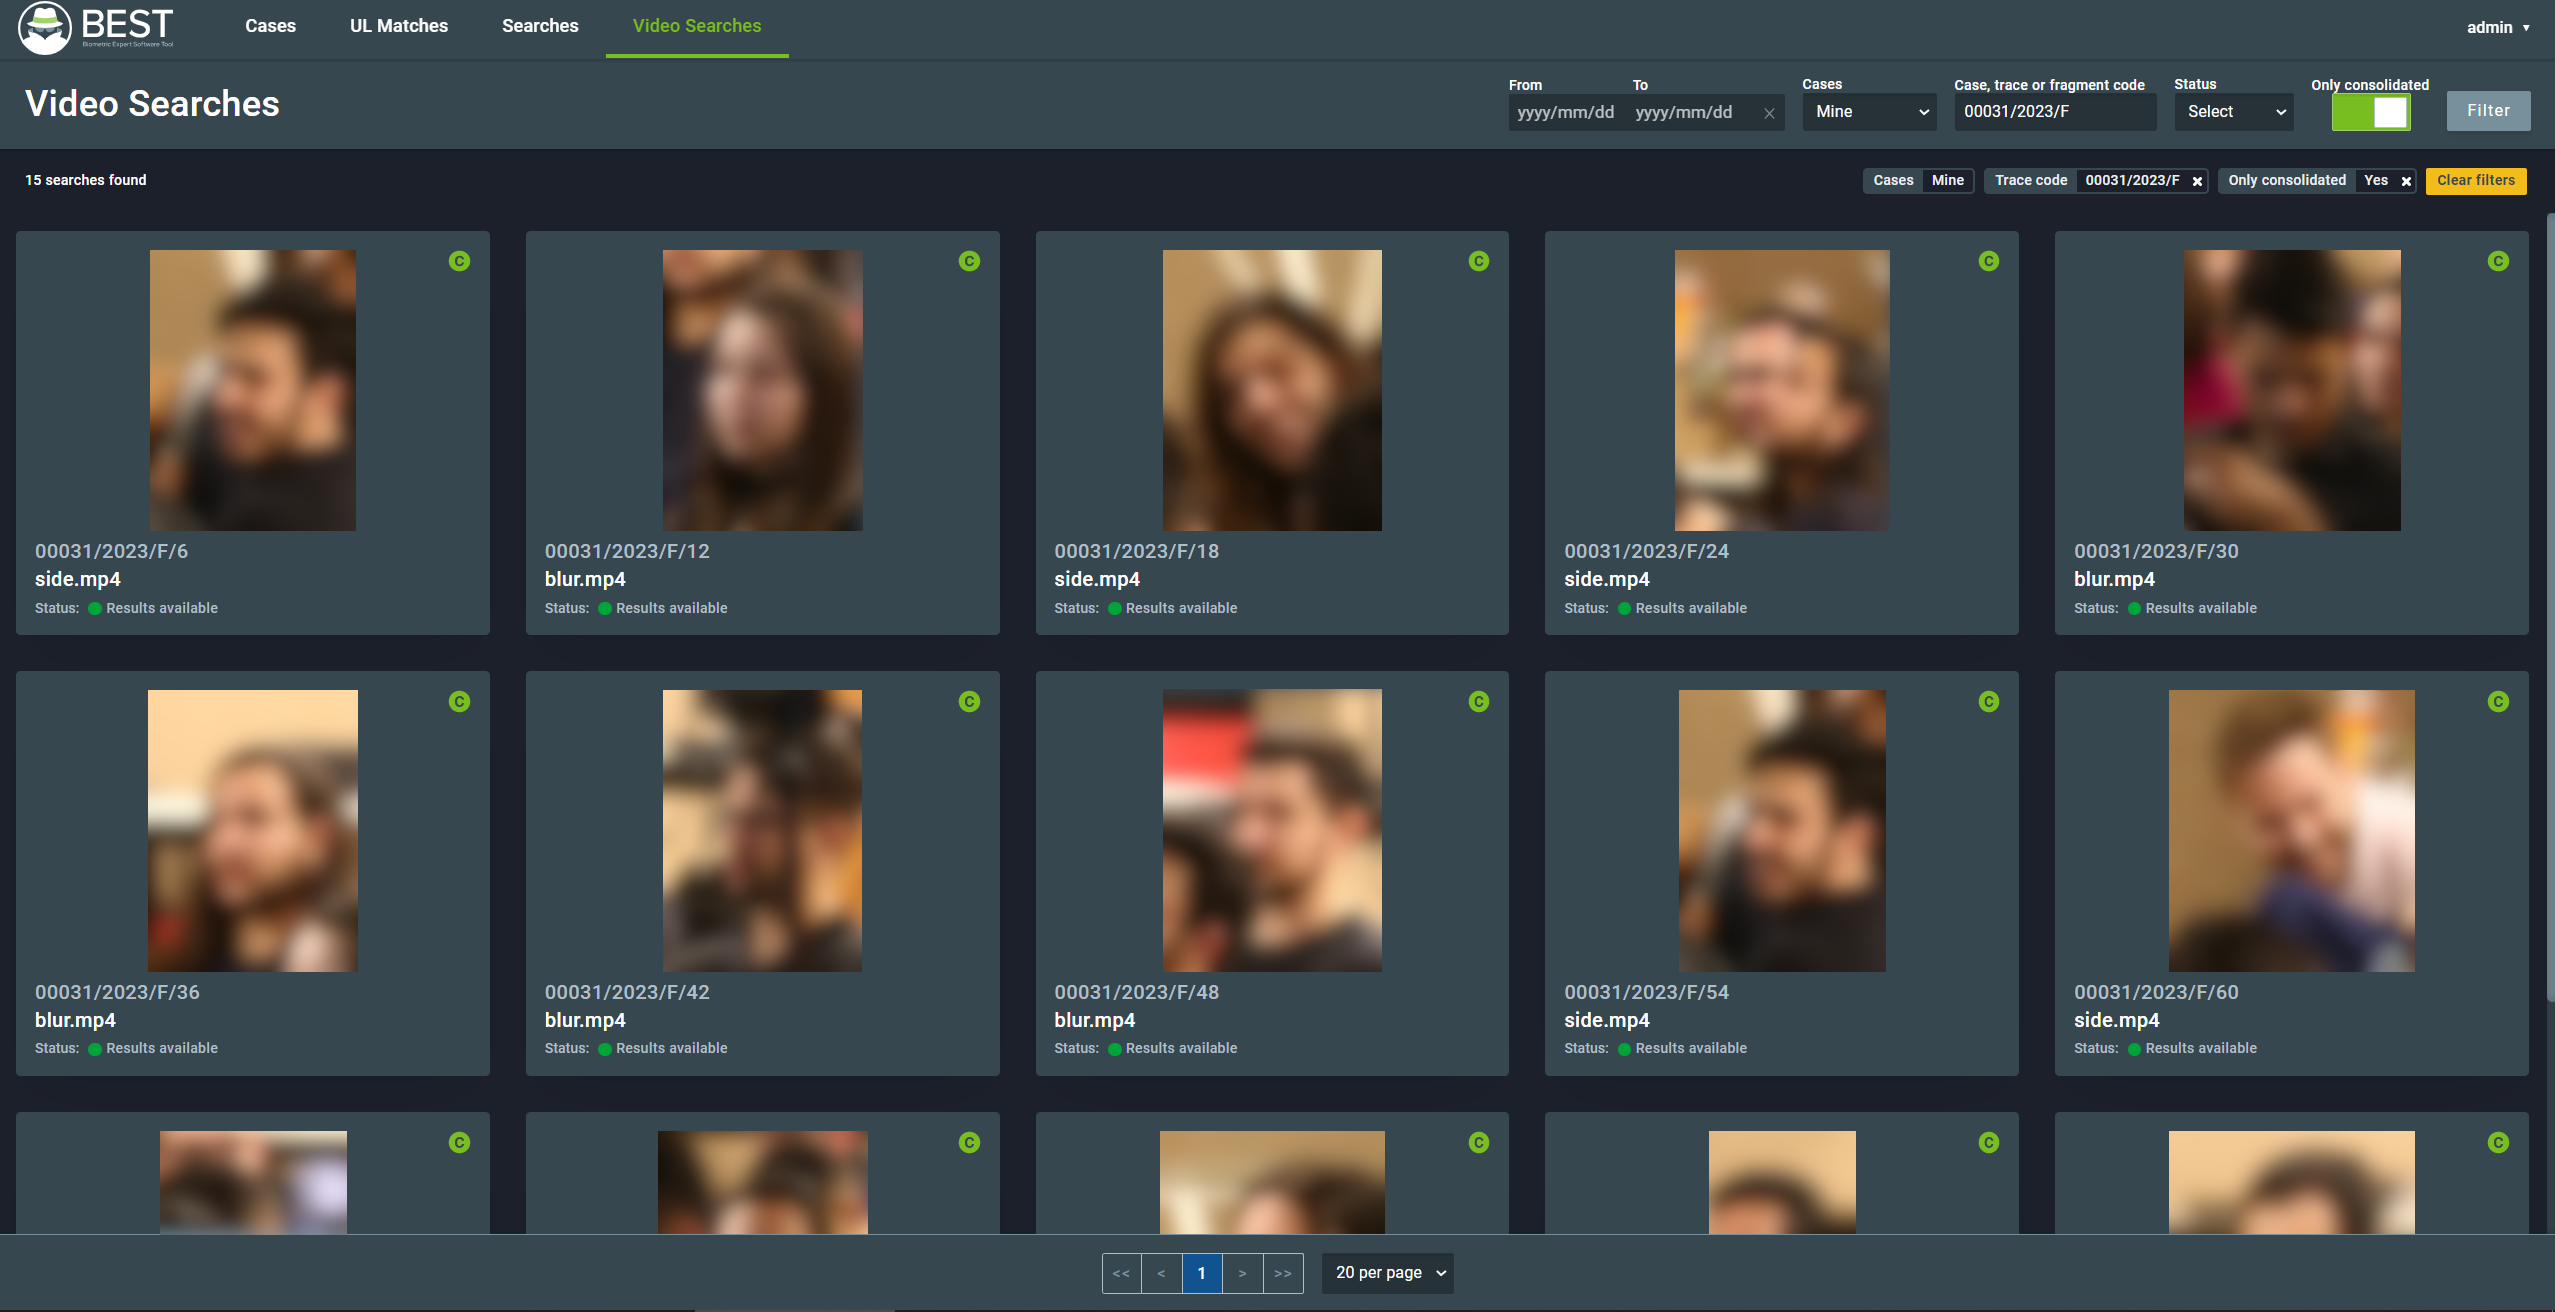
To perform video searches, BEST will extract the best face images of each person and consolidate them as a single identity. To view each image individually, you can turn off the Only Consolidated at the top of the page. You can also filter the list by date, case ownership, case, trace, or fragment code, and status.

By clicking any of the fragments listed, you’ll be redirected to the search results for the respective fragments. In this page, you can see the faces that matched the search criteria sorted by similarity score. The results will be shown in the bar at the right side of the page.
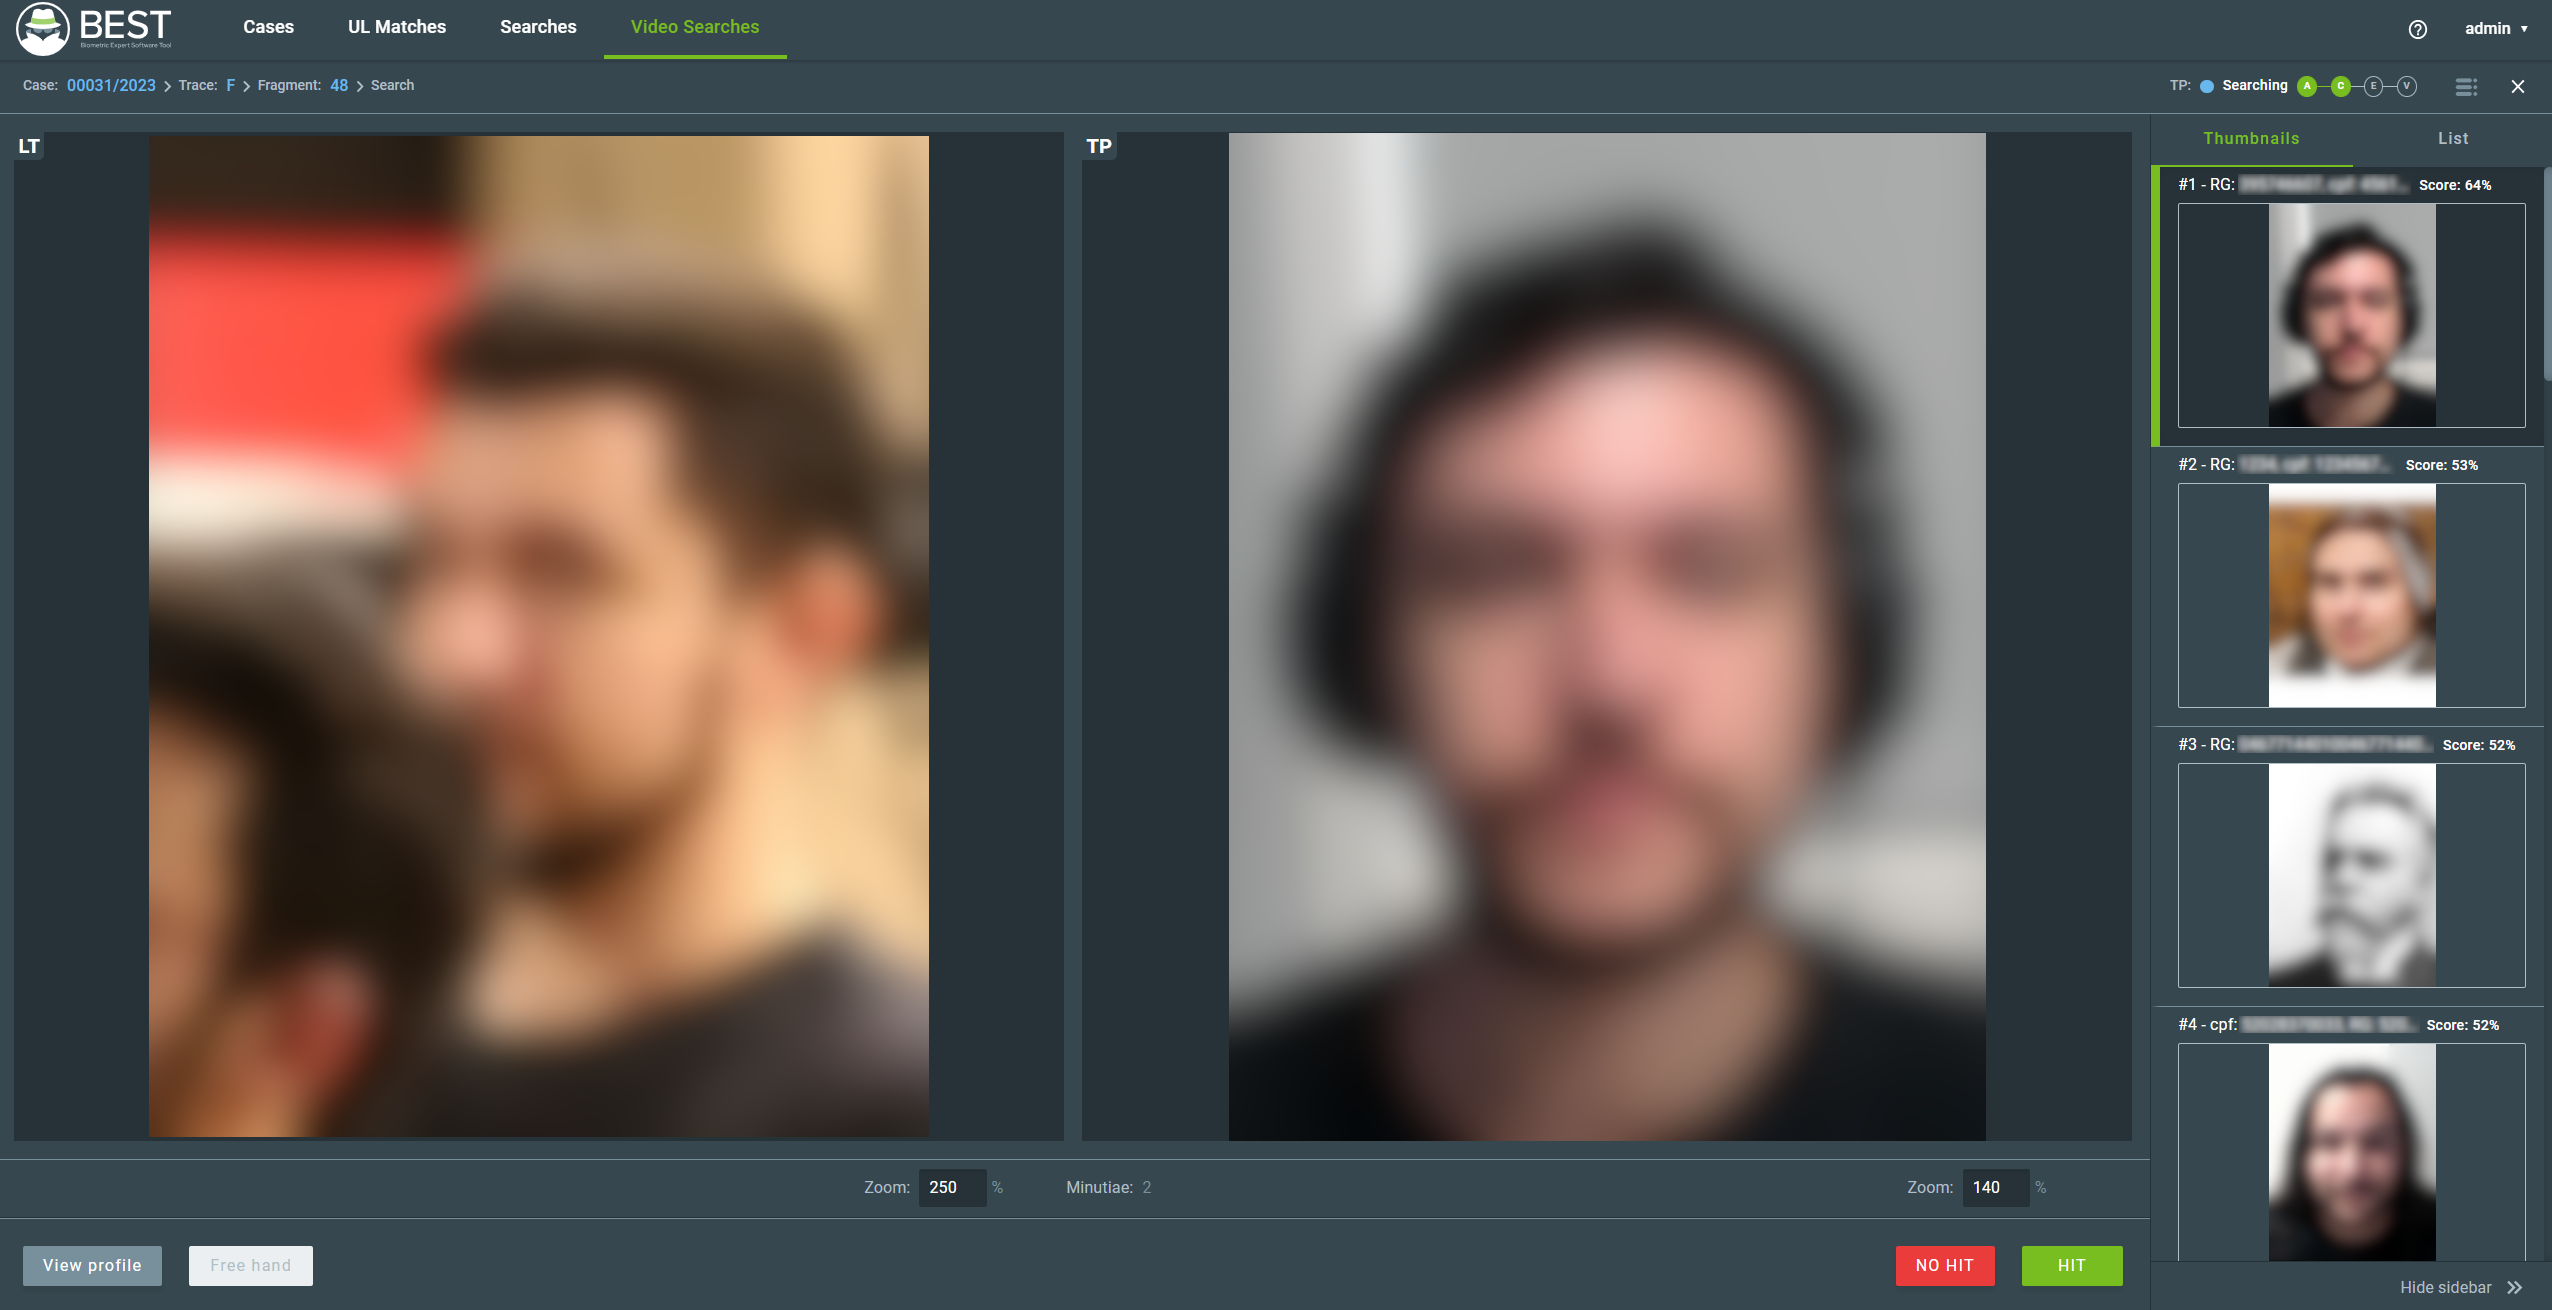
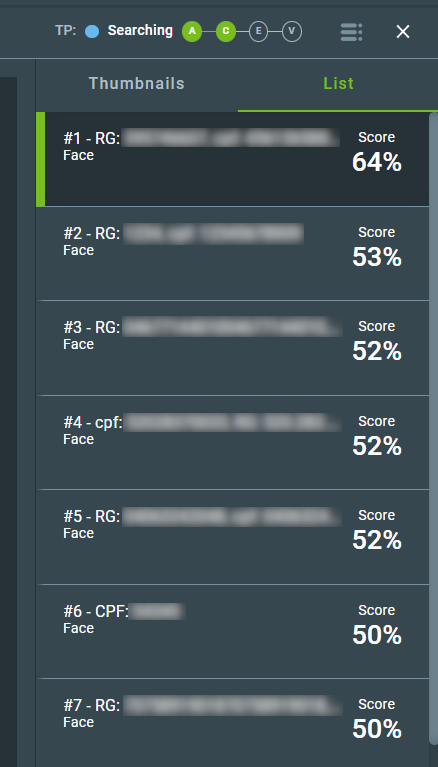
The results list is divided in two tabs: Thumbnails and List. The List tab only shows the profile details and score for each candidate. You can navigate the list by clicking the different candidates.
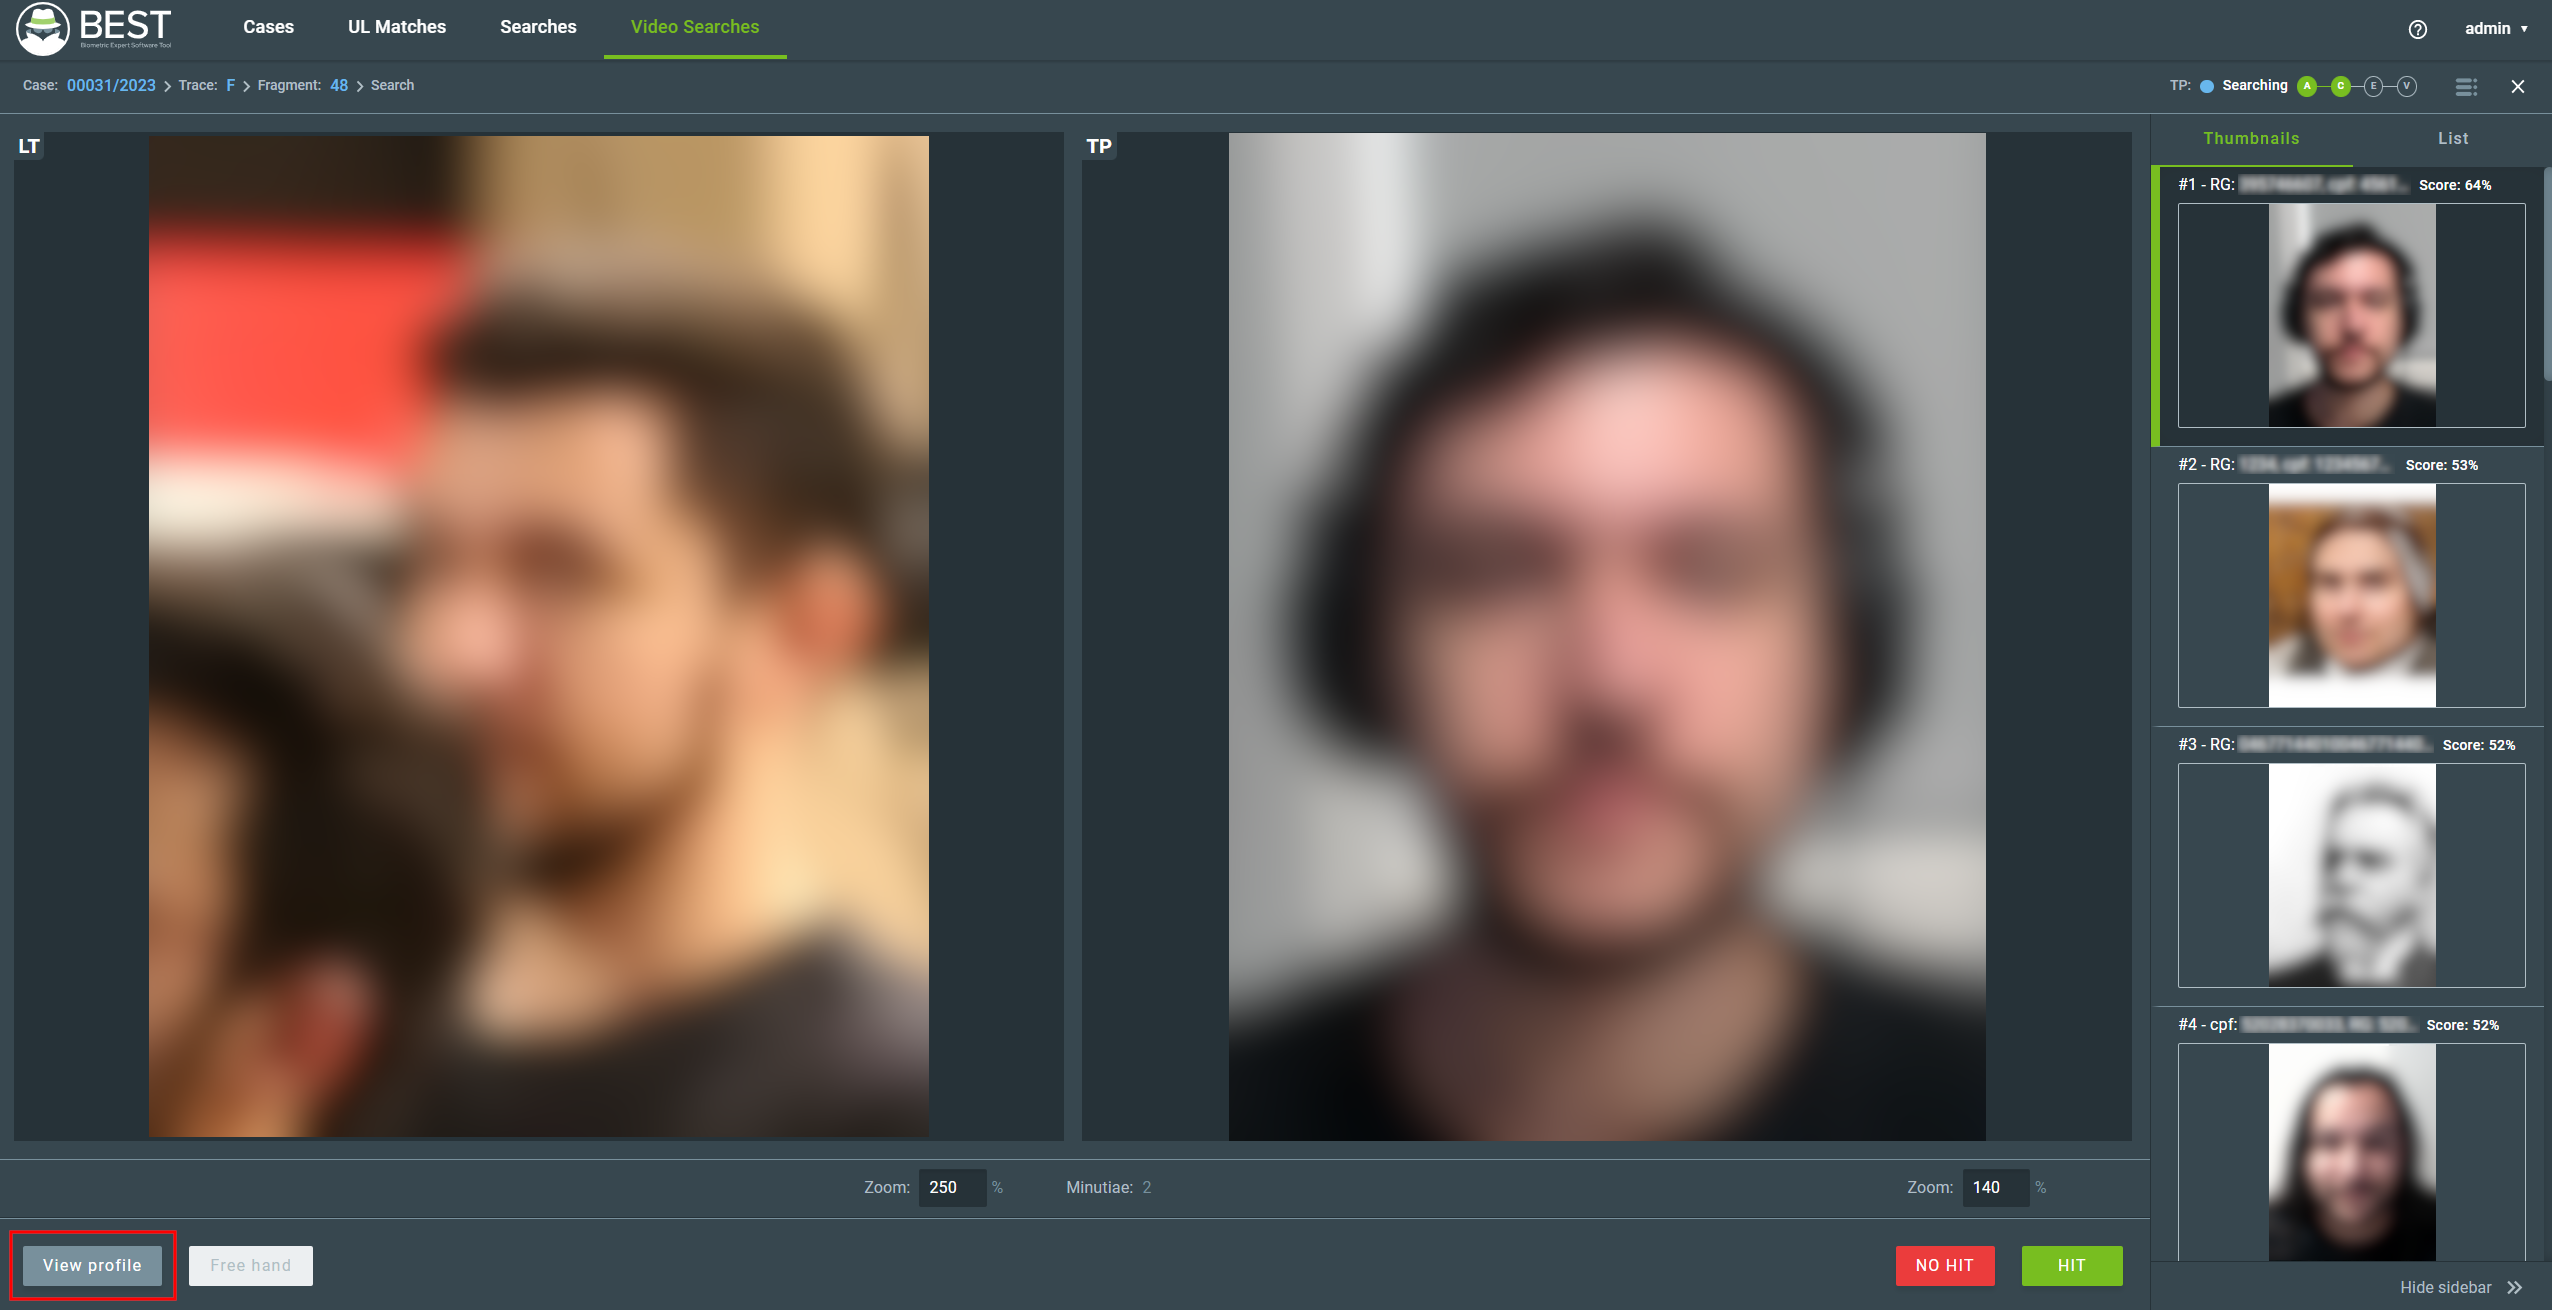
The center of the page will show the query and candidate images side by side and allows you to zoom both images for better comparison. To check the profile details of a candidate, click the View Profile button. The profile will open in a new tab.
In the search results page, you can mark a candidate as HIT or NO HIT the same way described in the Marking Hit or No Hit section.
After performing a HIT, you can proceed to generate a report, as described in the section below.
9. Reports
A report is the expert’s technical statement about the comparison between the fragment and the reference biometric data of the candidate. For each fragment marked as HIT, a report is generated. Reports have information about the case, the candidate, and a side-by-side comparison of the fragment and the biometric reference image.
You can access the case reports through the Reports panel of the Case Detail screen.
Accessing a report allows you to view all the information in the HIT report and edit the presentation of the biometric data before exporting the report file.
The complete report will contain the following information:
- Case registration number
- Crime type
- Description
- Observations
- Occurrence number
- Place
- Case creation and update dates
- Case experts and their roles
- Persons of Interest
- Trace code and information
- Trace creation and update dates
- Fragment code and status
- Fragment creation and update dates
- Biometric index of the reference image and matching score
- Images of the pair that generated a HIT with the minutiae and coincidences
- Profile of the candidate that generated the HIT
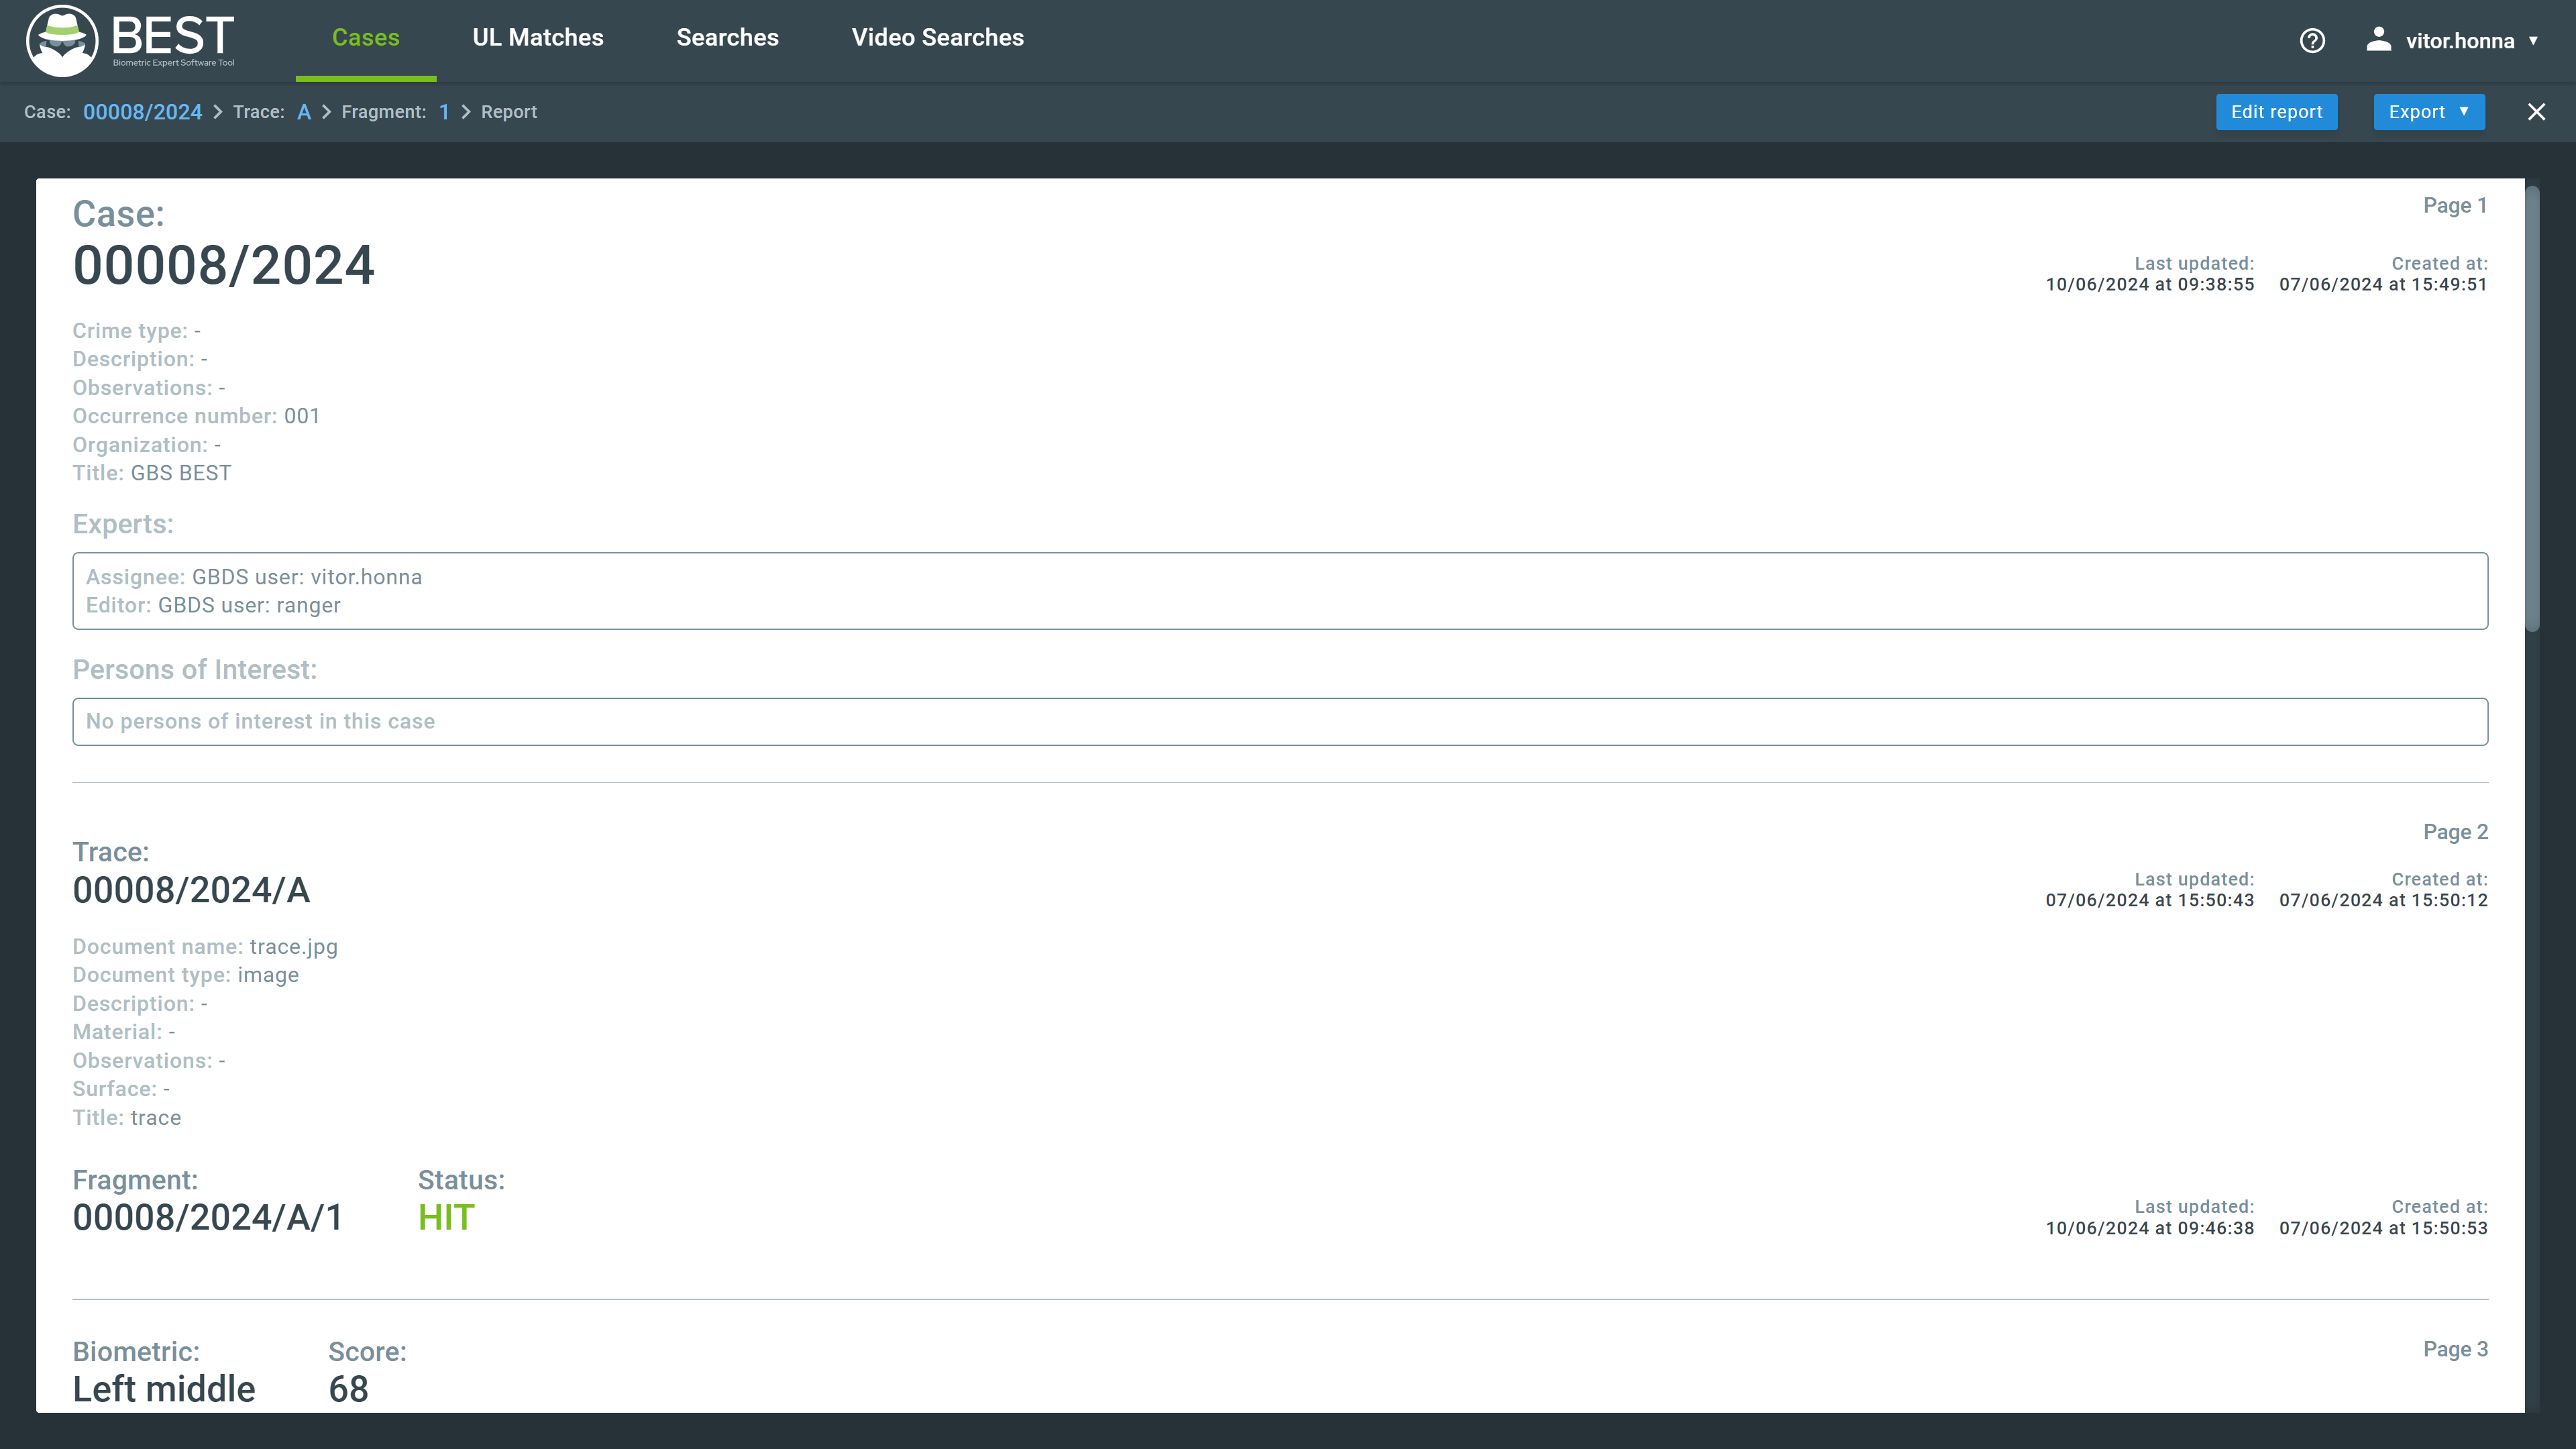
9.1. Edit Report
You can access the report edition screen by clicking the Edit Report button.

The Edit Report screen allows you to edit the information and presentation of the report.
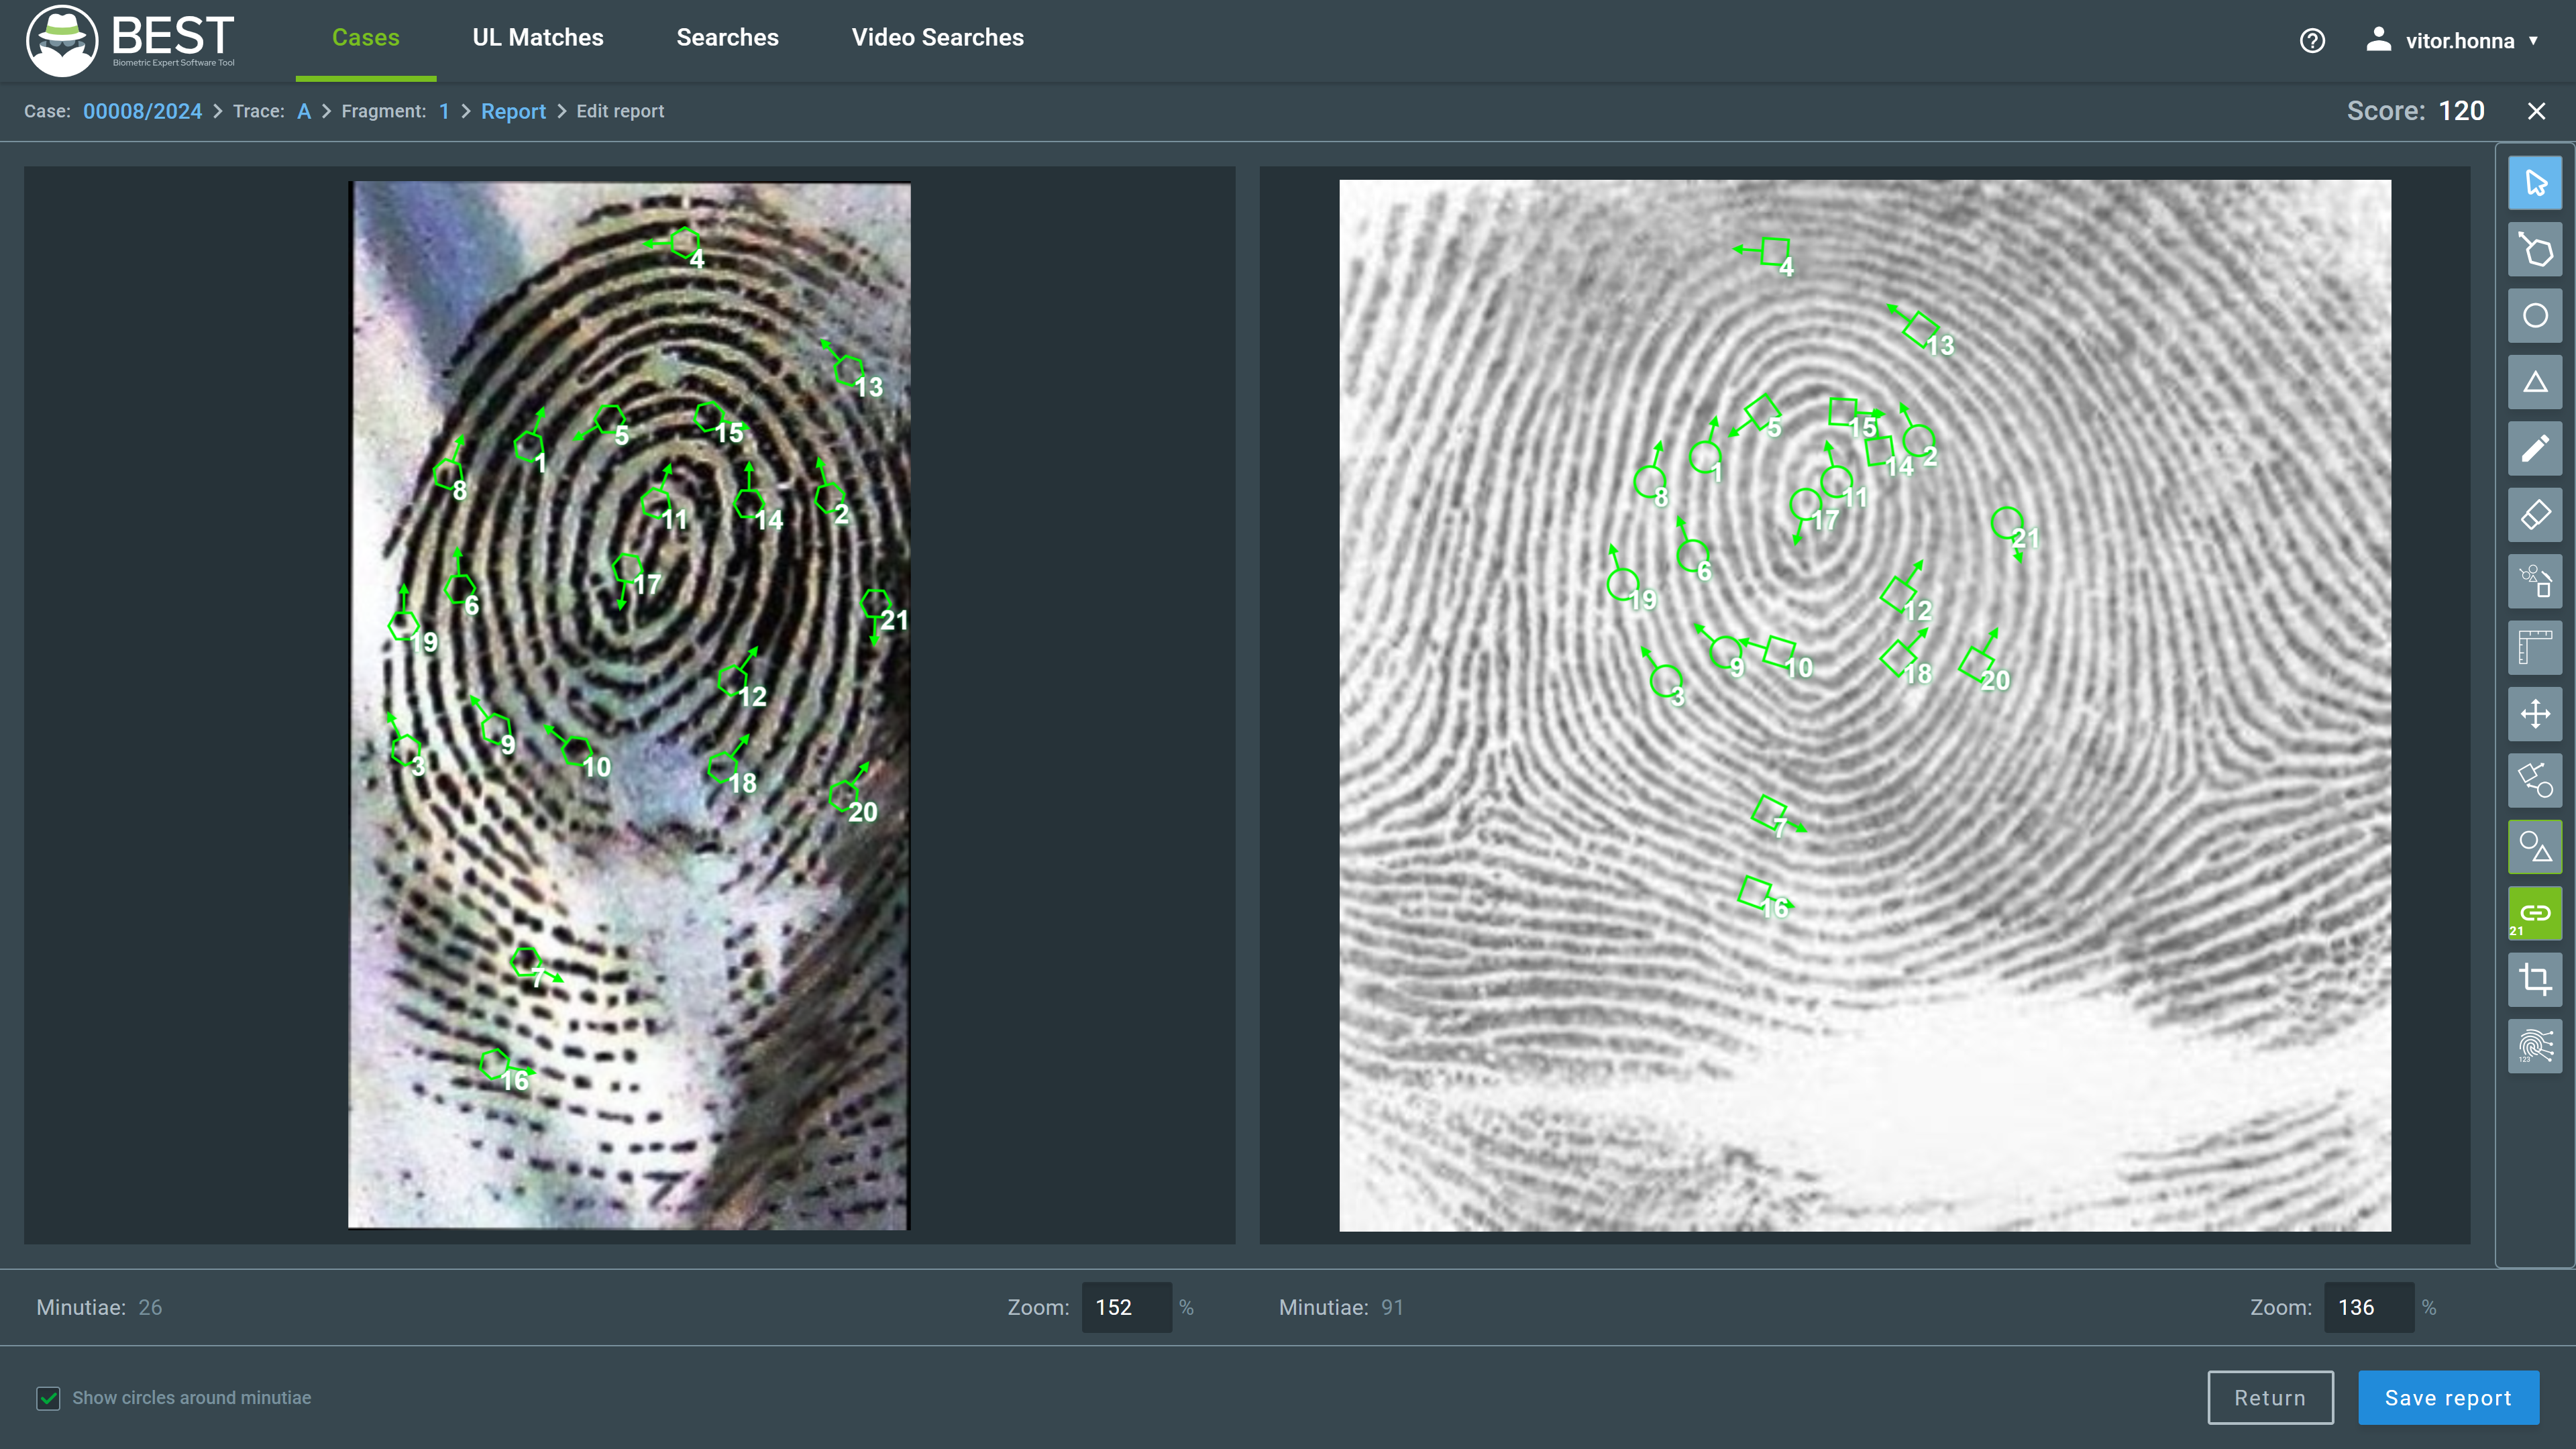
Some available tools are the same as present in the Editing Fragments window, and those are linked to the respective section for a better explanation of their operations. The tools available for editing reports are:
- Select
- Move Minutiae
- Create Minutia
- Erase Minutiae
- Show/hide Ruler
- Show/hide Minutiae
- Show/hide Cores and Deltas
Important
Any changes done to the report do not affect the fragment or reference images.
And some tools are only present in the report window:
Create matches
This tool allows you to create matches between minutiae that are not system-generated. To use it, click on the tool, then click on the fragment’s minutia and the corresponding minutia in the other image.
Erase all minutiae
This tool allows you to erase all minutiae from the fragment or the candidate image. To use it, hover over the tool and click on the desired option. A confirmation window will be displayed before the operation is performed.
Synchronized pan and zoom
This tool synchronizes the movement and zoom of the fragment and reference image.
Amount of matches shown
This tool is a slider that defines the number of matches shown in both images.
Crop
This tool automatically crops both images to show only the area with matching minutiae.
Distribute matches
This tool will move the minutiae number labels to the image’s borders. The labels can be adjusted for better visibility, dragging the marker to the desired position. You can also double-click a marker to change its notation.
Additionally, an option to Show circles around minutiae is located at the bottom left of the screen. Deactivating this option will deactivate the minutiae symbol when not in the Distribute matches mode and, when in it, will remove the red circle around the minutiae.
Attention
After editing a report, you need to save it. To save a report, click the Save report button.
9.2. Exporting Reports
At the report window, it is possible to export the generated report. To do so, click the Export button and select the desired format.

10. Finishing a Case
You can finish a case either by canceling it or by resolving it. These options are shown below.
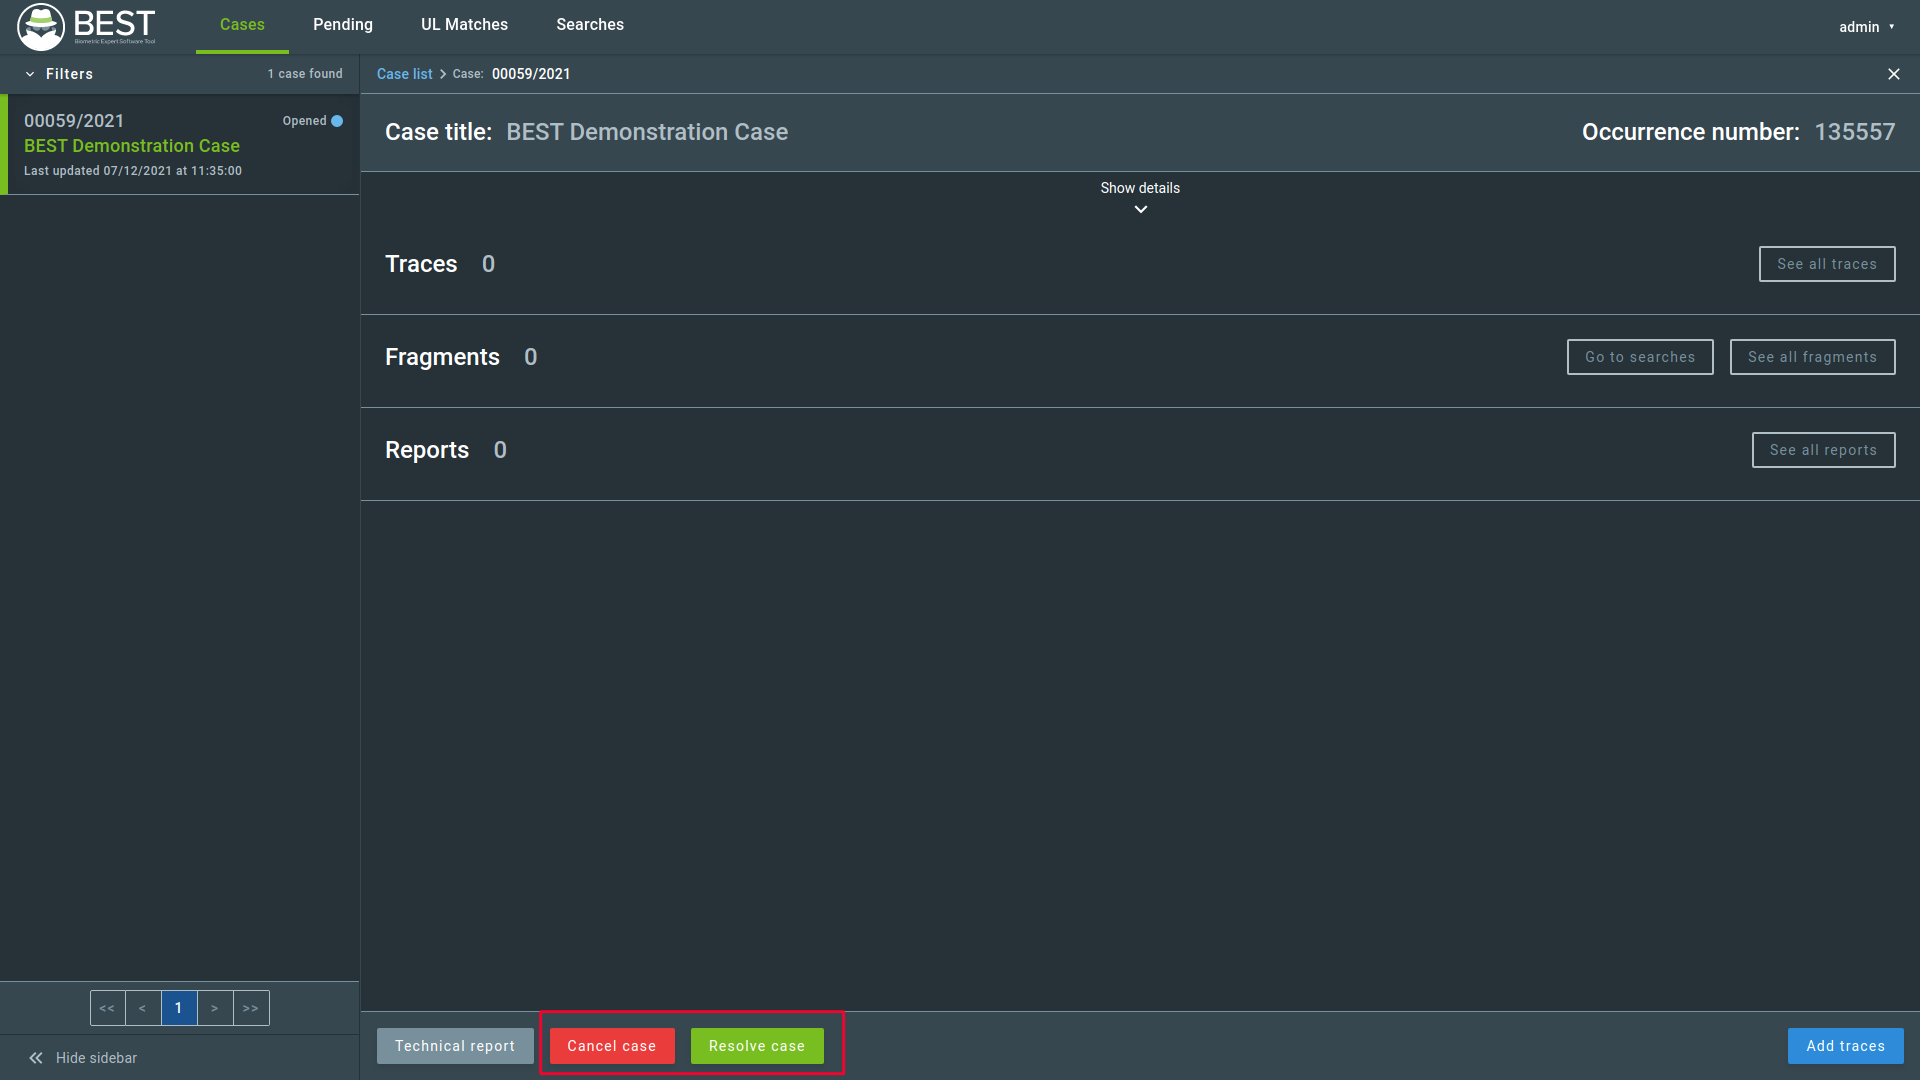
If all fragments in a case have final verdicts (HIT or NO HIT), you can resolve the case by clicking the Resolve case button. Doing so will open a confirmation window. Click the confirmation window Resolve case button to confirm the operation.

Resolving a case will move it from the Open Cases list to the Resolved Cases list.
To cancel a case, it must have no traces. If a case has traces, you must remove them before canceling the case. Trying to cancel a case with traces will trigger a warning:

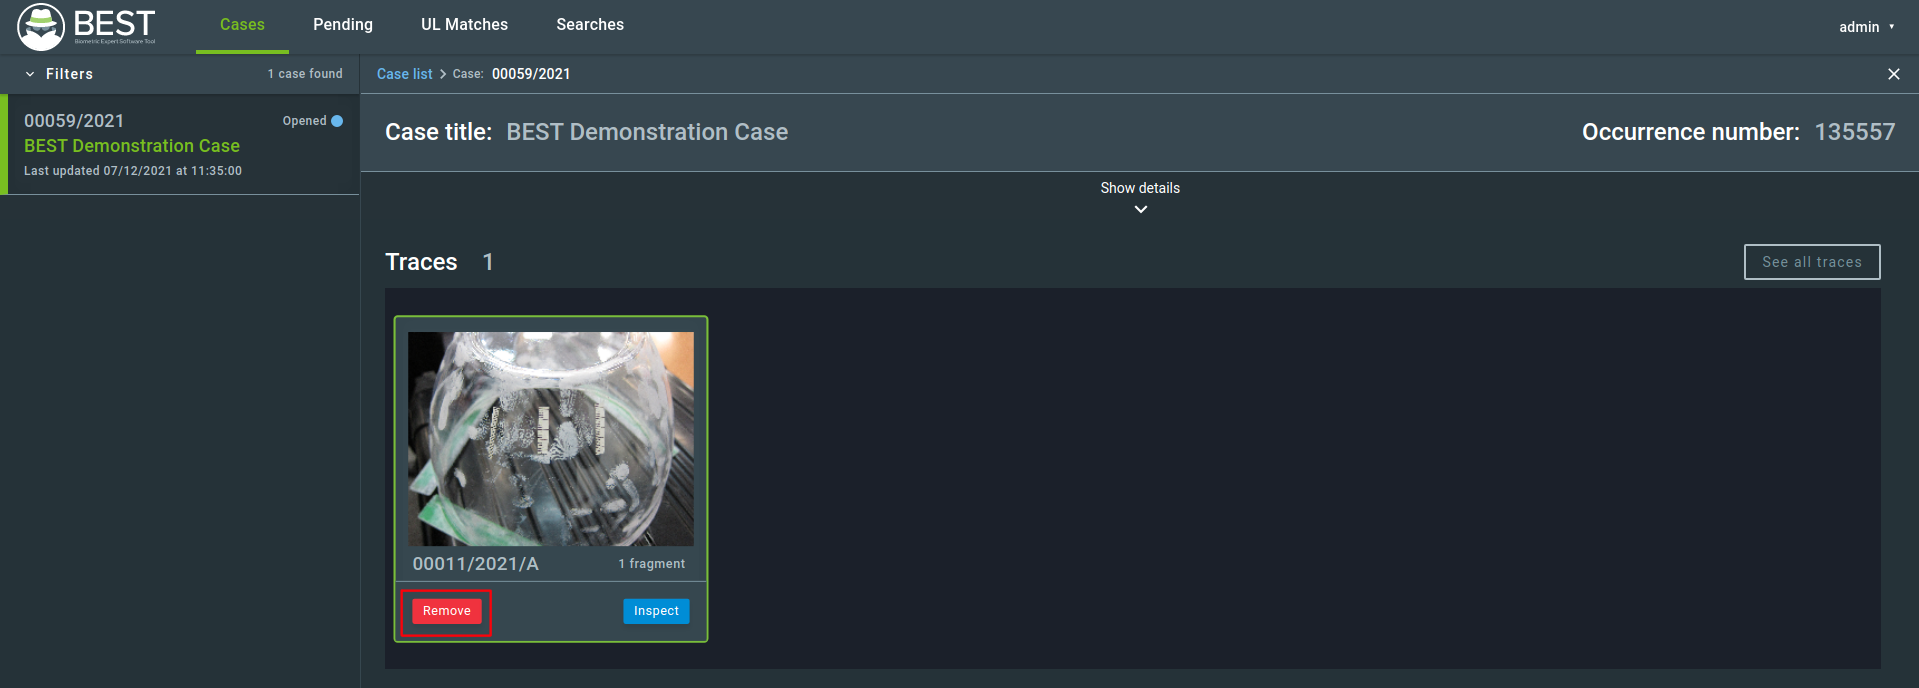
A trace can not be removed if it has any fragment being searched or with a given HIT or NO HIT. If the fragment has a search in progress status, you can cancel it following the Discarding Fragment instructions. When no fragment prevents the trace to be removed, you can remove the trace by hovering it in the case main screen and clicking the Remove button.
Important
If there are multiple traces, all traces must be removed individually before canceling the case.
Caution
You CAN NOT cancel a case with a fragment in a final status (HIT or NO HIT).
11. Pending - Double Blind
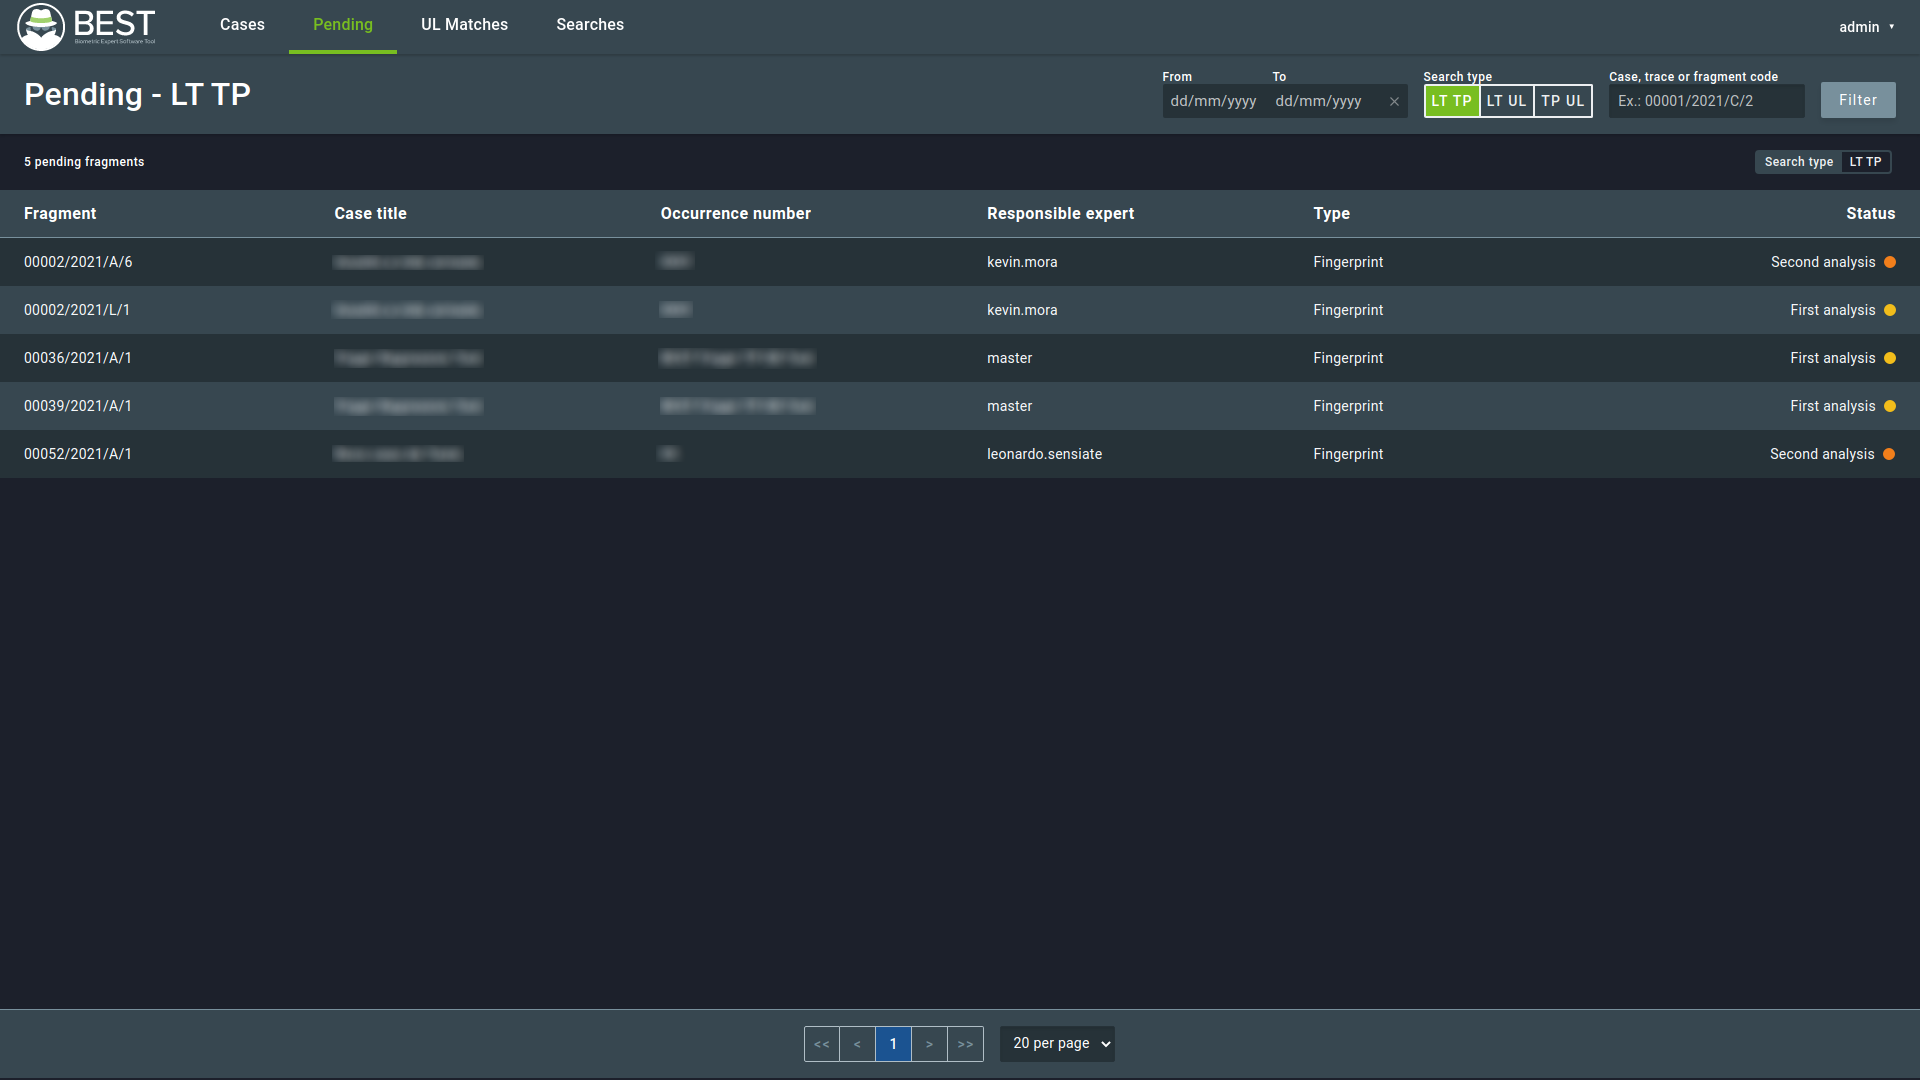
This tab is only available when the Double Blind analysis is enabled. You can access it through the main screen and it shows the fragments pending validation. The Double Blind analysis is used when there is a need for every HIT or NO HIT to pass through a blind double-check to confirm the decision.
There are two possible status for the analysis: First Analysis and Second Analysis. The first indicates that one analysis has been performed, which needs confirmation through Double Blind. It is marked with a yellow dot. The Second Analysis indicates that the double-blind analysis resulted in a different conclusion than the first analysis: one was considered a HIT, and the other was considered a NO HIT, meaning that the supervisor’s final verdict is needed. It is indicated with an orange dot.
Note
You need to have supervisor permissions to see cases that need a second Double Blind analysis.
Note
The first and second Double Blind analyses are performed over the same search results as the original analysis.
Important
The second expert - the one who performs the first double-blind analysis - does not have information about the first decision given for the case.
Note
The amount of information available for the supervisor about the previous analyses can be configured.
12. UL Matches
You can access the Unsolved Latent Matches list by clicking on UL Matches at the main screen’s top menu. The screen will show all matches between UL fragments and Tenprint (TP) candidates. It will also present the matching score, the document and name of the candidate, the fragment code, the occurrence number, the responsible expert, and the crime type.
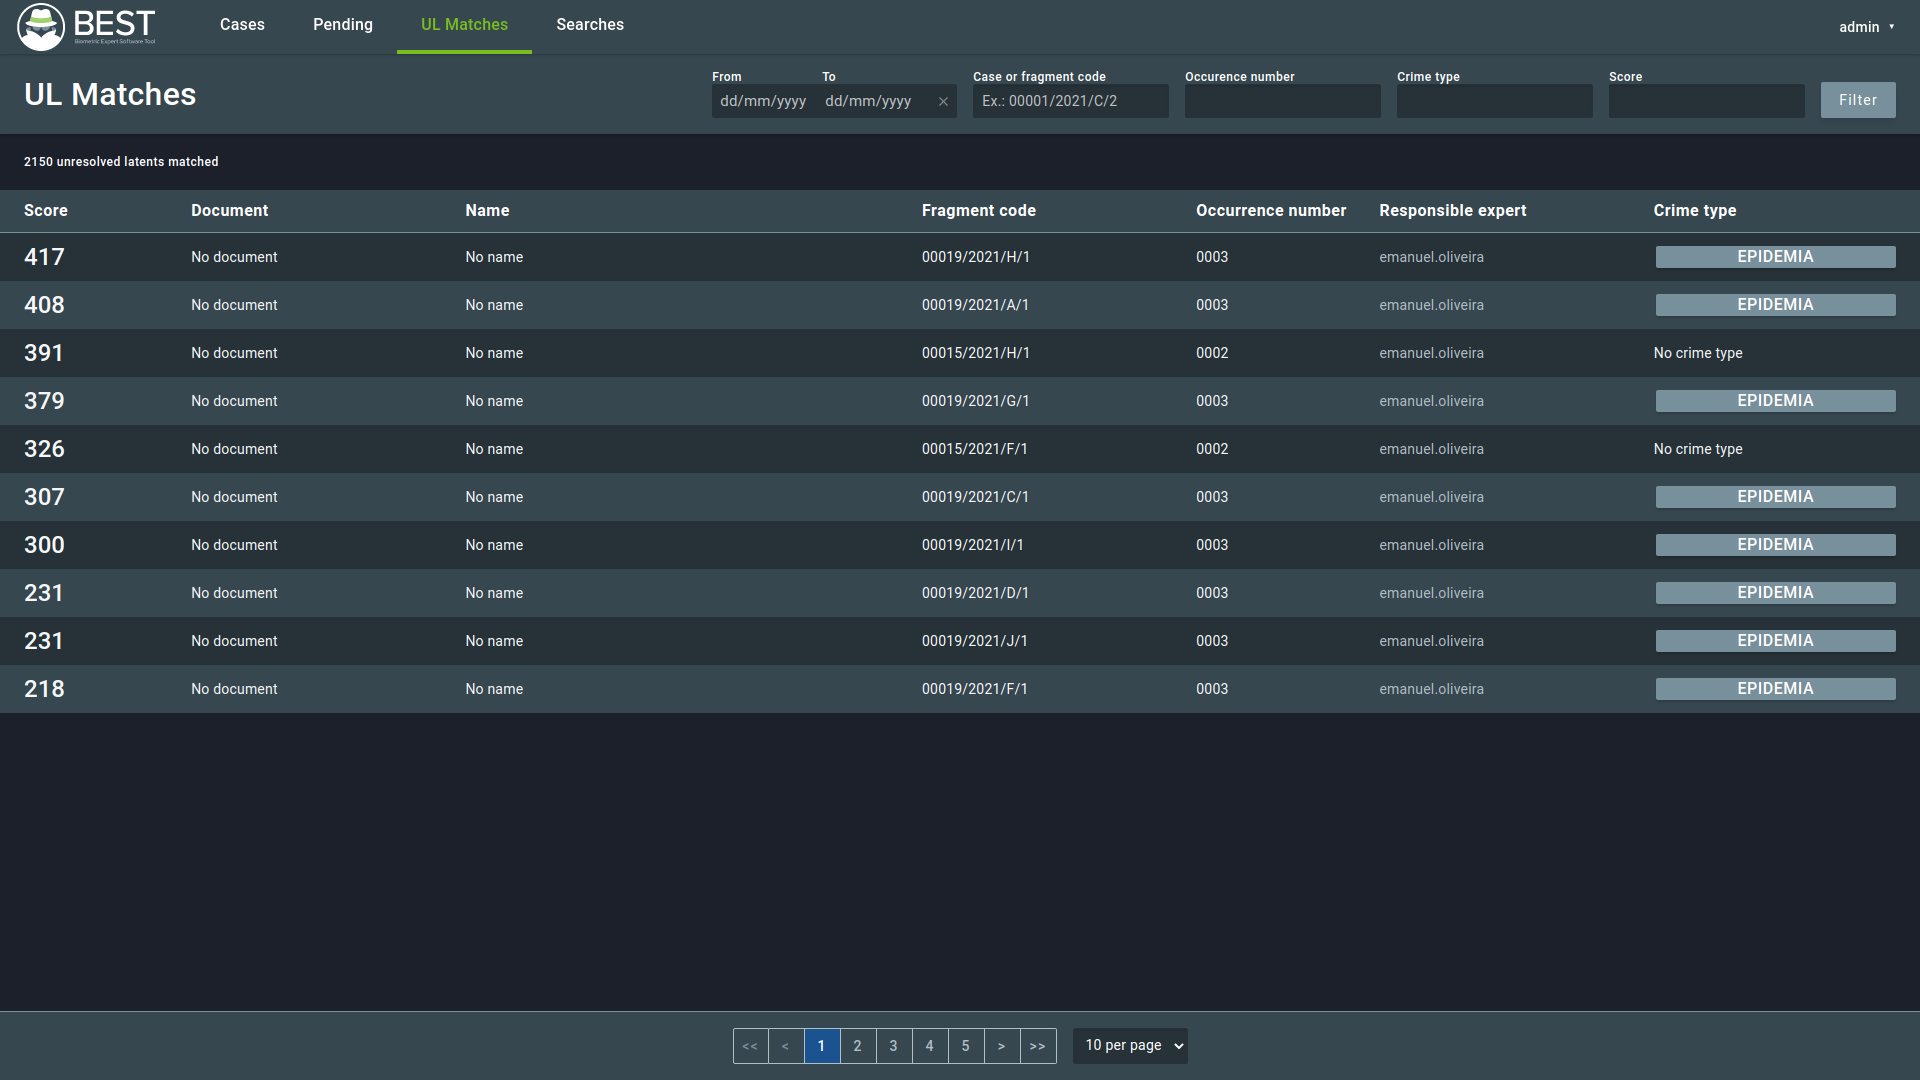
Clicking a UL Candidate profile will redirect you to the fragment edition screen.
13. Searches
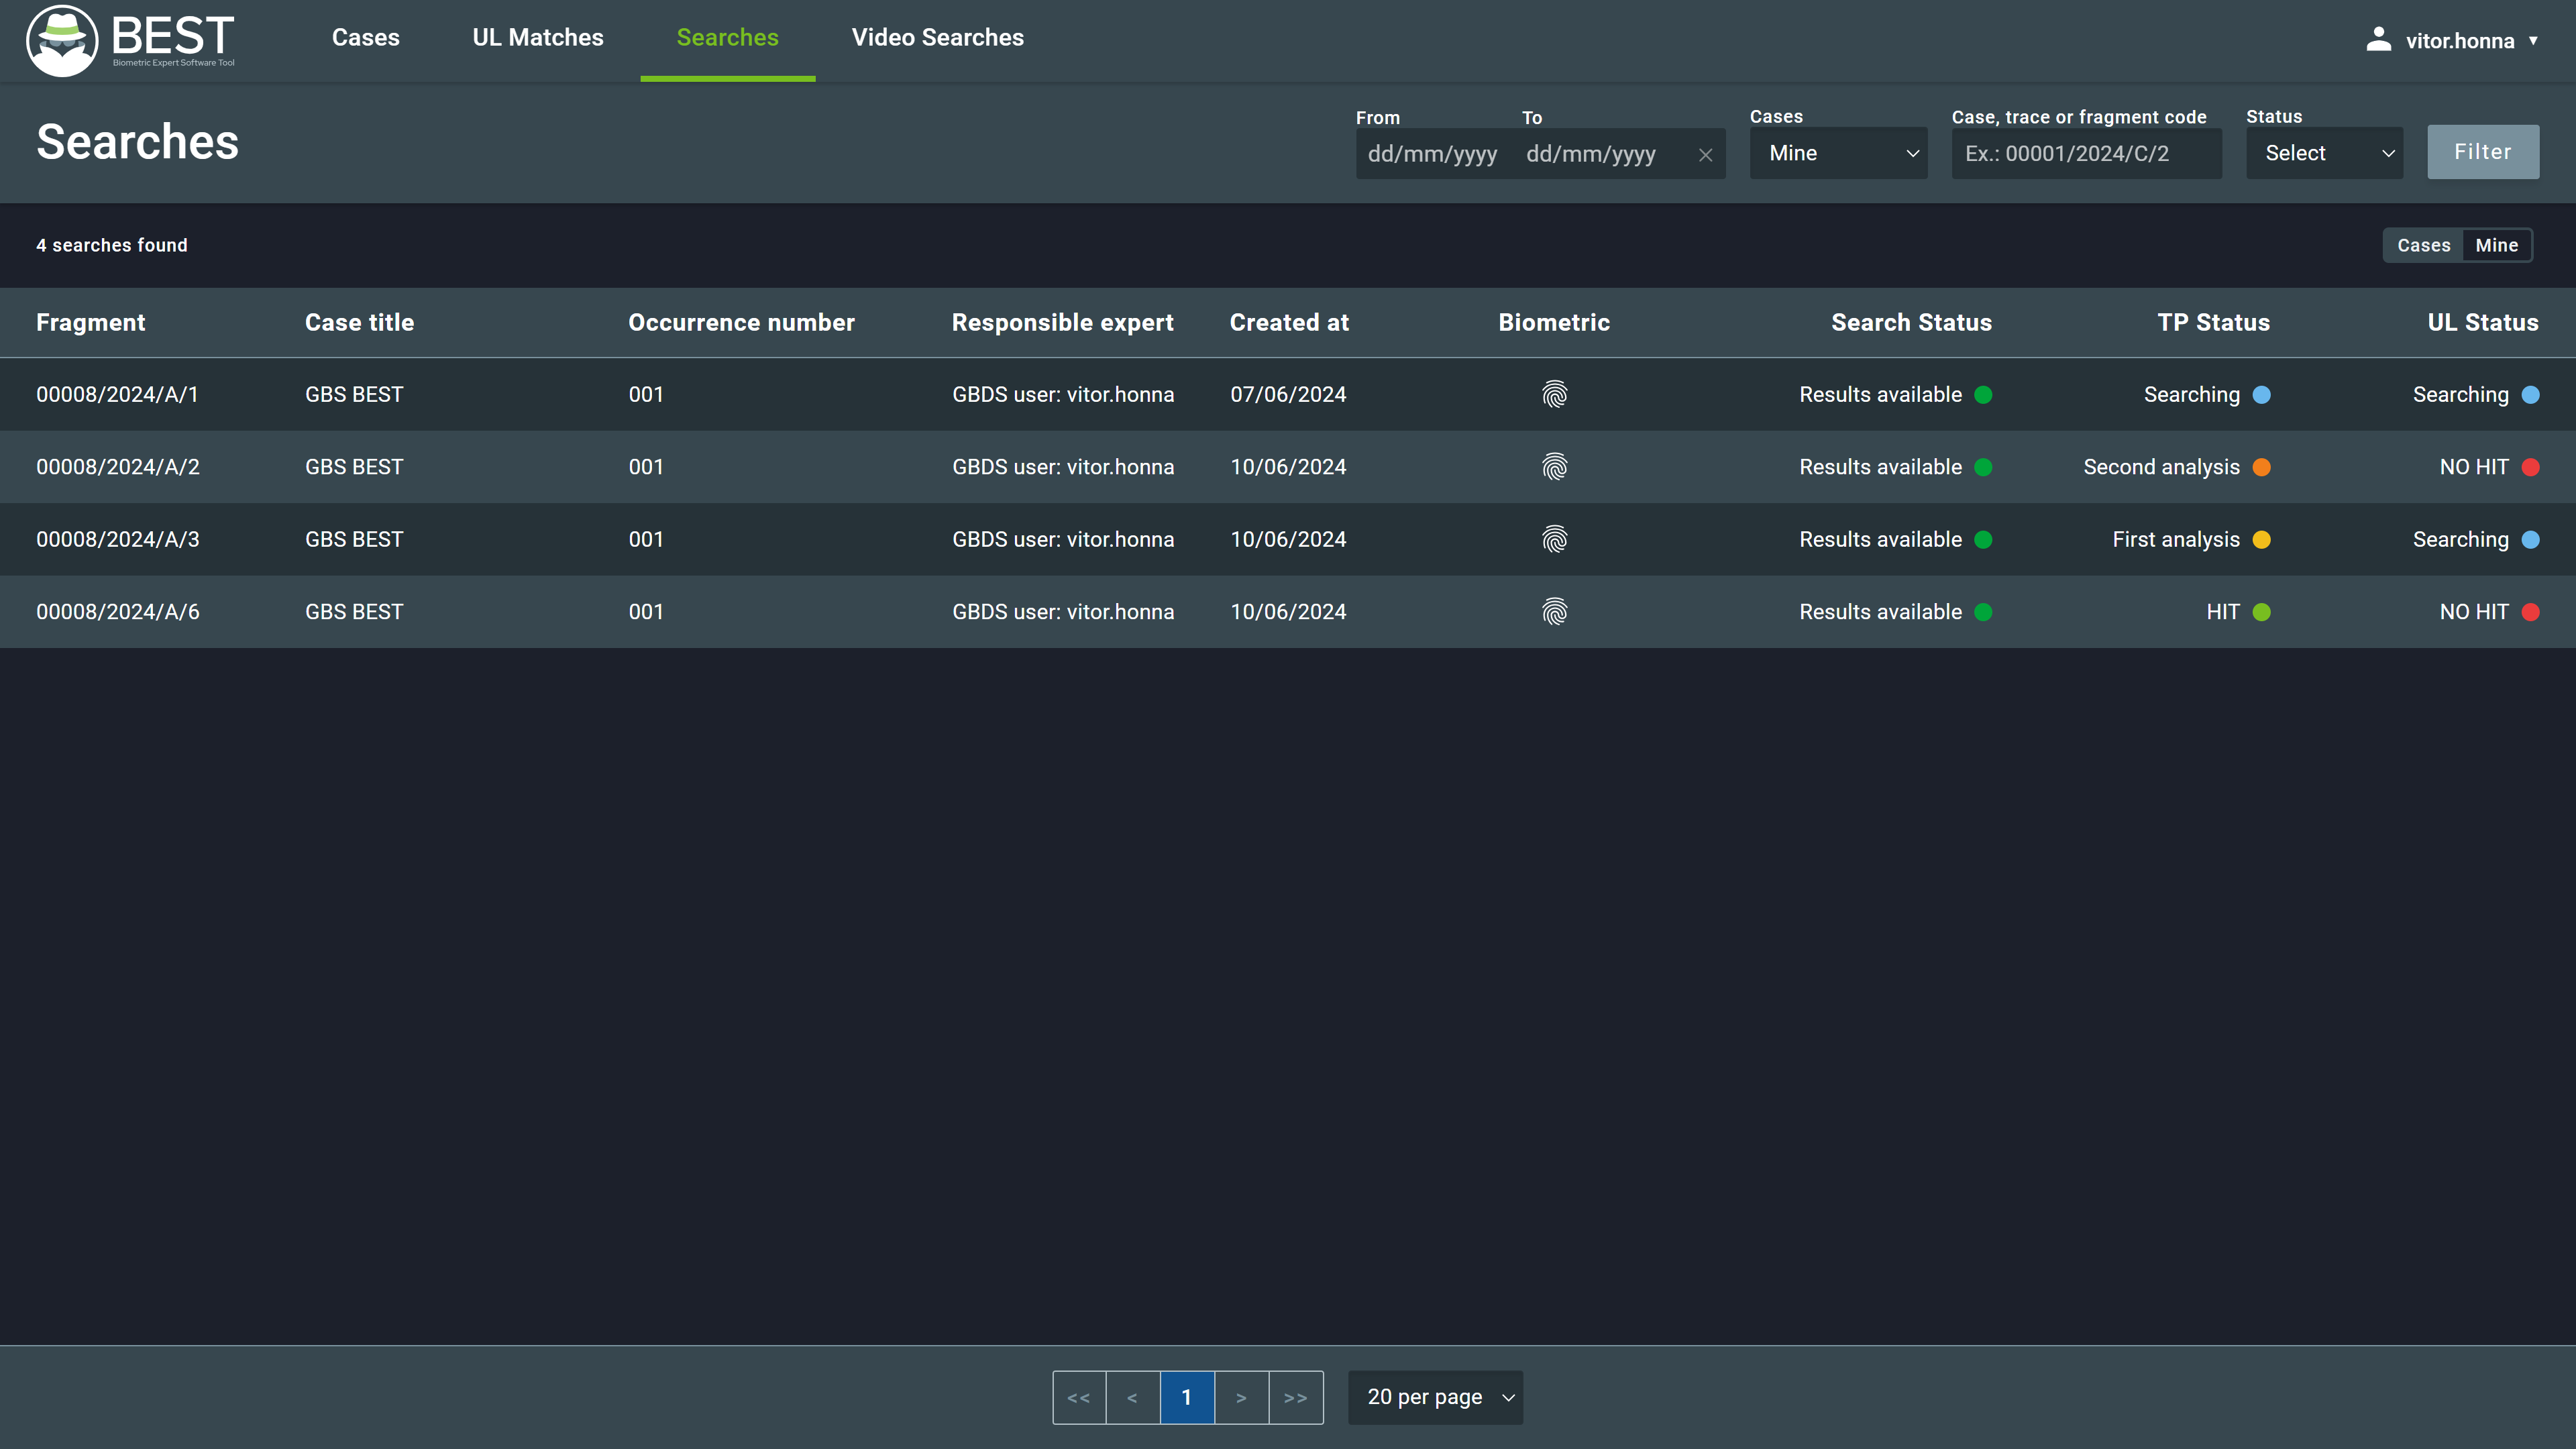
The searches tab lists all searches that have been submitted. This tab displays, for each search, its fragment, case title, occurrence number, responsible expert, search creation date, biometric type, search status, and analysis status for TP and UL. The search status can be:
In progress, marked with a yellow dot. It happens when the search is being processed or enqueued and waiting.Results available, marked with a green dot. It happens when the search is finished and the results are available for analysis.
Also, the TP and UL status can be:
HIT, identified by a green dot.NO HIT, identified by a red dot.Searching, identified by a blue dot.First AnalysisandSecond Analysis, identified by a yellow dot. It happens when Double Blind is active.
14. Performance Tracking
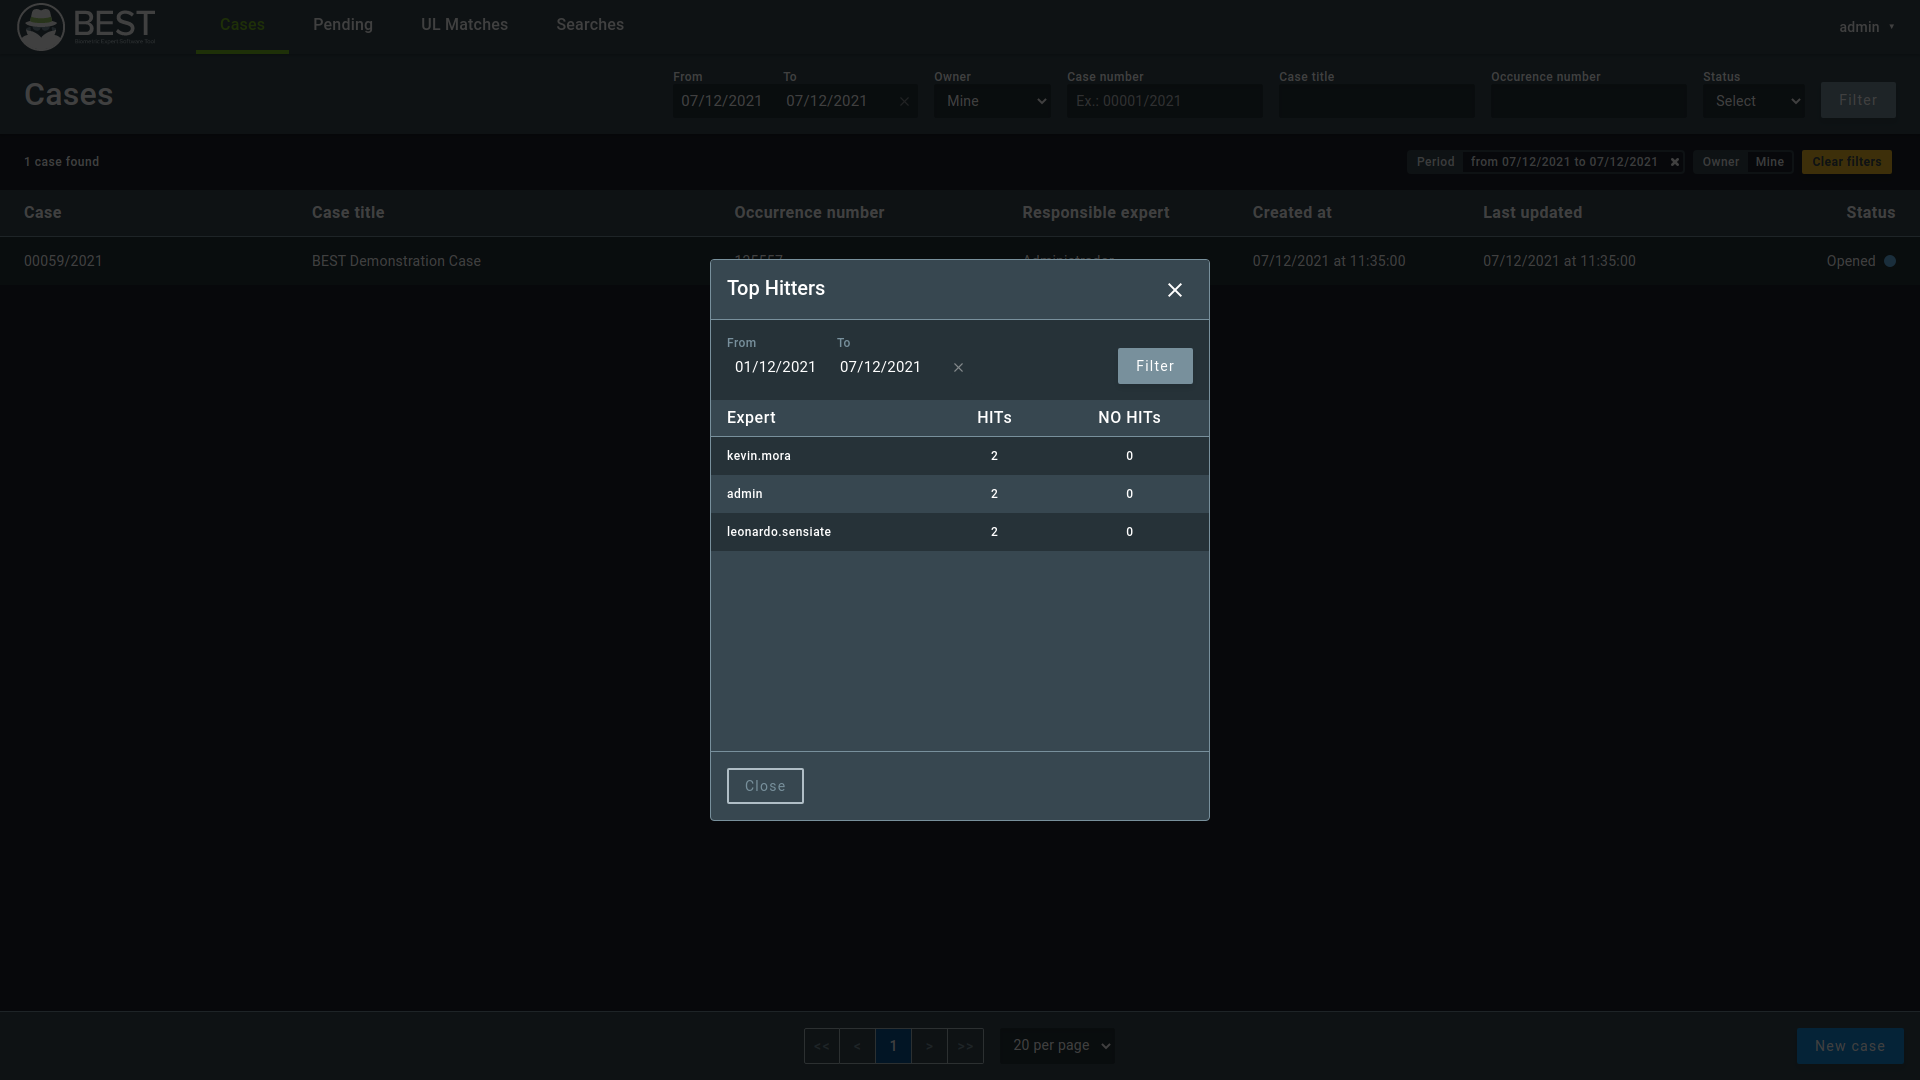
BEST provides two tools for performance tracking: The Top Hitters and the Activity Report. Both can be accessed anytime through the dropdown menu at the upper-right corner, as shown in the image below.

The Top Hitters option will show a list of the experts ranked by HITs and NO HITs performed within a defined period of time.
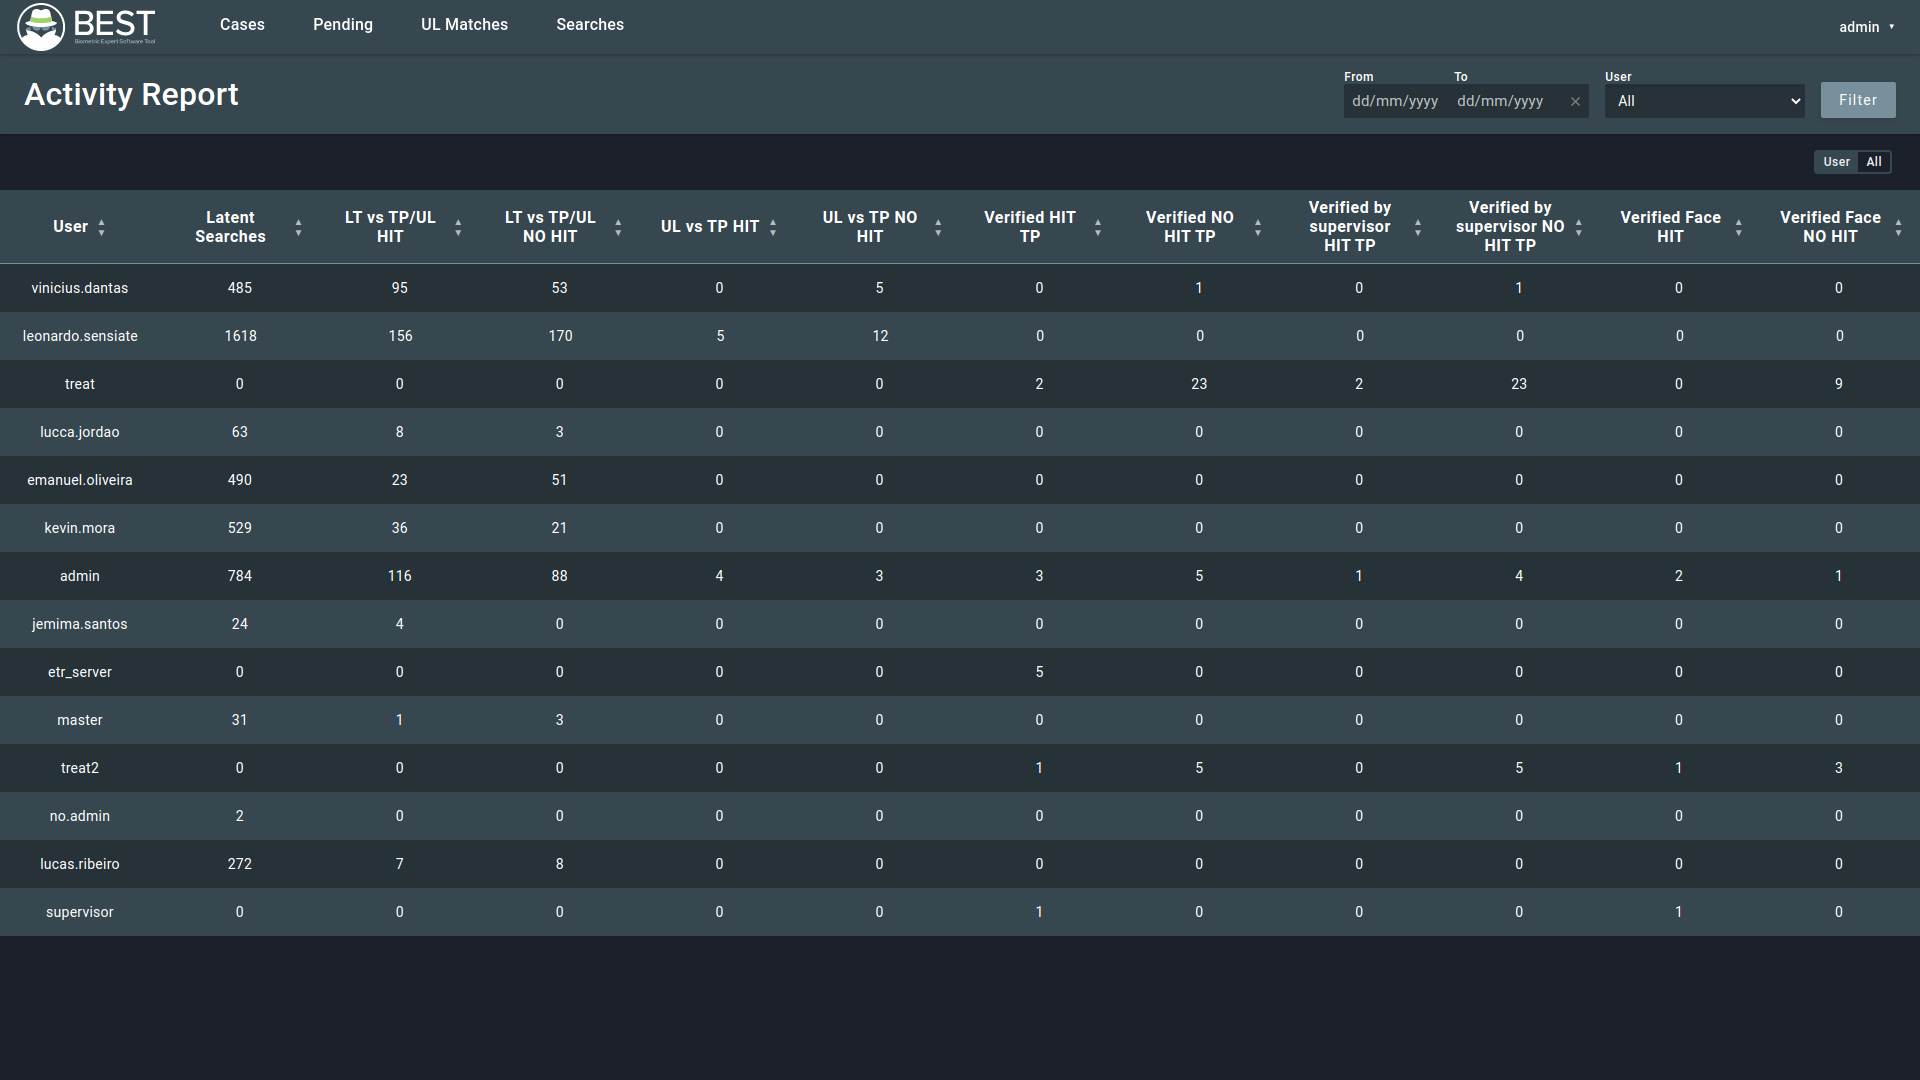
The Activity Report is an ample review of the usage of BEST, listing the searches performed and actions taken by each expert. The Activity Report screen will present the data for of all experts, as shown in the image below.
15. Settings
On this screen, there are options for the users to set their usage preferences:
- Theme: dark or light;
- Language;
- Time format: 12-hour clock (AM/PM) or 24-hour clock;
- Date format: dd/mm/yyyy, mm/dd/yyyy, or yyyy/mm/dd;
- Minutiae size - Defines the size of the minutiae;
- Minutiae fill - Defines whether the minutiae outline will be thin or thick and filled;
- Minutiae arrow - Defines the length of the minutiae orientation arrow;
- Minutiae transparency - Defines the transparency of the minutiae;
- Minutiae quality colors;
- Restore to default button - to restore colors to default.
- Show ignored candidates label - This will label a candidate as “Ignored” in the candidates list whenever you choose another candidate to view.
The Settings page also presents information about BEST and its components versions.

16. Shortcuts
This section lists the keyboard shortcuts according to the BEST screens.
16.1. Cases Screen
| Shortcut | Description |
|---|---|
| Shift+N | Opens the Create New Case window |
| Shift+N | Close the Create New Case window |
16.2. Case Screen
| Shortcut | Description |
|---|---|
| Alt+S | Exit the case |
| Shift+E | Add Expert |
| Shift+P | Add POI |
| Shift+N | Add Trace |
16.3. Report Screen
| Shortcut | Description |
|---|---|
| Alt+S | Return to the Reports screen |
| Alt+A | Open Edit Report Screen |
16.4. Edit Report Screen
| Shortcut | Description |
|---|---|
| Alt+C | Toggle Show Circles around minutiae |
| Shift+S | Save report editions |
| Alt+S | Return to the report |
| 1 | Select tool |
| Q | Create neutral minutia tool |
| W | Create termination minutia tool |
| E | Create bifurcation minutia tool |
| R | Create core tool |
| T | Create delta tool |
| A | Create matches tool |
| S | Erase minutiae tool |
| D | Erase all minutiae from fragment |
| F | Erase all minutiae from candidate |
| G | Show/hide ruler |
| H | Synchronized pan and zoom |
| Z | Show/hide minutiae |
| X | Show/hide cores and deltas |
| C | Toggles matches visibility |
| V | Crop tool |
| B | Distribute matches |
16.5. Fragment Screen
| Shortcut | Description |
|---|---|
| Shift+P | Perform a New Search |
| Shit+Alt+P | Go to Search window |
| Shift+R | Edit Resolution |
| + or Shift++ | Zoom in |
| - or Shift+- | Zoom out |
| Alt+A | Show details |
| Alt+S | Exit fragment screen |
| Ctrl+Shift+Z | Undo filter |
| Ctrl+Shift+Y | Redo filter |
| Ctrl+Z | Undo |
| Ctrl+Y | Redo |
| A | Erase all minutiae tool |
| D | Extract minutiae automatically |
| 1 | Select tool |
| 2 | Move minutiae tool |
| 3 | Rotate tool |
| Q | Create neutral minutia tool |
| W | Create termination minutia tool |
| E | Create bifurcation minutia tool |
| R | Create core tool |
| T | Create delta tool |
| A | Erase minutiae tool |
| S | Create matches tool |
| D | Show/hide ruler |
| Z | Show/hide minutiae |
| X | Show/hide cores and deltas |
| C | Toggle matches visibility |
| V | Crop tool |
| B | Distribute matches |
| N | Open filters |
16.6. Free Hand Screen
| Shortcut | Description |
|---|---|
| D | Erase all Latent minutiae |
| F | Erase all candidate minutiae |
| G | Extract latent minutiae automatically |
| H | Extract candidate minutiae automatically |
| 1 | Select tool |
| 2 | Move minutiae tool |
| Q | Create neutral minutia tool |
| W | Create termination minutia tool |
| E | Create bifurcation minutia tool |
| R | Create core tool |
| T | Create delta tool |
| A | Create matches tool |
| S | Erase minutiae tool |
| J | Show/hide ruler |
| K | Synchronized pan and zoom |
| Z | Show/hide minutiae |
| X | Show/hide cores and deltas |
| C | Toggle matches visibility |
| V | Auxiliary image: binarized |
| B | Auxiliary image: ridge lines |
| N | Crop tool |
| M | Distribute Matches |
16.7. Search Screen
| Shortcut | Description |
|---|---|
| Shift+N+H | No Hit |
| Shift+H | Hit |
| Shift+A | Collapse list sidebar |
| Shift+E | Open Free Hand |
| Shift+Q | Open the Fragments screen |
| Shift+W | Open profile |
| Shift+P | New Search |
| Shift+C | Open the search configurations |
| Alt+S | Exit search screen |
| Left Arrow++ or Shift+Left Arrow++ | Left image zoom in |
| Left Arrow+- or Shift+Left Arrow+- | Left image zoom out |
| Right Arrow++ or Shift+Right Arrow++ | Right image zoom in |
| Right Arrow+- or Shift+Right Arrow+- | Right image zoom out |
| 1 | Select tool |
| A | Show/hide ruler |
| S | Synchronized pan and zoom |
| Z | Show/hide minutiae |
| X | Show/hide cores and deltas |
| C | Toggle matches visibility |
| V | Auxiliary image: binarized |
| B | Auxiliary image: ridge lines |
16.8. Trace Screen
| Shortcut | Description |
|---|---|
| + or Shift++ | Zoom in |
| - or Shift+- | Zoom out |
| Shift+R | Set resolution |
| Alt+A | Show details |
| Alt+S | Open traces list |
| 1 | Select tool |
| 2 | Set resolution tool |
| Q | Fingerprint rectangle extraction tool |
| W | Palmprint rectangle extraction tool |
| E | Iris rectangle extraction tool |
| R | Face rectangle extraction tool |
| A | Fingerprint polygon extraction tool |
| S | Palmprint polygon extraction tool |
| D | Iris polygon extraction tool |
| F | Face polygon extraction tool |
| Z | Face recognition tool |
16.9. UL Match Screen
| Shortcut | Description |
|---|---|
| Shift+Q | Open Free Hand |
| Shift+W | View Profile |
| Shift+N+H | No Hit |
| Shift+H | Hit |
| 1 | Select tool |
| A | Show/hide ruler |
| S | Synchronized pan and zoom |
| Z | Show/hide minutiae |
| X | Show/hide cores and deltas |
| C | Toggle matches visibility |
| V | Auxiliary image: binarized |
| B | Auxiliary image: ridge lines |
