1. Introduction
GBS Print is a web app for managing and printing identity documents. It receives documents to be printed and groups them into batches. The batches are then printed, scanned, and checked to ensure the documents were printed correctly and that each document is linked to the unique typographic code (bar code) present in the document paper received from the printing house. Then, the batches of checked documents are grouped into packages and sent to the stations for distribution. GBS Print also allows the user to configure the printers used to print the documents and generate reports about the documents processed.
This manual is updated for Print version 1.0.0.
1.1. Access and Authentication
The application should be accessed with a web browser (Google Chrome is recommended). The URL for access is specific to each deployment. If necessary, contact Griaule’s support team to obtain the correct URL.
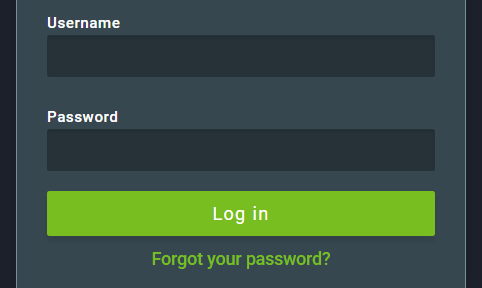
Authentication is required to access the application. The credentials required are username and password.
Note
At the bottom of the screen there is an option to change the user interface language. This option is also available in the Settings menu after logging in.
1.2. Two-factor Authentication (2FA)
When two-factor authentication (2FA) is turned on, the first time you try to log in, after entering your username and password, you’ll be shown a QR Code that must be registered in Google Authenticator.
Note
Google Authenticator is a time-based code generator that is available as an application for Android and iOS smartphones.
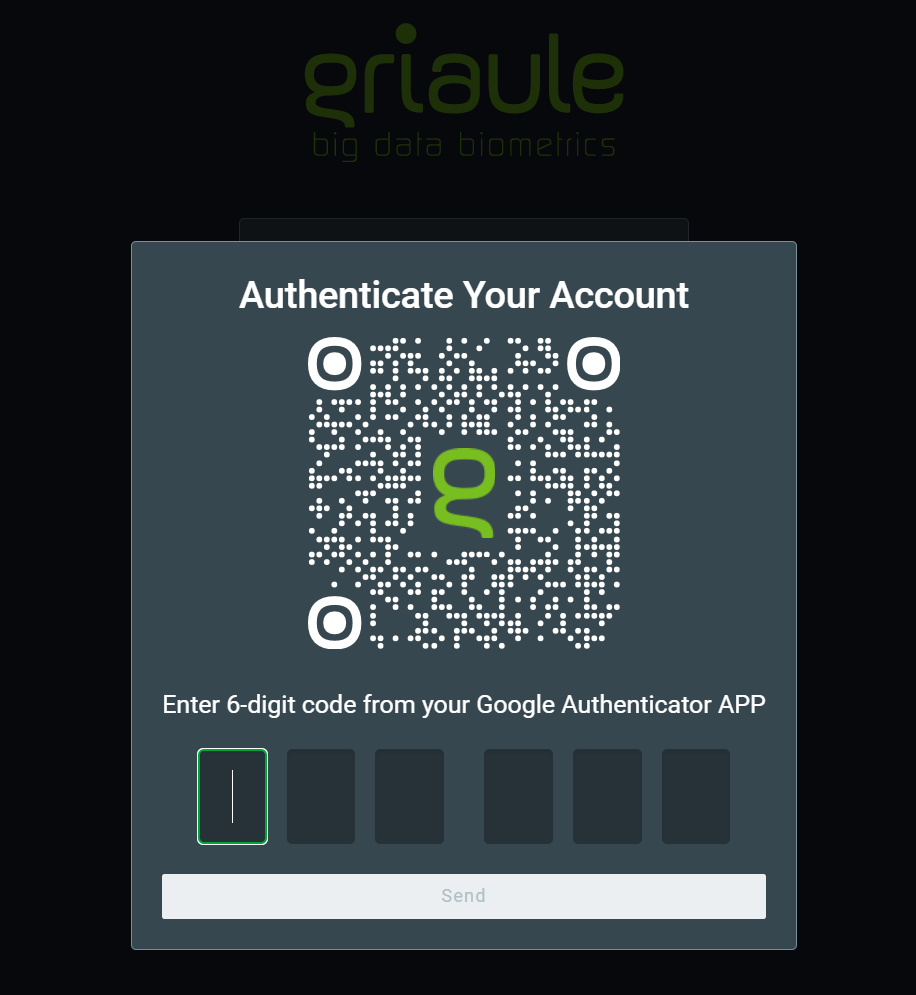
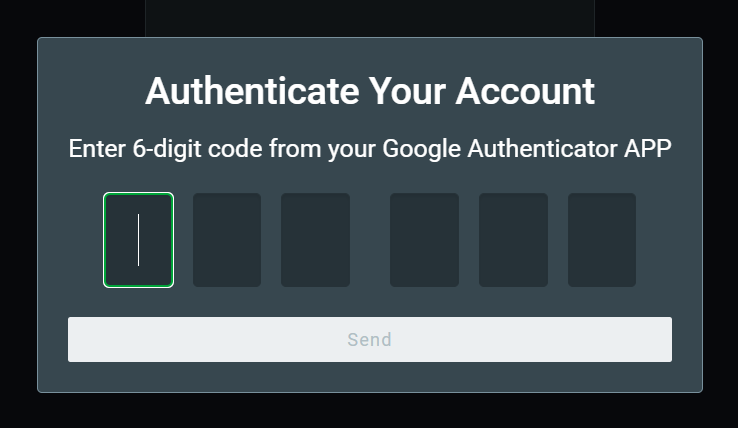
After successfully registering the QR Code in Google Authenticator, enter the unique time-sensitive 6-digit code and click on Send.
You will only need to register the QR Code once. But for each subsequent login, you will be asked to enter the 6-digit code generated by Google Authenticator.
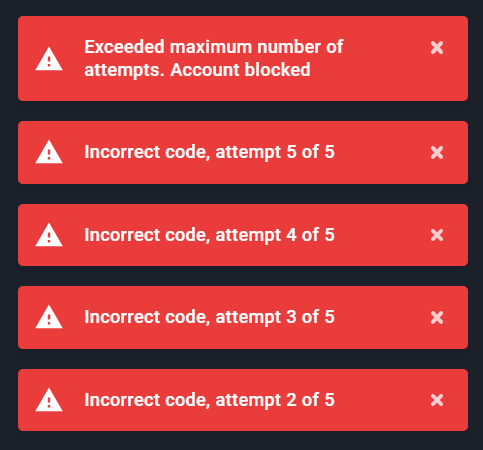
There is a limited number of unsuccessful login attempts a user can make. Every time an incorrect code is entered, an error message will be shown:
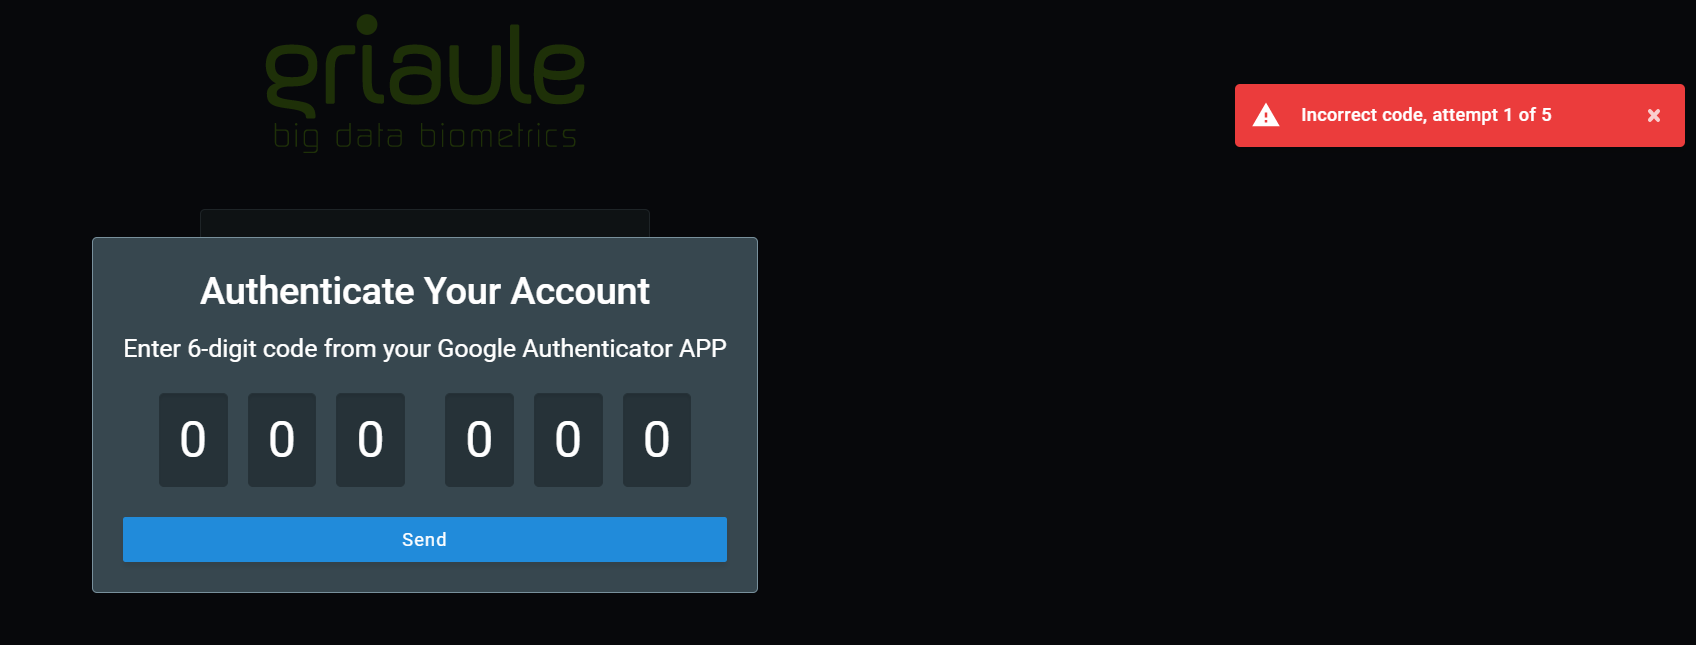
If you reach the maximum amount of unsuccessful login attempts, your account will be automatically blocked.
Warning
If your account is blocked, contact your system administrator.
1.3. Simultaneous Login and Browser Enrollment
Only one session per user is allowed. It is not possible to log in with the same profile more than once in the application. If an user is already logged in and another access happens using the same username and password, the user with the oldest session will be warned and logged out in their next action.
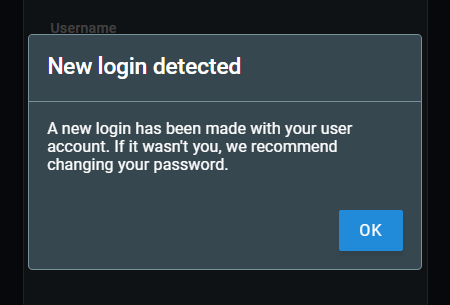
Also, only one browser may be used at a time. When trying to log in using a different browser, the user will be informed that it is necessary to authenticate the new browser. The authentication of a new browser will revoke the access from the previous one.
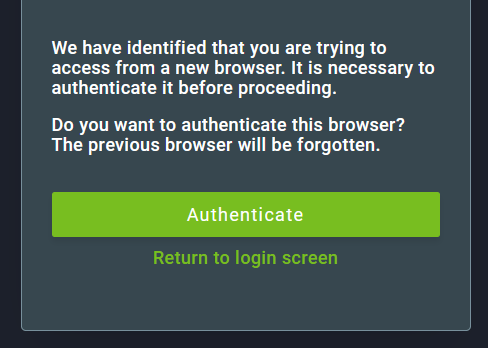
To authenticate a new browser, click on Authenticate and then enter the verification code that will be sent to the email linked to the user account.

If the authentication is successful, a notification will appear on the upper-right corner of the screen after logging in.

1.4. Change or Reset your Password
For security reasons, you can change your password or reset it if you forget it.
1.4.1. Change your Password
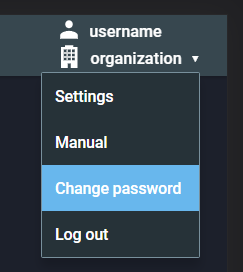
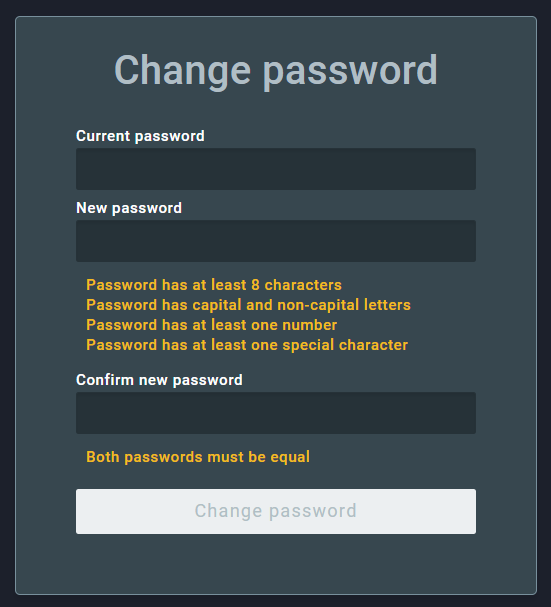
To change your password, after logging in, hover over your username on the upper-right corner of the screen and click on Change password.
Then, enter the current password and the new password two times. Make sure to meet the password requirements, they are listed under the new password field and will turn green when met. Finally, to confirm the change, click on Change password.
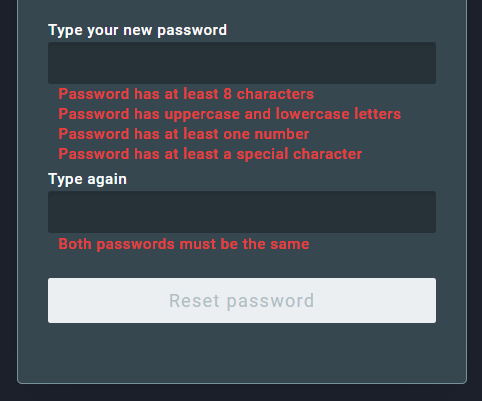
1.4.2. Reset your Password
To reset your password, on the login screen, click on Forgot your password?:
Then, enter the profile username and click on Send.
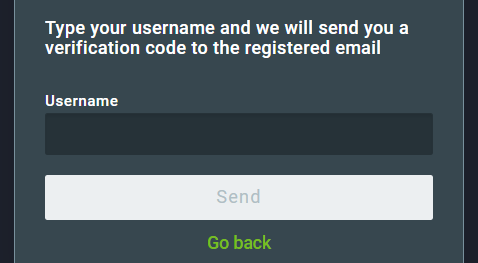
An email containing a verification code will be sent to the email address linked to that profile. Enter the verification code and click on Send code.
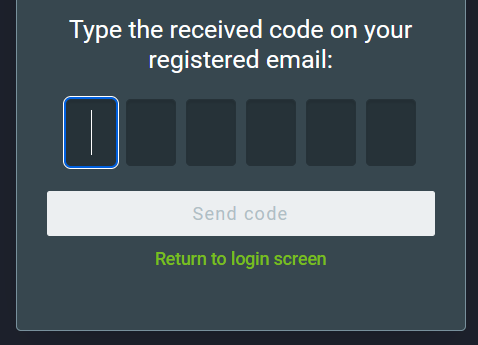
If the code is correct, you will be able to create a new password. Enter the new password two times. Make sure to meet the password requirements, they are listed under the new password field and will turn green when met. Finally, to confirm the reset, click on Reset password.
2. User Interface
After logging in, the user will be directed to the main screen of GBS Print. The user interface is divided into two main sections: the top bar and the main content area.
In the top bar, there are 5 tabs and a dropdown menu:

- Batches
- Check Print
- Packages
- Printers
- Reports
- Username Menu. Hovering over the username, there is a dropdown menu with additional options.
2.1. Batches
The Batches tab displays the list of document batches that have been created. A batch is a group of documents that will be printed together. The number of documents in a batch is configurable. The batches are organized in a table with columns for the batch ID, date of creation, layout, priority, station, number of documents in the batch, and its status.
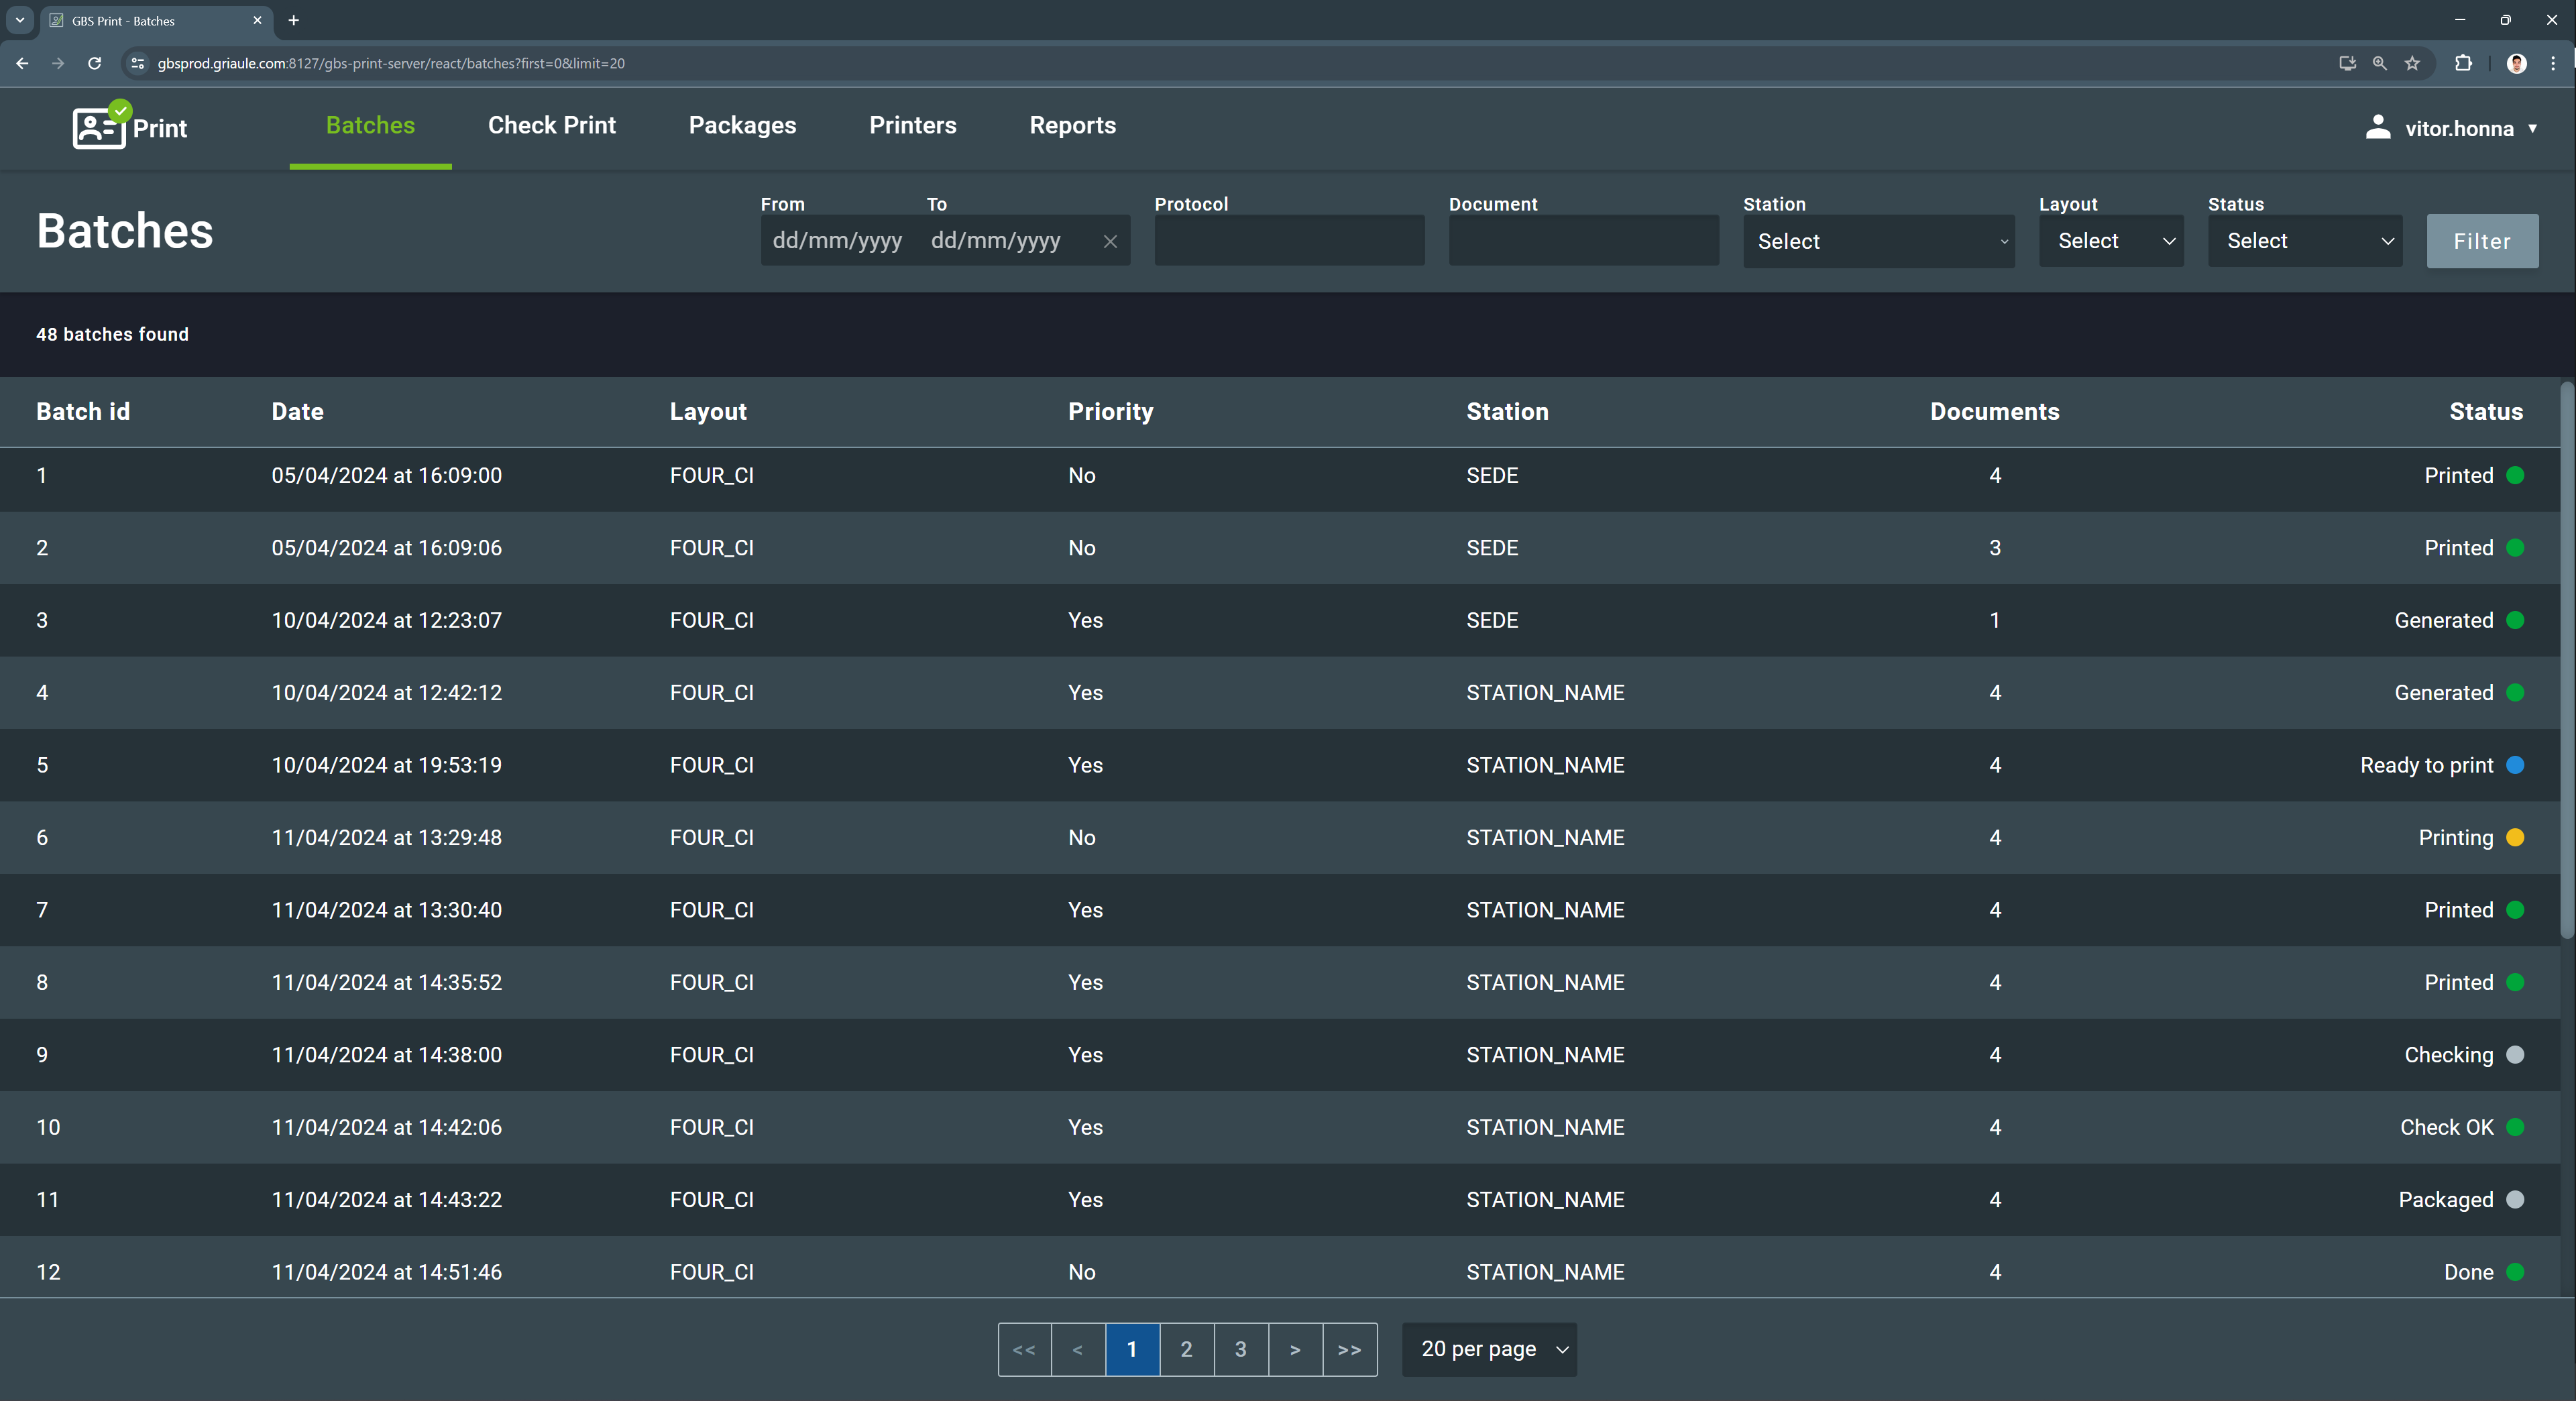
There are eight possible statuses for a batch:
| Status | Color | Description |
|---|---|---|
| Generated |
Green
|
Initial status. Documents are awaiting printing. |
| Ready to print |
Blue
|
Print command has been registered, and documents are ready to be printed. |
| Printing |
Yellow
|
Documents are being printed. |
| Printed |
Green
|
All documents in the batch have been printed. |
| Checking |
Gray
|
Documents in the batch are being checked. |
| Check OK |
Green
|
All documents in the batch have been checked. The batch can be added to a package. |
| Packaged |
Gray
|
Batch has been added to a package and is awaiting dispatch to the designated location. |
| Done |
Green
|
Final status. The batch has been sent to the designated location. |
The batch status evolves as the documents are processed following the Print workflow. For further details, refer to Batch Status in the Workflows section.
On the upper-right side of the screen, there are filter options to help the user find specific batches. It is possible to filter by date range, protocol, document, station, layout, and status. To apply a filter, select the desired filters and click on Filter. Then, only the batches that meet the selected criteria will be displayed.
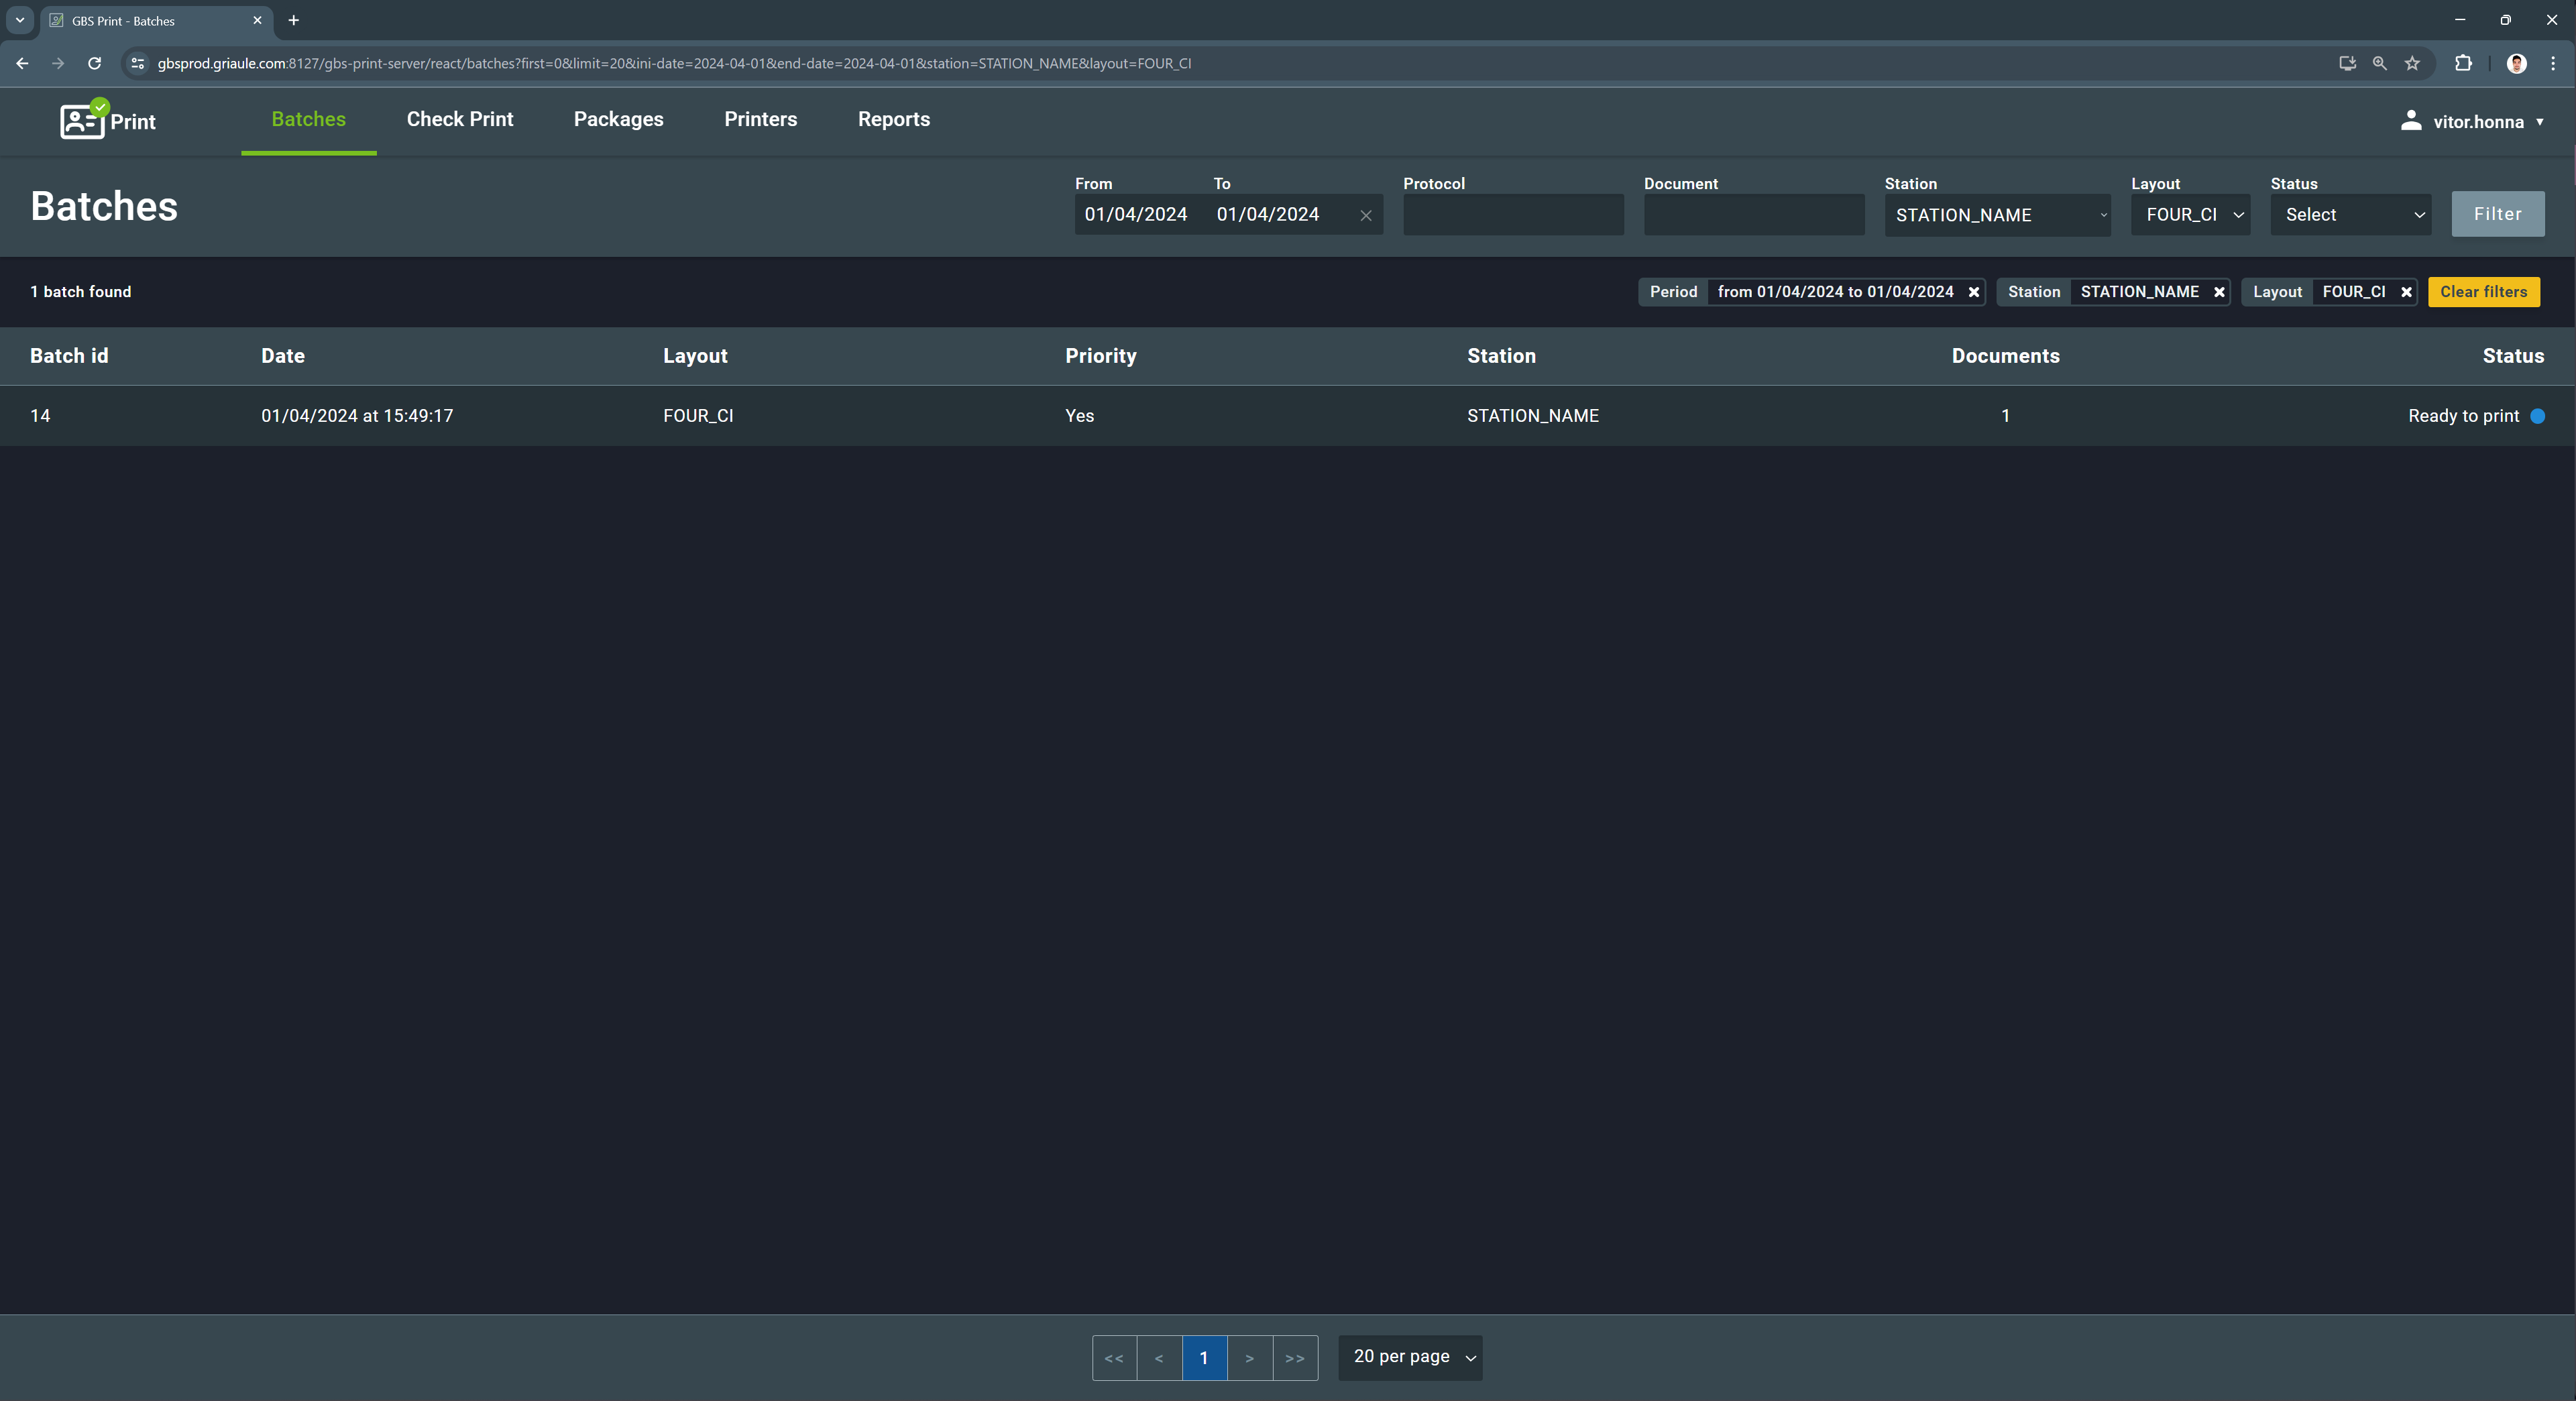
To remove a filter, click on the X button beside the applied filter, or click on the yellow button Clear filters to remove all the filters at once.

2.1.1. Batch details
Clicking on one of the batches from the list will open the Batch details screen. This screen displays the documents that are part of the batch, including the status of each document.
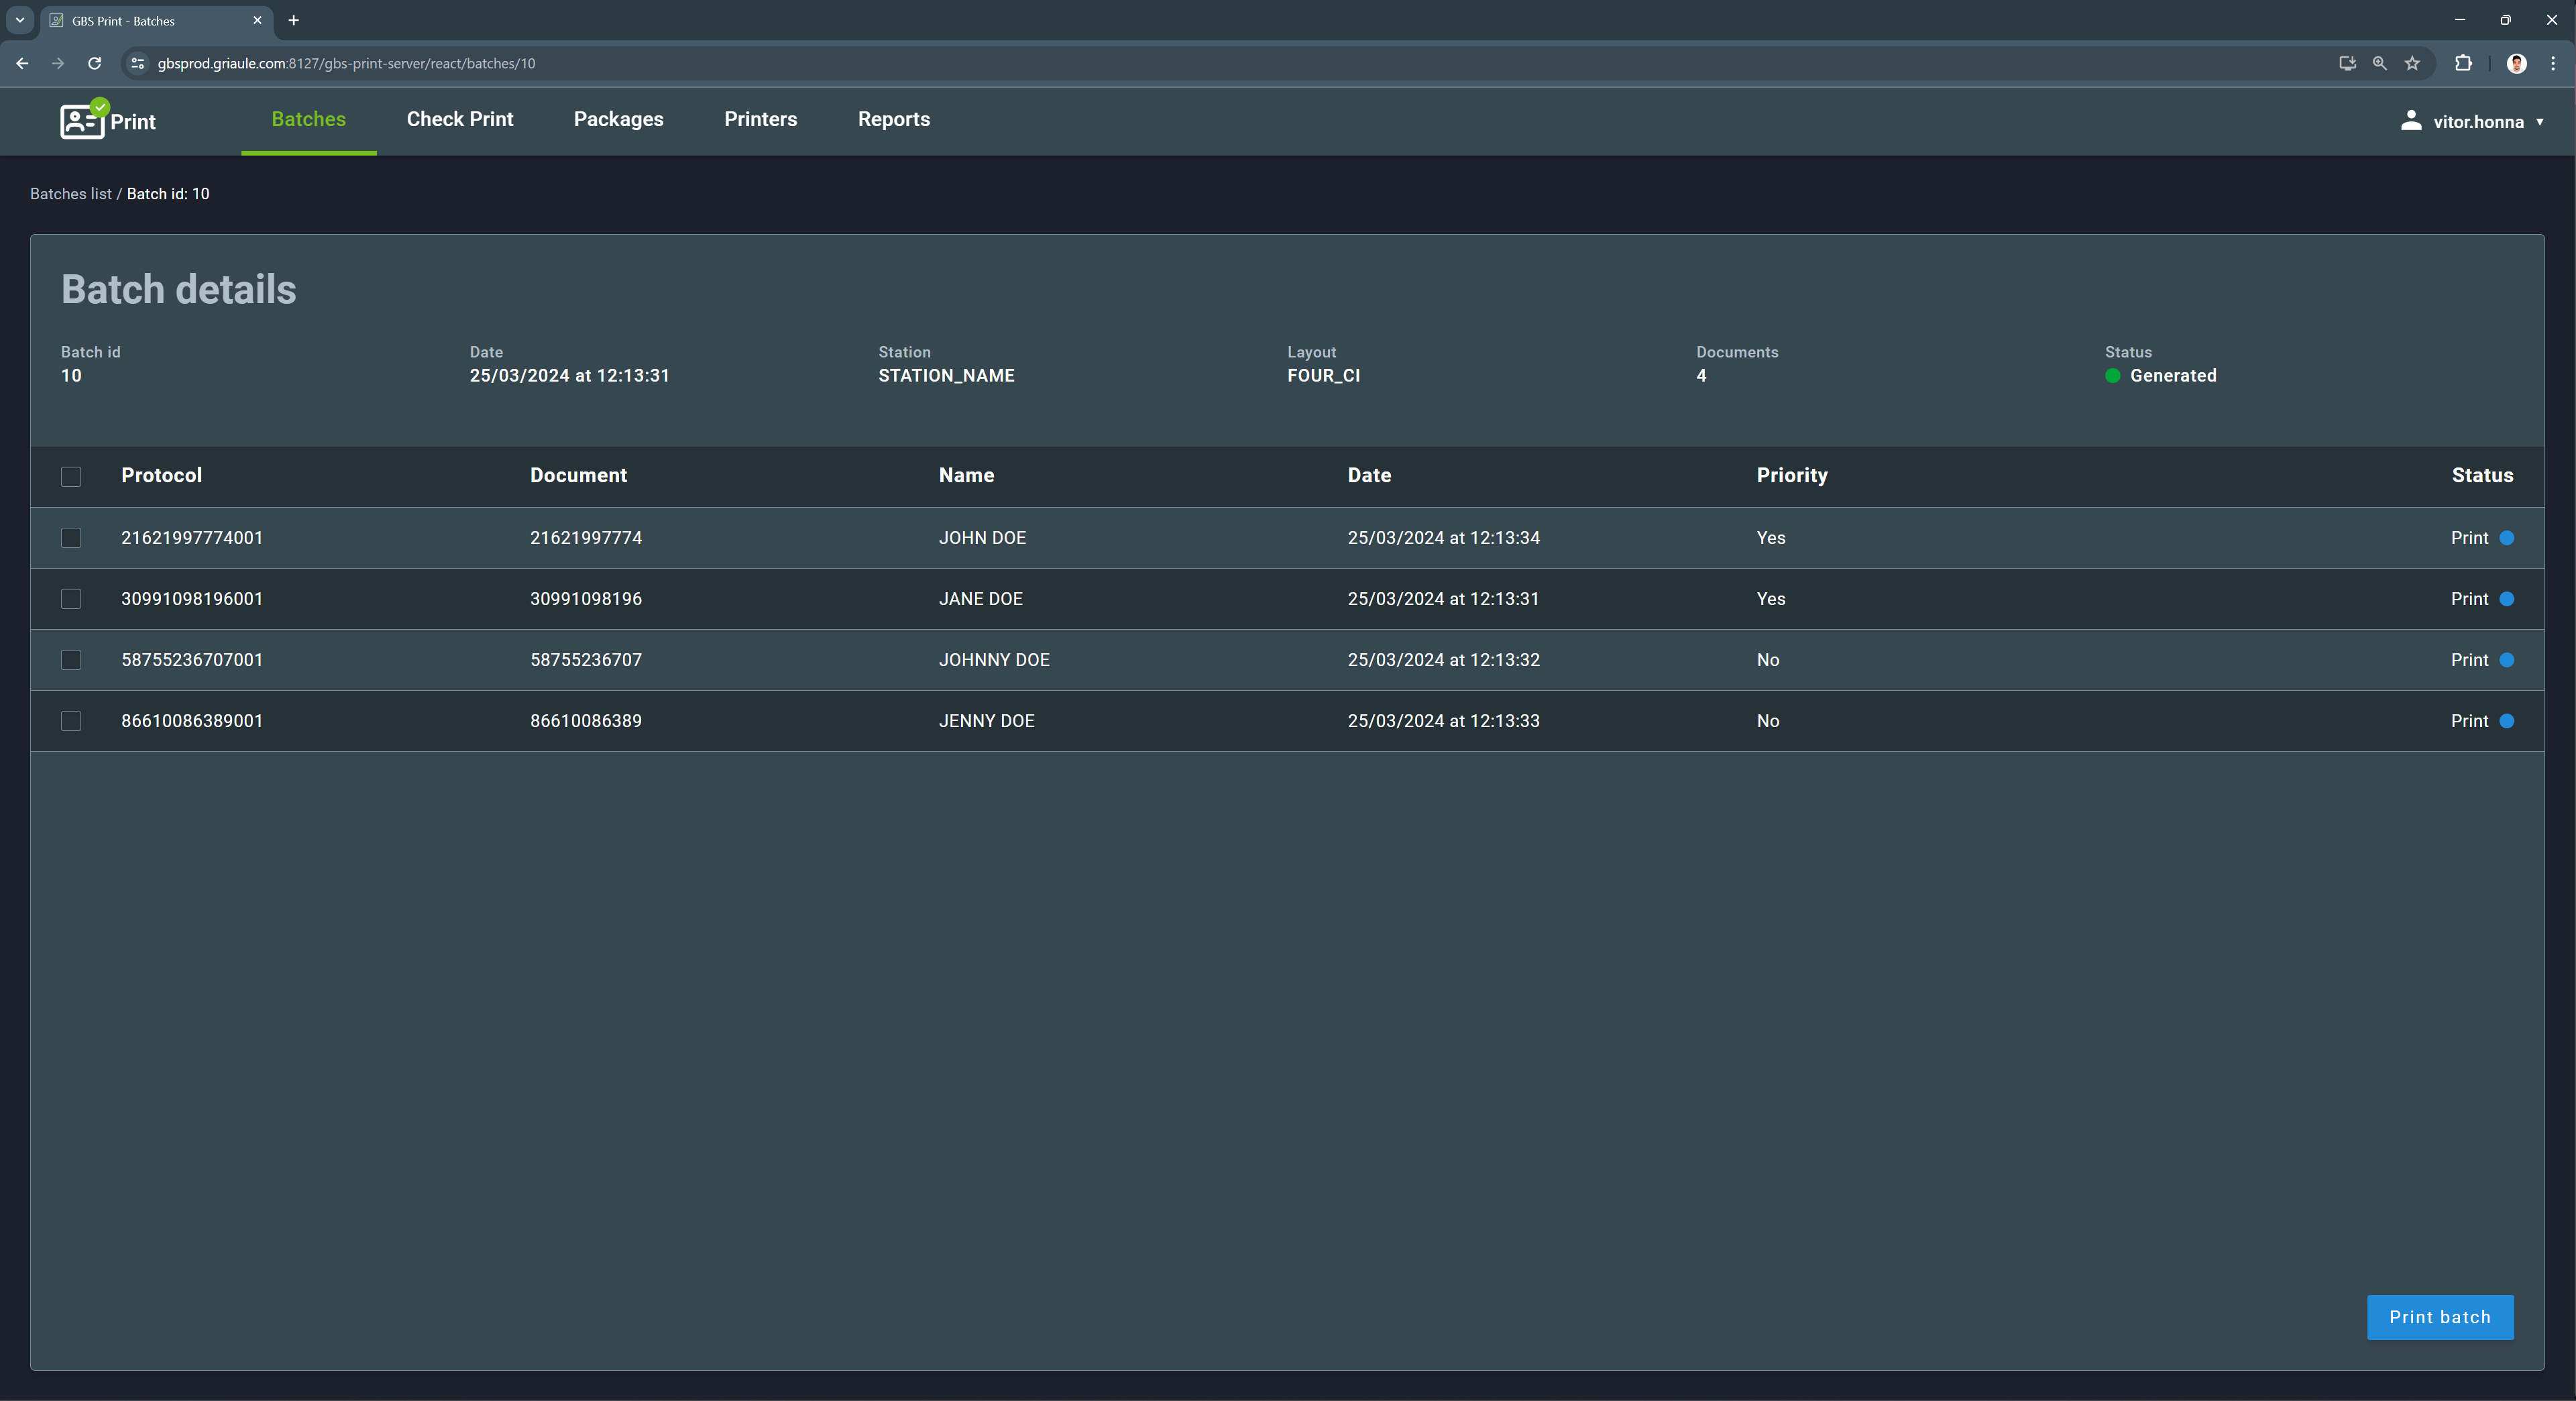
There are eight possible statuses for a document in a batch:
| Status | Color | Description |
|---|---|---|
Blue
|
Initial status. Document has been added to the batch and is awaiting printing. | |
| Printing |
Yellow
|
Document is being printed. |
| Printed |
Green
|
Document successfully printed. |
| Fail |
Red
|
Document printing failed. |
| Rejected |
Orange
|
There was a problem with the document after printing, and it was rejected by the user. |
| Check OK |
Green
|
Document successfully verified. |
| Cancelled |
Gray
|
Document cancelled by the user. |
| Done |
Green
|
Document has been sent to the designated location. |
The document status evolves as they are processed following the Print workflow. For further details, refer to Document Status in the Workflows section.
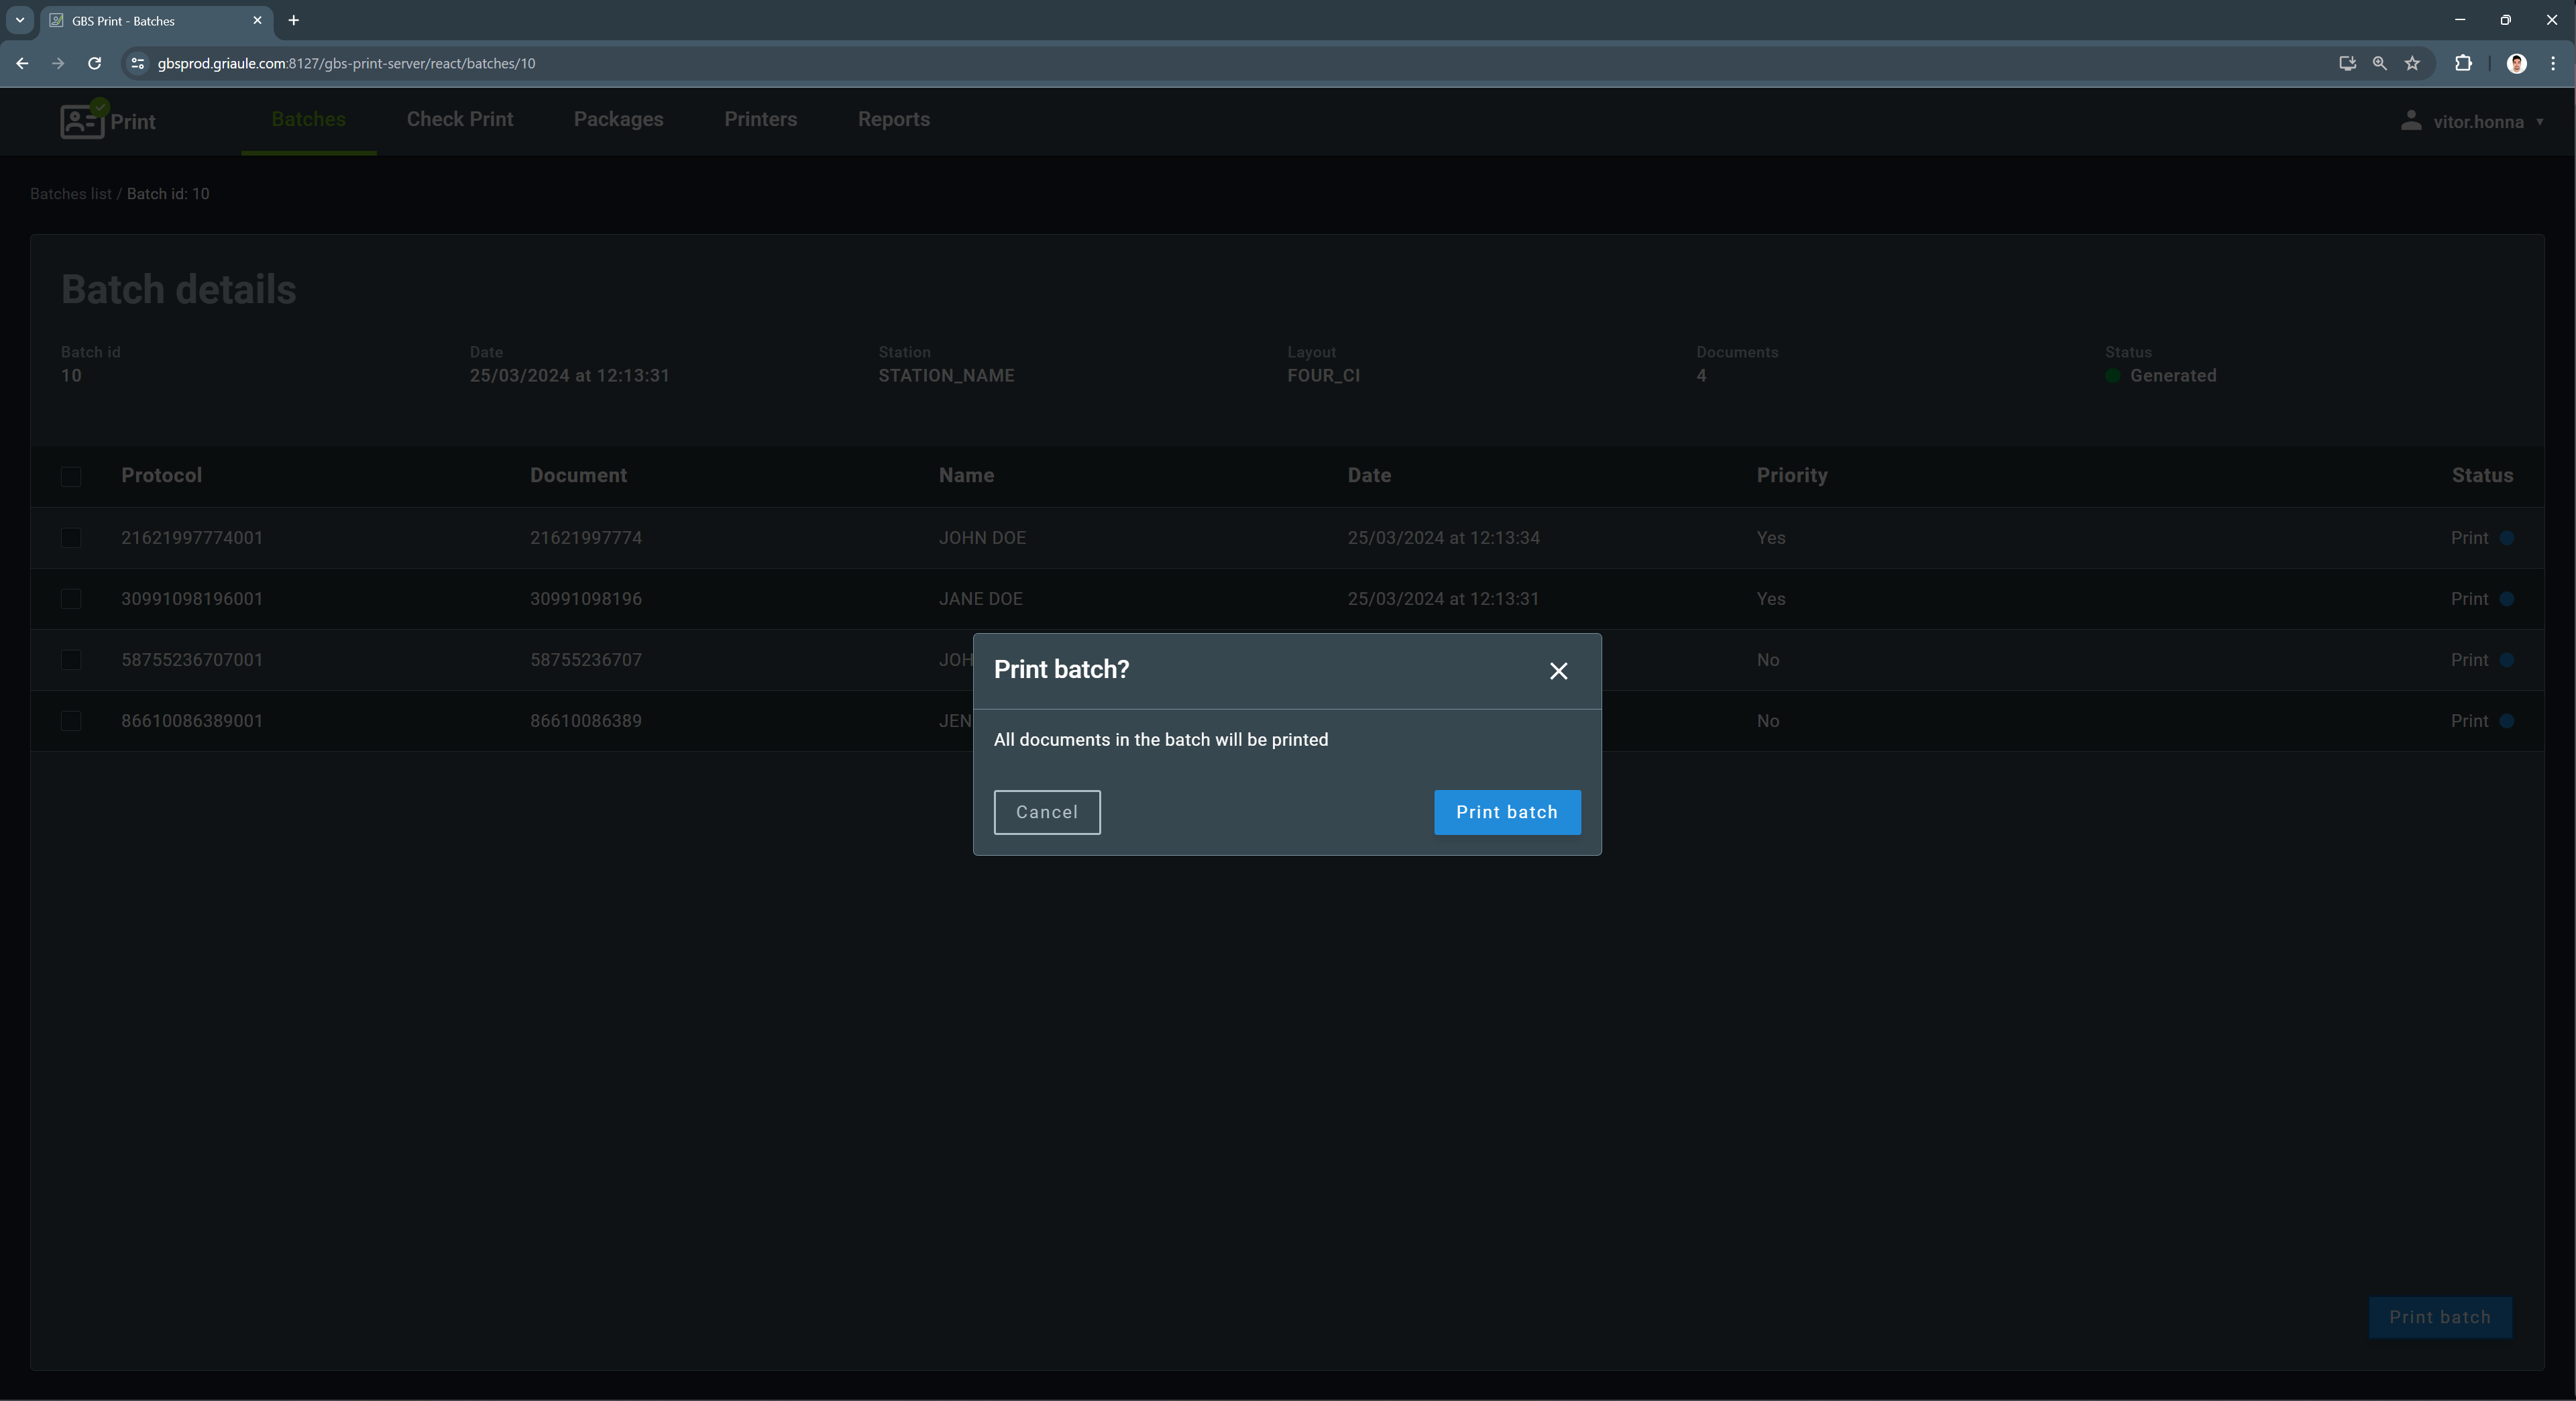
2.1.2. Printing a Batch
To print a batch, click on the Print batch button, located on the lower-right corner of the screen, and confirm clicking on Print batch on the dialog box.
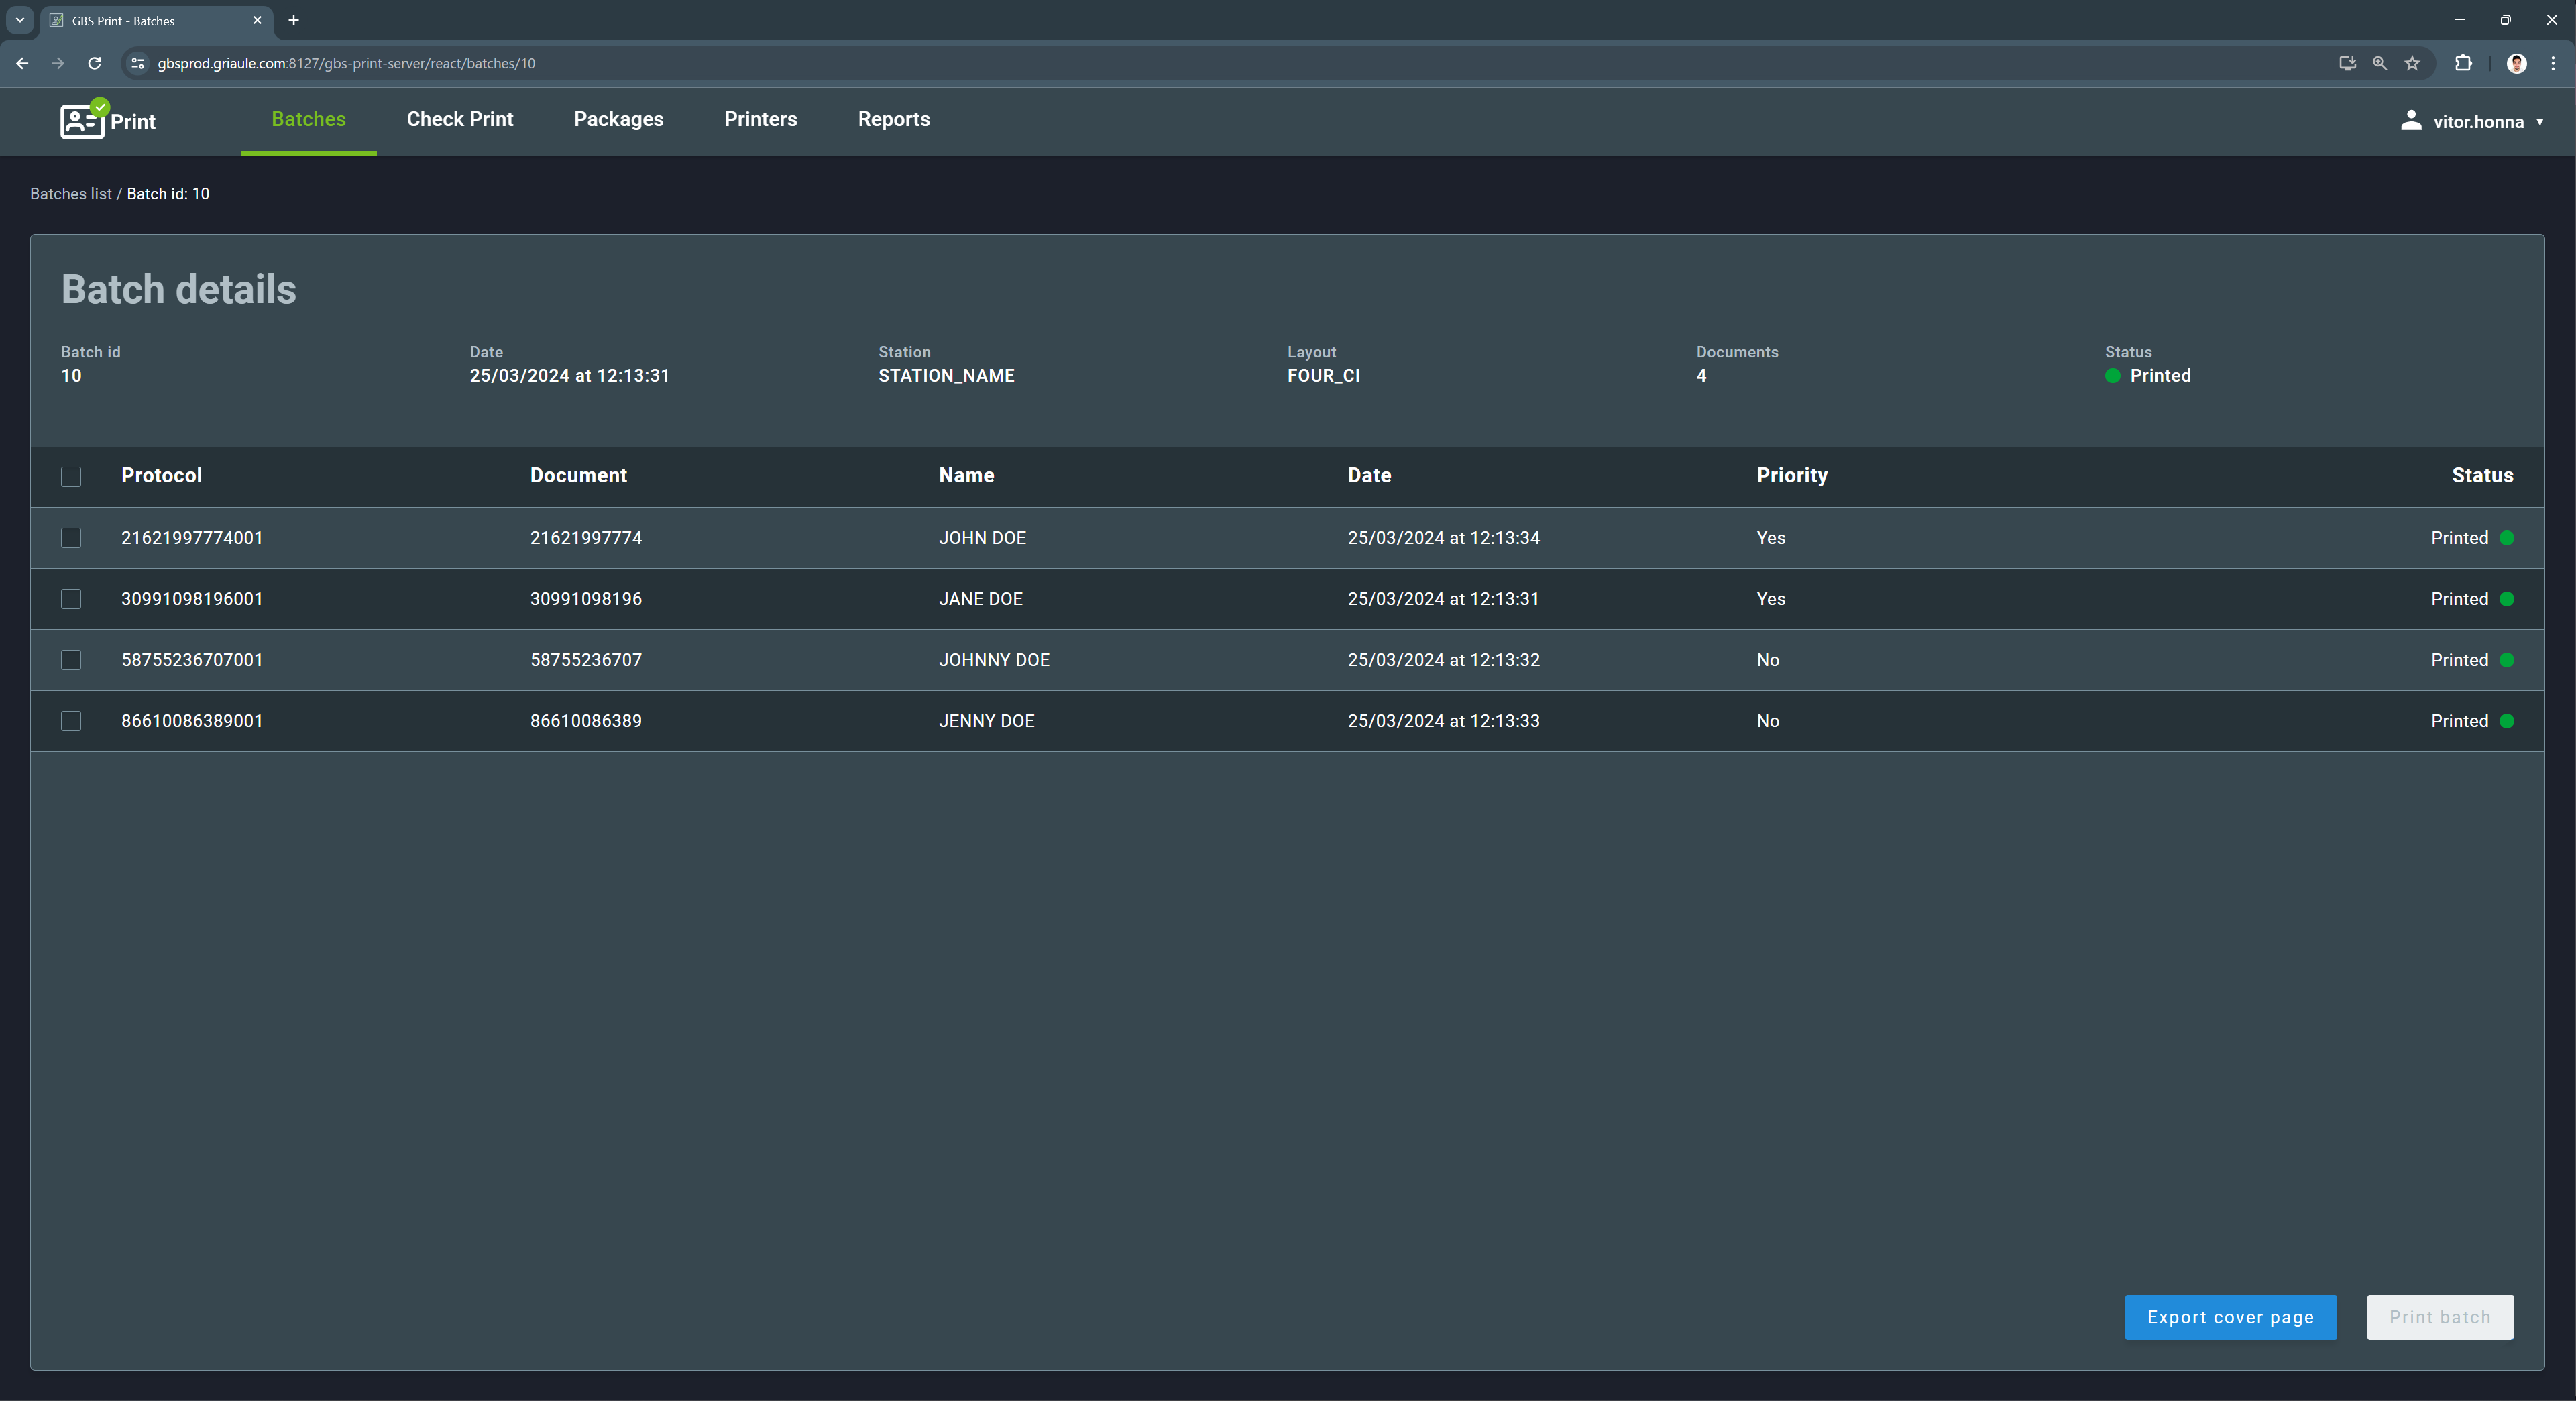
When the print operation is successful, the status of the batch and the documents will change to Printed.
The cover page of a batch contains information about the batch and the documents it contains. To export the cover page, click on the Export cover page button. The cover page will be downloaded in PDF.
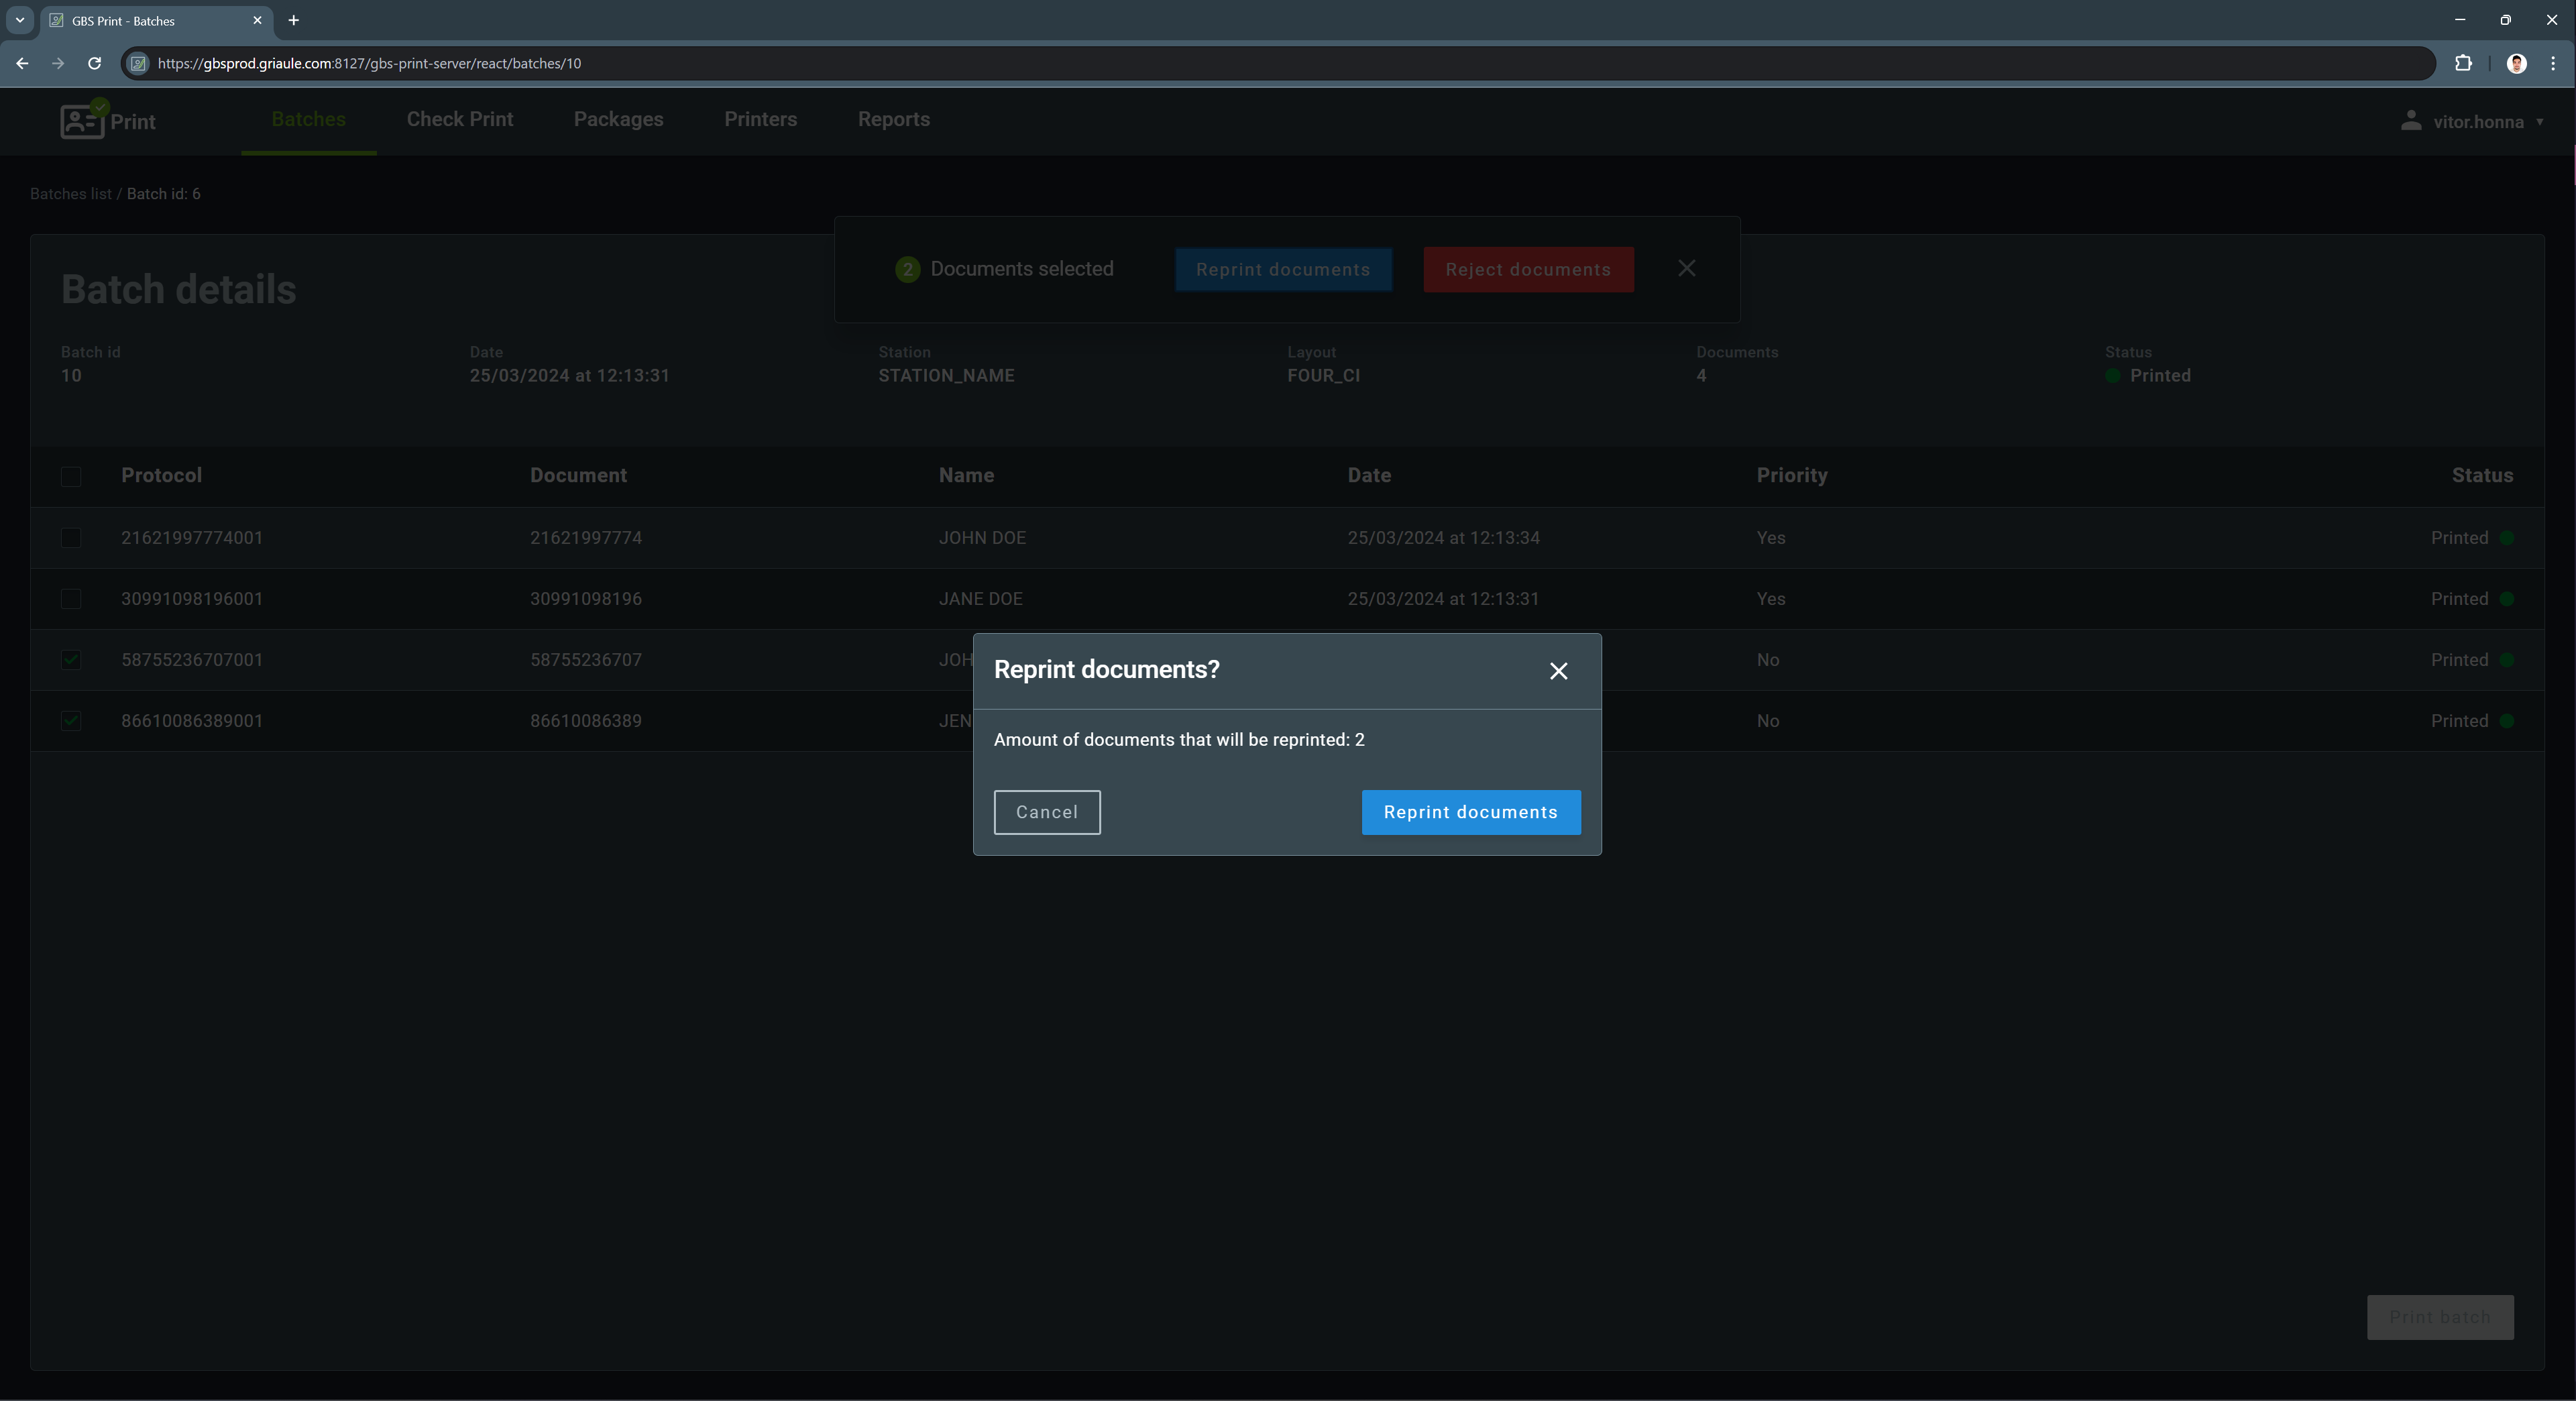
2.1.3. Rejecting and Reprinting a Document in a Batch
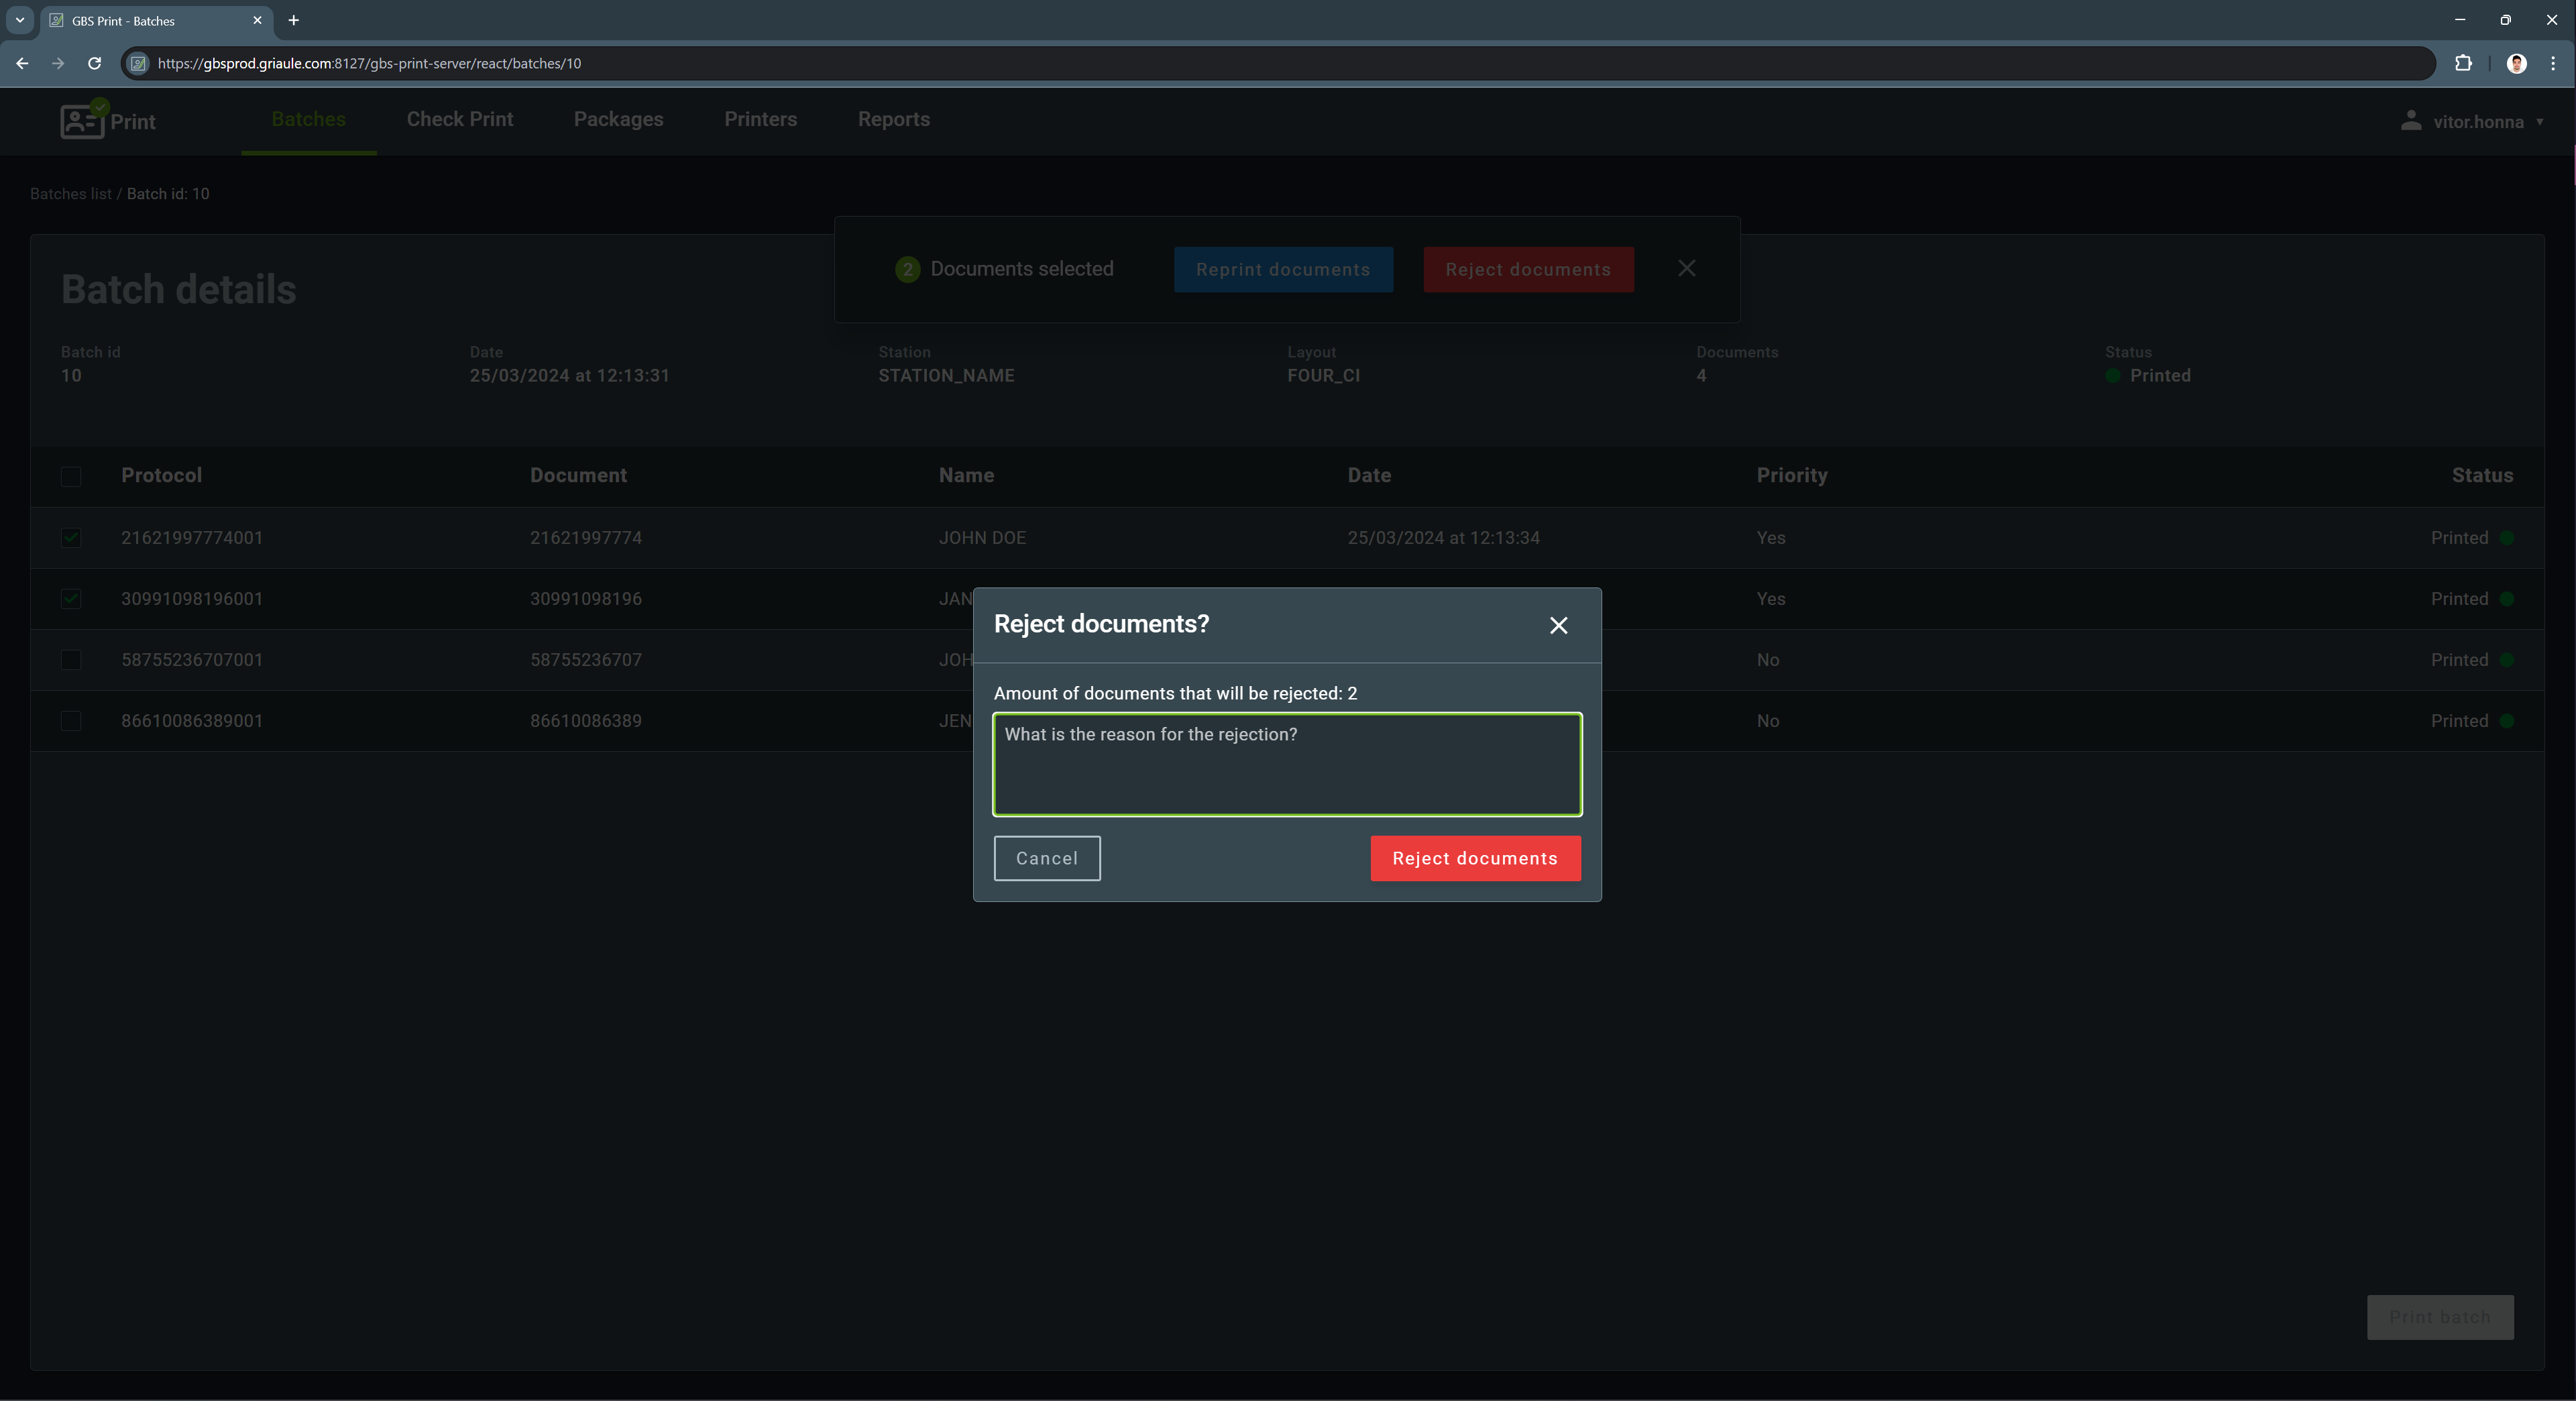
After printing a batch, if there are issues, it is possible to reject or reprint specific documents. To do so, select the documents using the checkboxes on the left side of the document line. Then, a dialog box will appear with the options to Reprint (blue button) or Reject (red button) the selected documents. A document can only be rejected or reprinted if its status is Printed.

2.1.3.1. Rejecting a Document
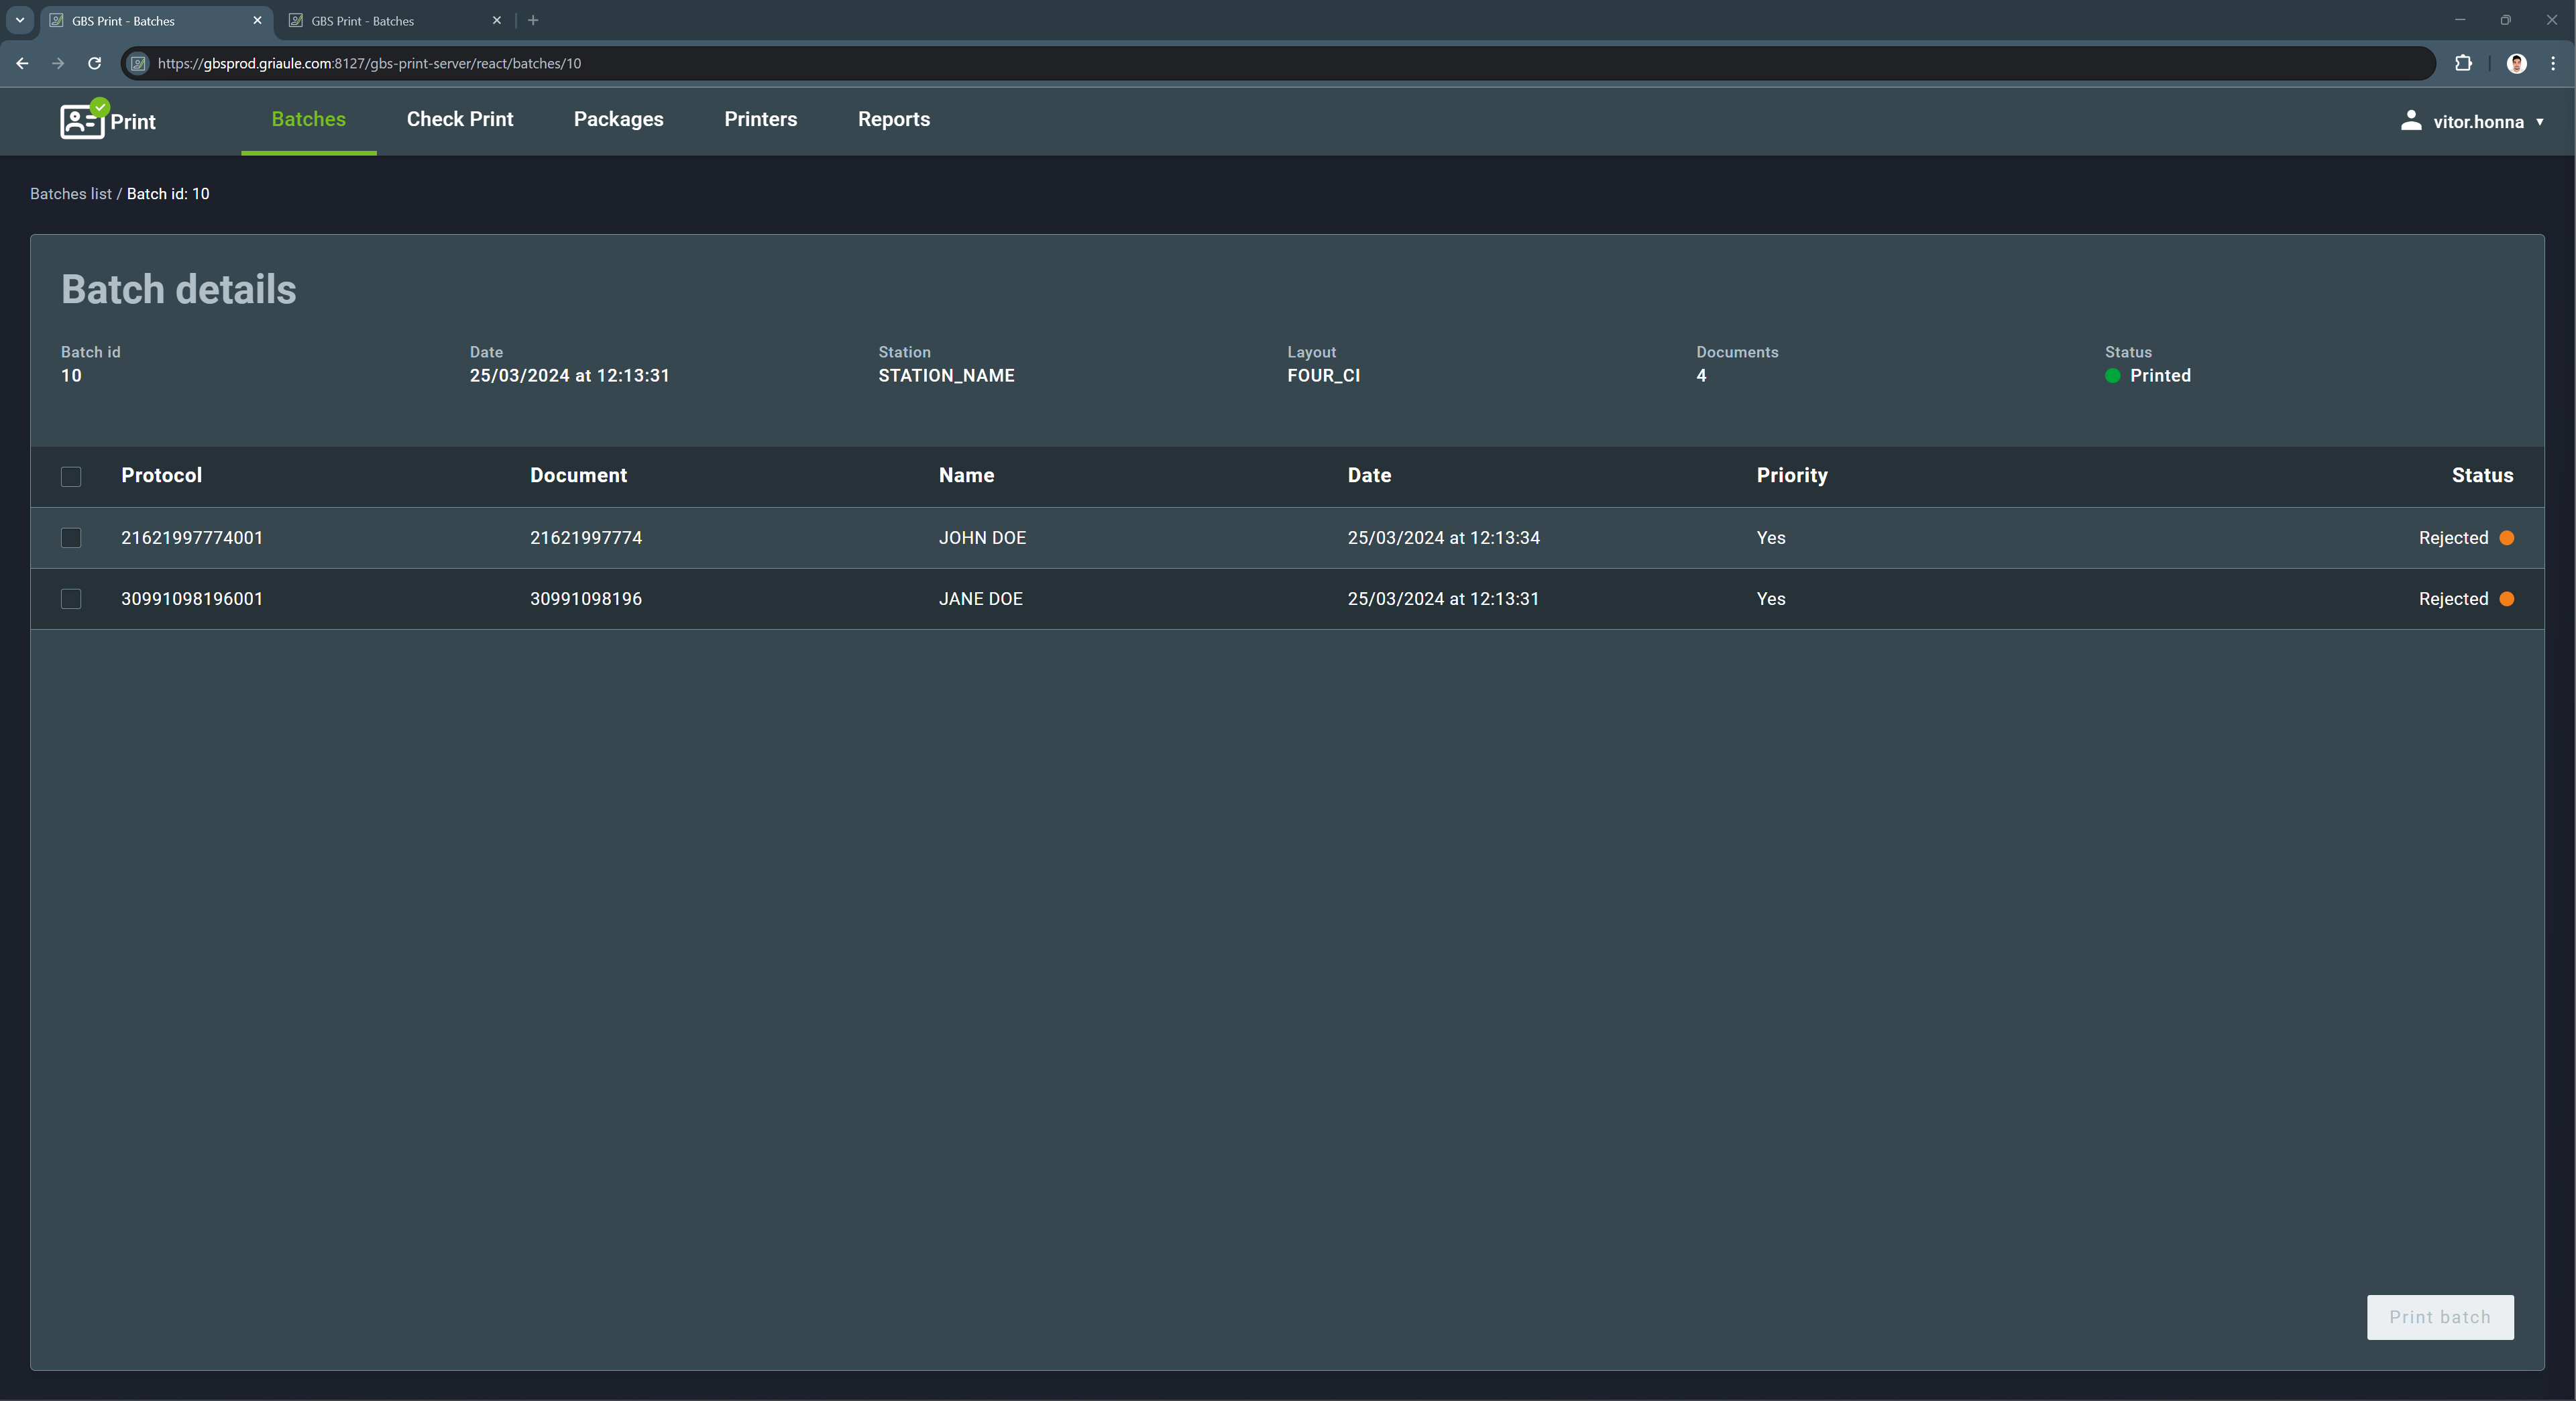
After clicking on Reject documents, a dialog box will appear showing the number of documents that will be rejected and asking for a reason for the rejection. Enter the reason and click on Reject documents.
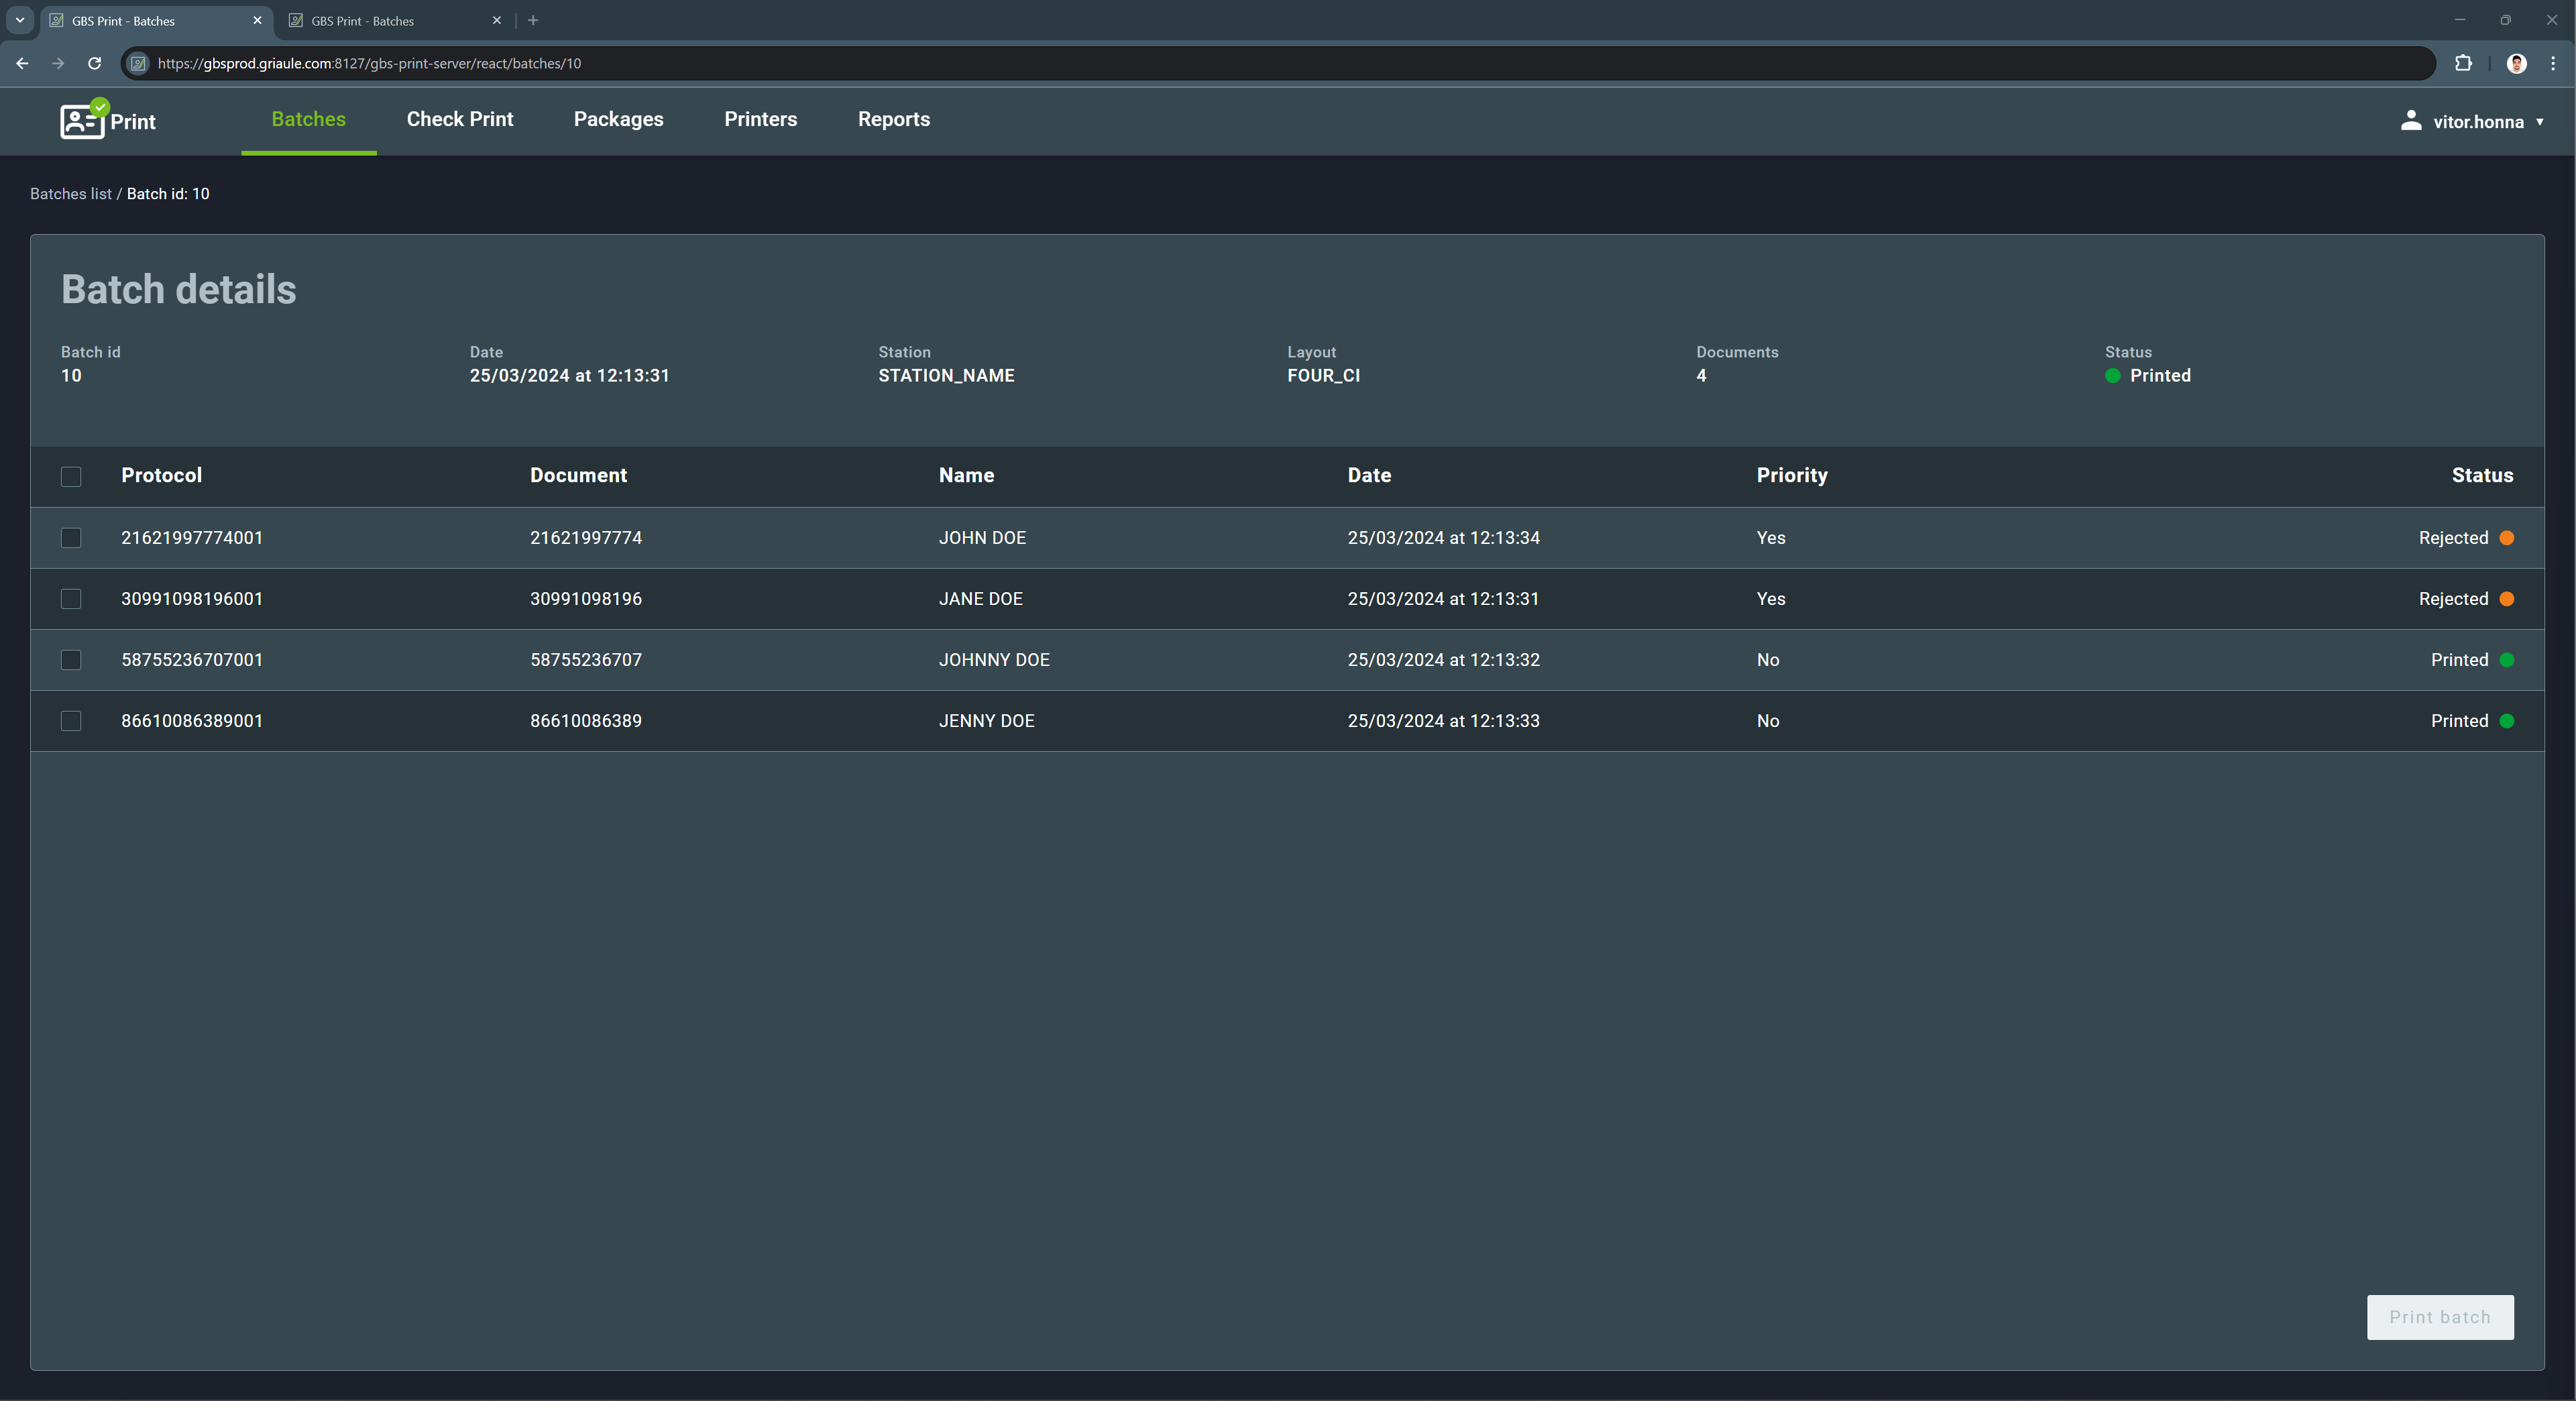
This action will change the status of the selected documents to Rejected.
2.1.3.2. Reprinting a Document
After clicking on Reprint documents, a dialog box will appear showing the number of documents that will be reprinted. To confirm the reprint, click on Reprint documents.
This action will remove the documents from the current batch:
And create a new batch with the selected documents. The status of the new batch will be Generated, and the status of the documents will reset to Print.
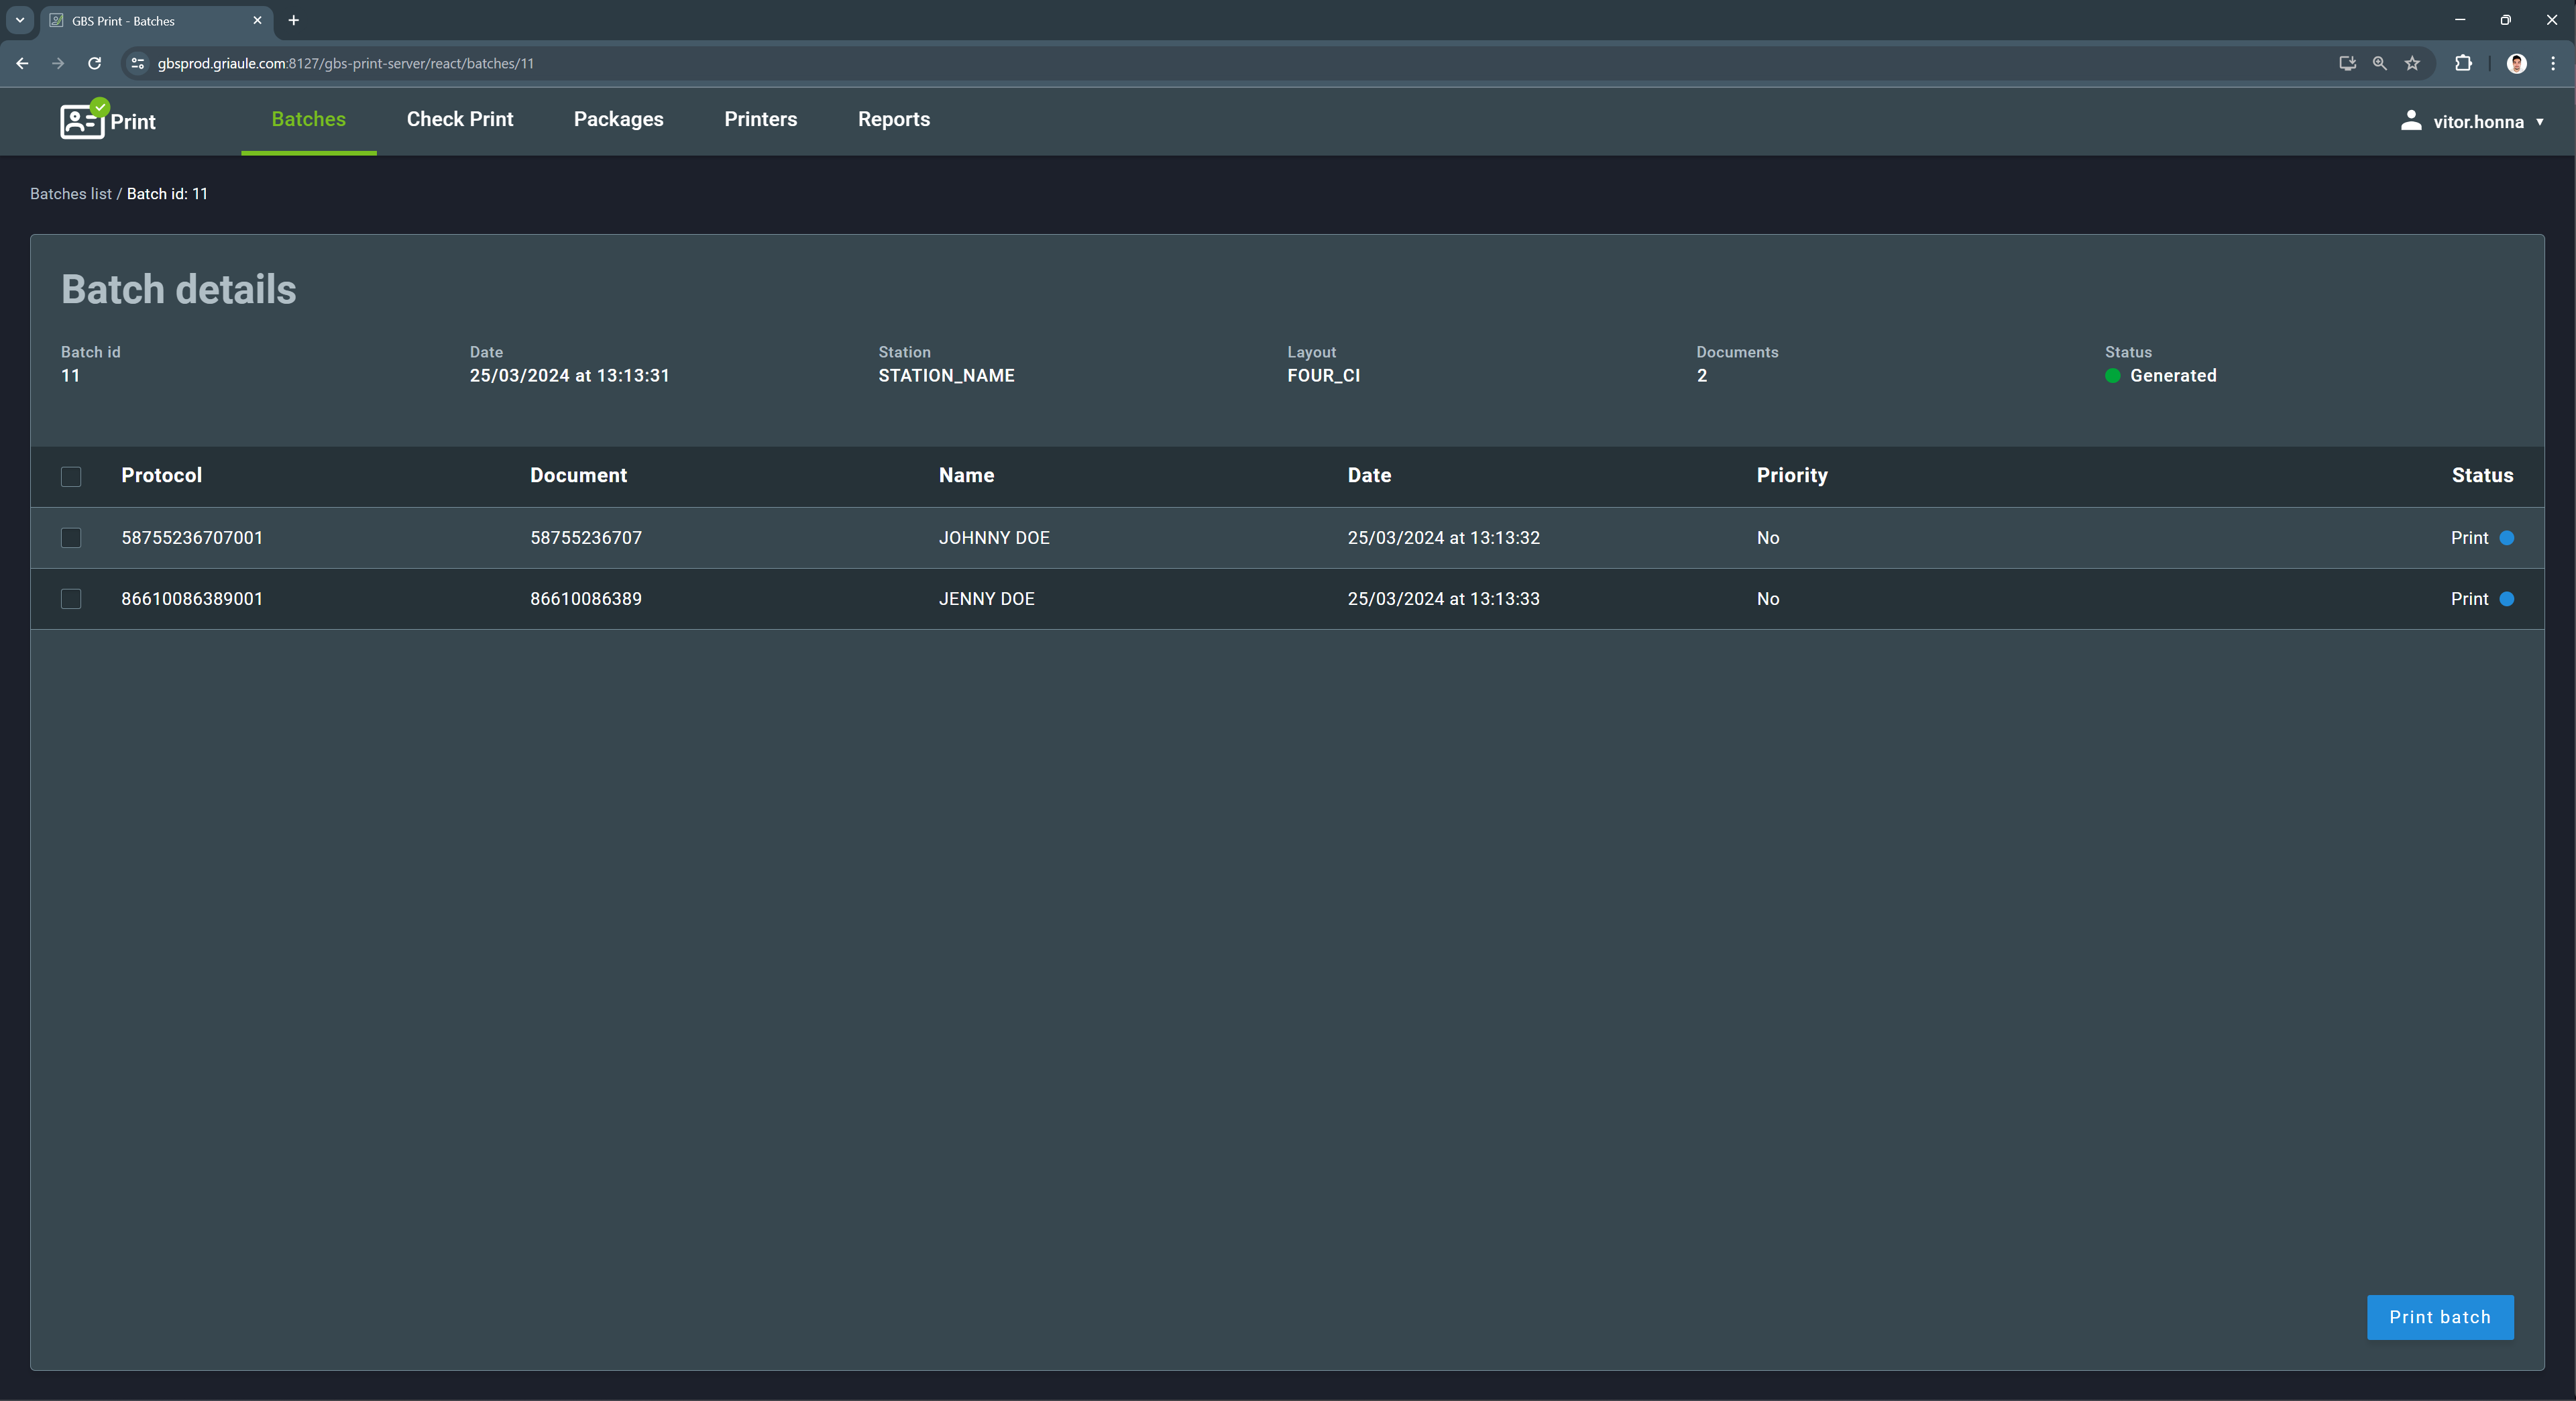
Note
If an available batch exists - that is, if there is a batch with the same layout and station that is not yet full - the documents will be added to that batch instead of creating a new one.
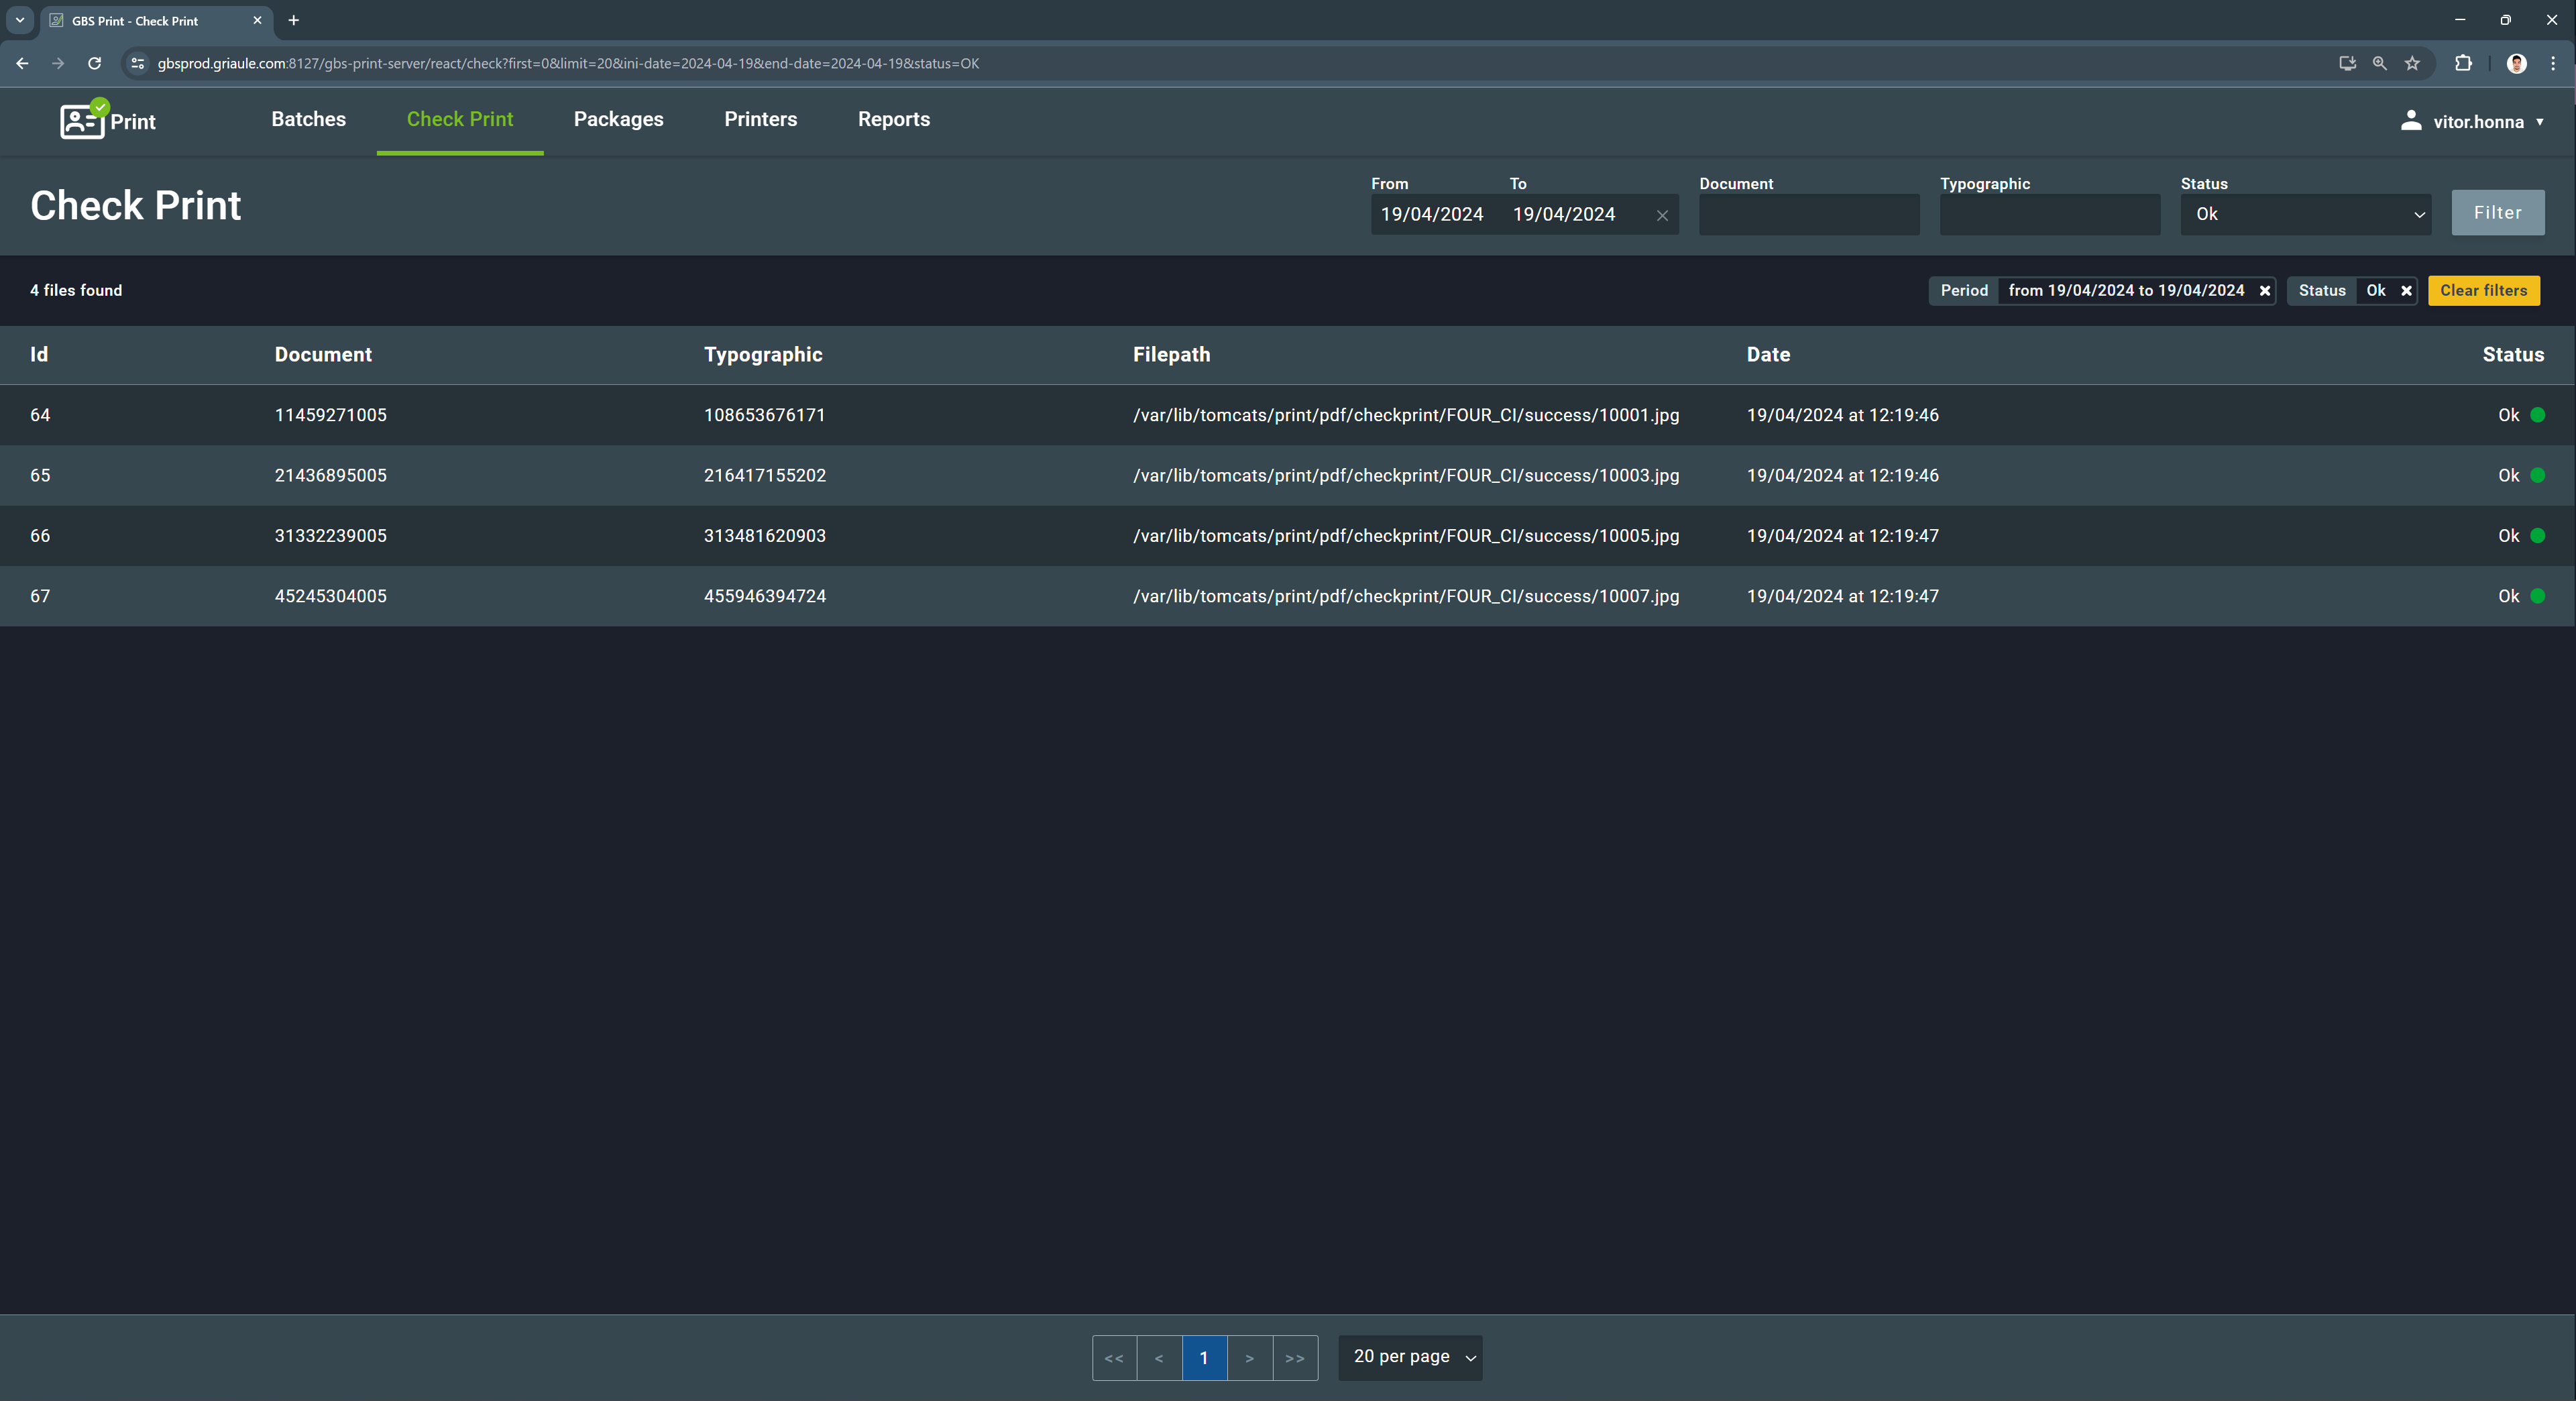
2.2. Check Print
The Check Print tab displays a list of scanned documents with their current status.
Before this process starts, the user must scan the documents and place them in the folder configured for the document layout in the Settings menu. The placement of files may be automatic, varying according to the environment.
After being printed and scanned, the documents are automatically processed by GBS Print and shown in this list. The check process serves two main purposes: verifying if the document was printed and scanned correctly and linking the document number to the page typographic. The typographic is a unique alphanumeric code that is present in all document blank pages and is used to assert the document’s authenticity.
For practical instructions on how to handle and scan the printed documents, see the Appendix Procedure for Document Scanning and Check Print.
There are seven possible statuses for a document in the Check Print tab:
| Status | Color | Description |
|---|---|---|
| OK |
Green
|
Document successfully checked and linked to the typographic. |
| Cancelled |
Gray
|
Document was cancelled by the user. |
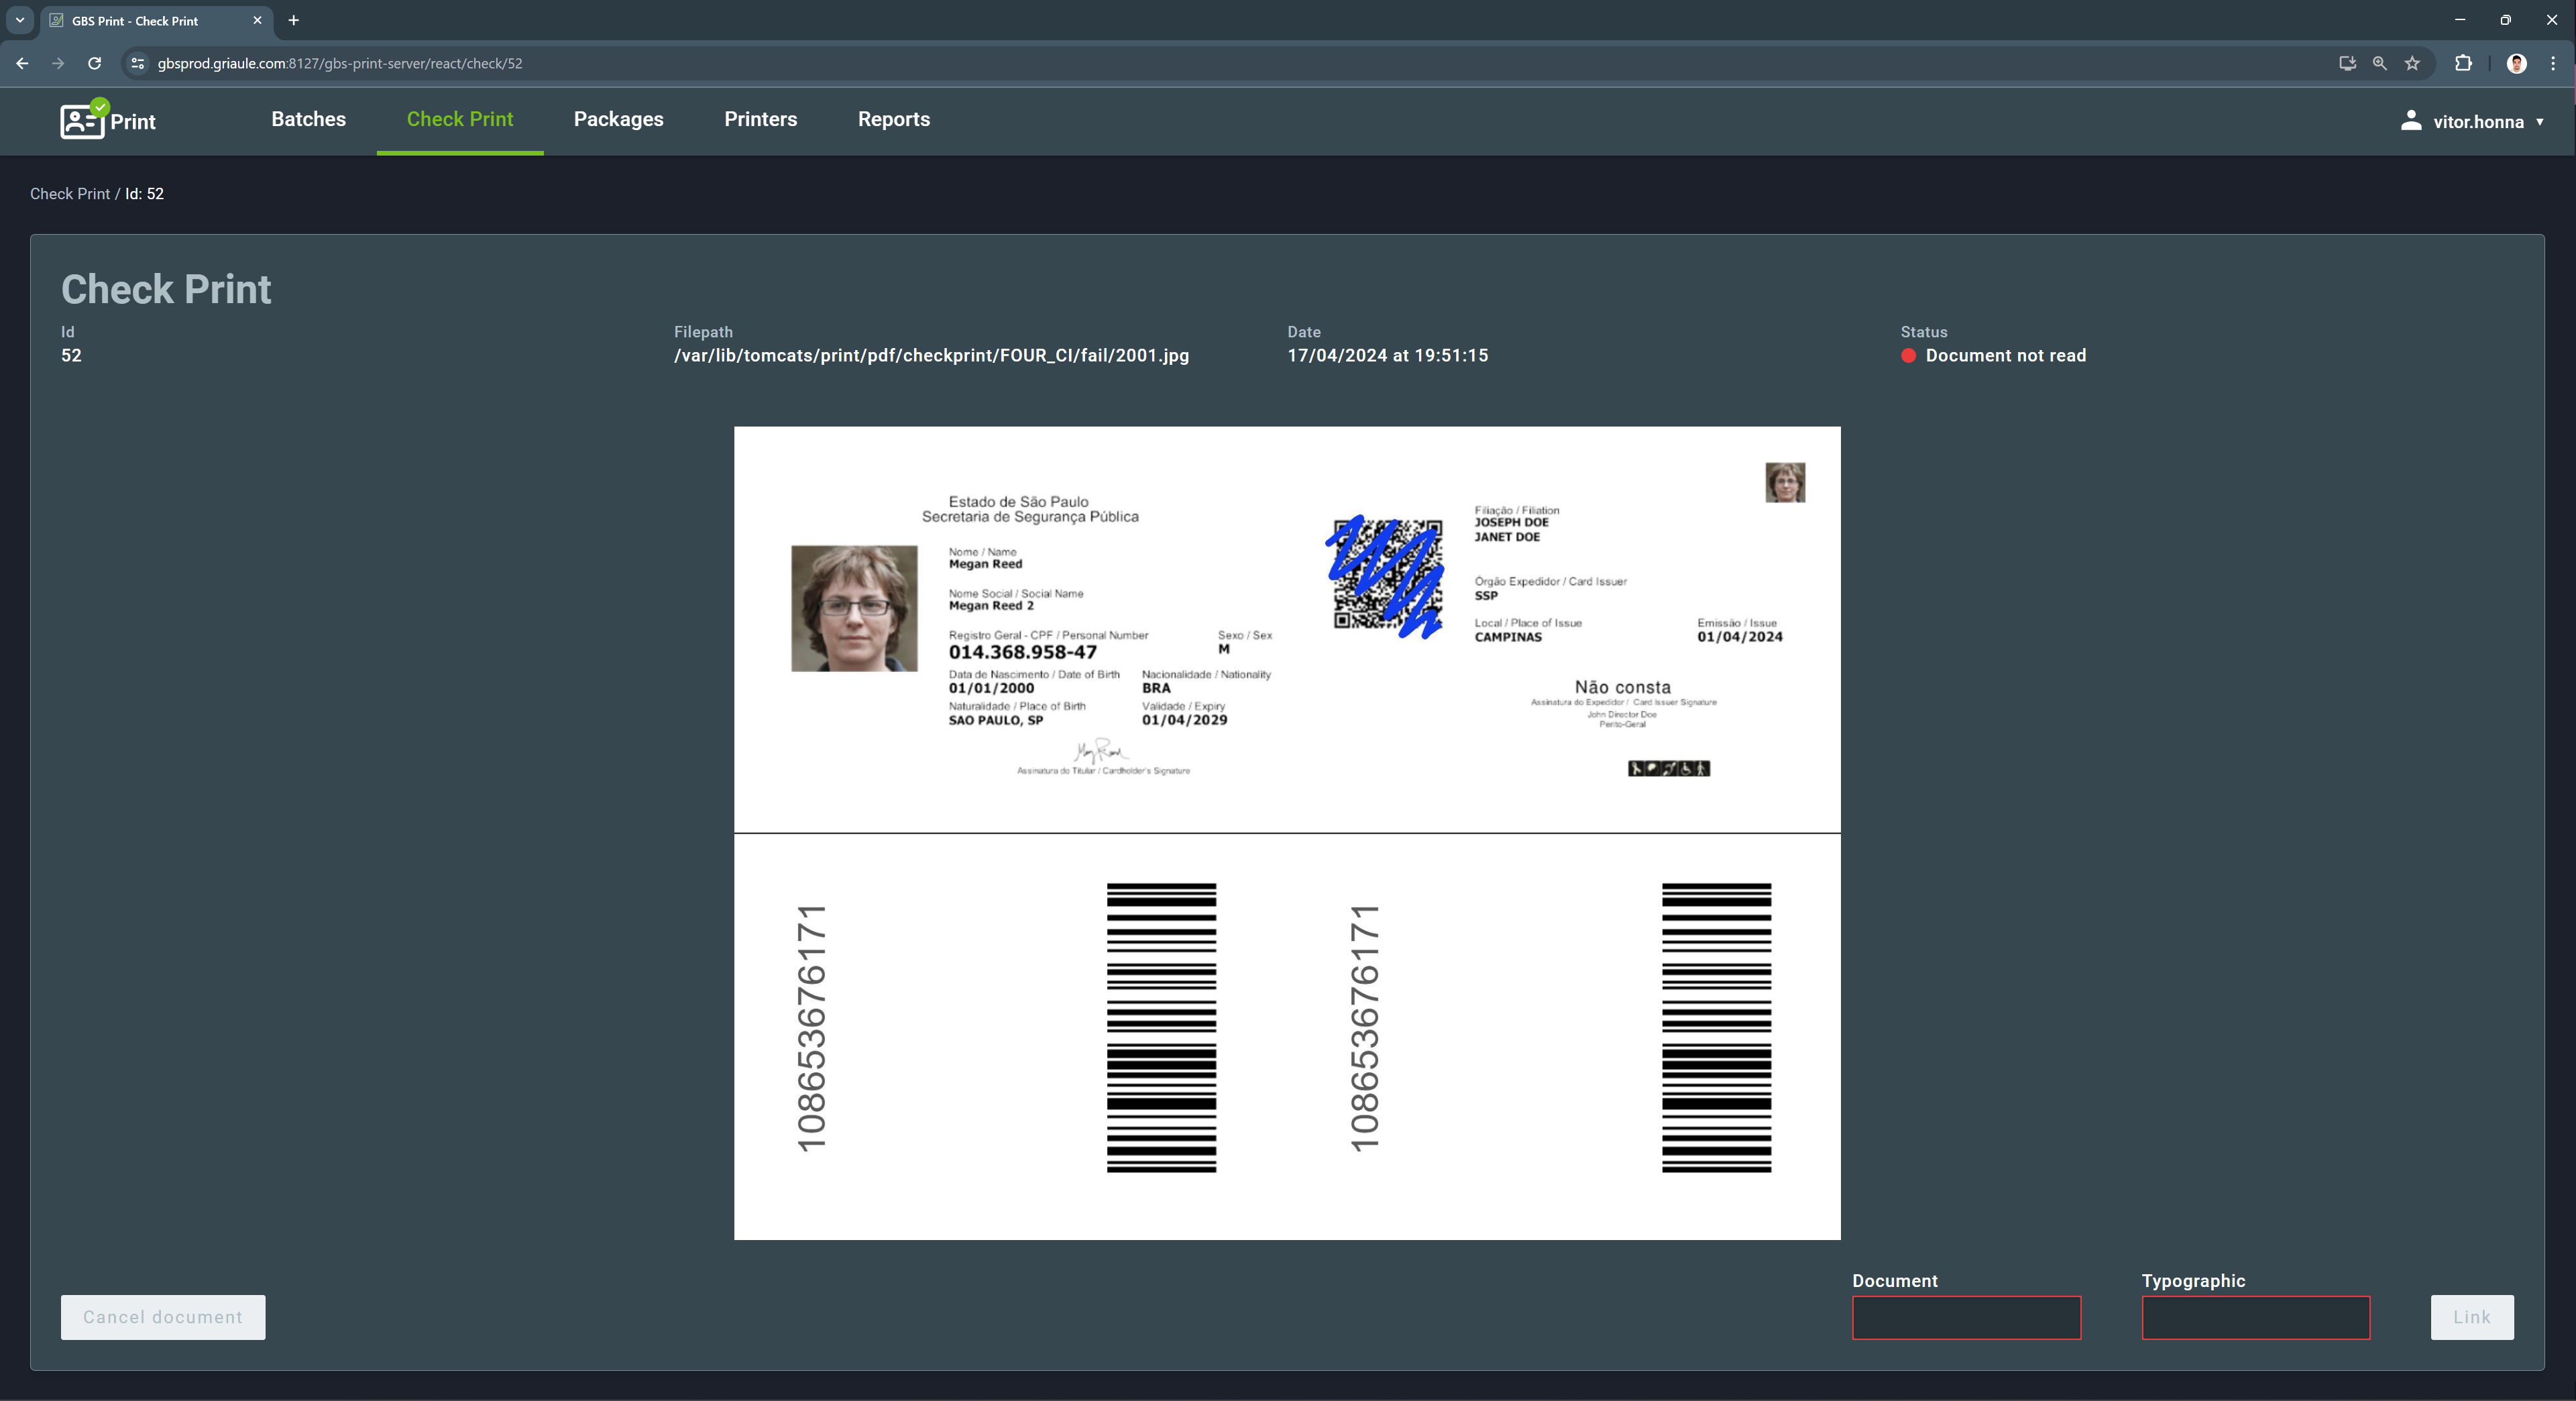
| Document not read |
Red
|
Document number could not be automatically read from the QR code of the scanned document. |
| Document does not exist |
Red
|
Document number read from the QR code of the scanned document does not exist in the GBS Print records. |
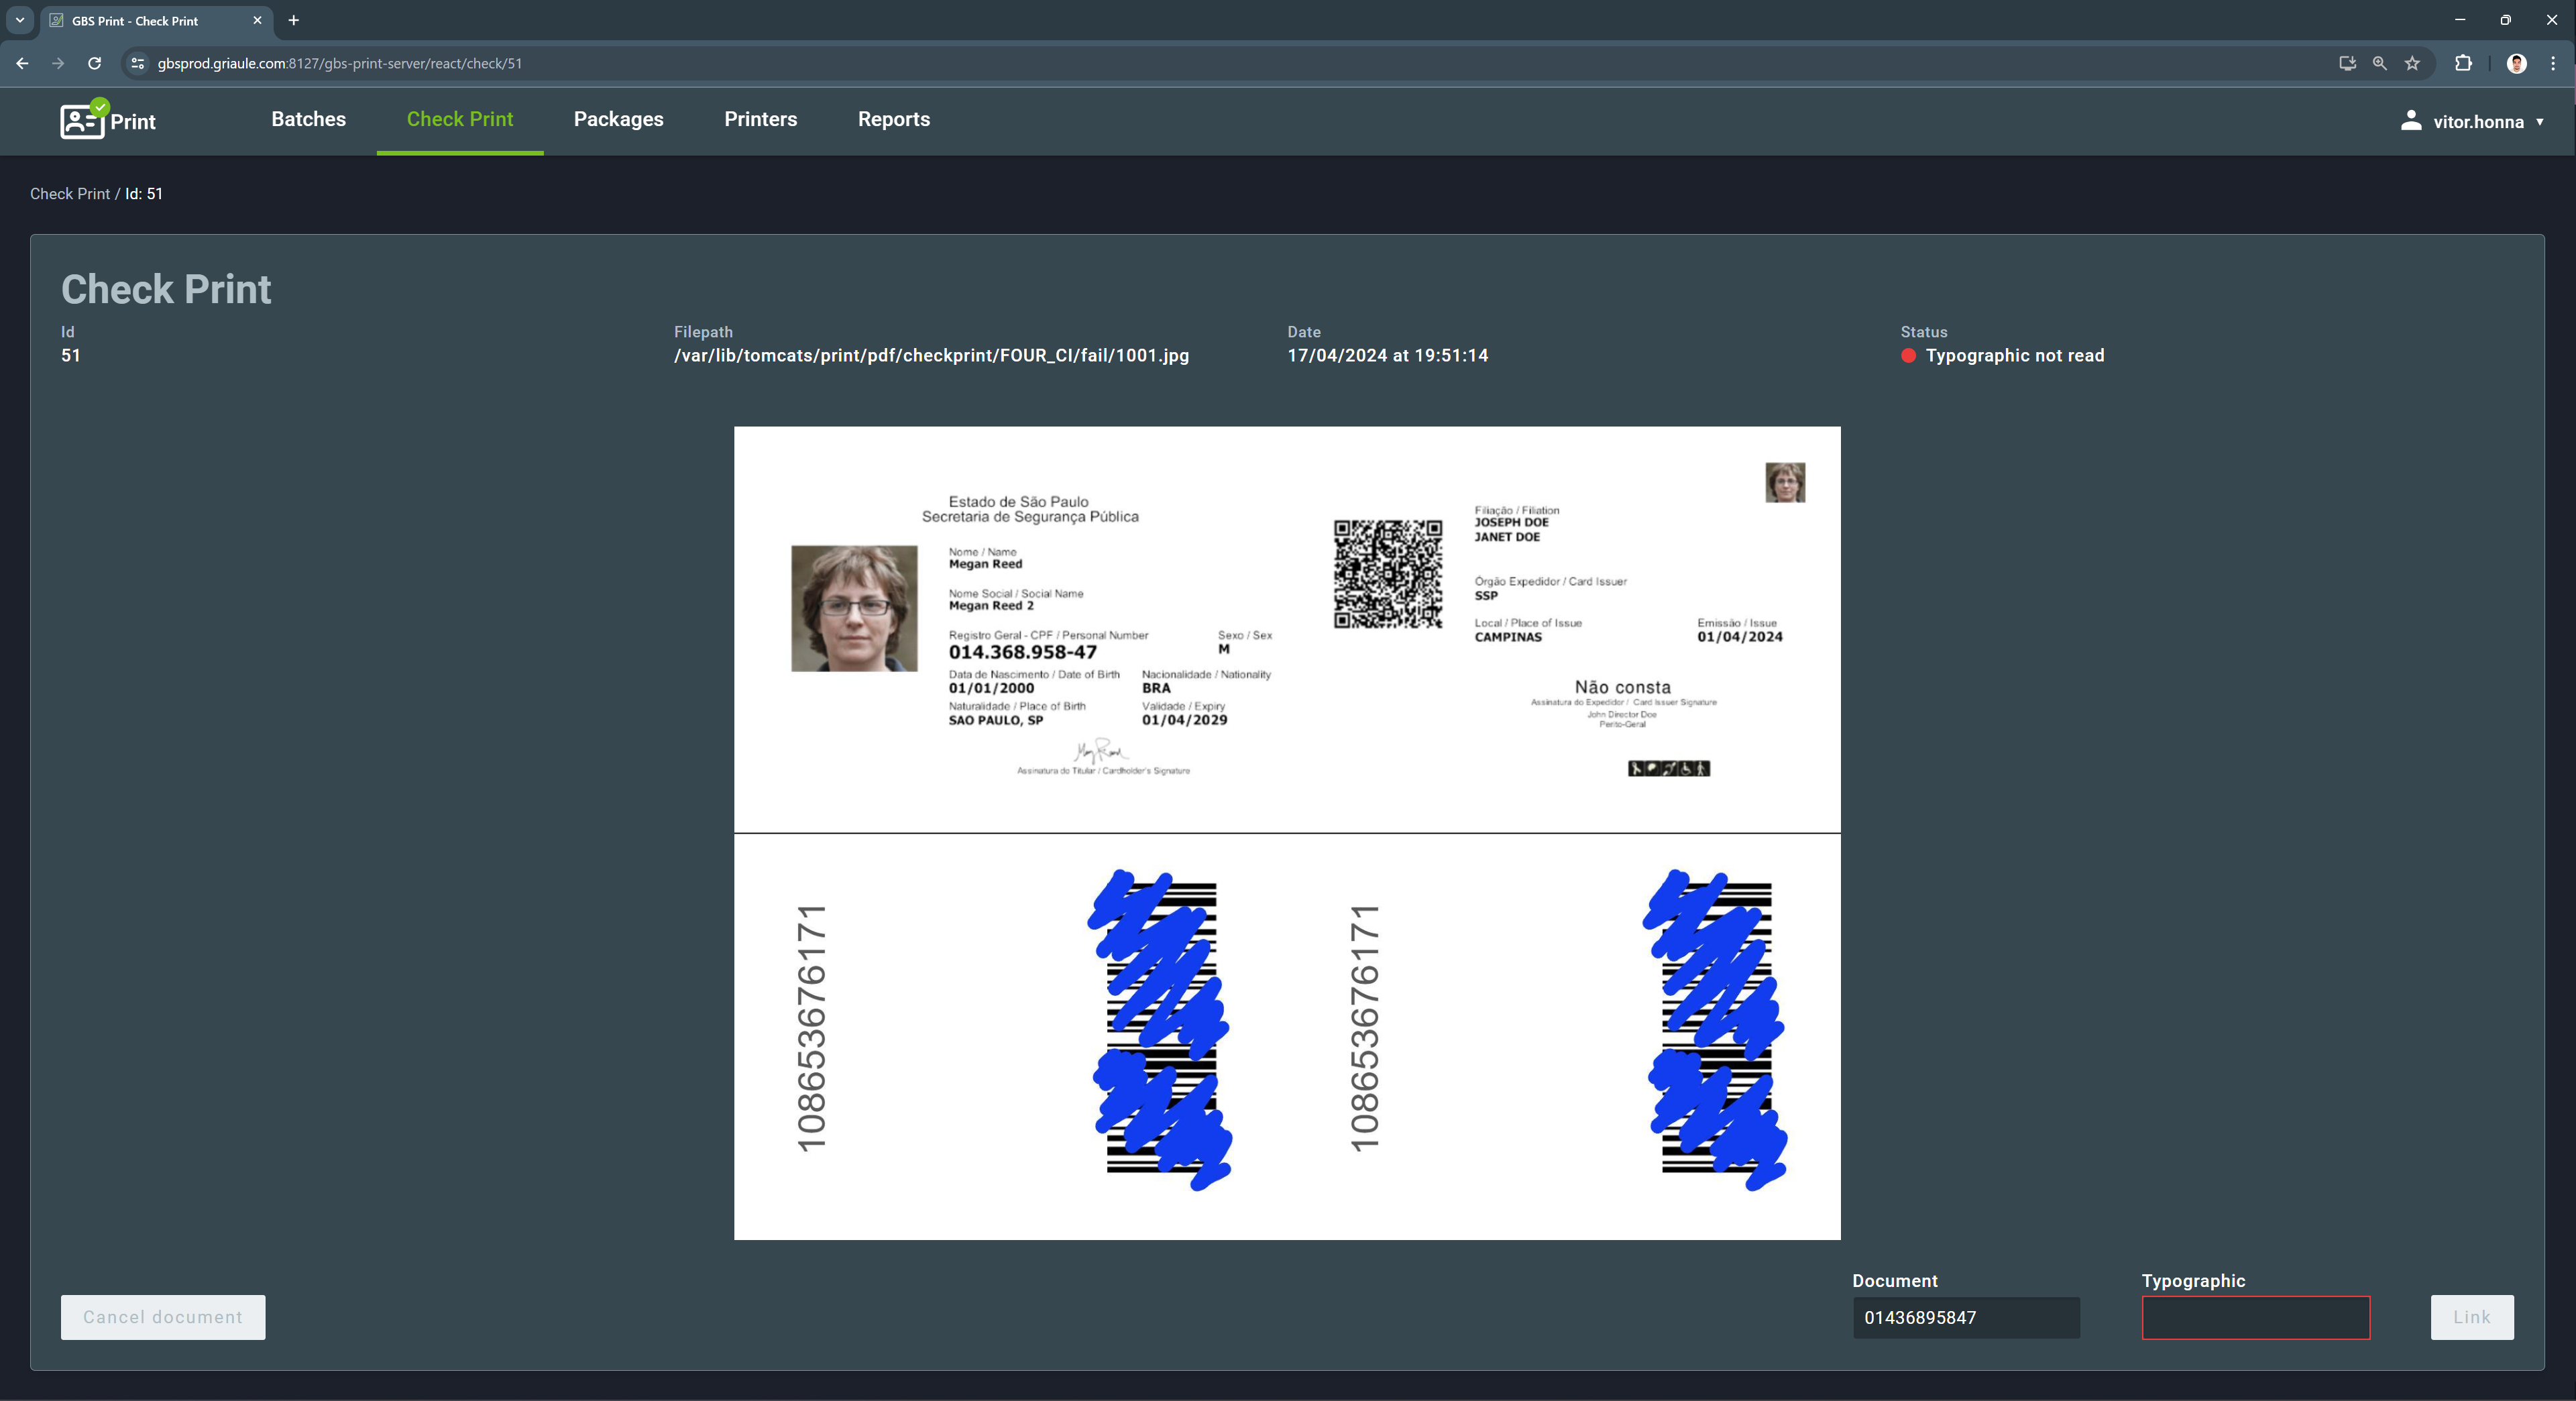
| Typographic not read |
Red
|
Document was successfully read, but the typographic code could not be automatically read from the barcode of the scanned document. |
| Update fail |
Red
|
There was a problem while updating the document information in GBDS. |
| Fail |
Red
|
An internal error occurred during processing. |
The status of the document in the Check Print tab evolves as they are processed following the Print workflow. For further details, refer to Step 2: Check Print Tab in the Workflows section.
Similarly to the other tabs, there are filter options to help the user find specific documents. It is possible to filter by date range, document number, typographic, and status. To apply a filter, select the desired filters and click on Filter. Then, only the documents that meet the selected criteria will be displayed.
To remove a filter, click on the X button beside the applied filter, or click on the yellow button Clear filters to remove all the filters at once.
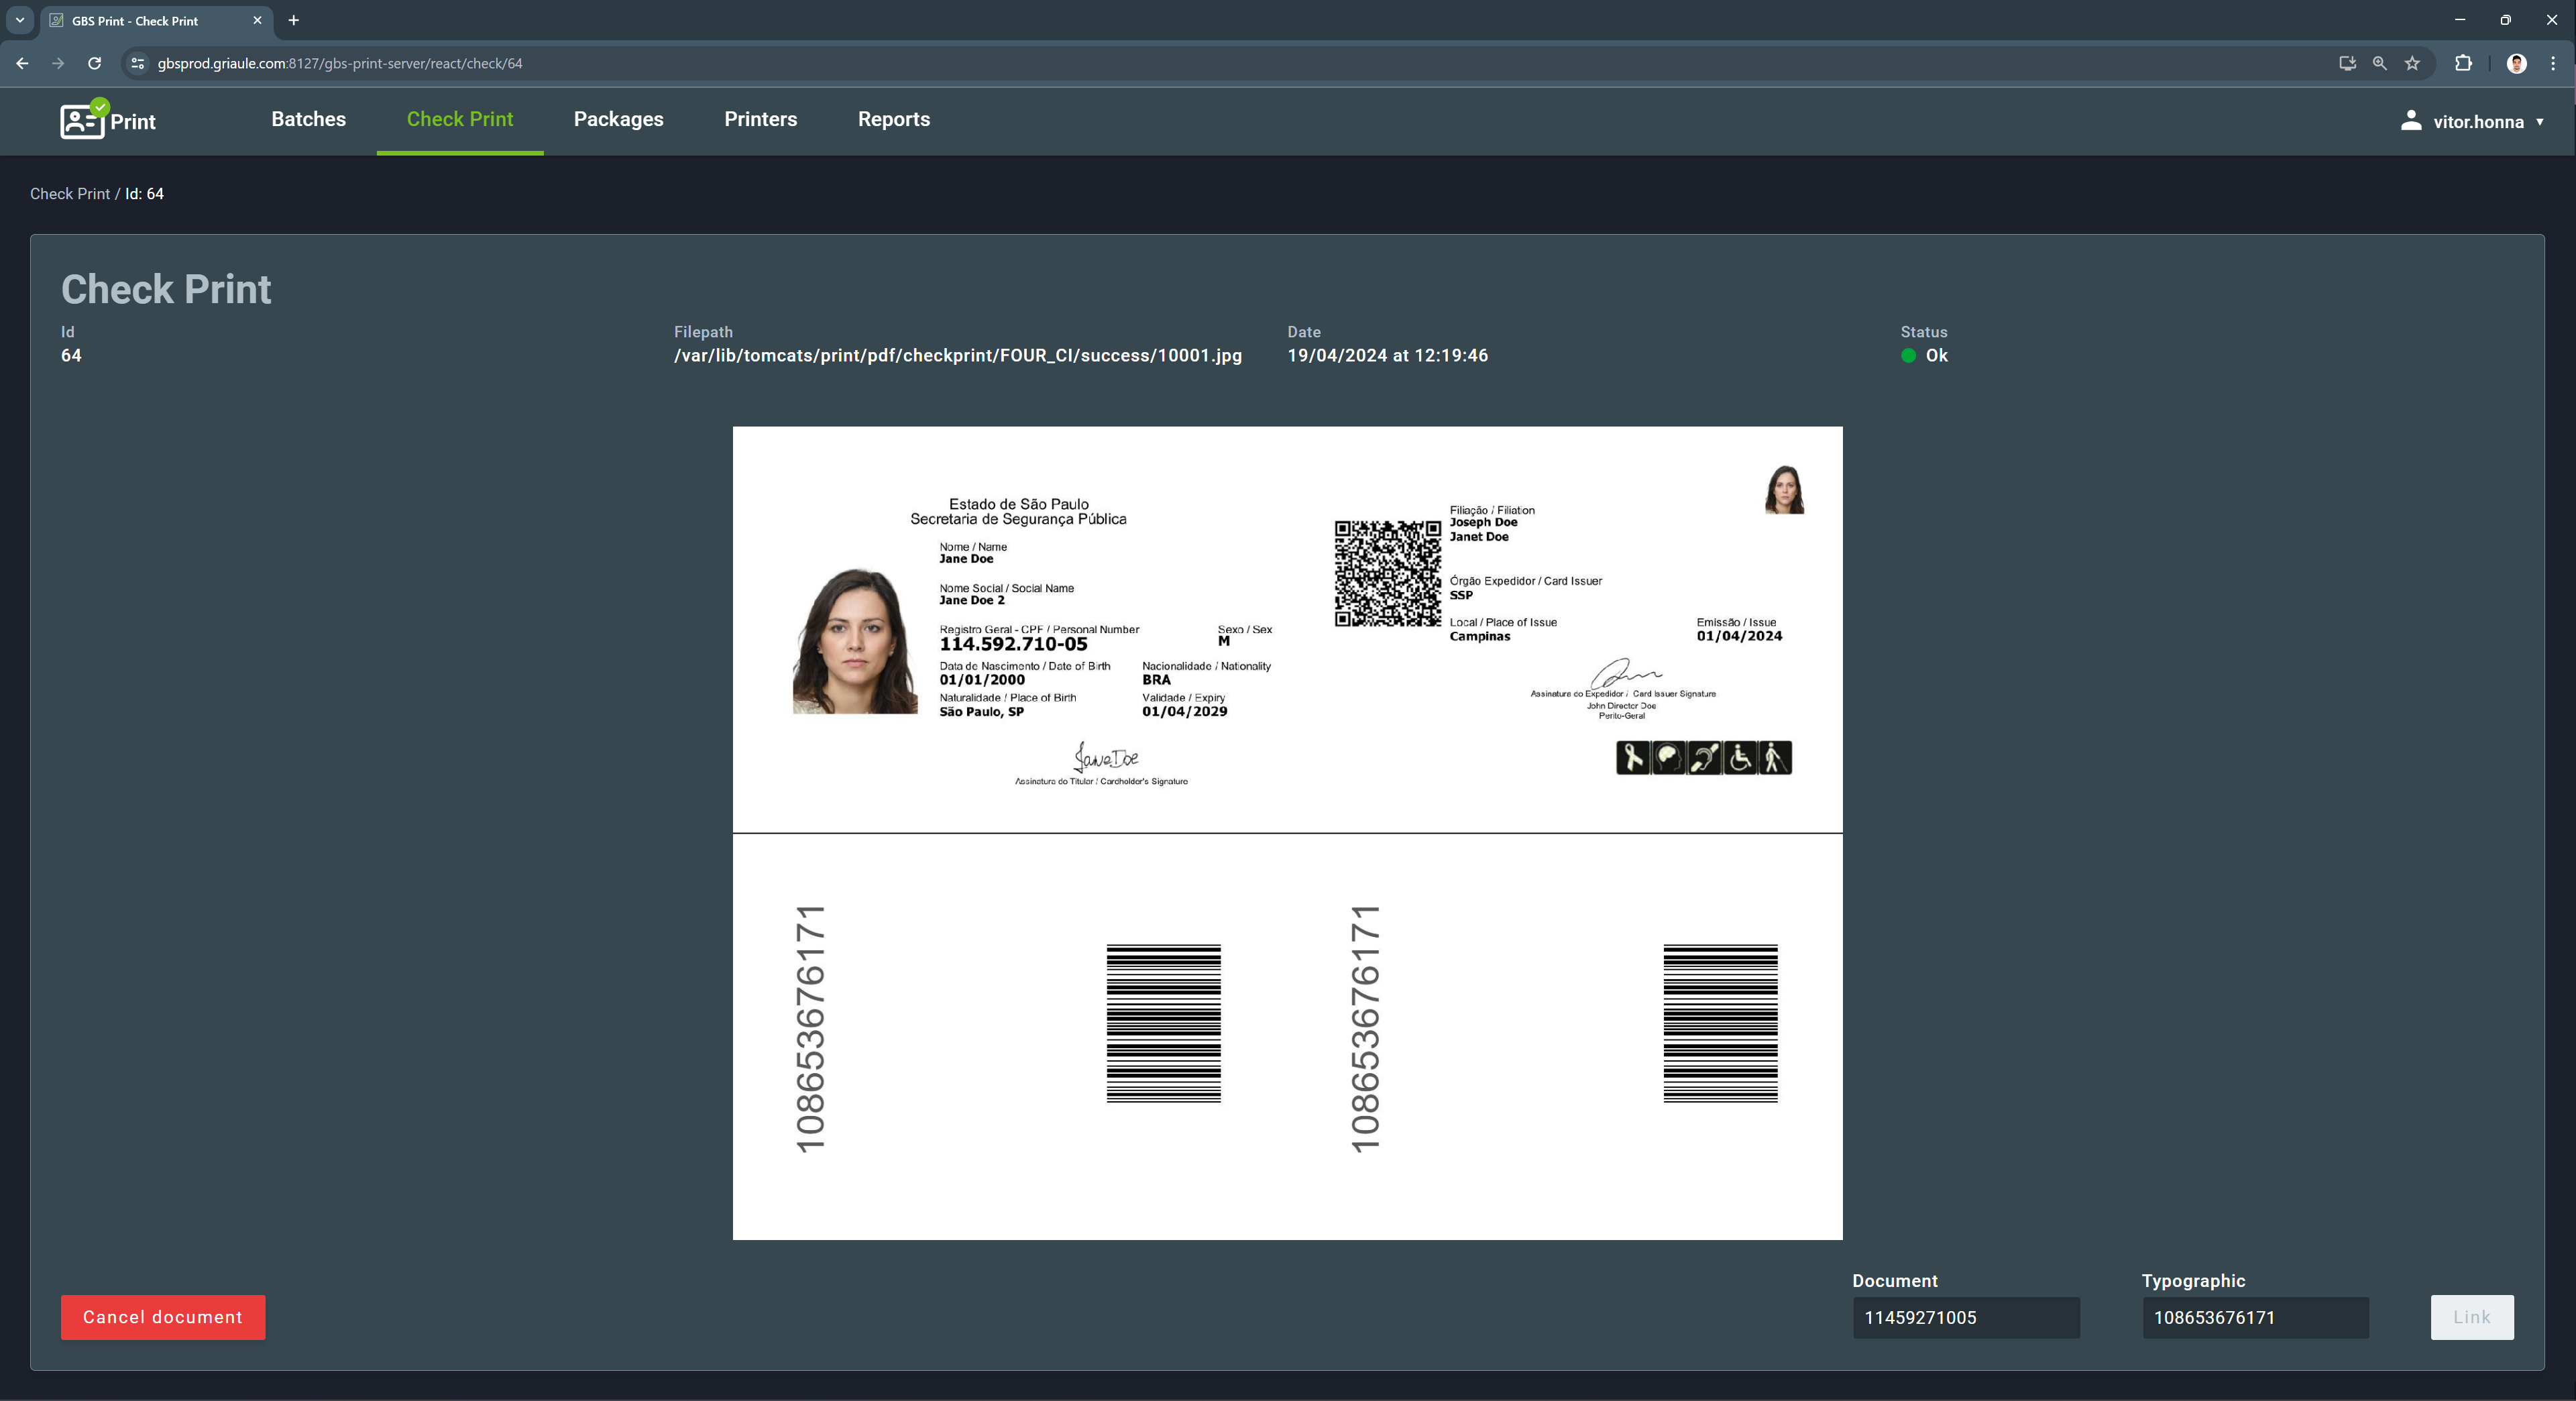
If the document successfully passes all automatic check steps, its status will be OK, and no intervention from the user is required - however, it is recommended that the user perform a quick visual inspection to guarantee that all information has been captured correctly.
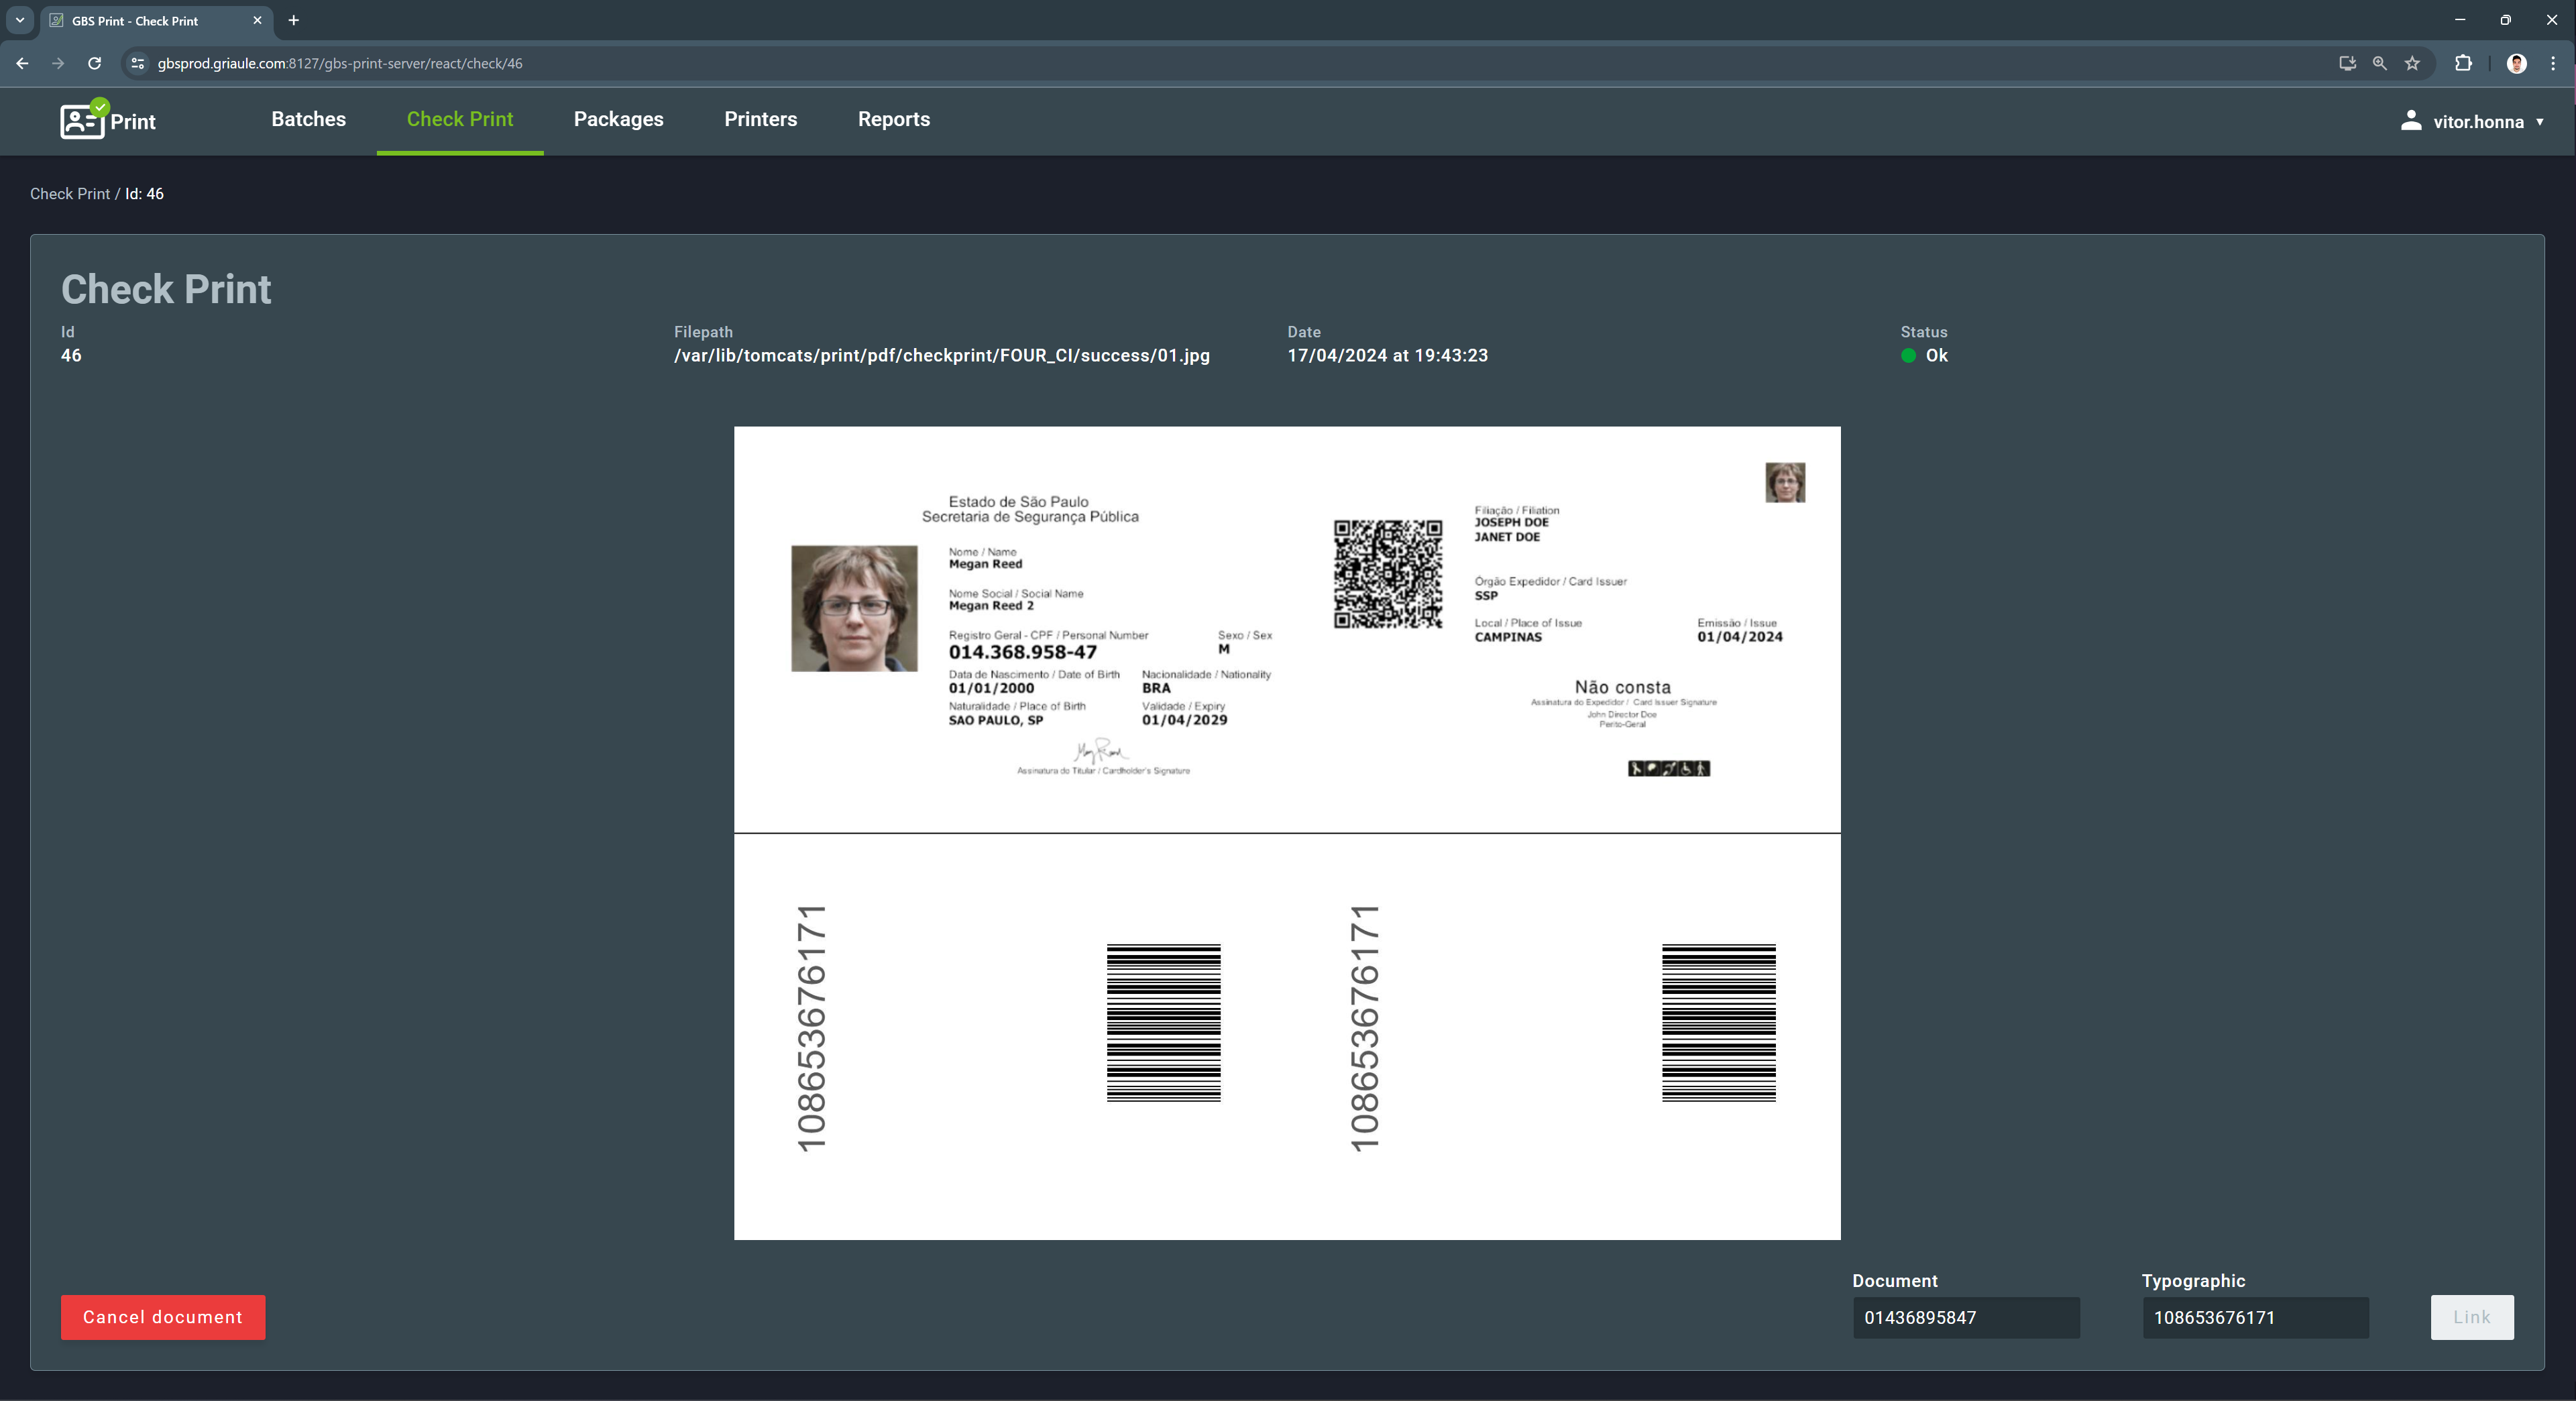
Clicking on the document line will display the document details, including the image of the scanned document and the fields that were read. In this case, the document and the typographic are automatically linked. The Link button on the lower-right corner of the screen remains disabled until any information in the document or typographic fields is changed.
2.2.1. Manually Linking a Document and a Typographic
In case the document fails the automatic check, the user must manually check and link the document to the typographic. To do so, open the document details by clicking on the document line. Then, depending on the error, the user may need to manually enter the document number, the typographic, or both. After entering the necessary information, the Link button on the lower-right corner of the screen will be enabled and turn blue. Click on it to link the document and the typographic and finish the manual check process.
If the link is successful, the status of the document will change to OK.
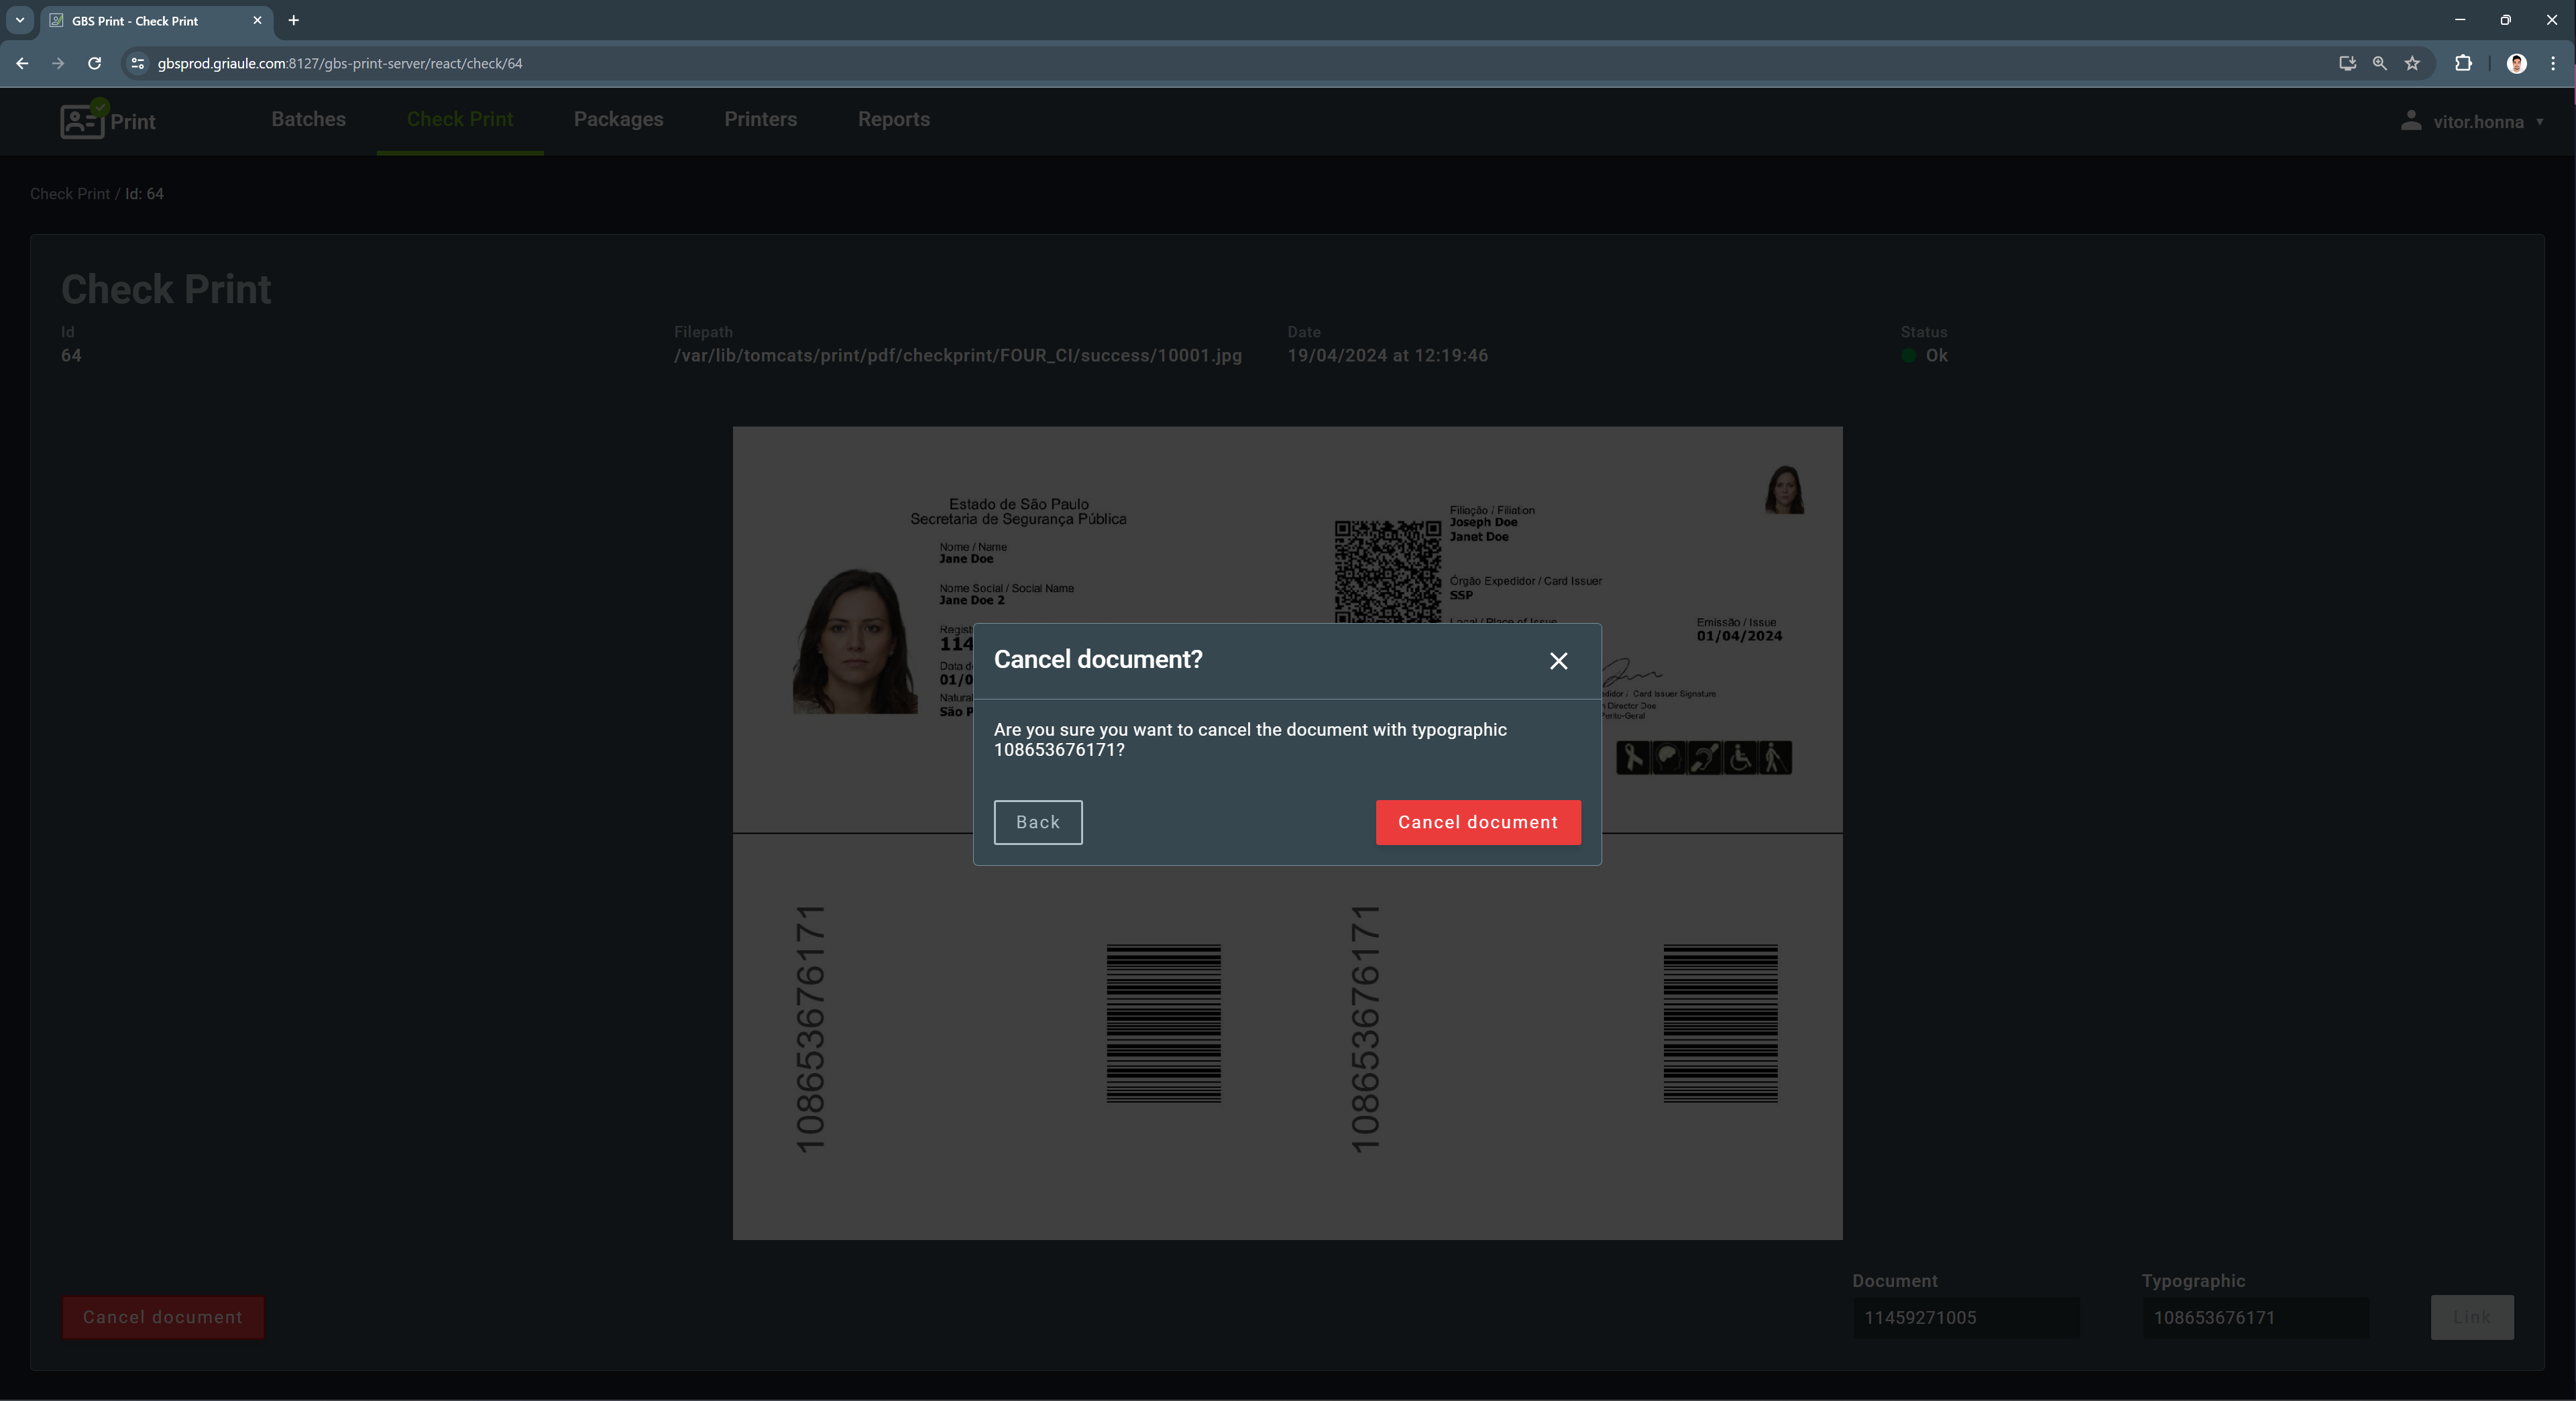
2.2.2. Cancelling a Document
After a document is linked to a typographic, if necessary, it is possible to cancel the document at any time, even after its sent. To do so, click on the document line to open the document details. Then, click on the Cancel document button on the lower-left corner of the screen. A dialog box will appear asking for confirmation. Click on Cancel document to confirm the action.
2.3. Packages
The Packages tab displays the list of packages that have been created and their respective status. A package is a group of batches with documents that have either been checked or rejected.
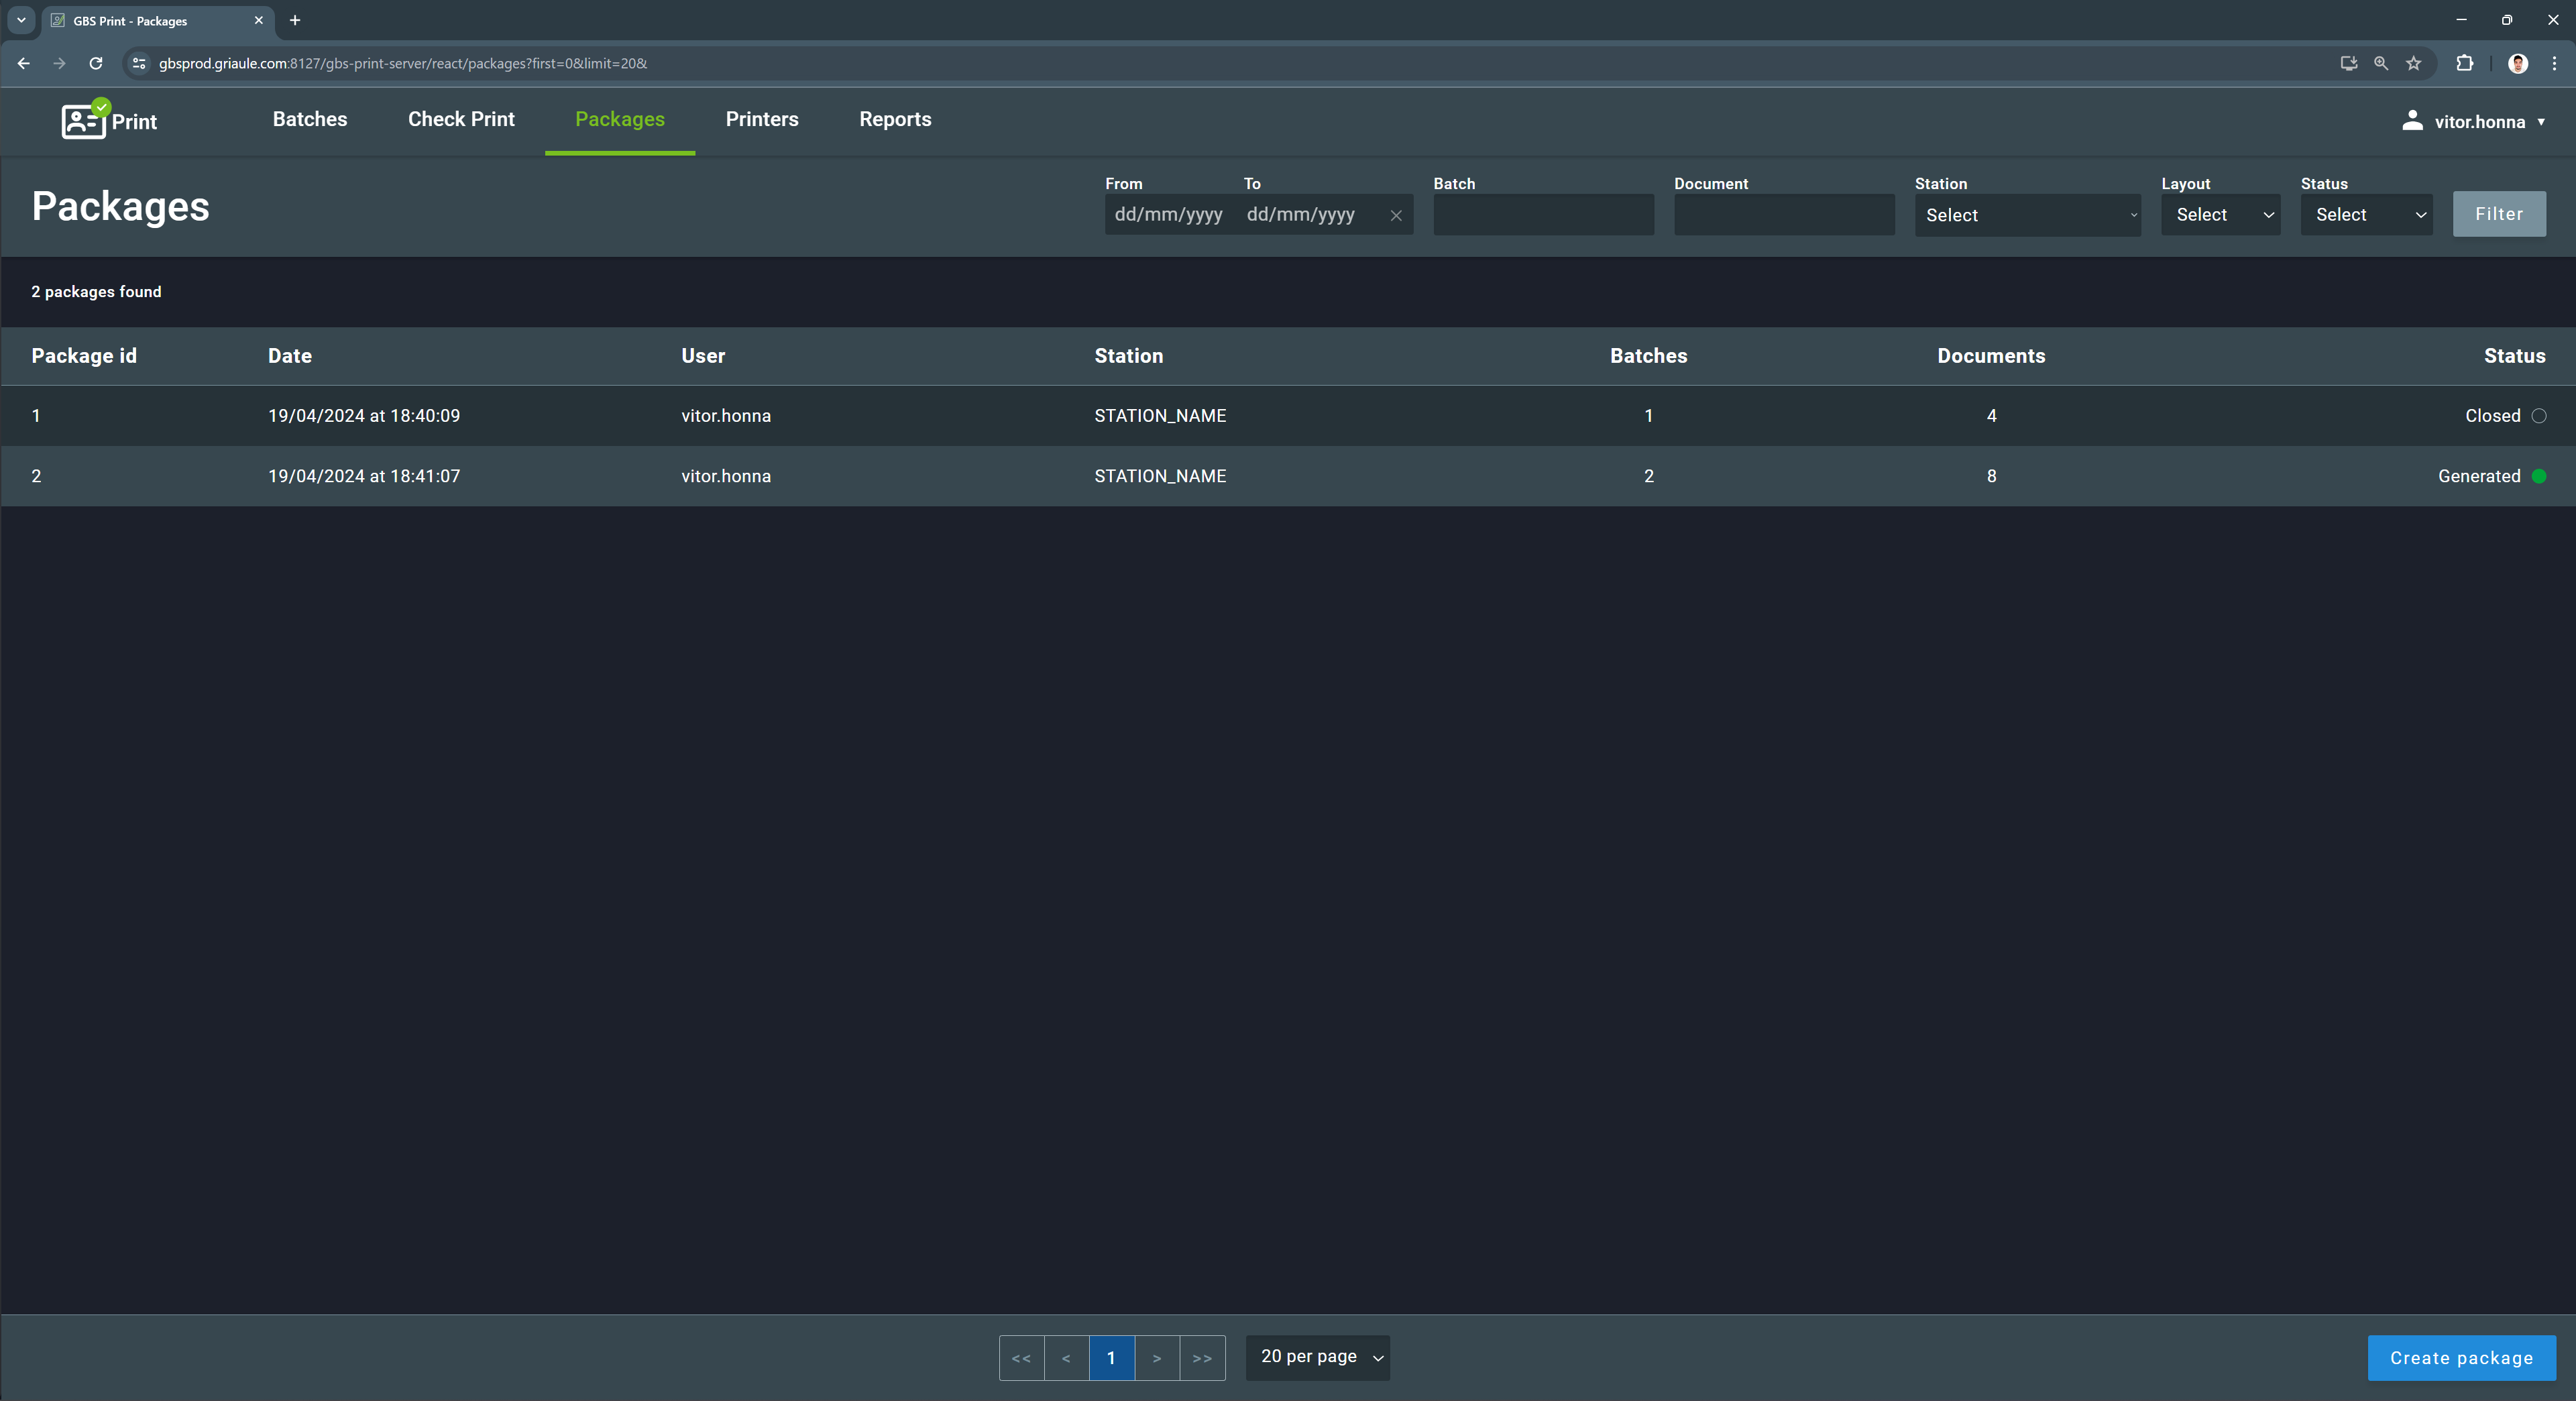
There are only two possible statuses for a package:
| Status | Color | Description |
|---|---|---|
| Generated |
Green
|
Initial status. Package has been created and is awaiting to be sent. |
| Closed |
Transparent
|
Final status. |
The package status evolves as they are processed following the Print workflow. For further details, refer to Step 3: Packages Tab in the Workflows section.
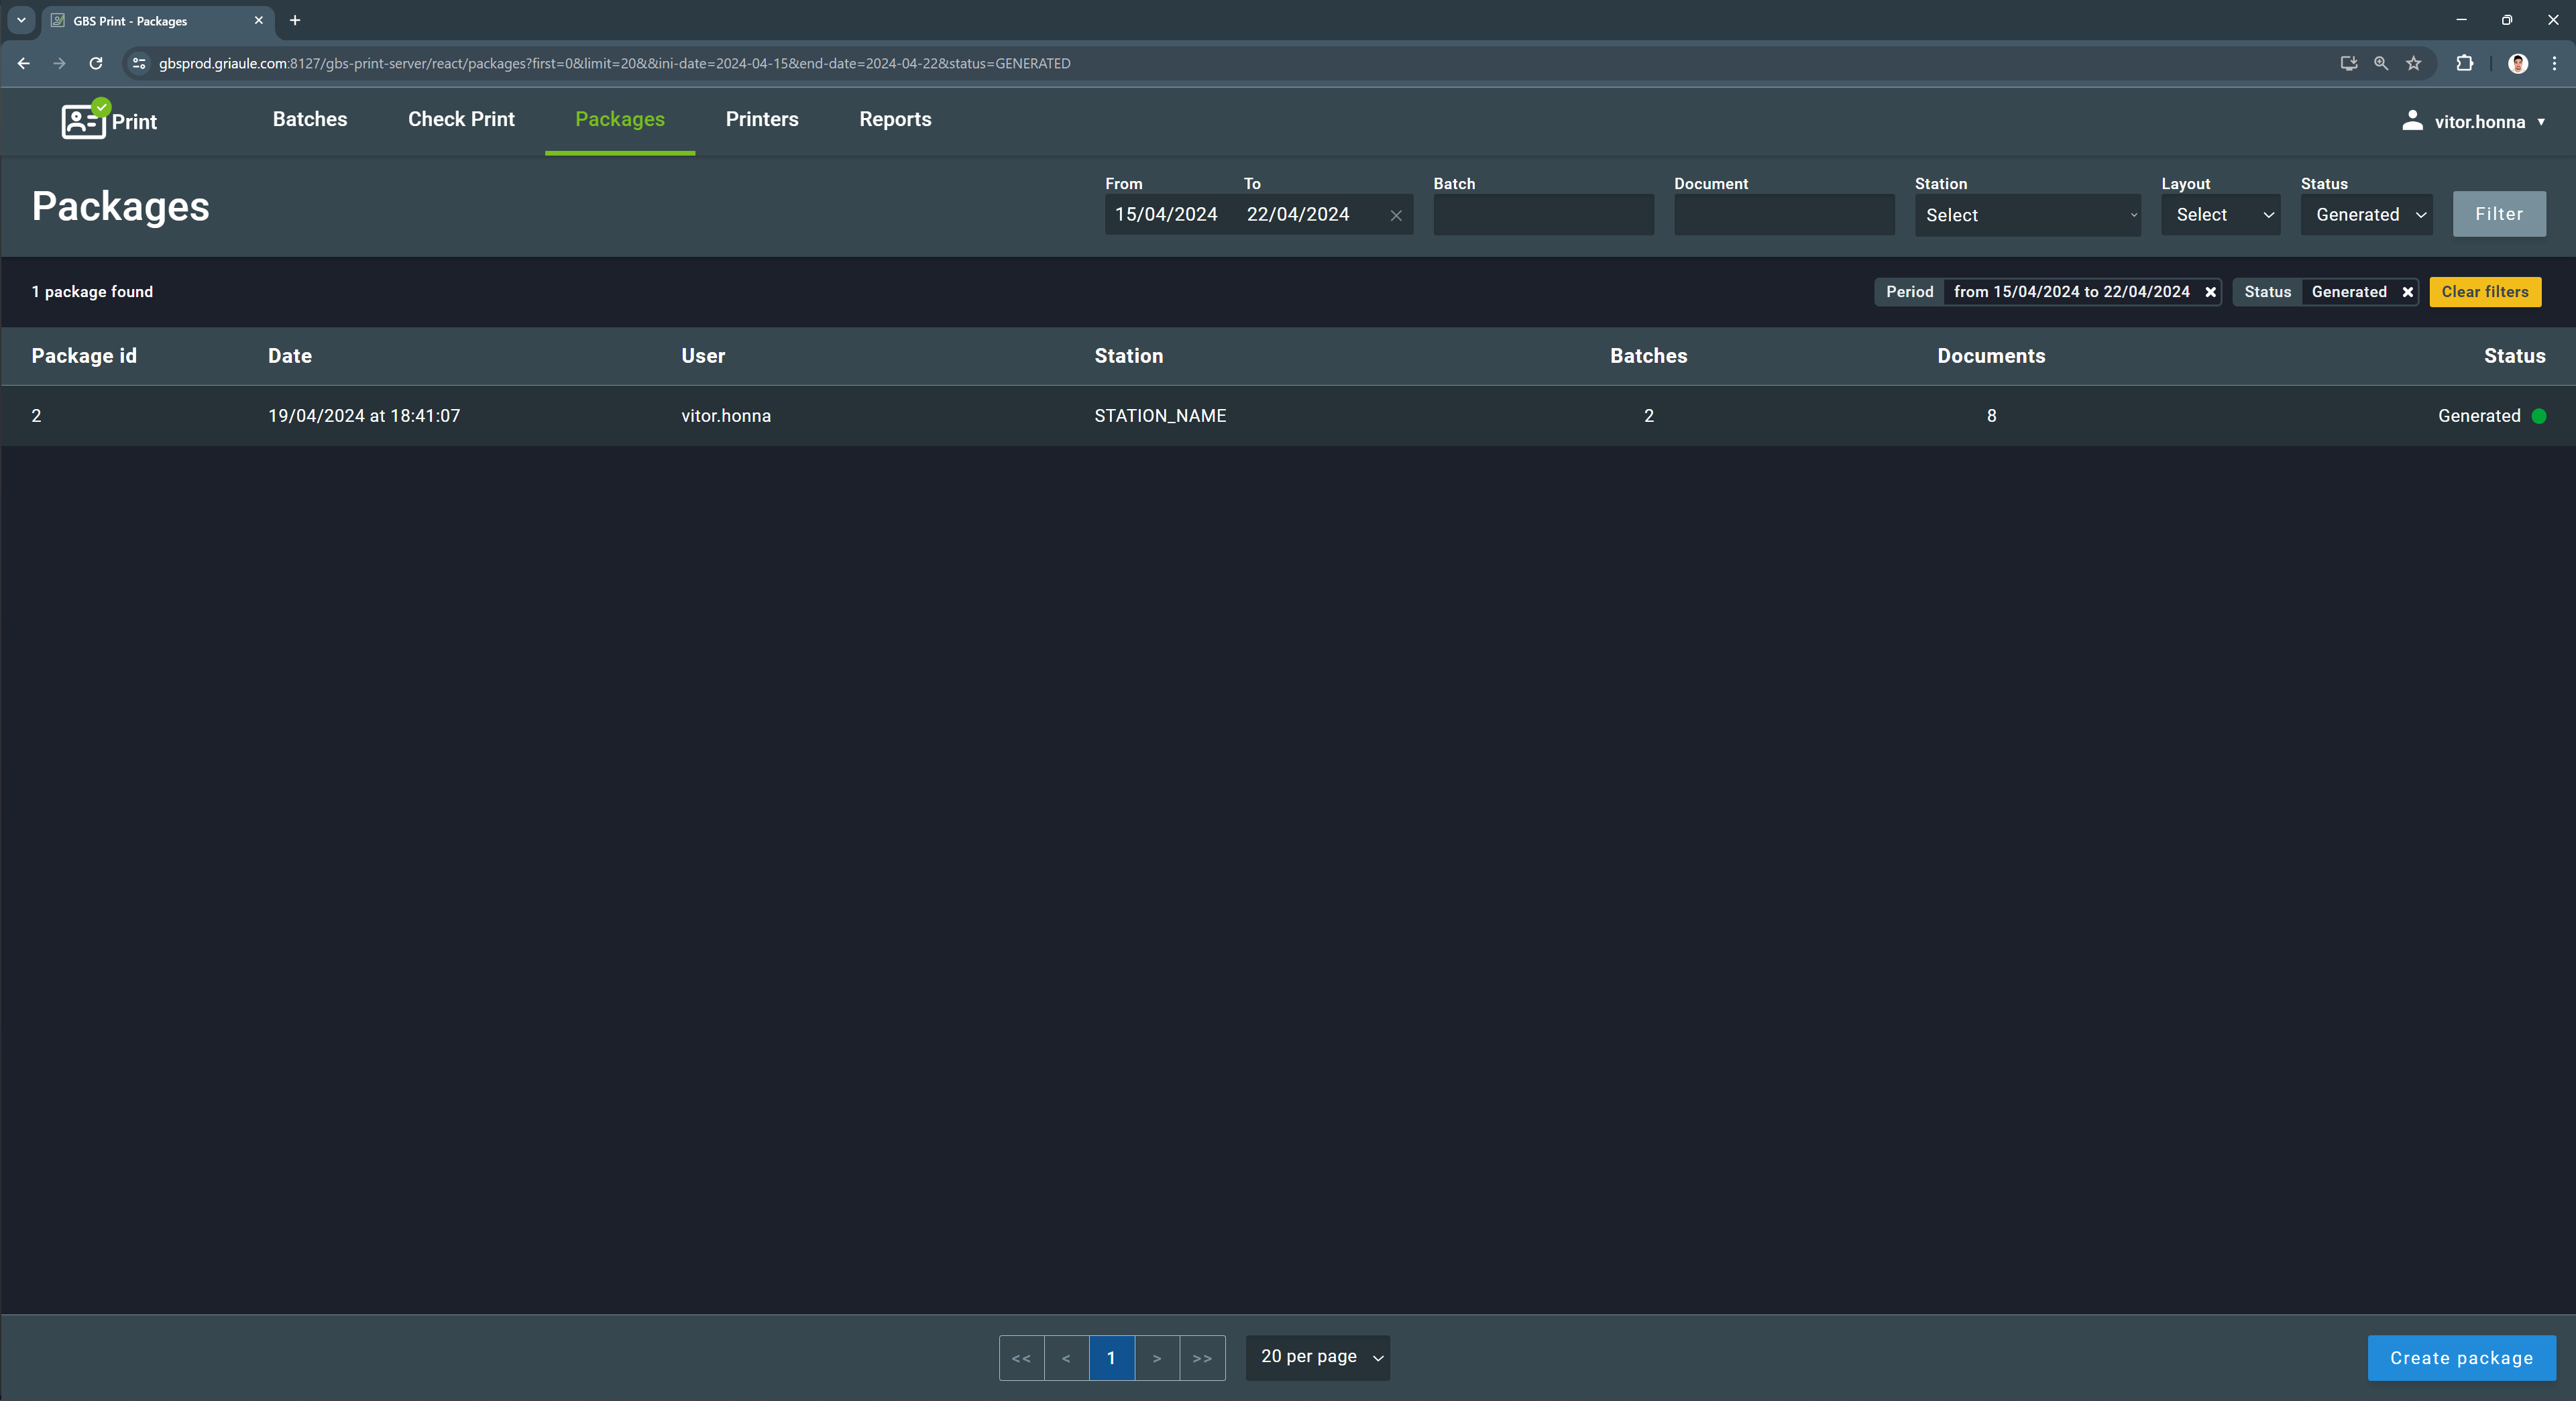
Similarly to the other tabs, there are filter options to help the user find specific packages. It is possible to filter by date range, batch id, document number, station, layout, and status. To apply a filter, select the desired filters and click on Filter. Then, only the packages that meet the selected criteria will be displayed.
To remove a filter, click on the X button beside the applied filter, or click on the yellow button Clear filters to remove all the filters at once.
2.3.1. Creating a Package
To create a package, click on the Create package button, located on the lower-right corner of the screen. Then, in the dialog box, open the dropdown menu and select a station from the list. It is also possible to find a station by typing its name in the search field, after opening the dropdown menu.
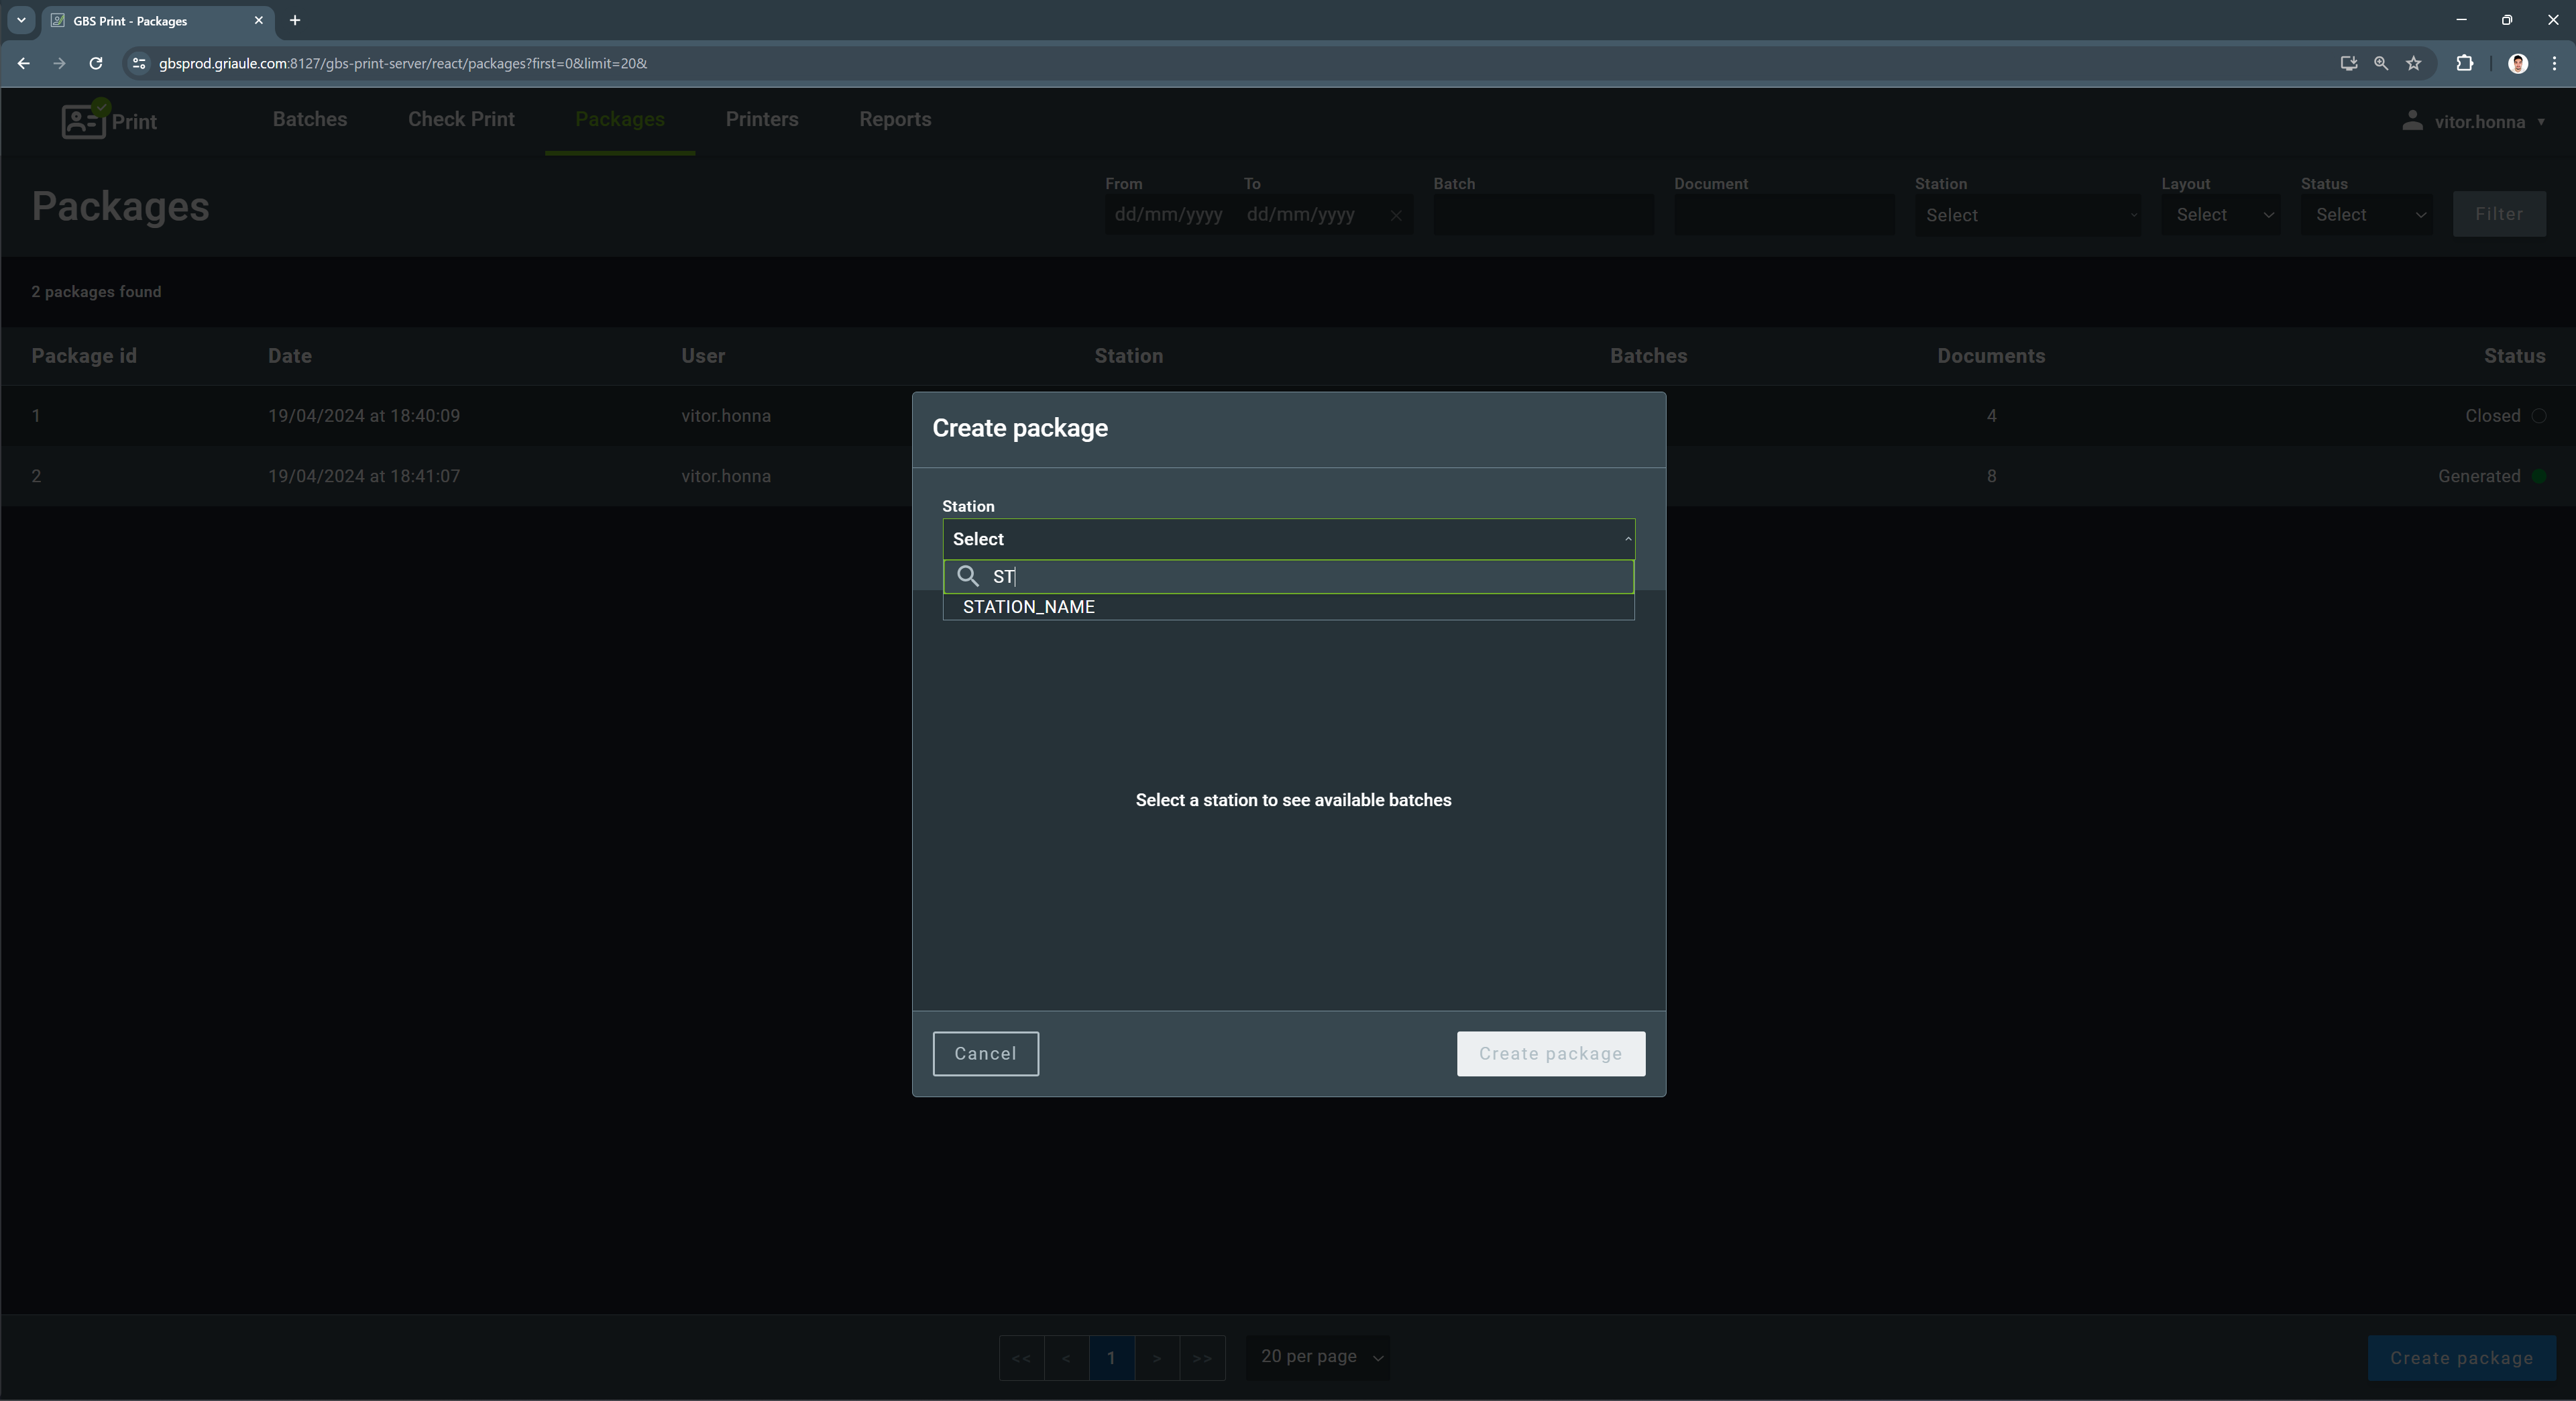
Next, using the checkboxes on the left side of the batch lines, select the batches that will be part of the package. Only batches with status Check OK can be added to a package. Finally, click on the Create package button.
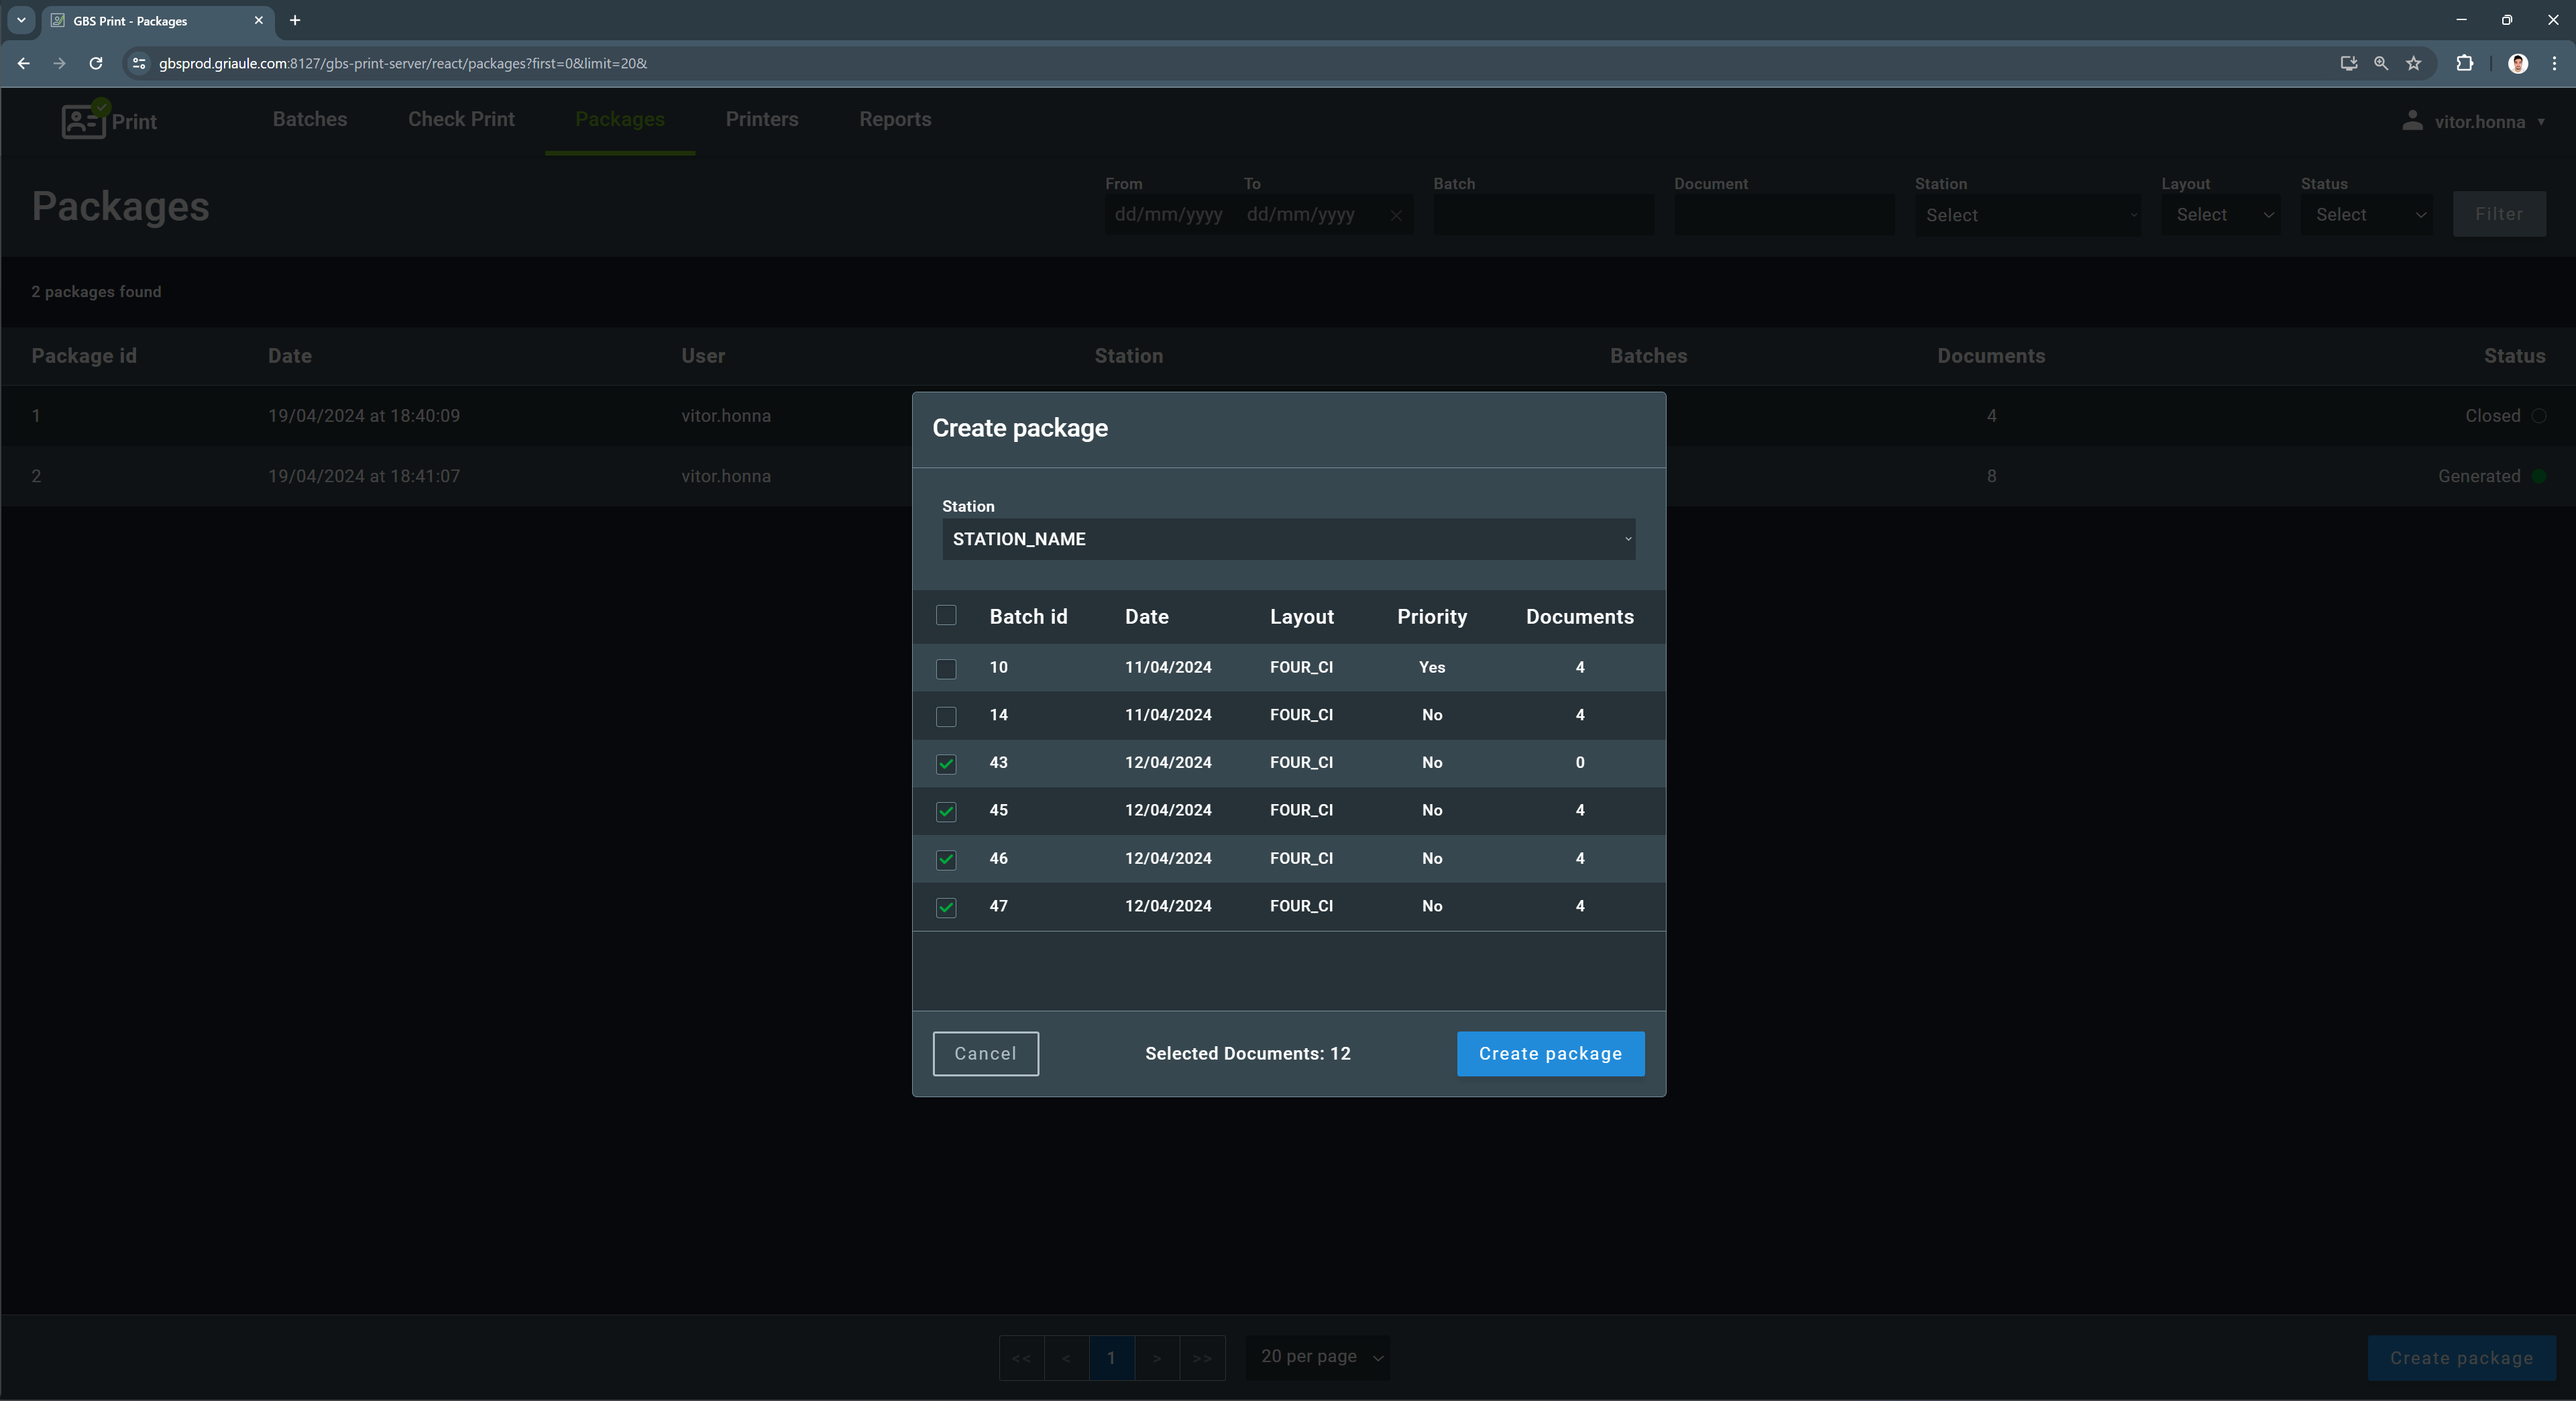
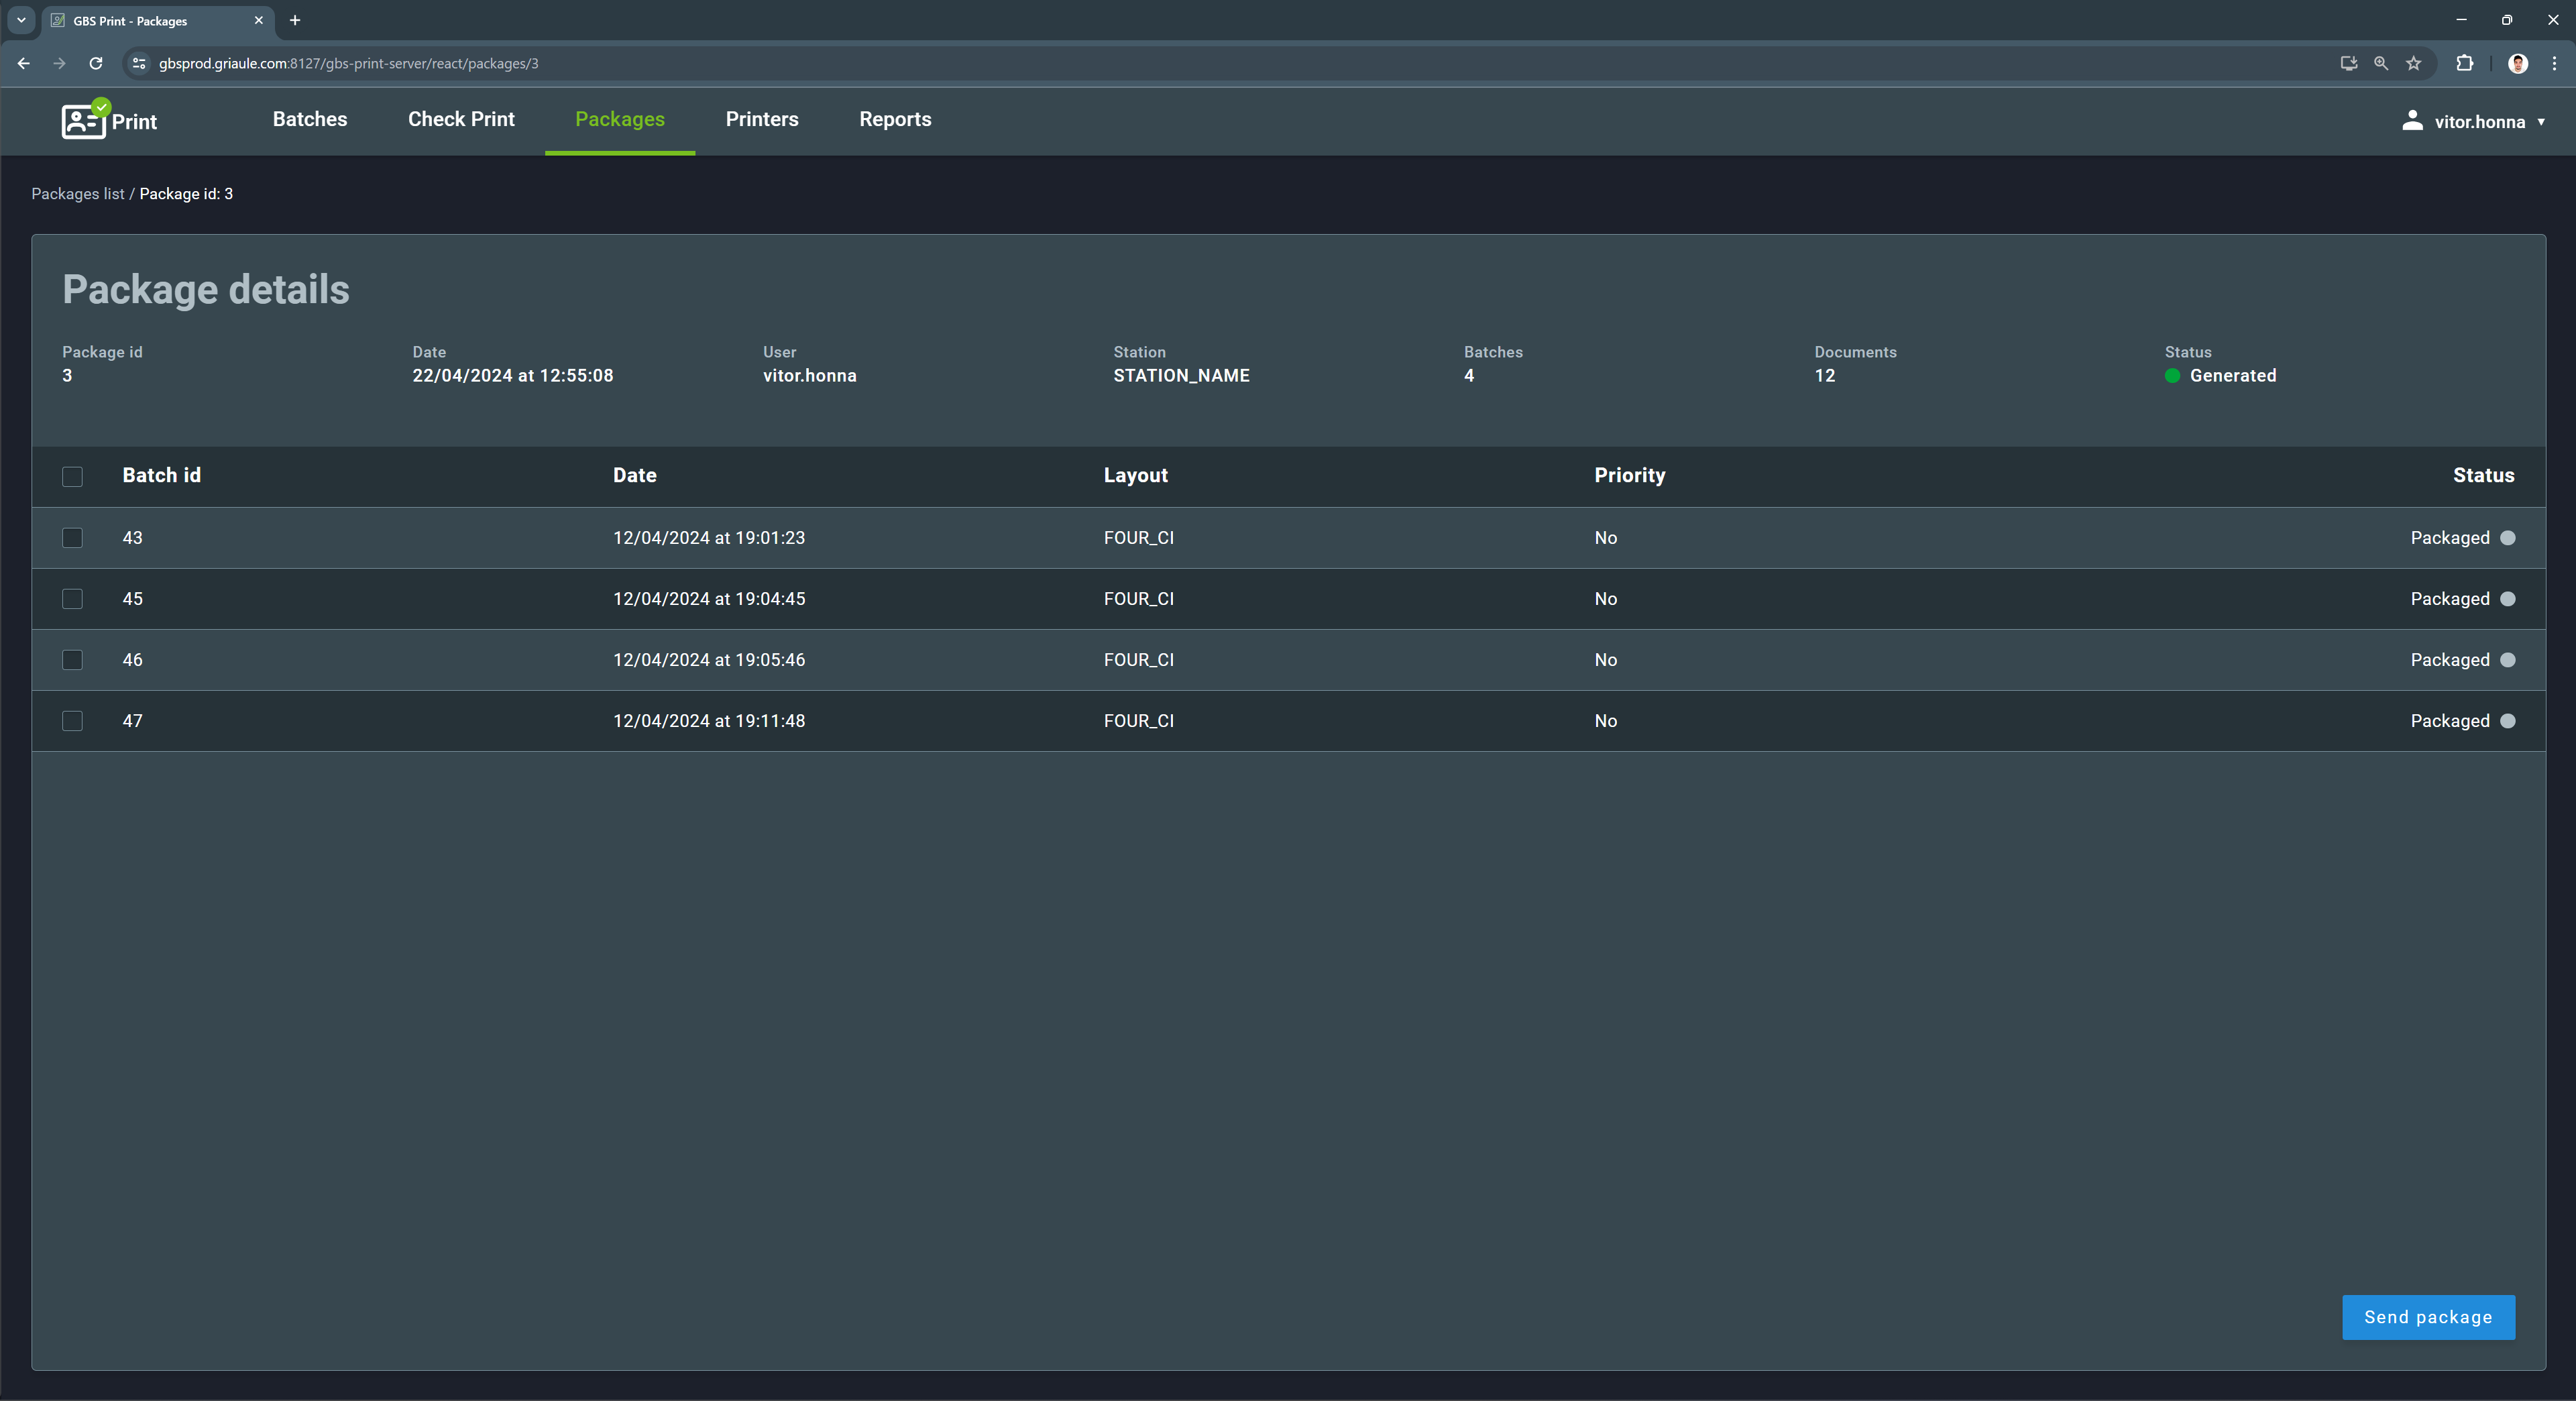
The new package will be added to the list, with the status Generated. Clicking on the package line will open the Package details screen. This screen displays the batches that are part of the package, including the status of each batch.
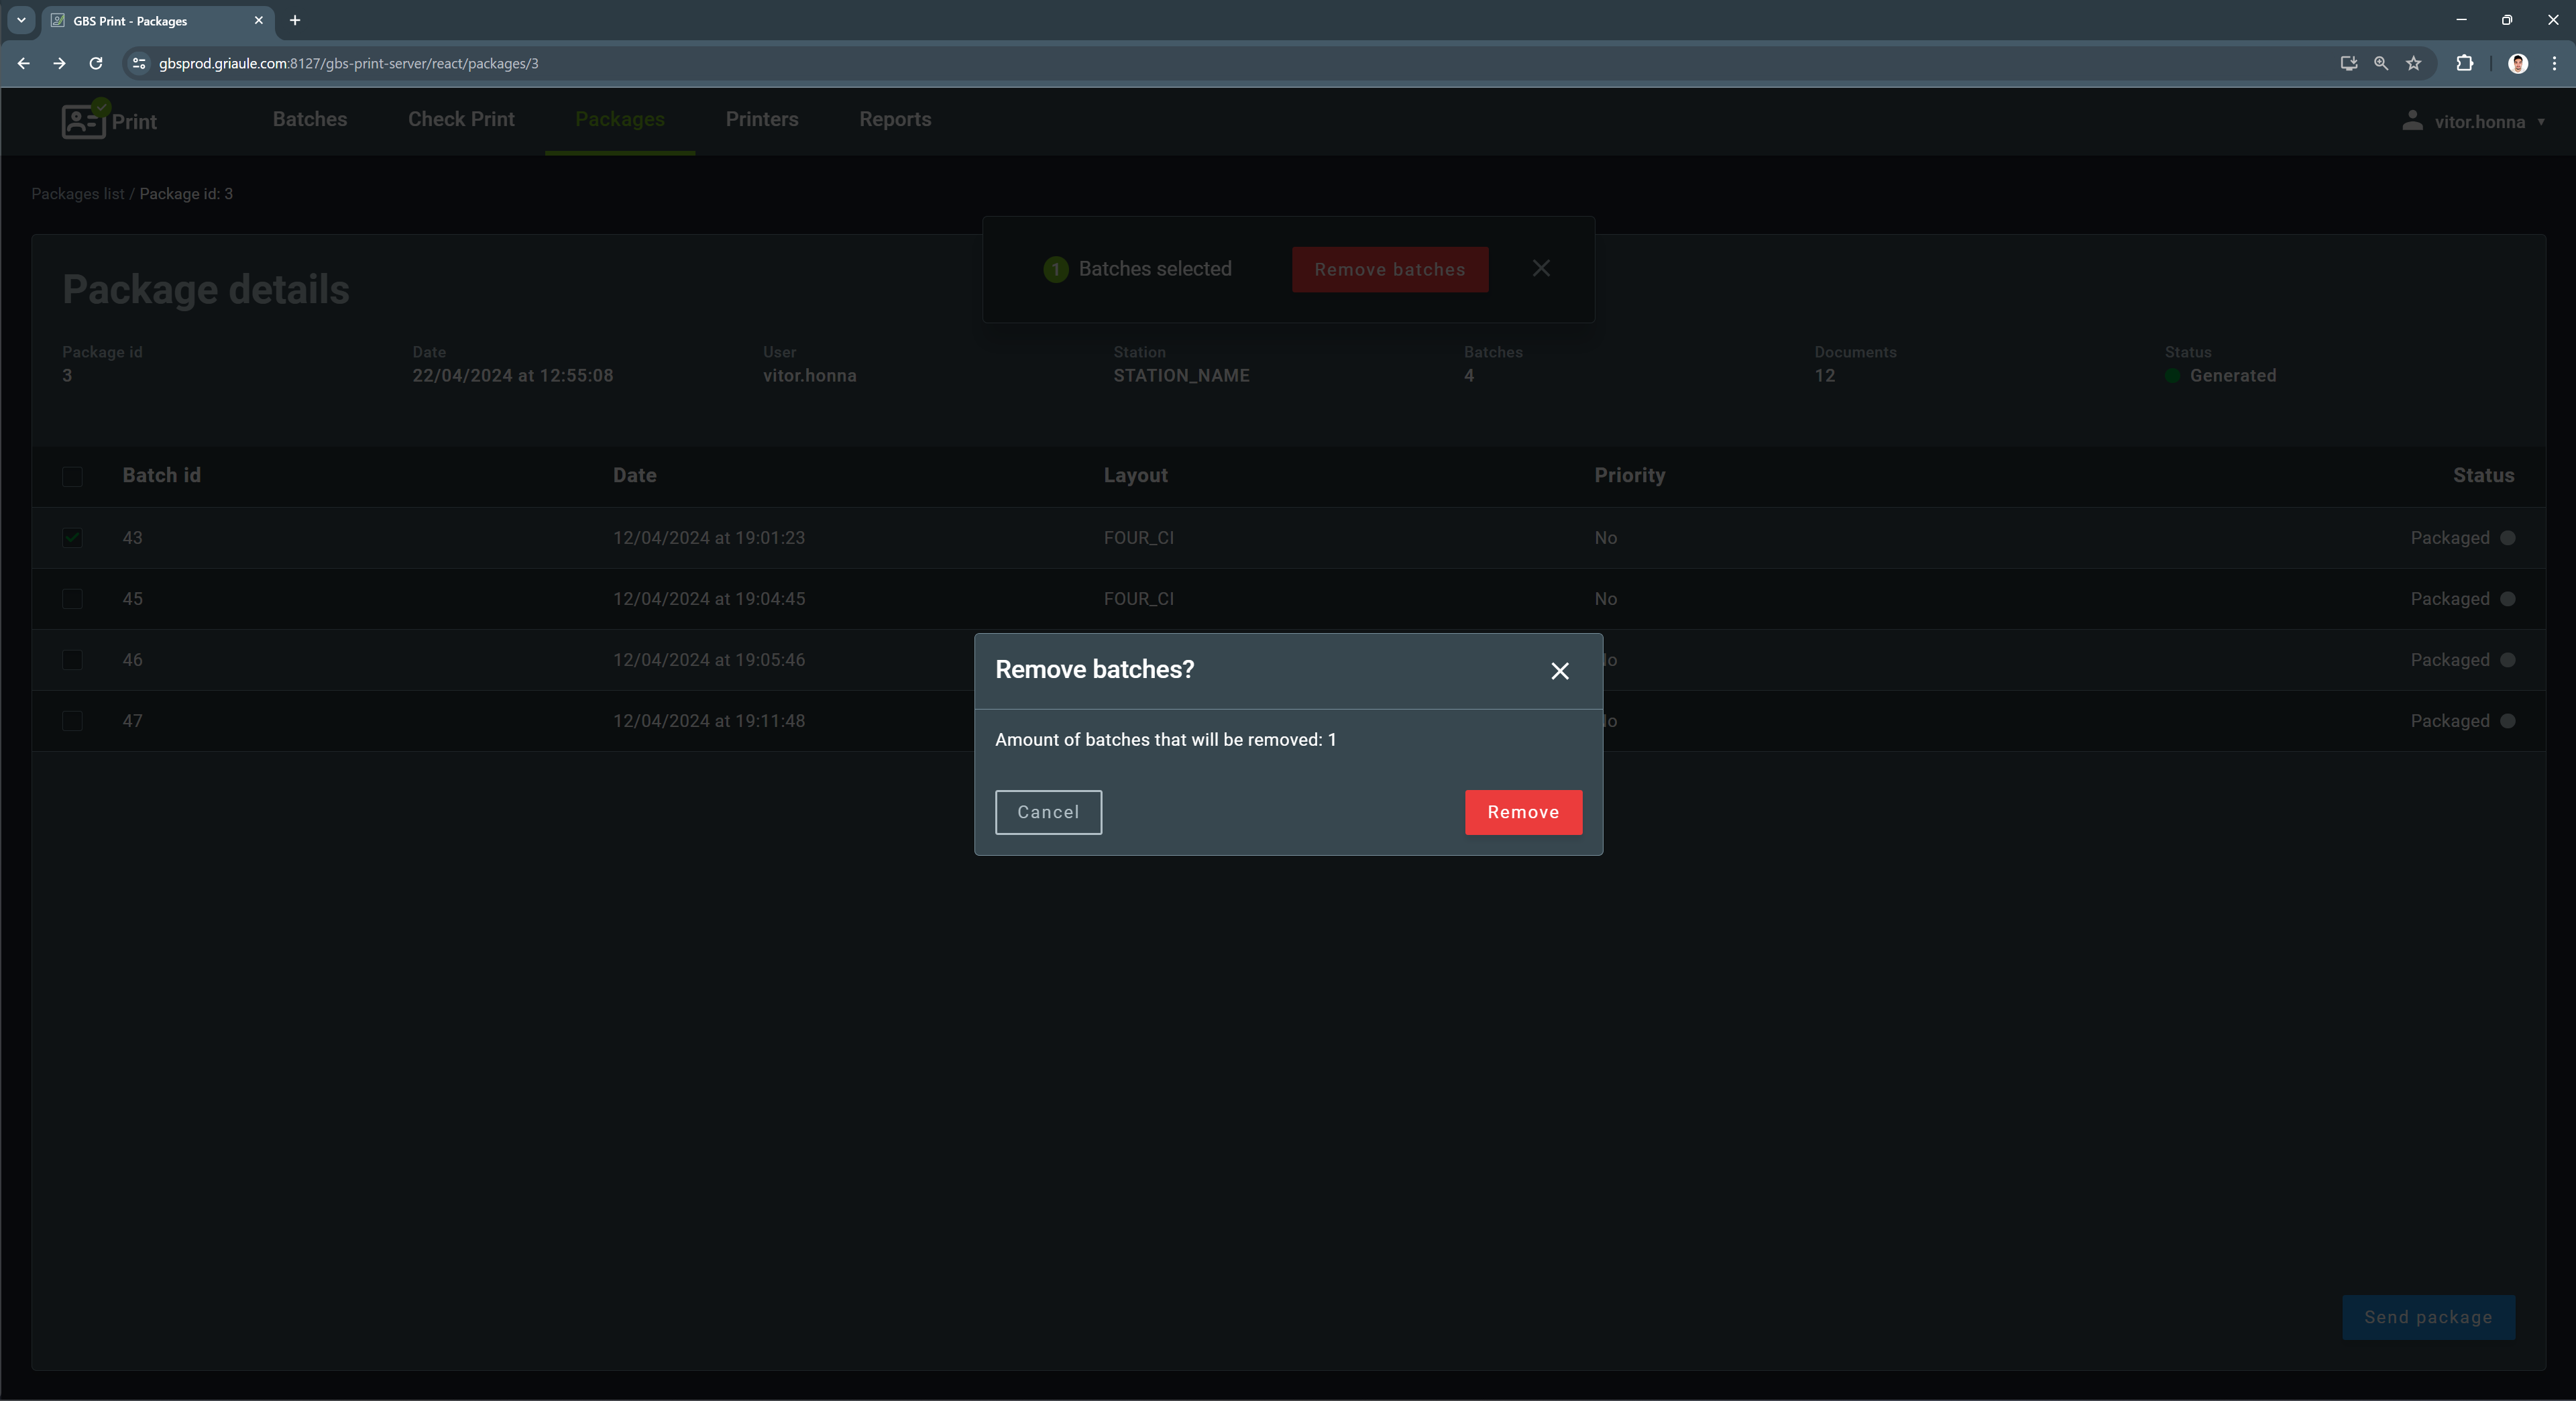
2.3.2. Removing a Batch from a Package
In the Package details screen, it is possible to remove a batch from a package. To do so, select a batch using the checkbox on the left side of the batch line. Then, click on the Remove batches button.
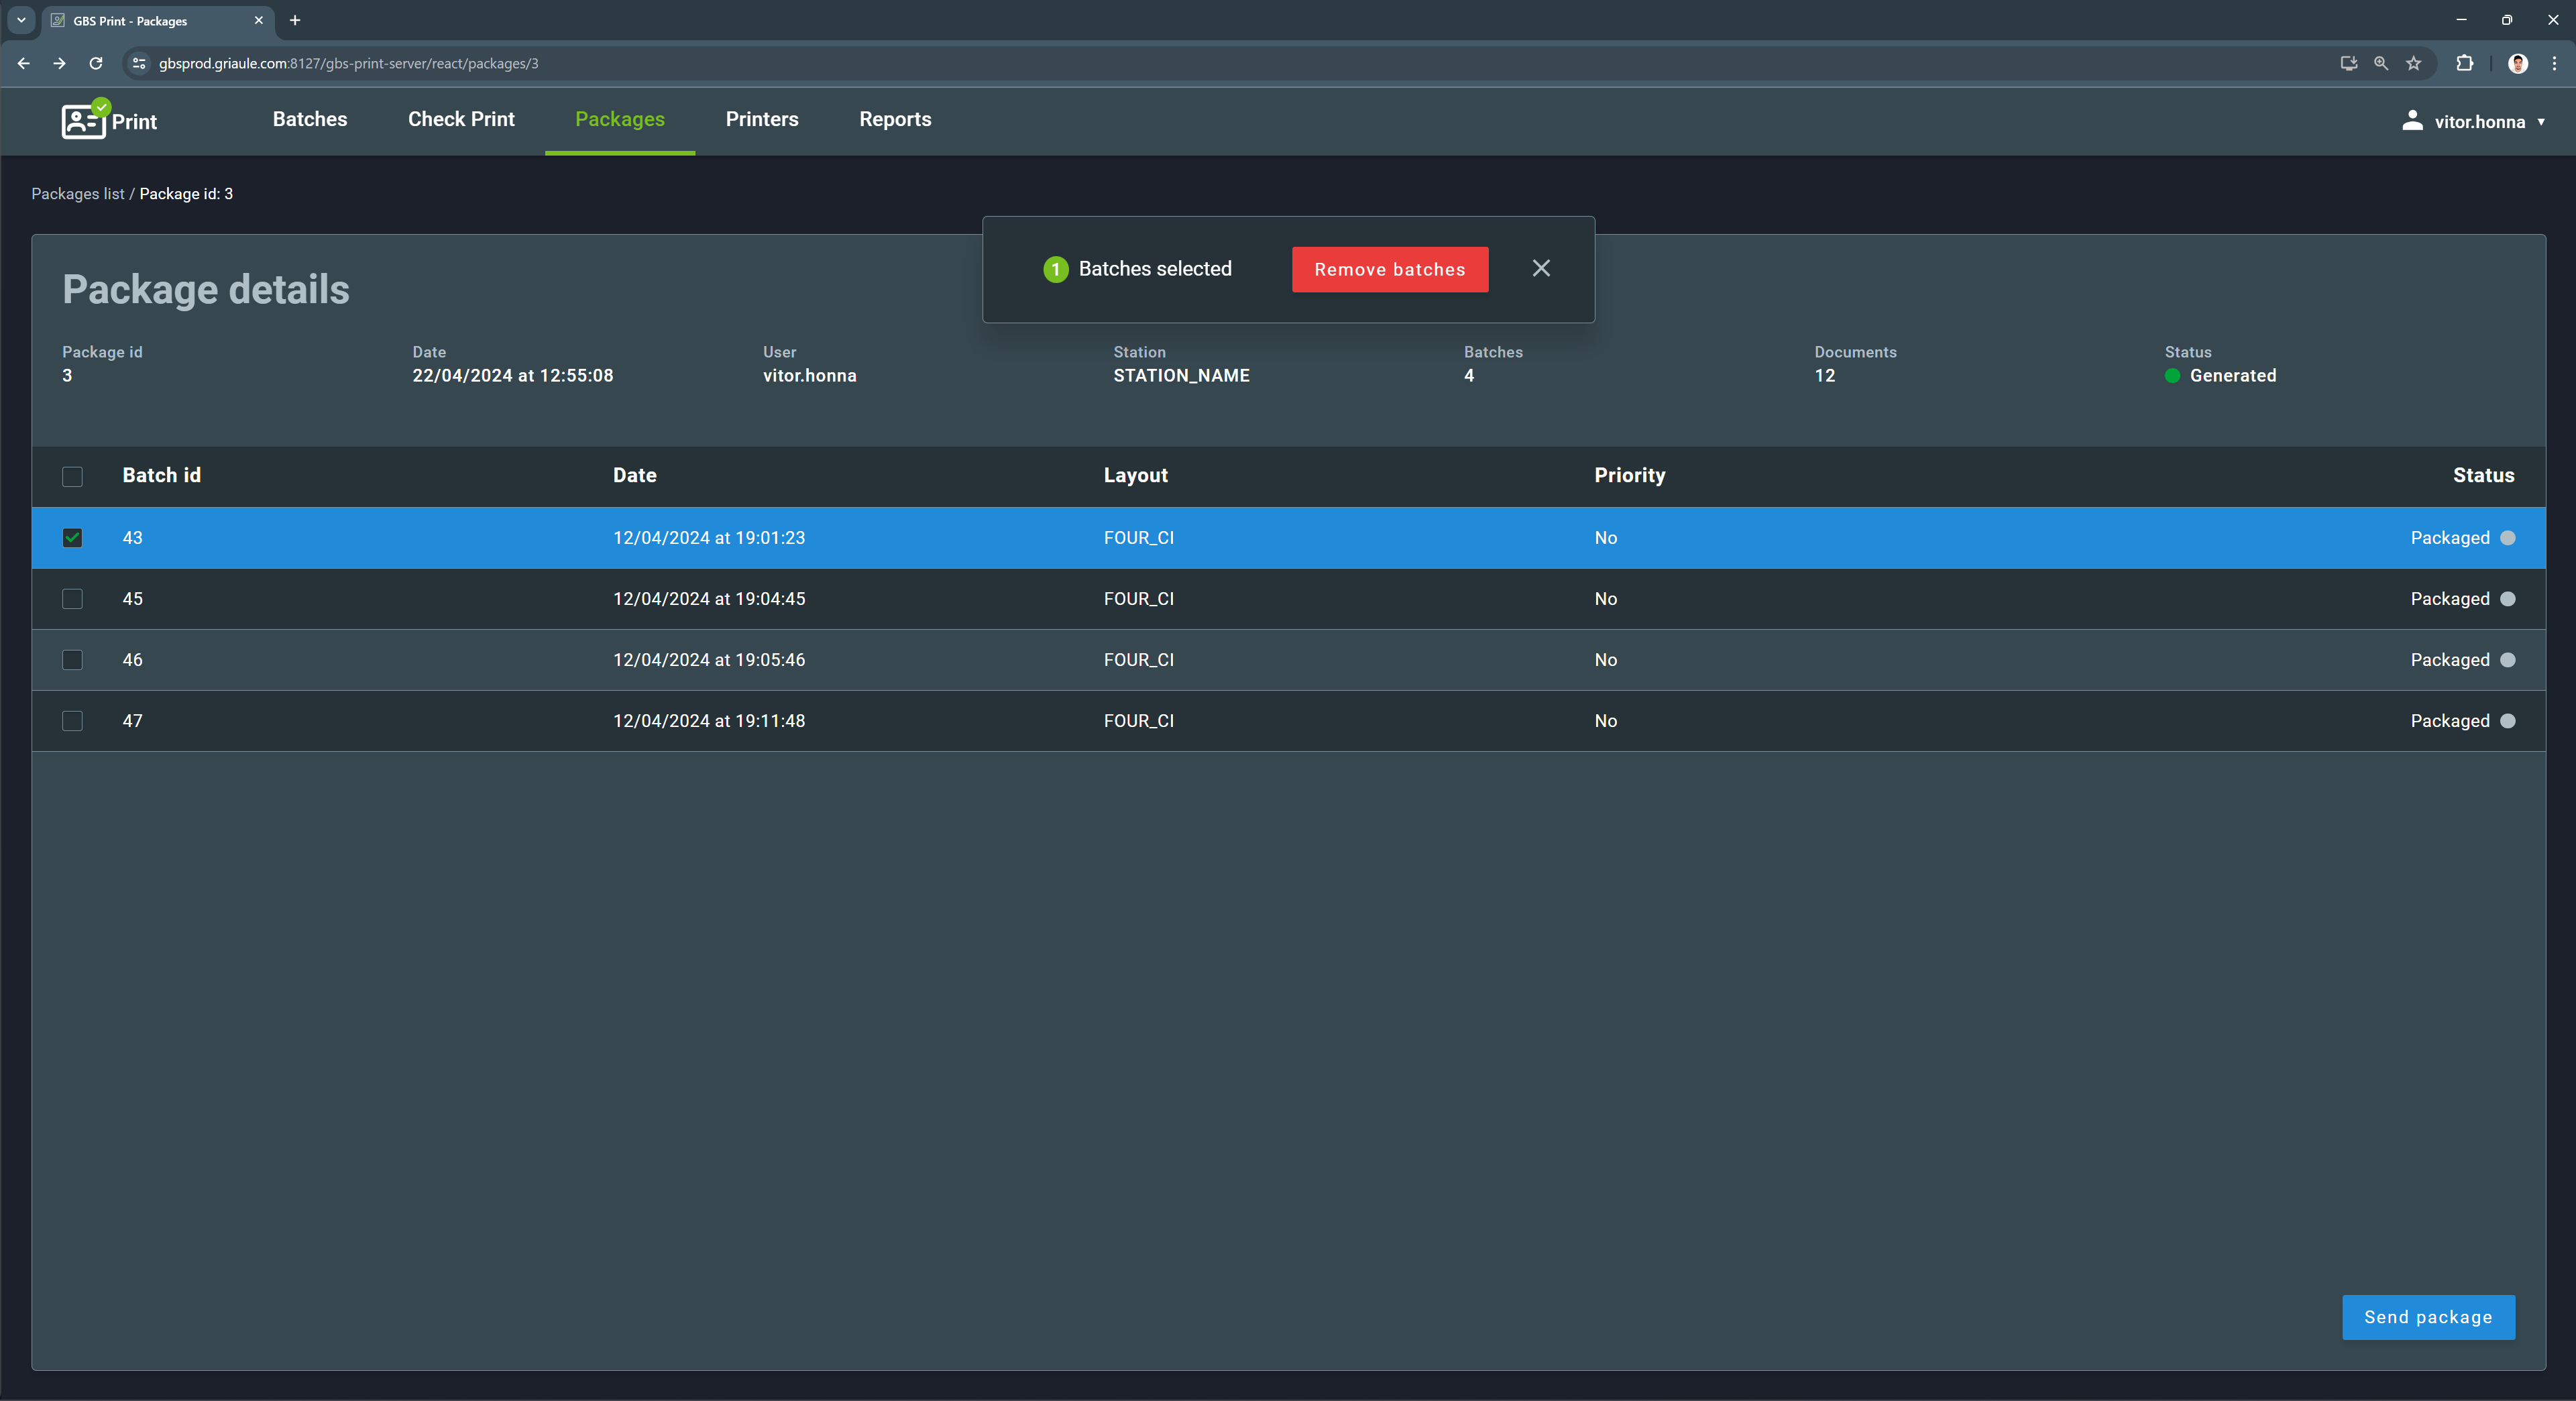
A dialog box will appear asking for confirmation. Click on Remove to confirm the action.
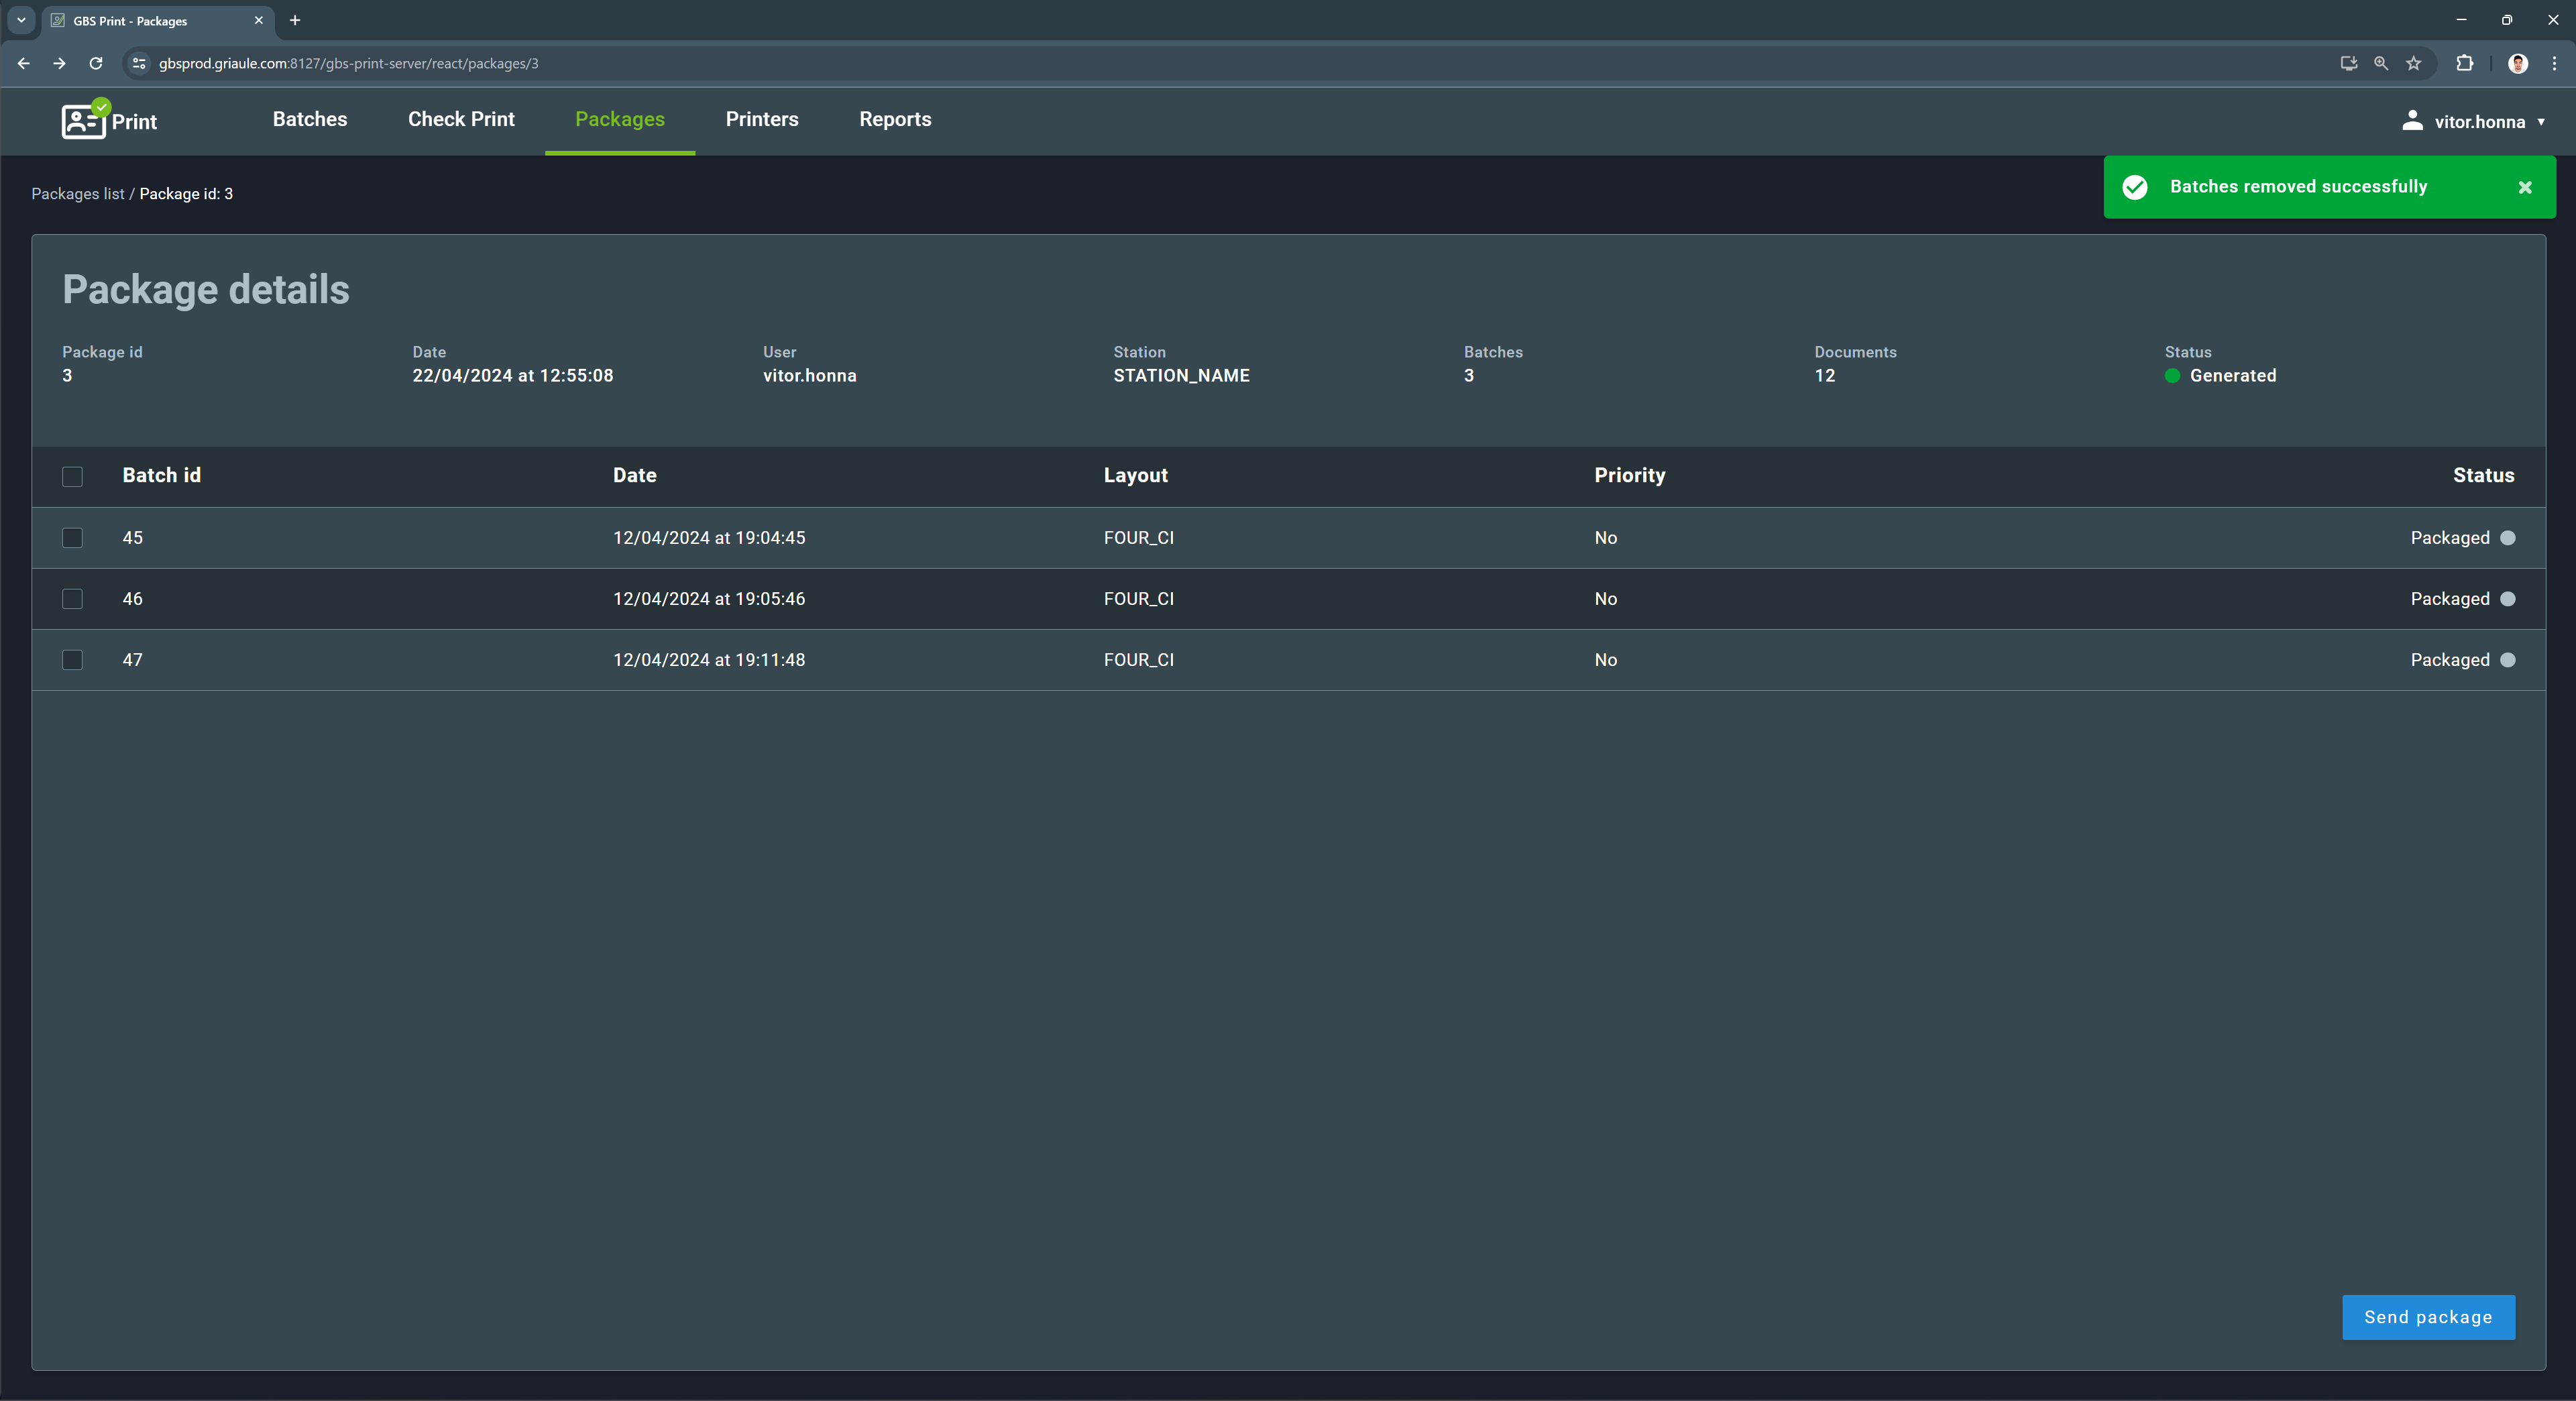
If the batch is successfully removed, a success message will be displayed on the upper-right corner of the screen.
2.3.3. Sending a Package
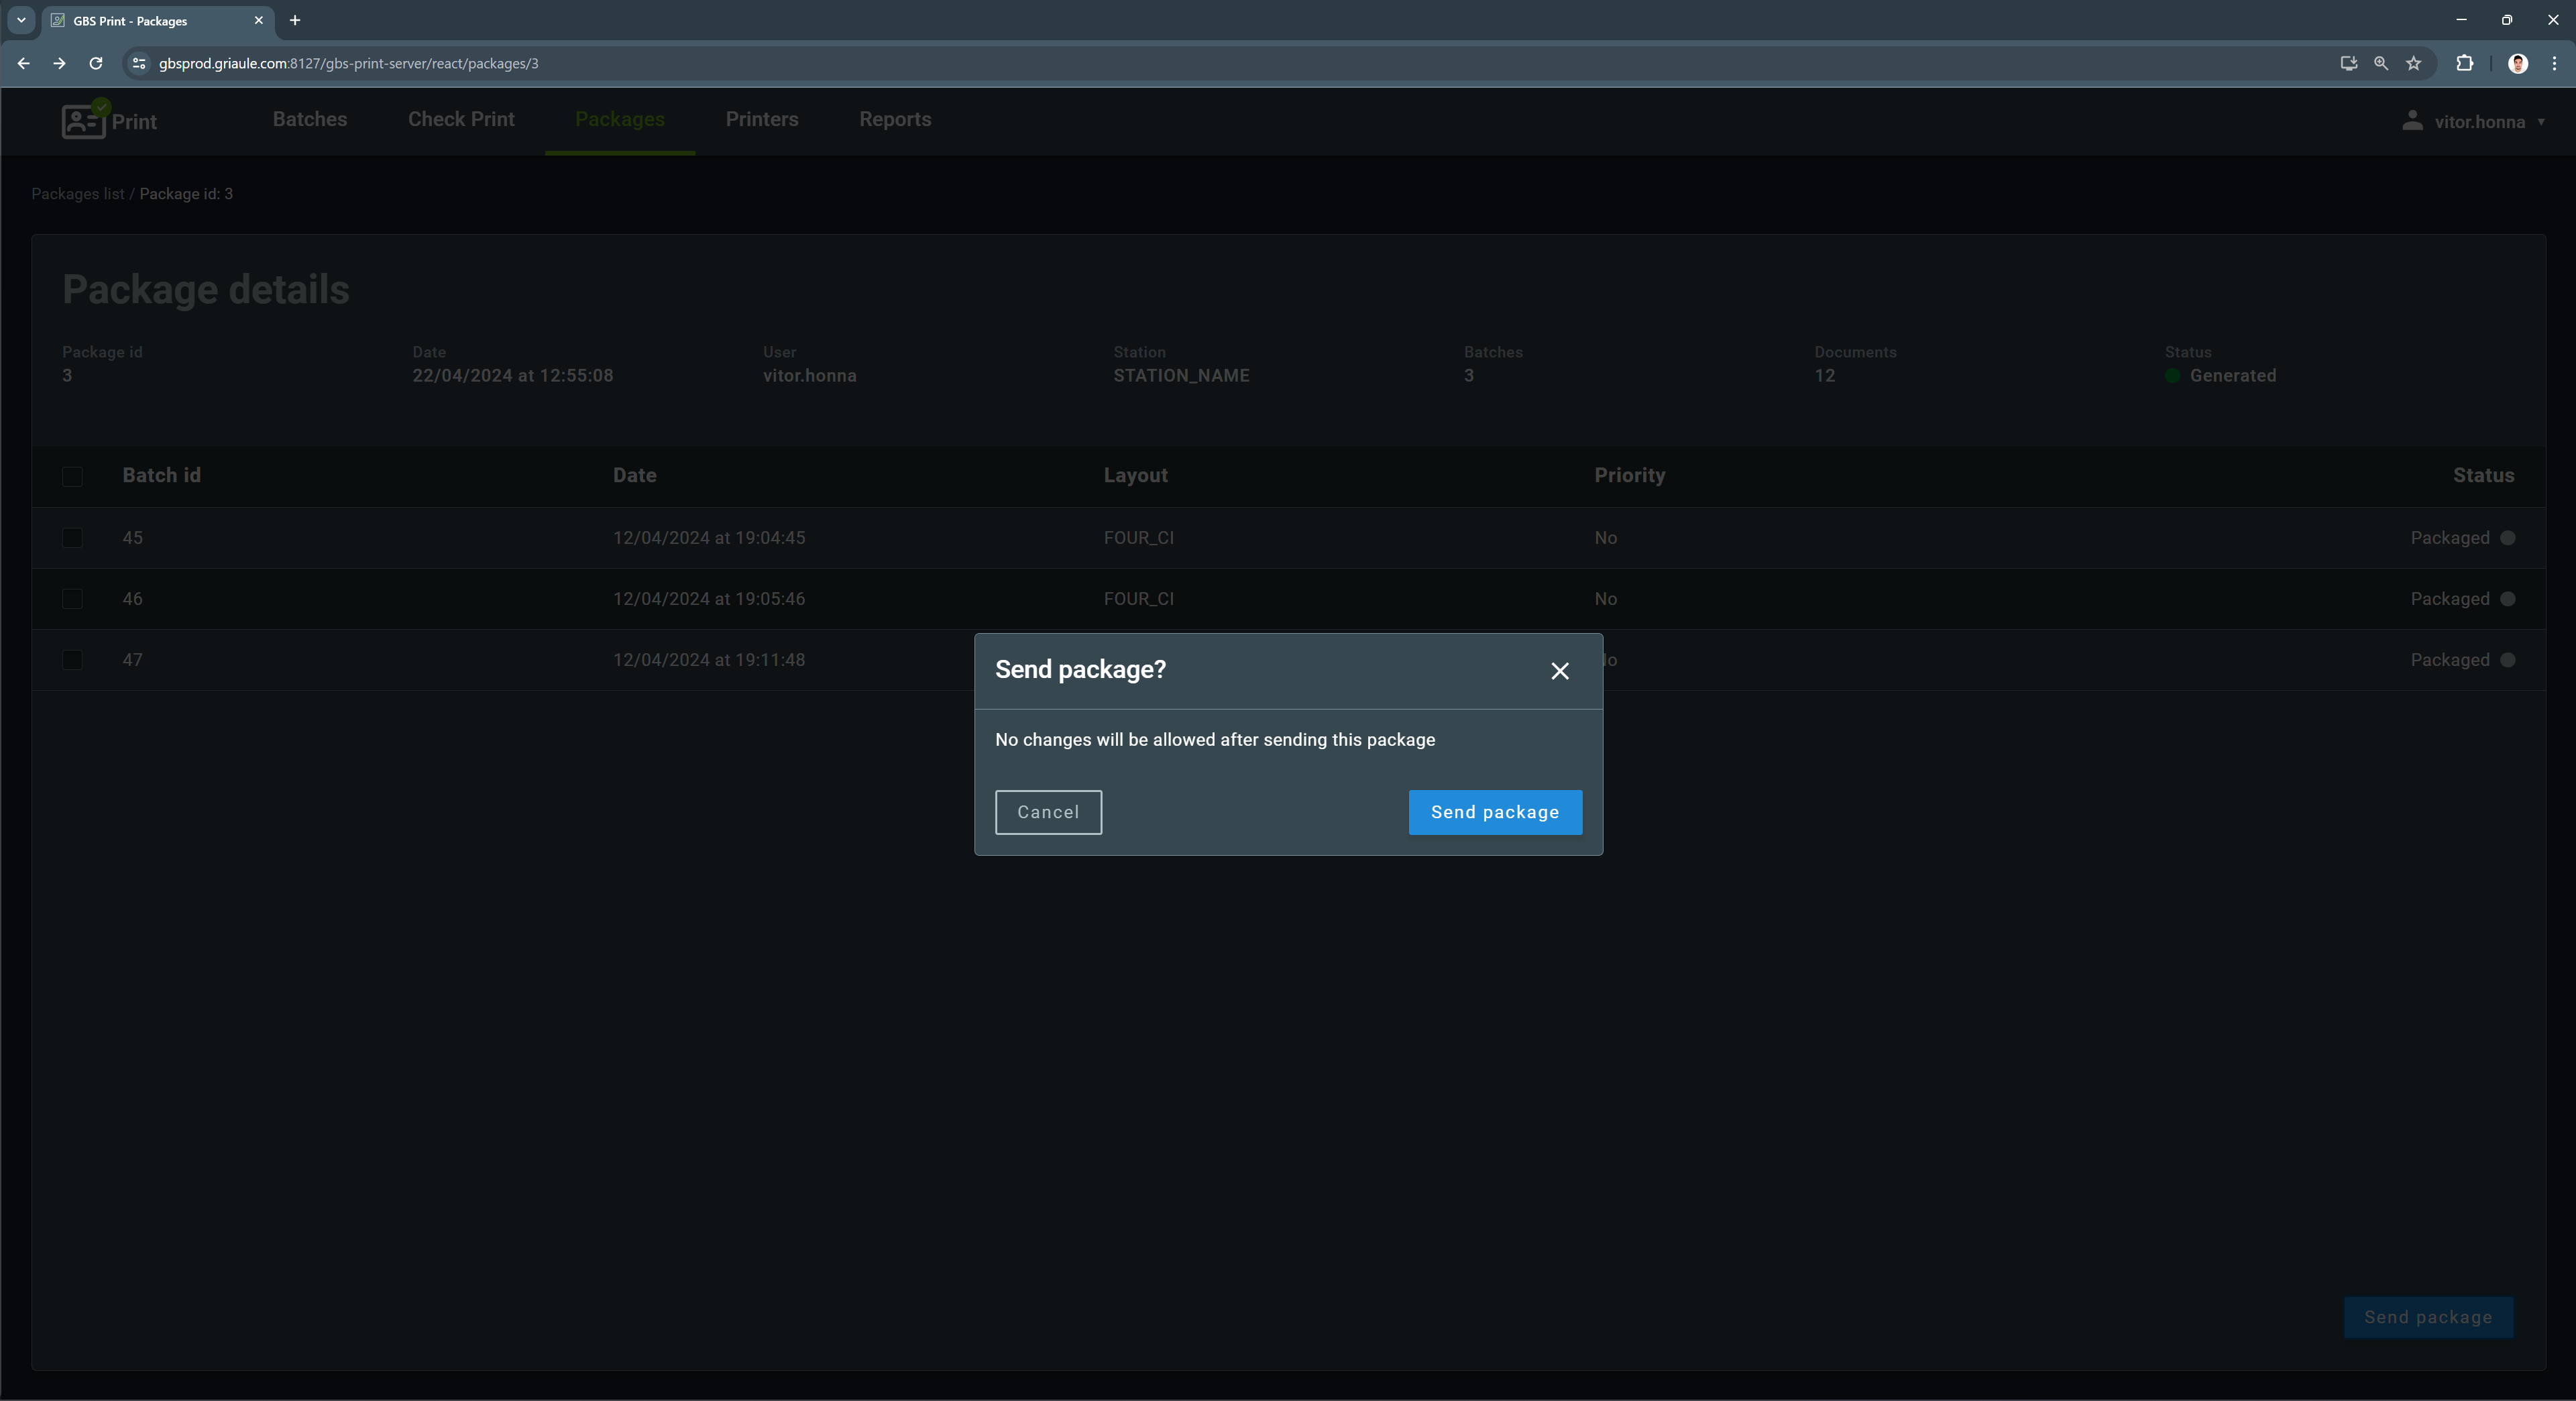
To send a package, in the Package details screen, click on the Send package button. A dialog box will appear asking for confirmation. Click on Send package to confirm the action.
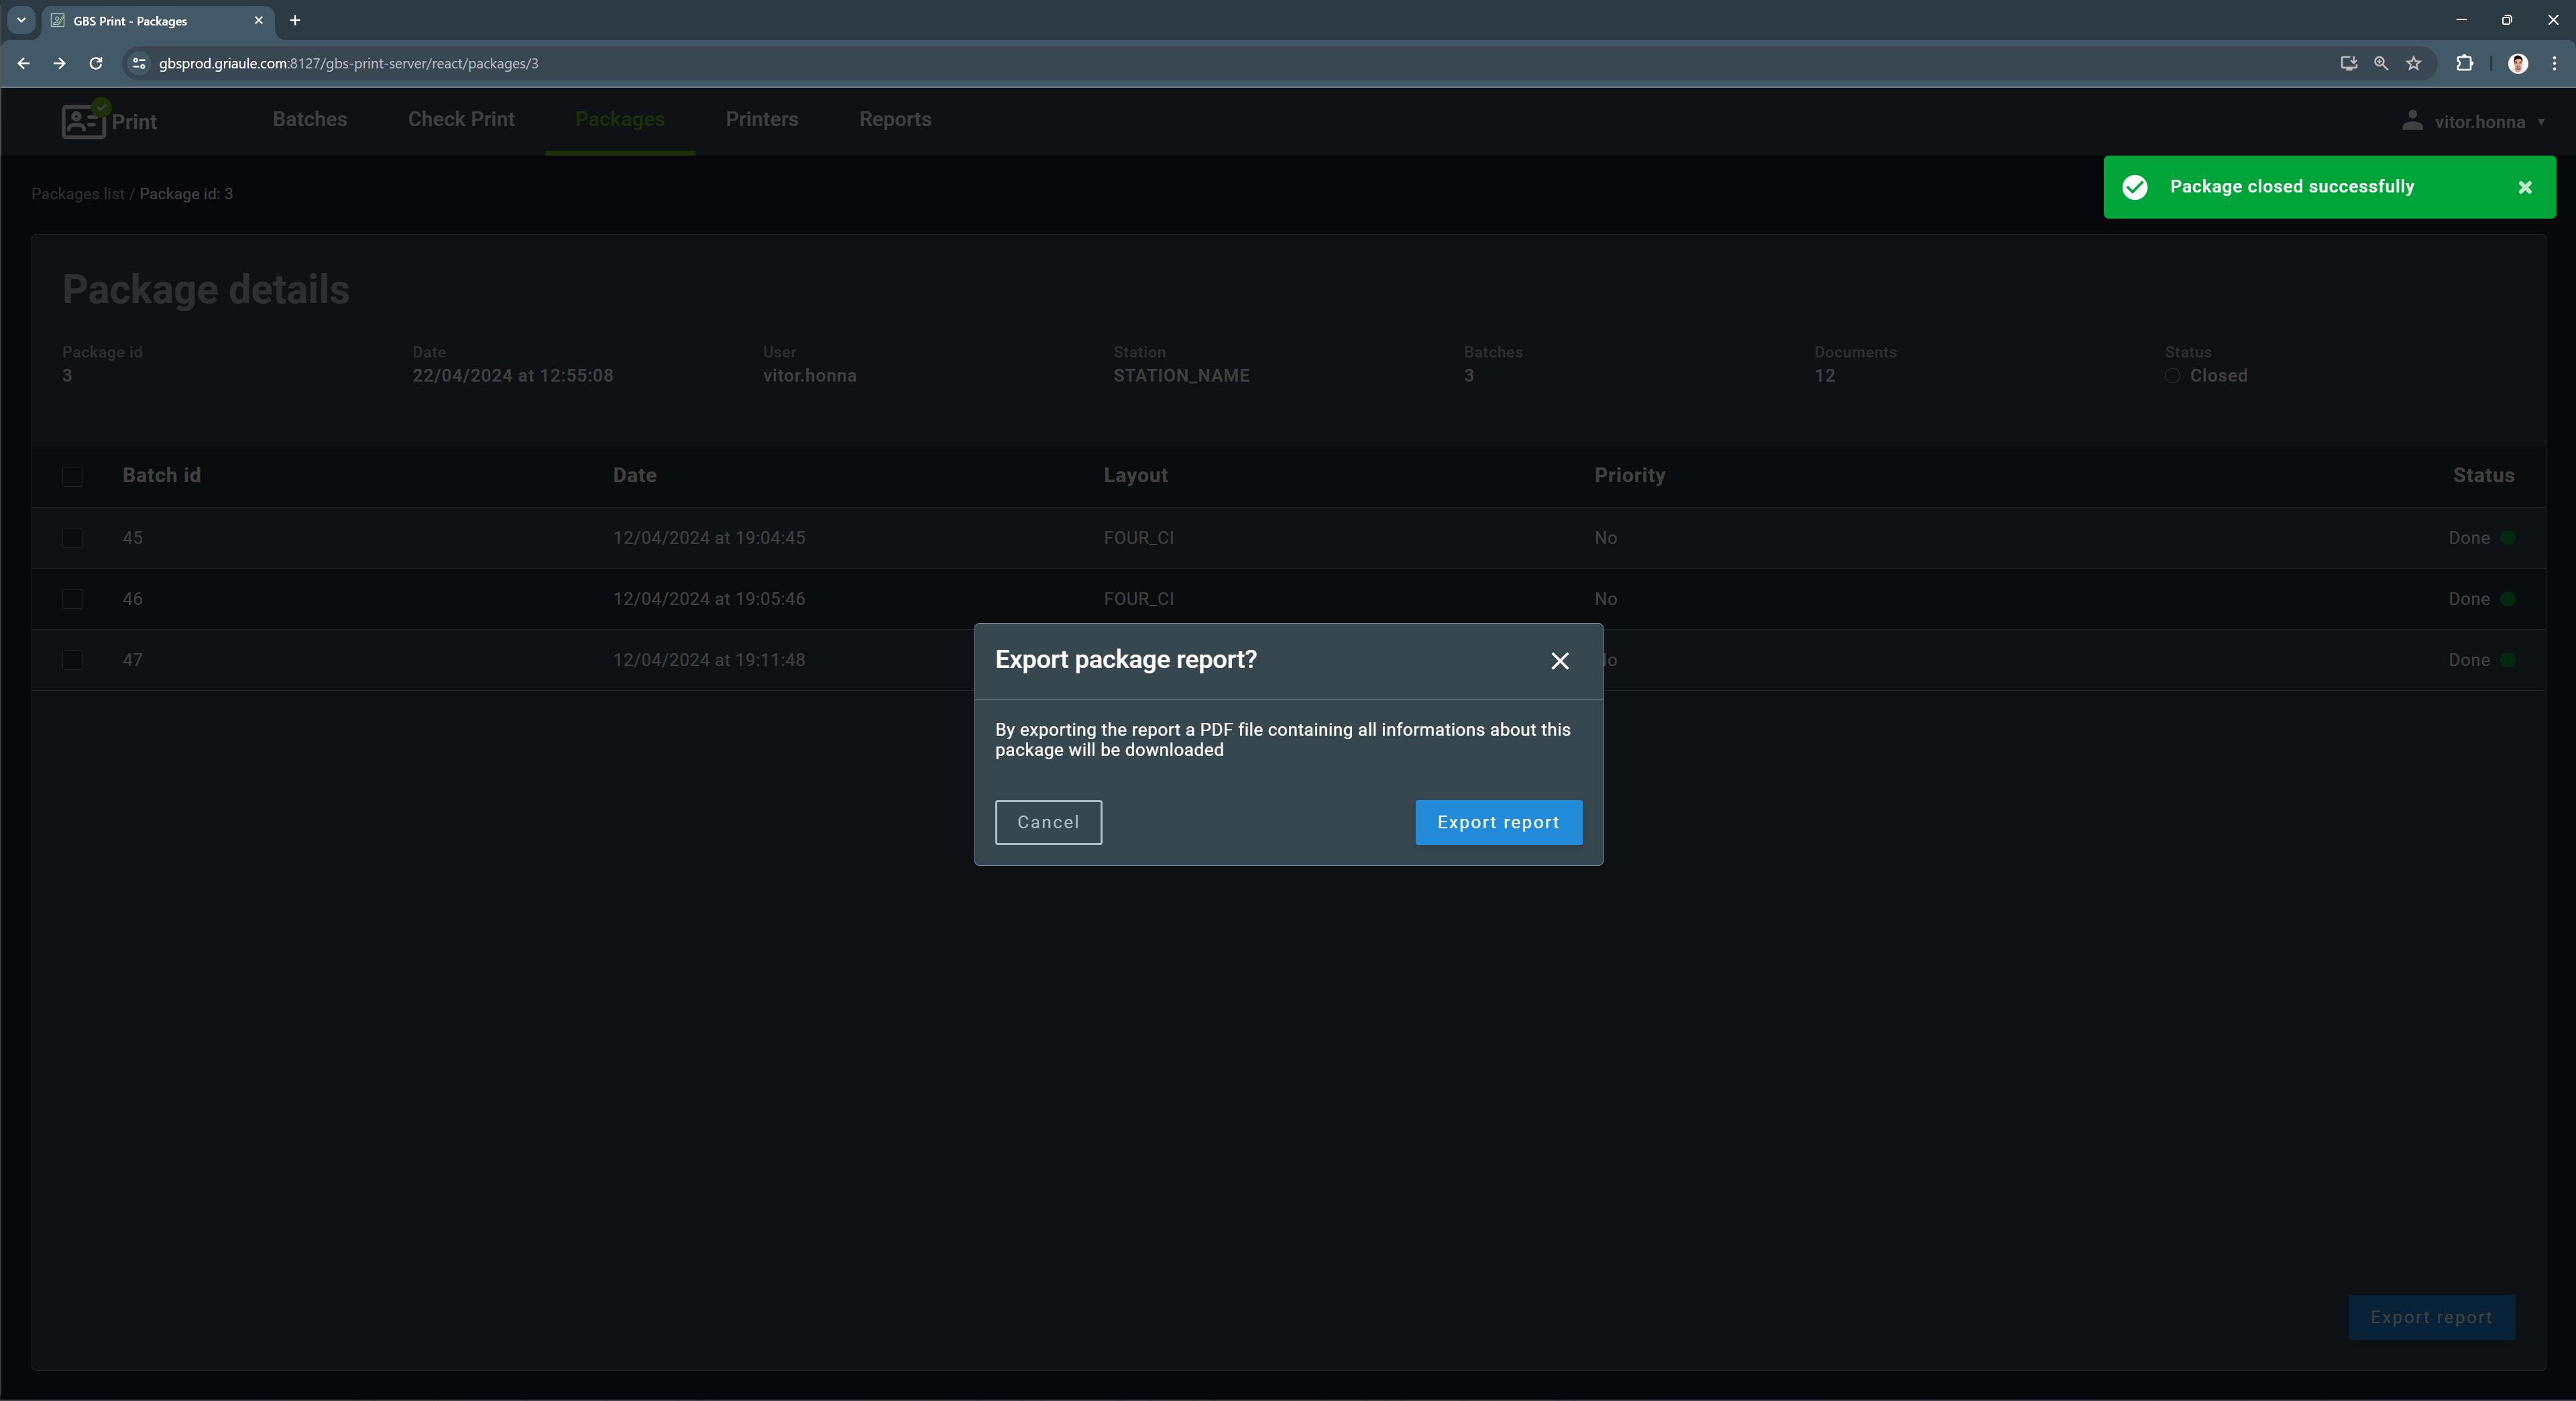
If the package is successfully sent, a success message will be displayed on the upper-right corner of the screen. Also, a dialog box will appear asking if the user wants to export the package report. Click on Export report to download the package report in PDF.
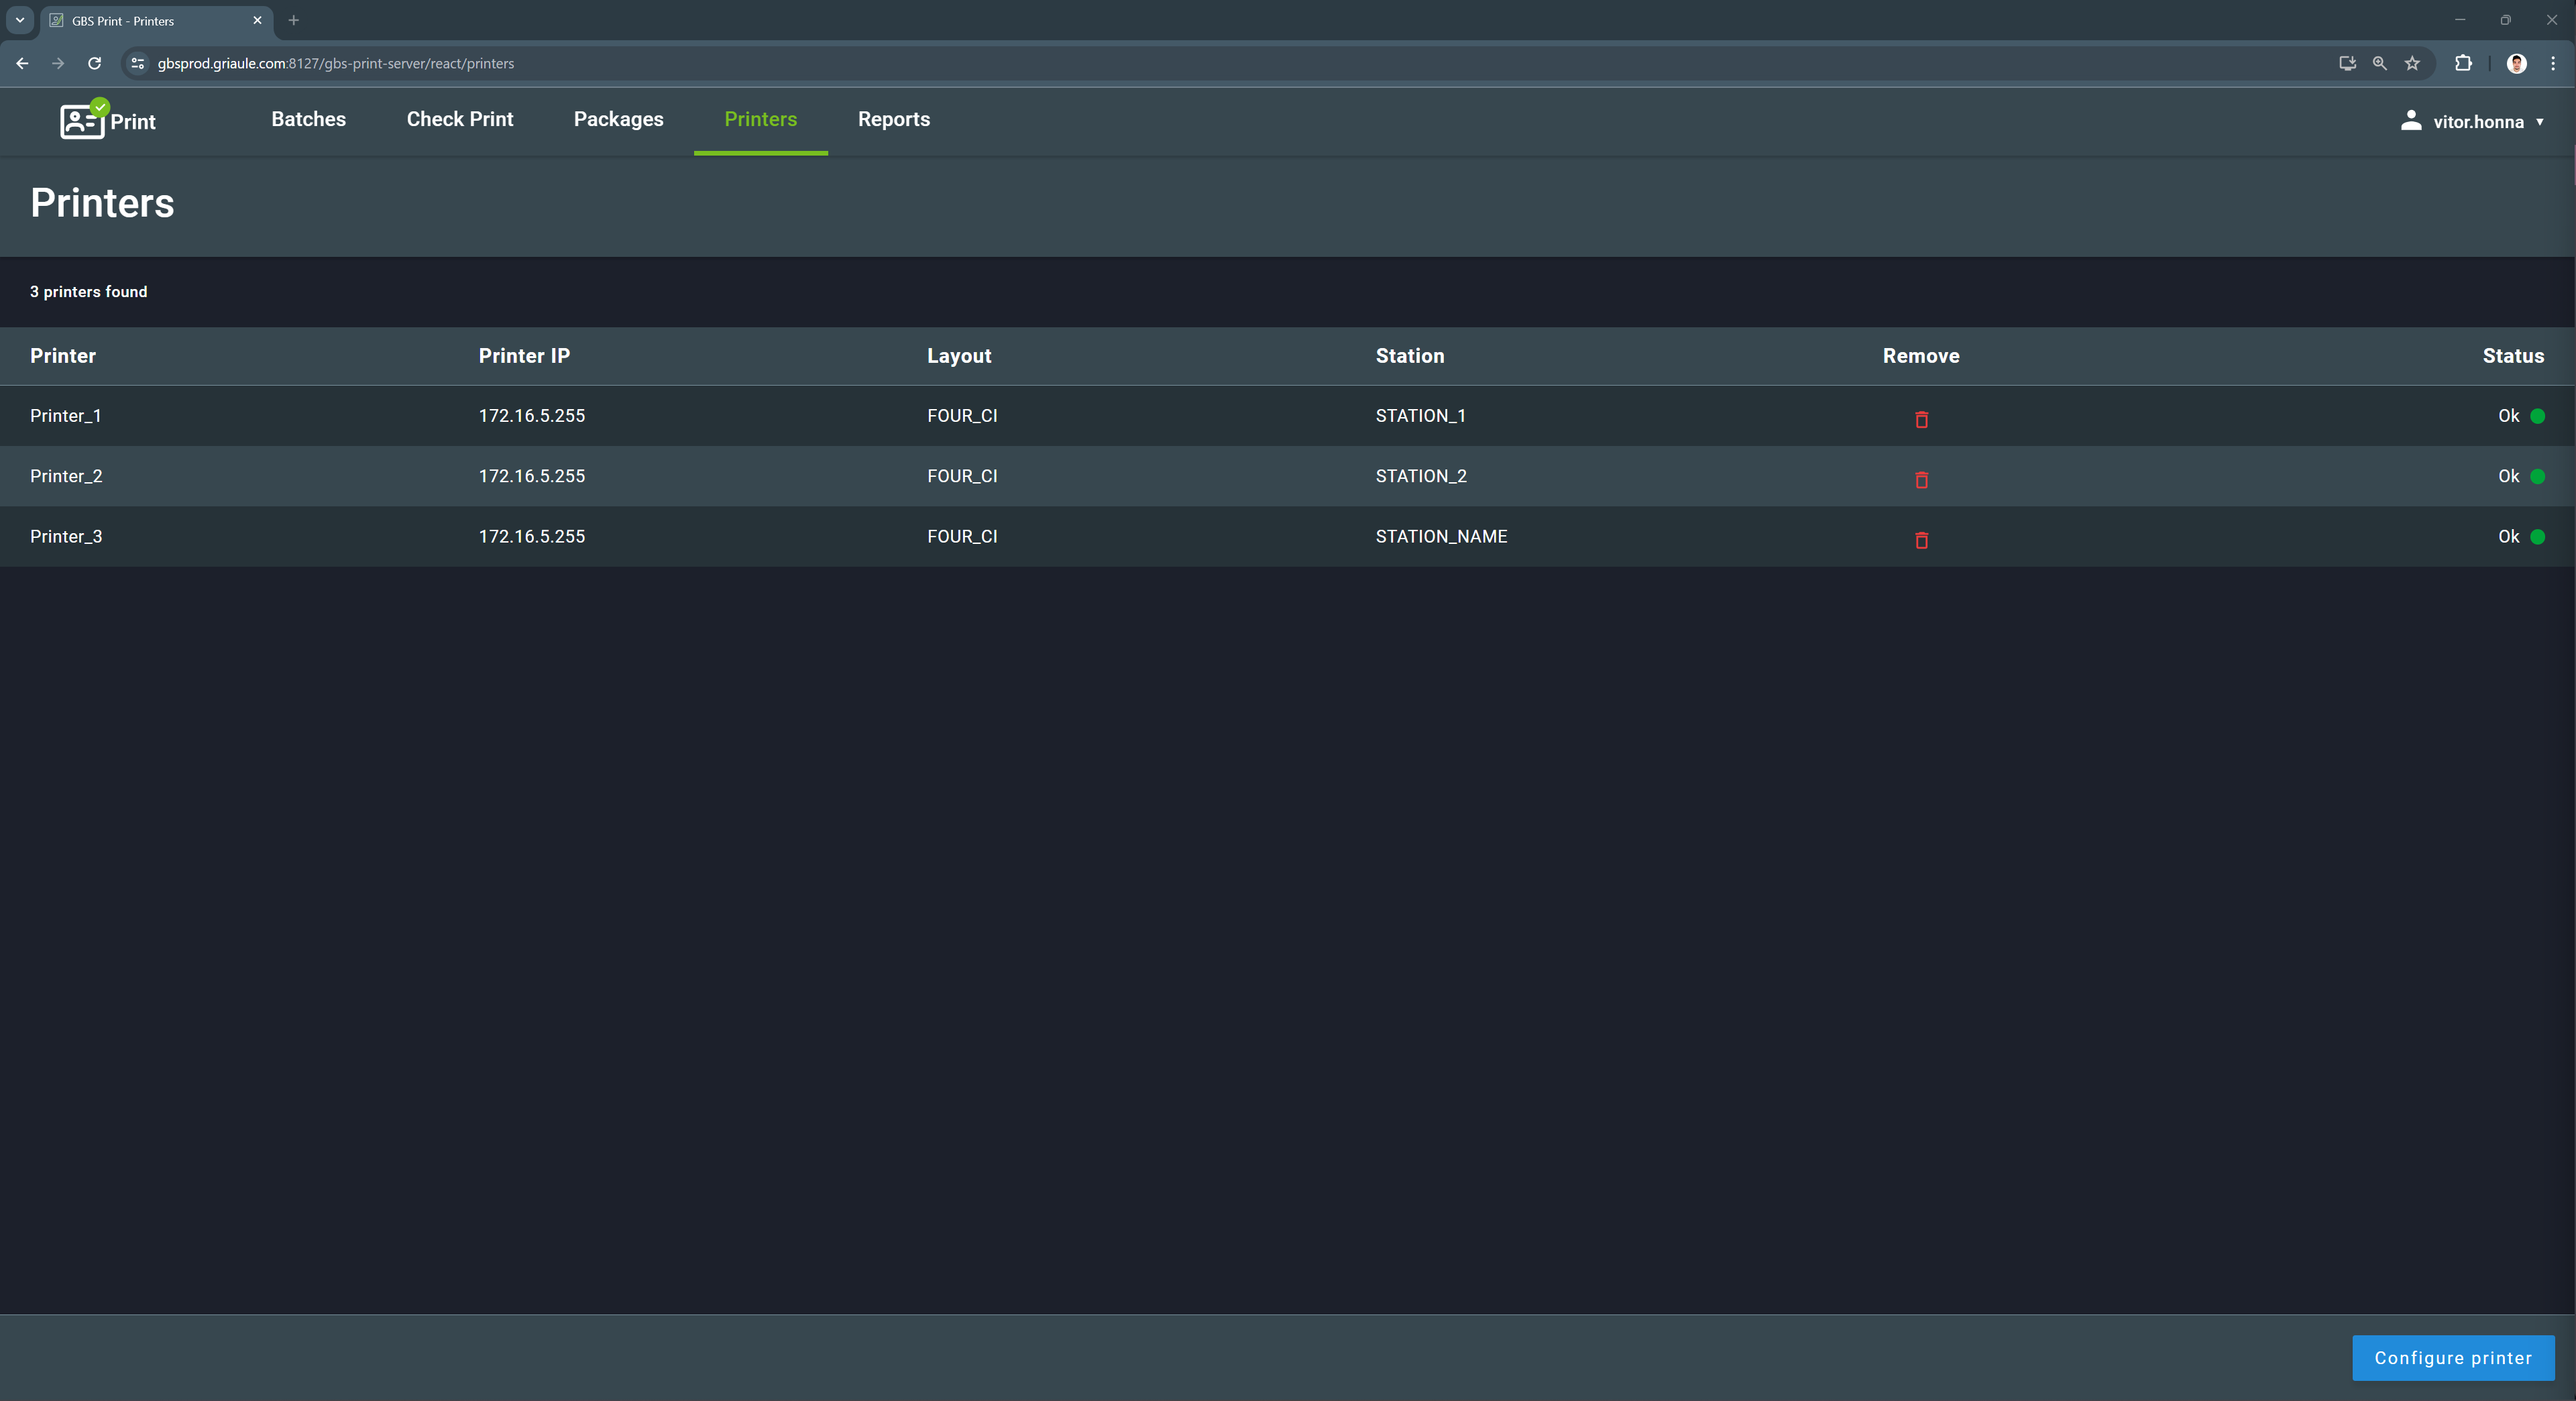
2.4. Printers
In the Printers tab, you can configure the printers that will be used to print the documents.
The list shows the installed printers and their respective configurations, including name, IP, document layout, station, and status.
Important
The printer must be installed on the computer before configuring it in GBS Print. For further information, refer to the Printing Systems section in the GBS Print Setup Manual.
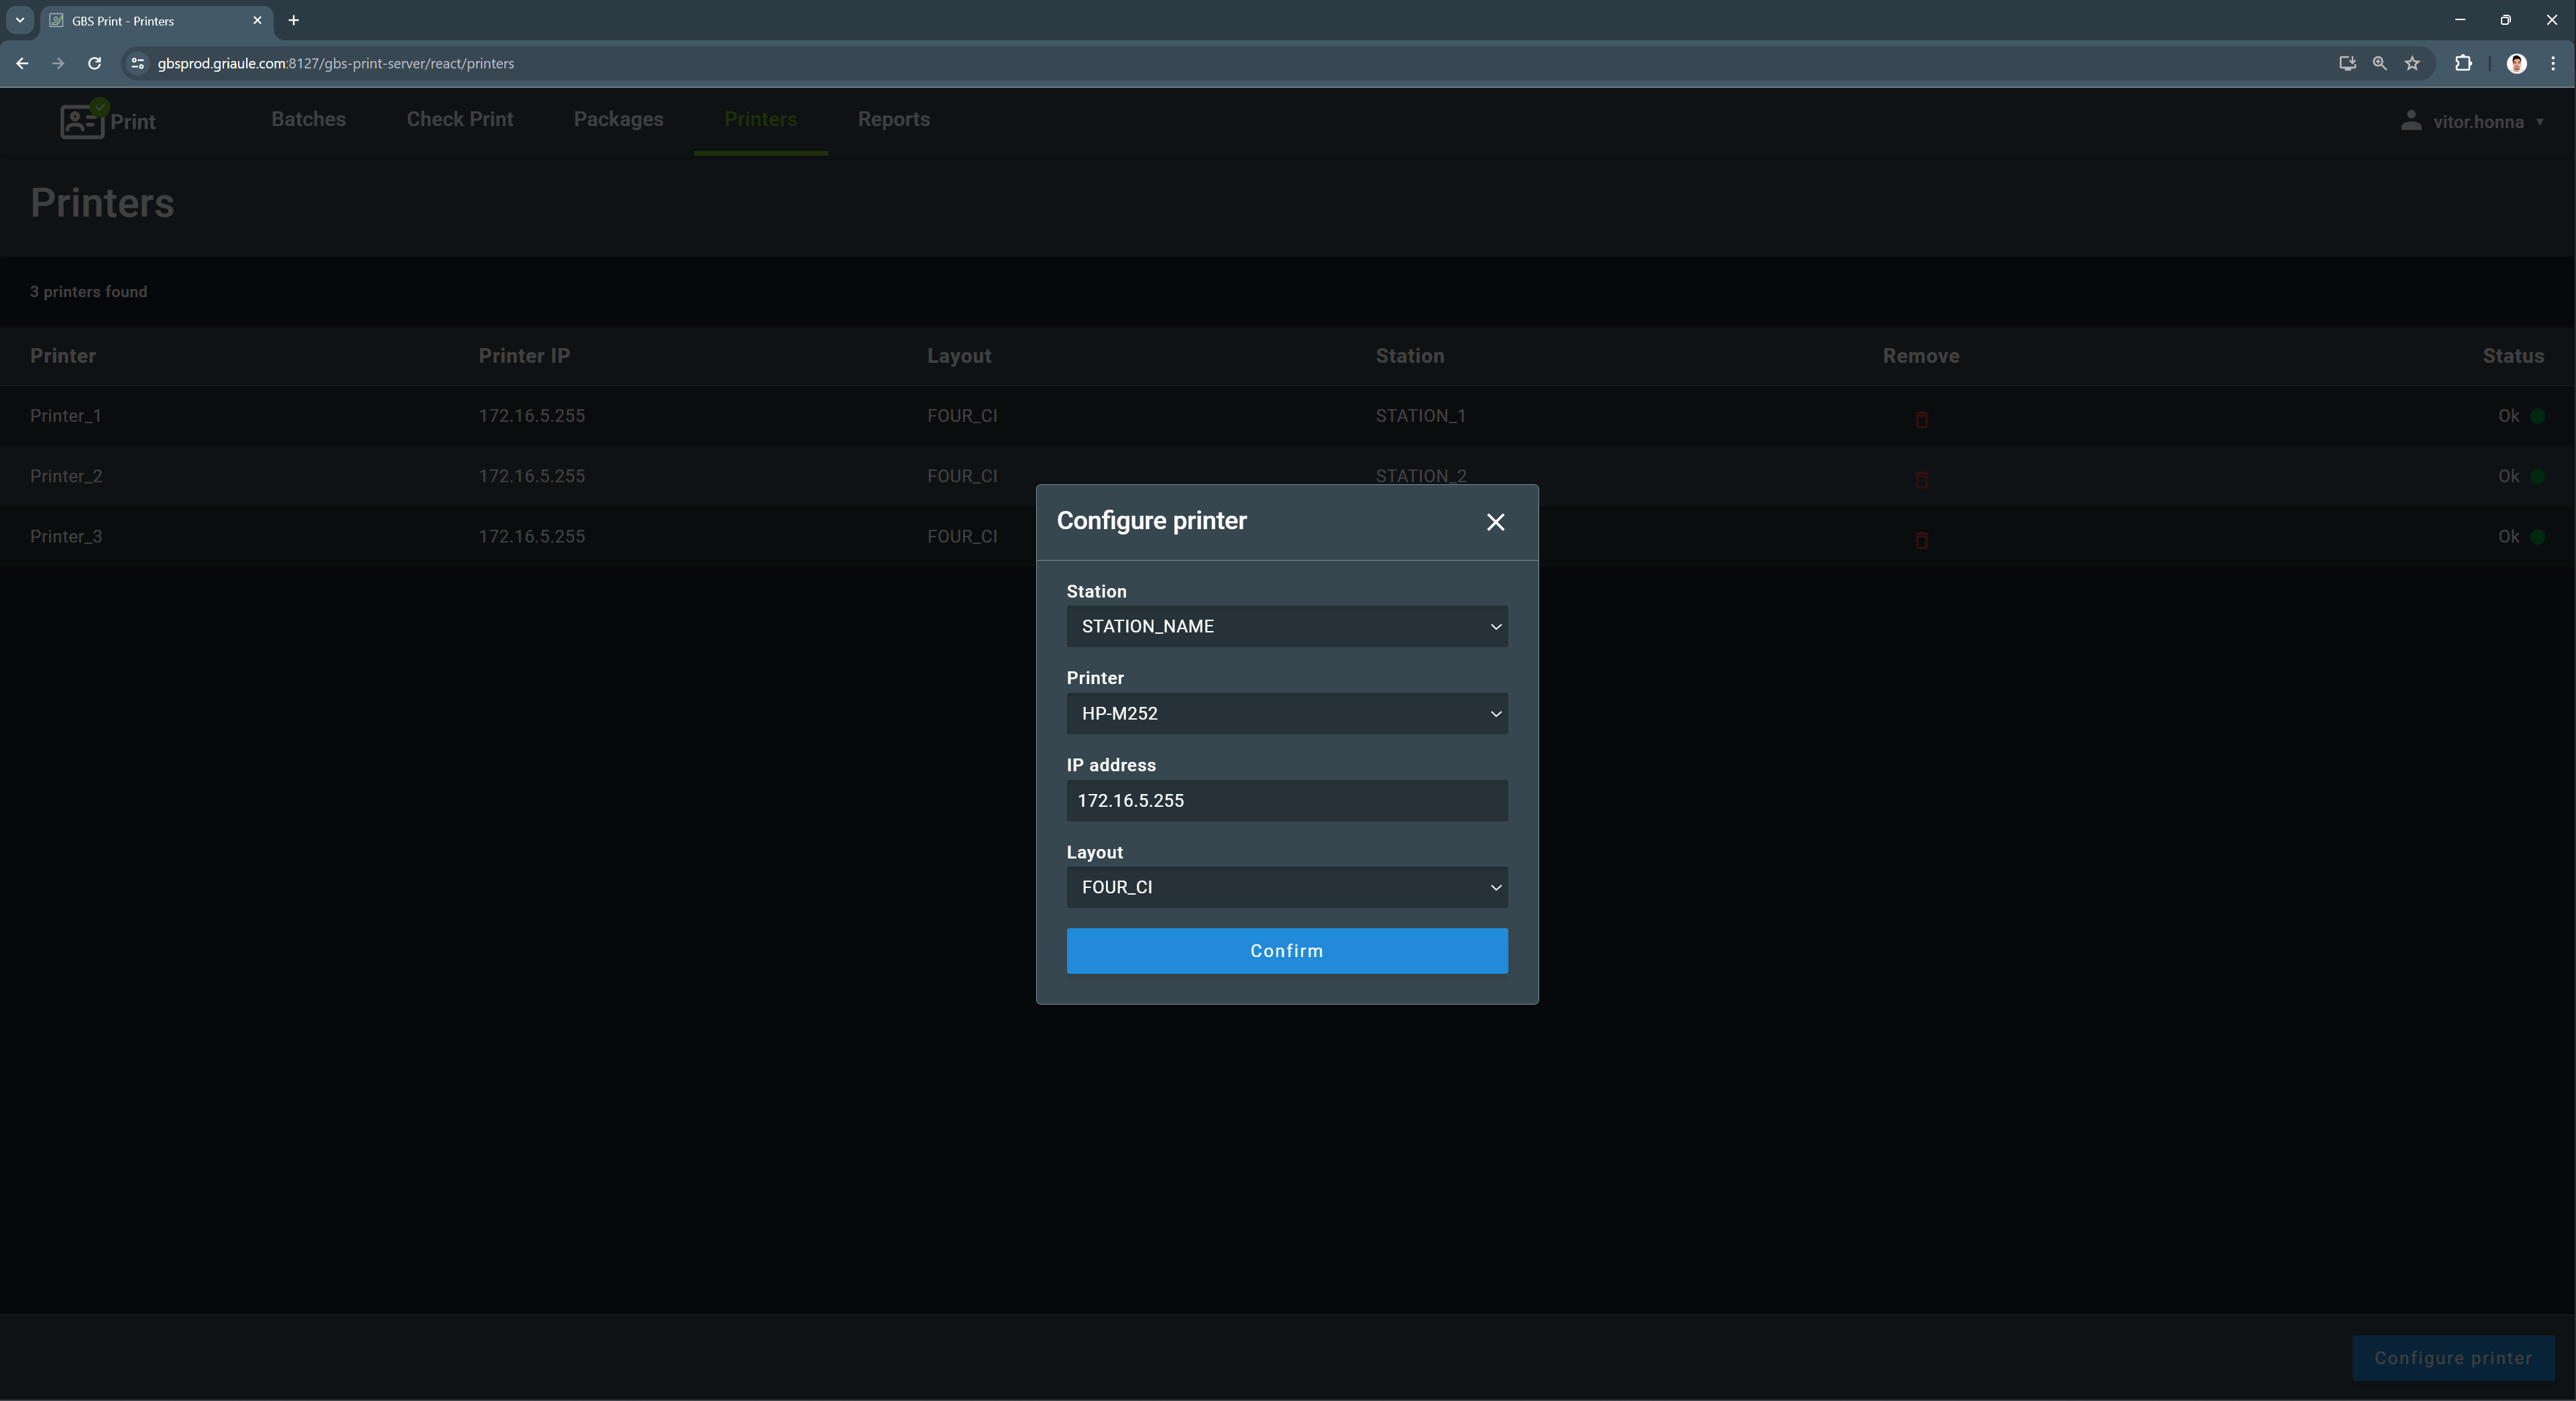
To add a new printer, click on the Configure printer button, located on the lower-right side corner of the screen. A dialog box will appear with the fields to fill in the printer information. Select a station and a printer from the dropdown menu, enter the IP address of the printer, and select the document layout that will be printed by this printer. After filling in the fields, click on Confirm.
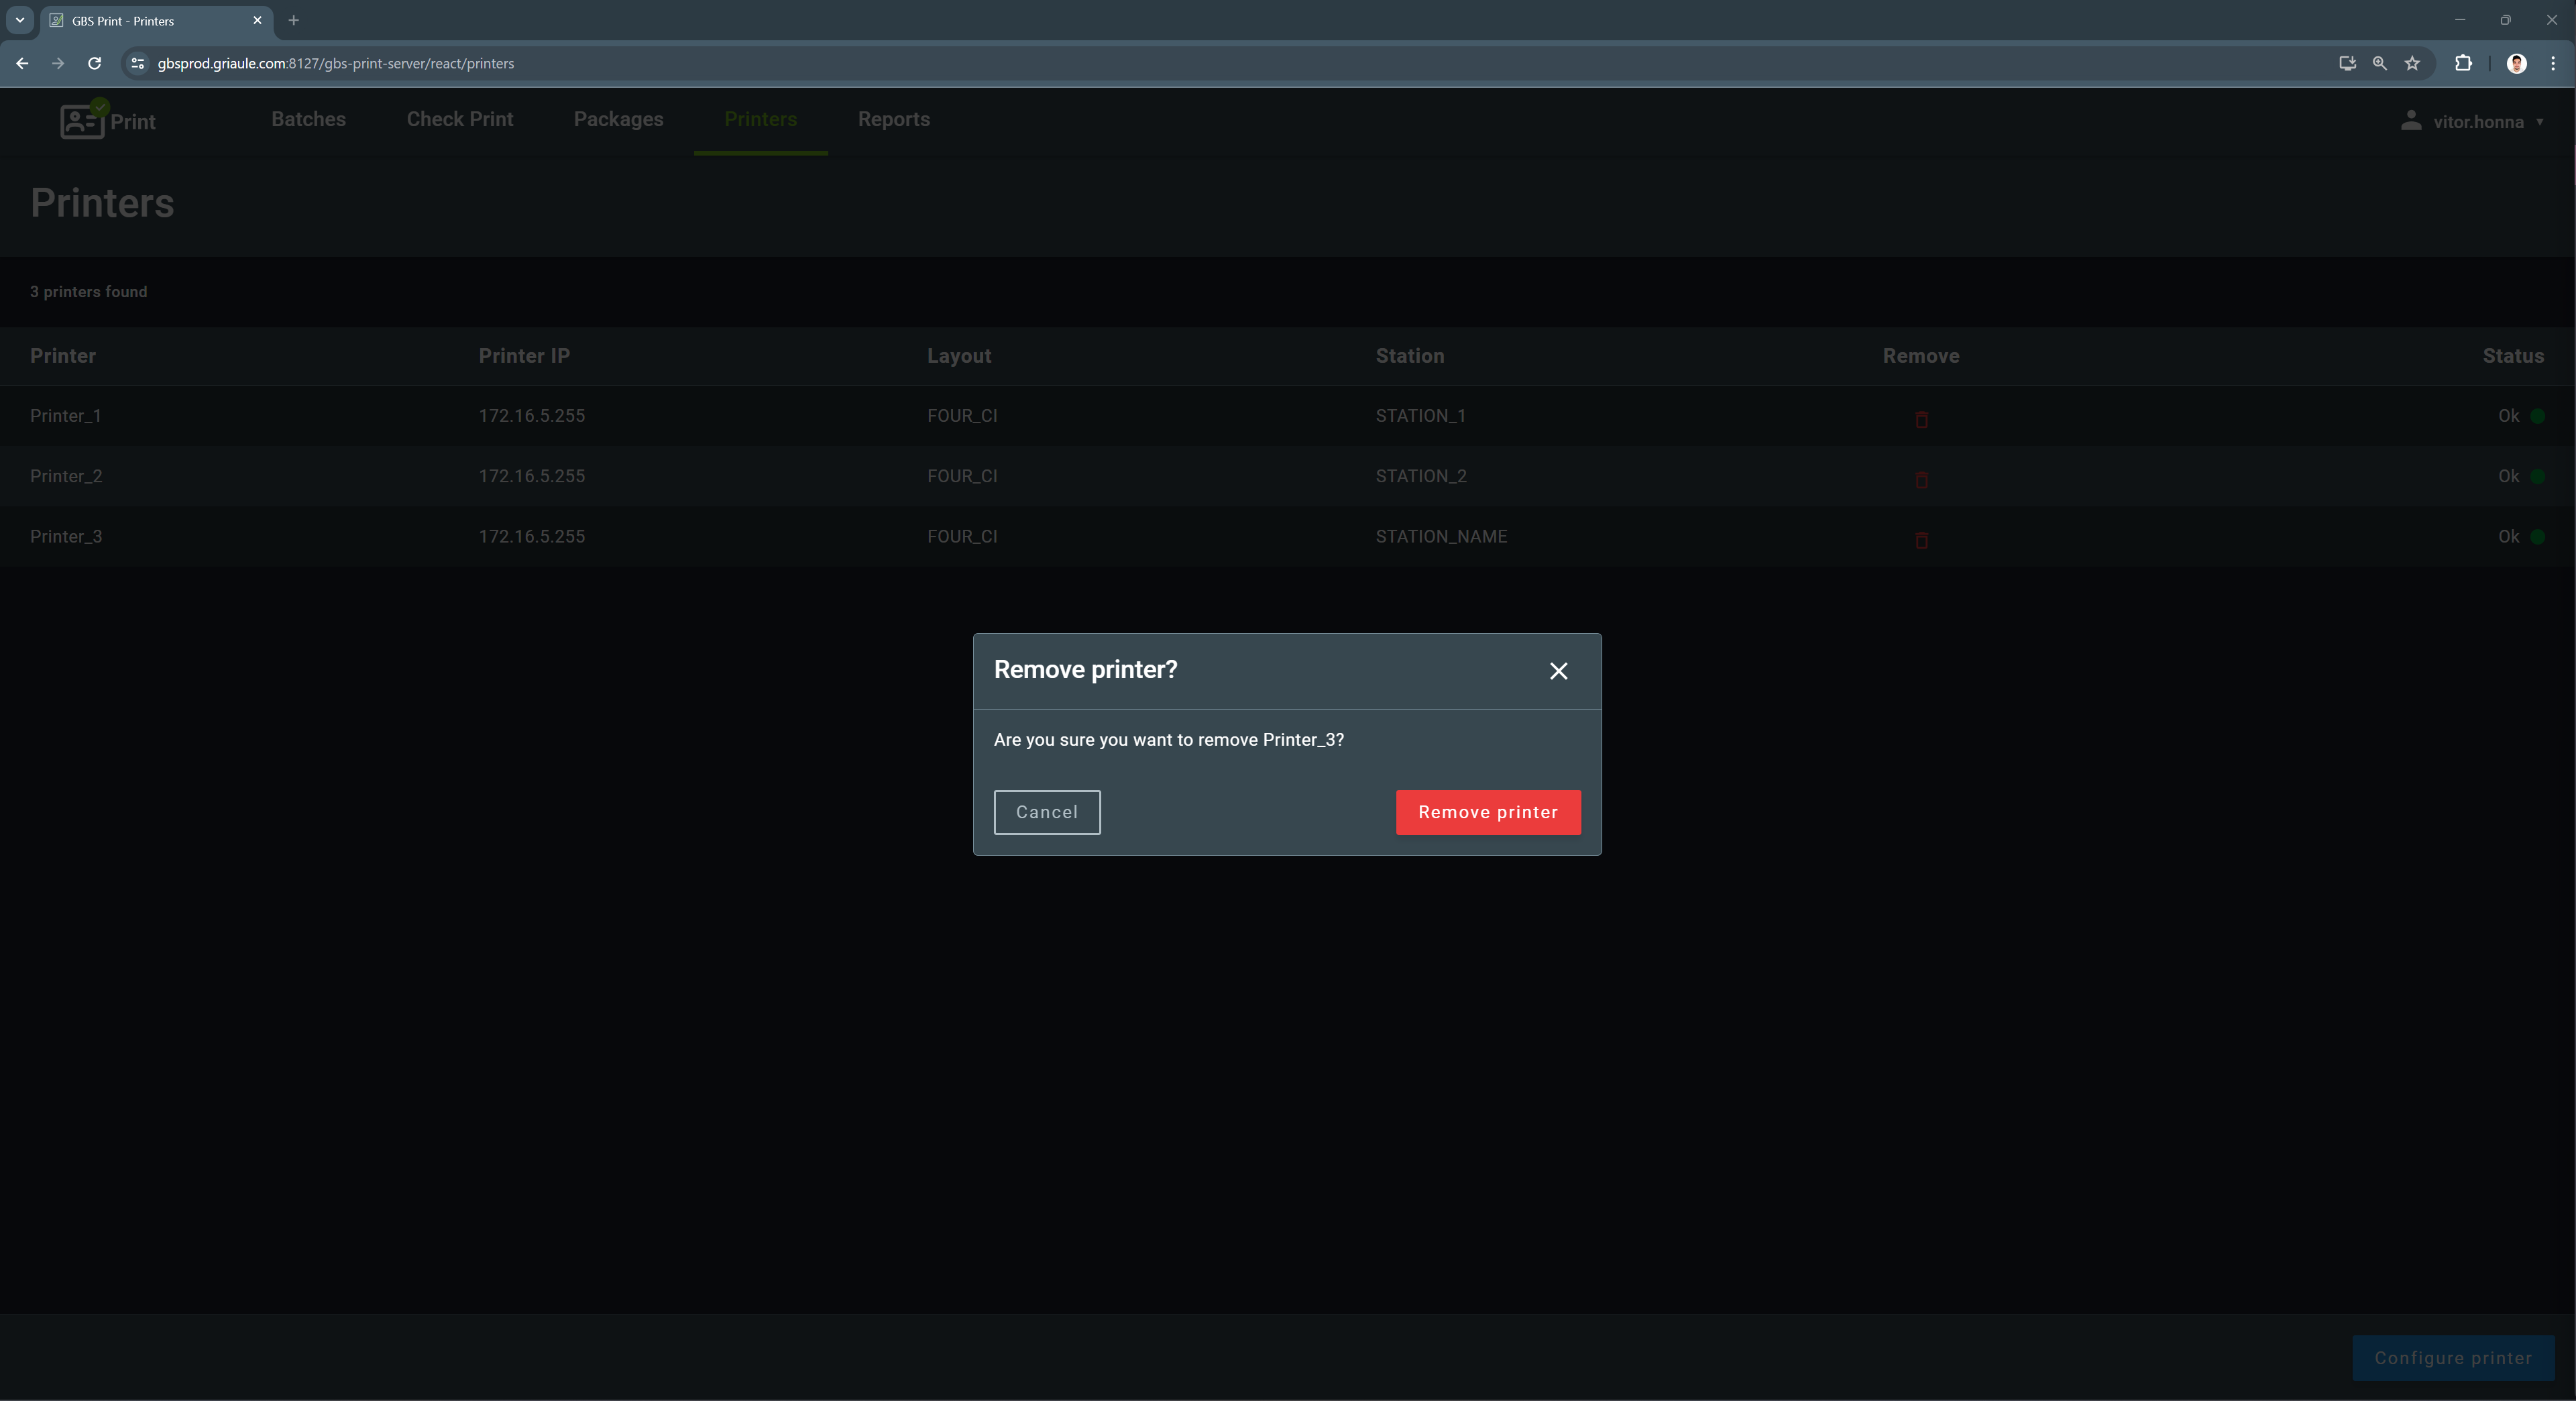
To remove a printer, click on the trash can icon on the Remove column of the printer line. A dialog box will appear asking for confirmation. Click on Remove printer to confirm the action.
2.5. Reports
The Reports tab displays the amount of documents that have been processed. It shows the number of documents received to be printed, sent to the printer, printed, checked, rejected, and sent on package.
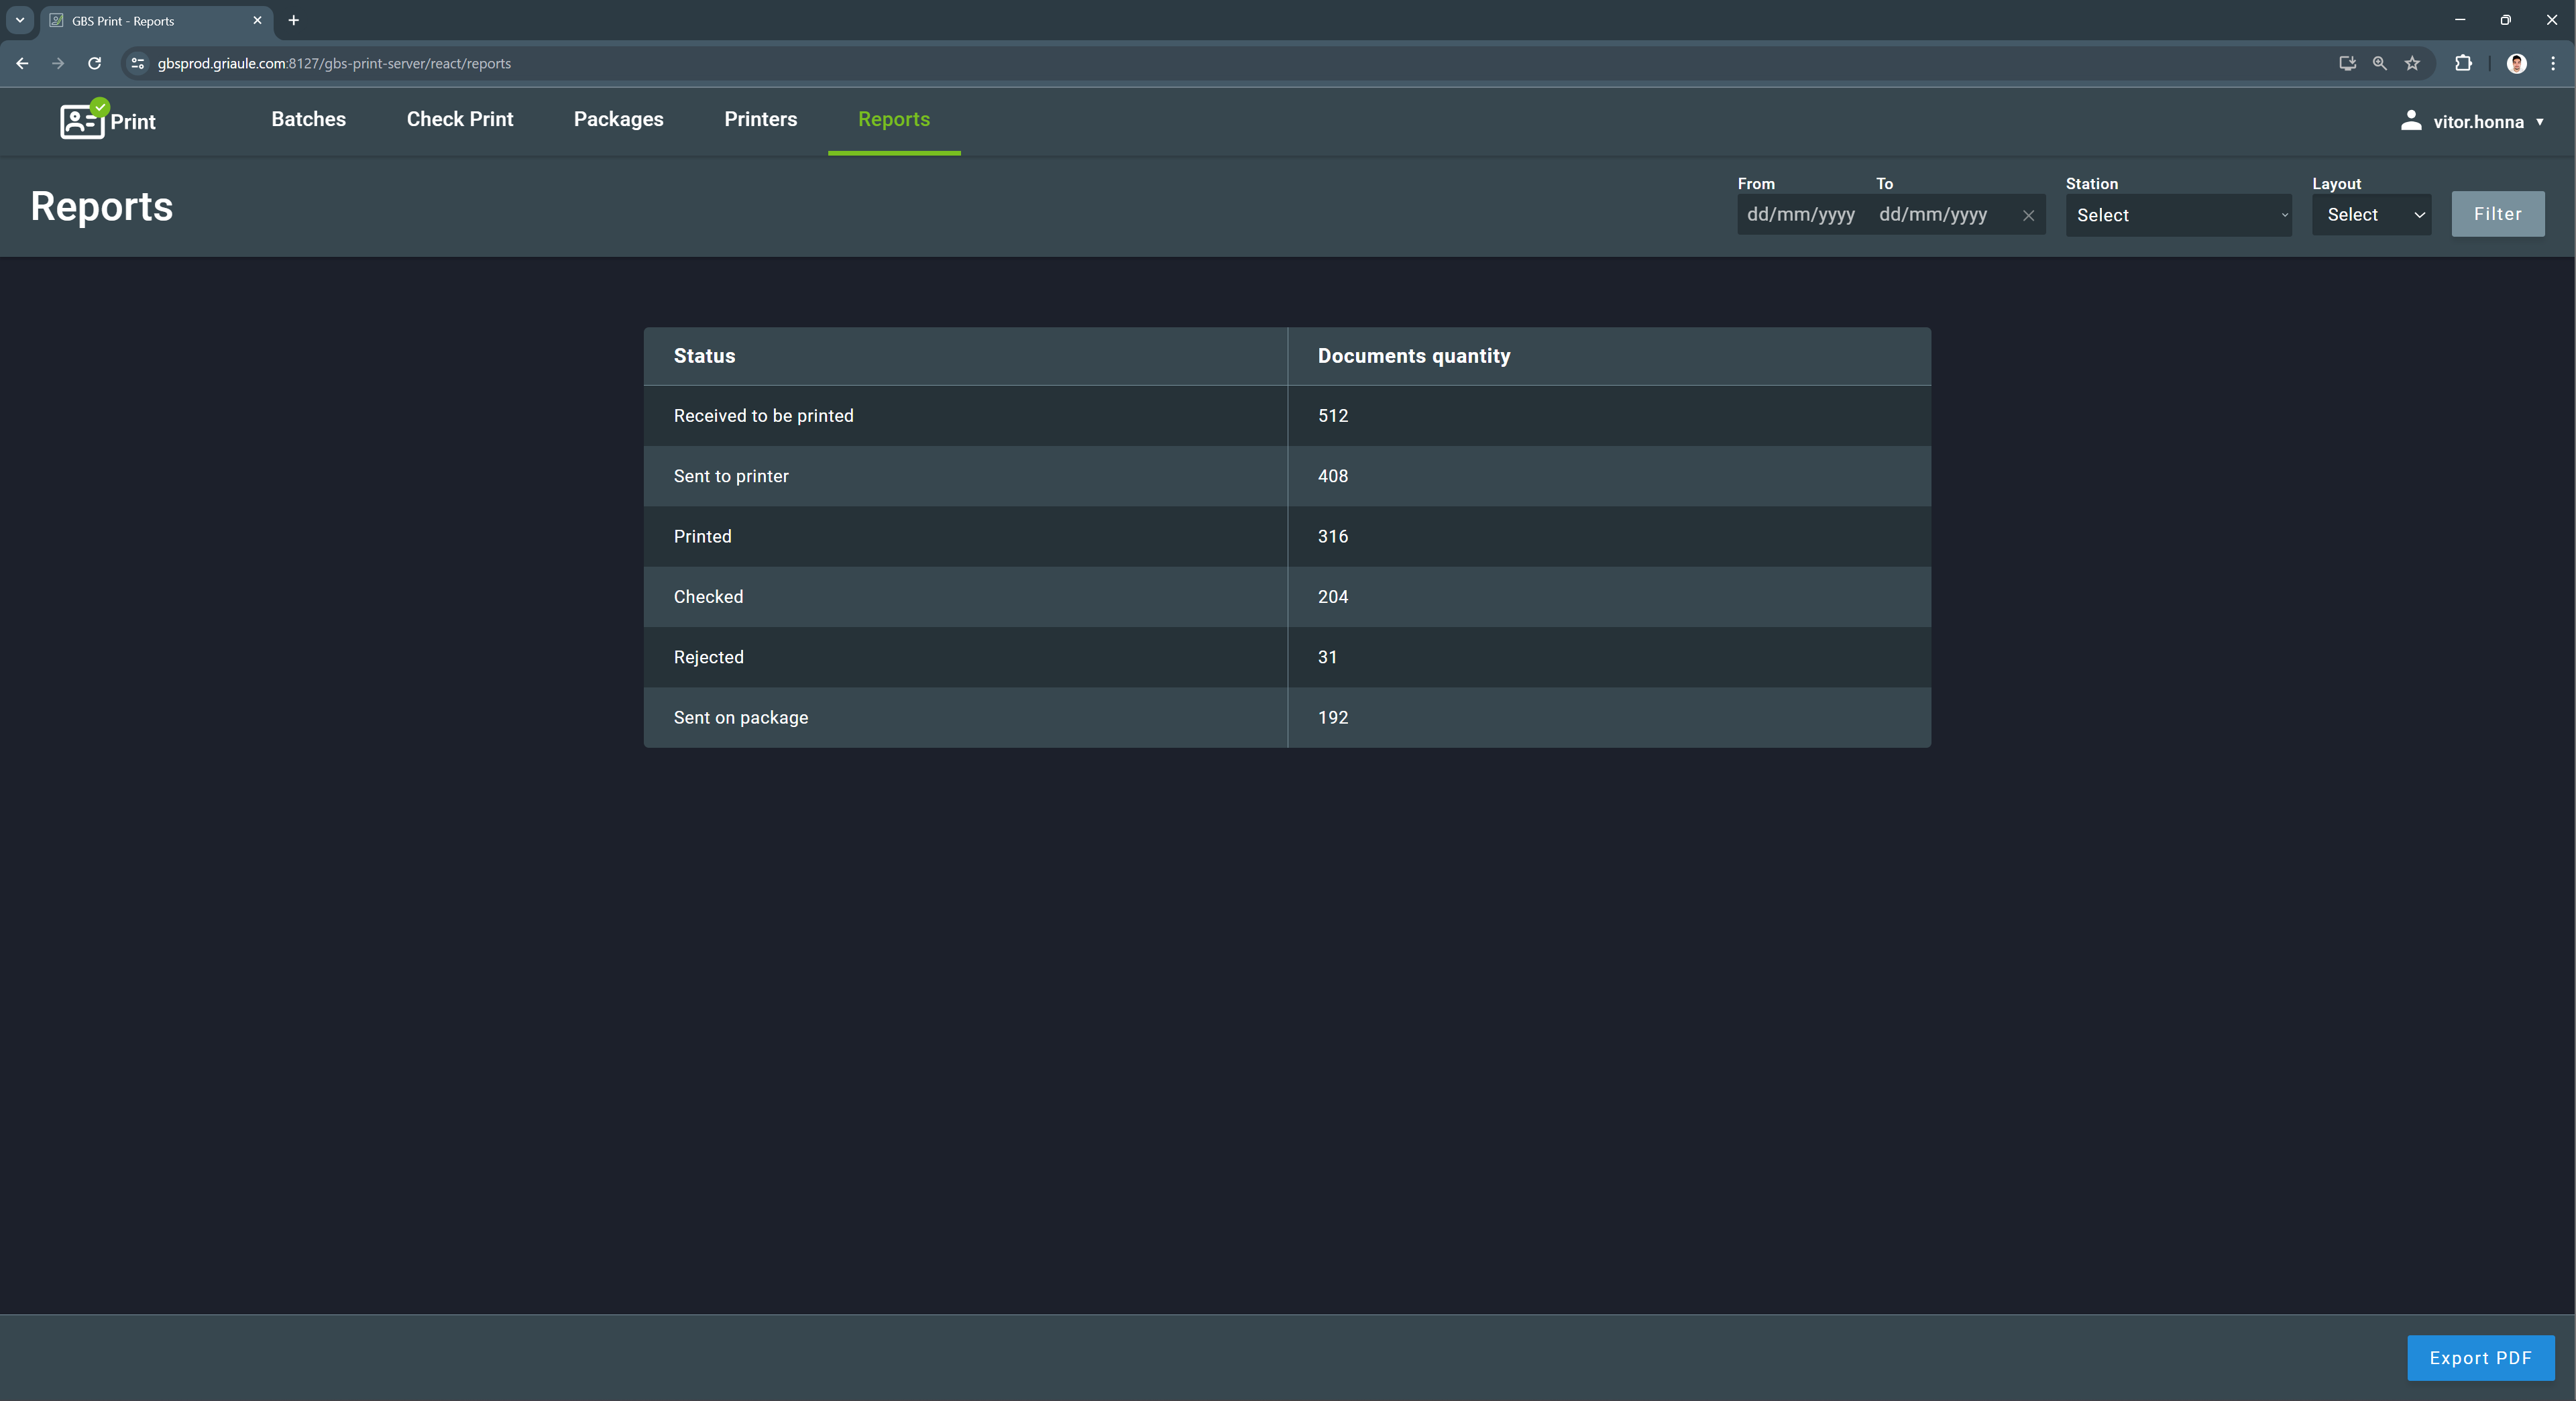
Similarly to the other tabs, there are filter options to help the user create specific reports. It is possible to filter by date range, station, and layout. To apply a filter, select the desired filters and click on Filter. Then, only the amount of reports that meet the selected criteria will be displayed.
To remove a filter, click on the X button beside the applied filter, or click on the yellow button Clear filters to remove all the filters at once.

2.6. Menu
In the upper-right corner of the screen, you can hover over the username to access the menu:
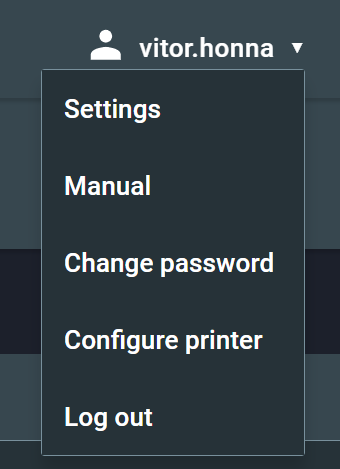
The available options are:
- Settings;
- Manual;
- Change password;
- Configure printer;
- Logout.
Note
Some options may not be available depending on the environment configuration.
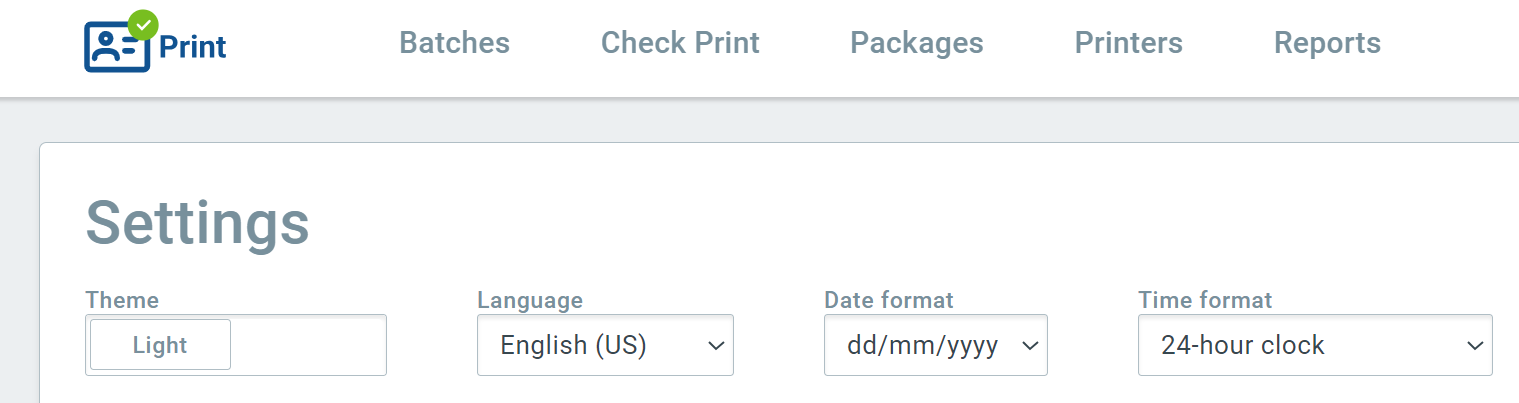
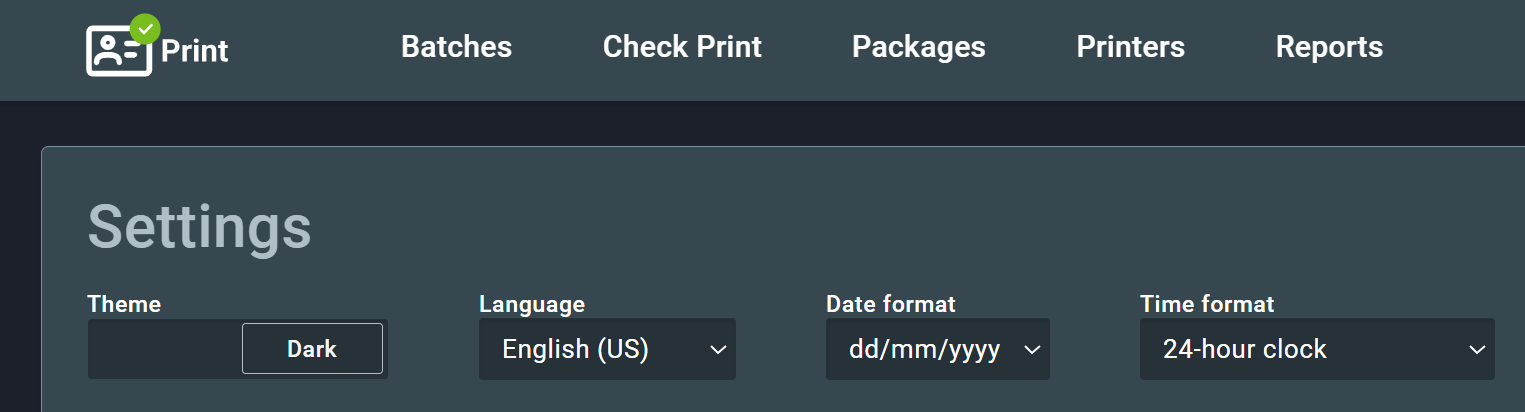
2.6.1. Settings
This section allows the user to change some aspects of the user interface:

- Theme: Light or Dark;
- Language: Portuguese, English, or Spanish;
- Date format: dd/mm/yyyy, mm/dd/yyyy, or yyyy/mm/dd;
- Time format: 12-hour clock (AM/PM) or 24-hour clock.
- Check print folders: folder paths for each document layout.
3. Workflows
This section explains the workflow for printing a document using GBS Print. It goes in more detail on how the status of documents, batches, and packages change as they are processed.
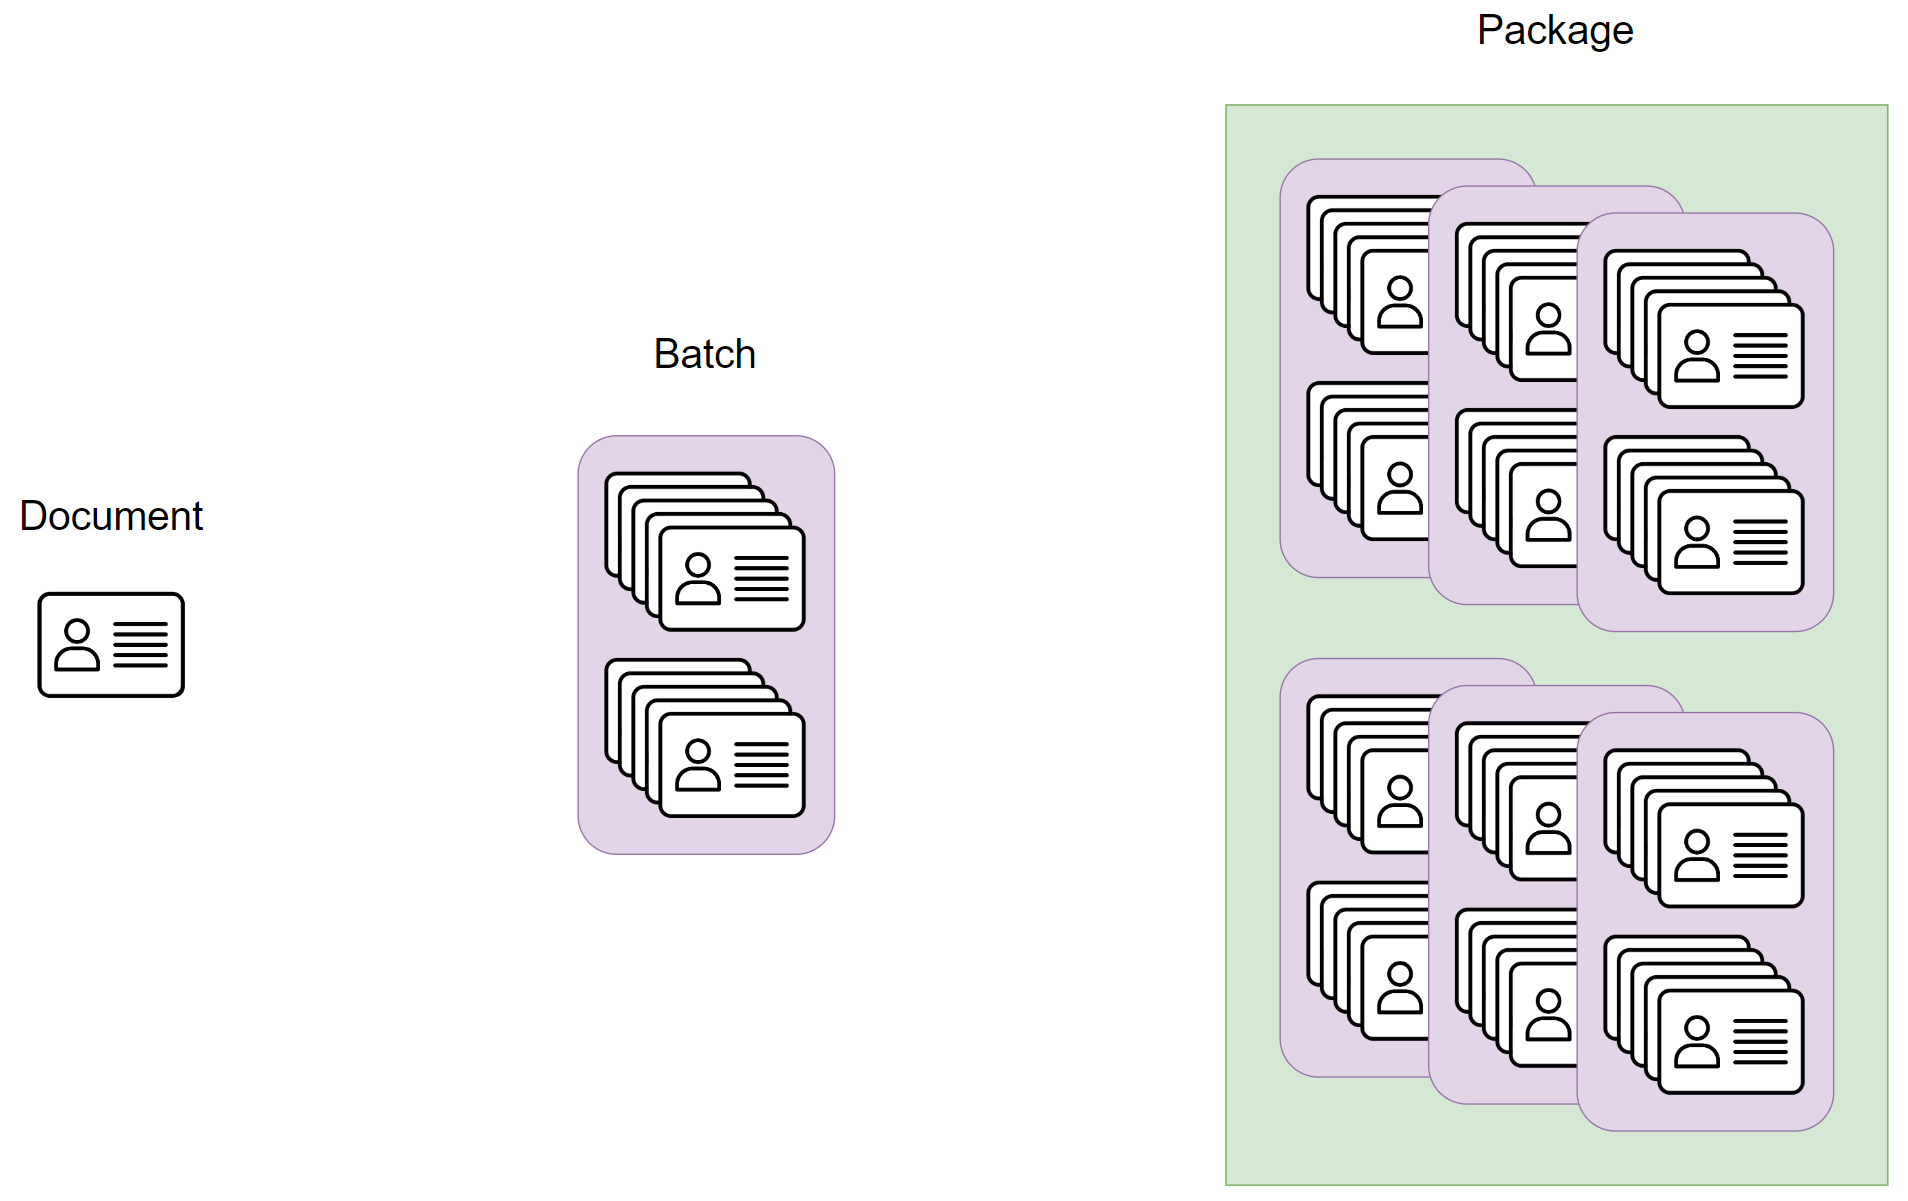
3.1. Basic Concepts
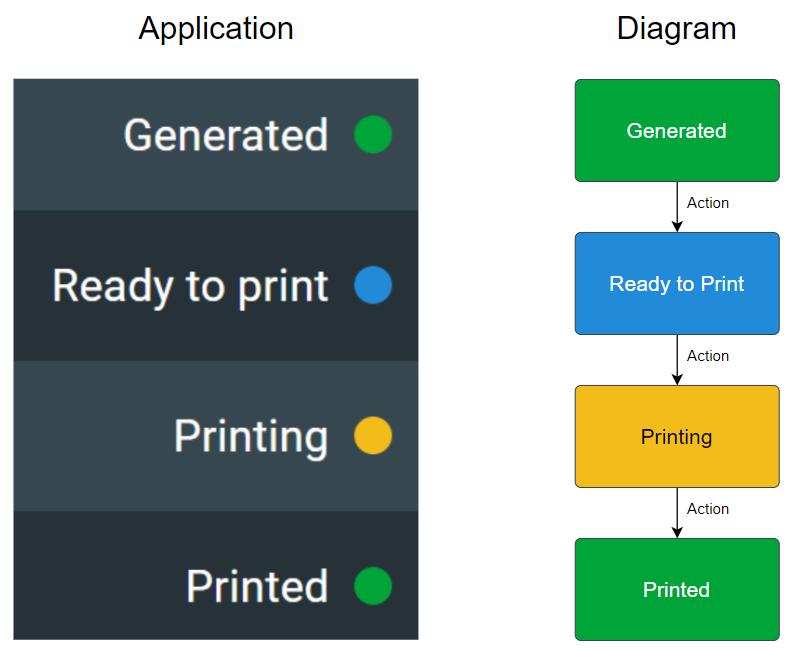
The most basic unit in GBS Print is the document. A document is an entity that contains the information to be printed in the ID Card. The documents are grouped into batches, which are then printed, scanned, and checked. The checked batches are grouped into packages and sent to the stations for distribution. The following diagram shows these concepts and their relationships in GBS Print.
3.2. Overview
The workflow is divided into three main steps: Batches, Check Print, and Packages, with several sub-steps that may change the status of a document. Each step correspond to a tab in the user interface, where all the actions related to that step are performed.
In the following sections’ diagrams, the statuses and transitions between them are grouped by the tabs where they take place; each tab will be indicated by a different color: violet for Batches, blue for Check Print, and green for Packages.

In each diagram, the initial state is represented by a black circle, and the final state is represented by a black circle with a double border, as shown in the following image:
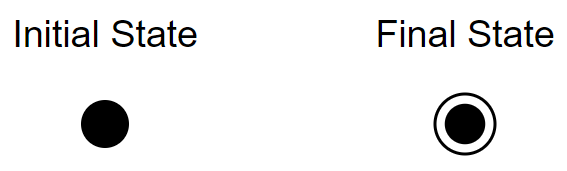
The rounded rectangles represent the statuses of the entities; they are color-coded according to the status color in the user interface. The arrows represent the transitions between the statuses, and the labels on the arrows indicate the actions that trigger the transitions.
The diagrams in the following sections show all possible statuses for each entity and the transitions between them.
3.3. Step 1: Batches Tab
3.3.1. Batch Status
There are eight possible statuses for a batch:
- Generated (green)
- Ready to print (blue)
- Printing (yellow)
- Printed (green)
- Checking (grey)
- Check OK (green)
- Packaged (gray)
- Done (green)
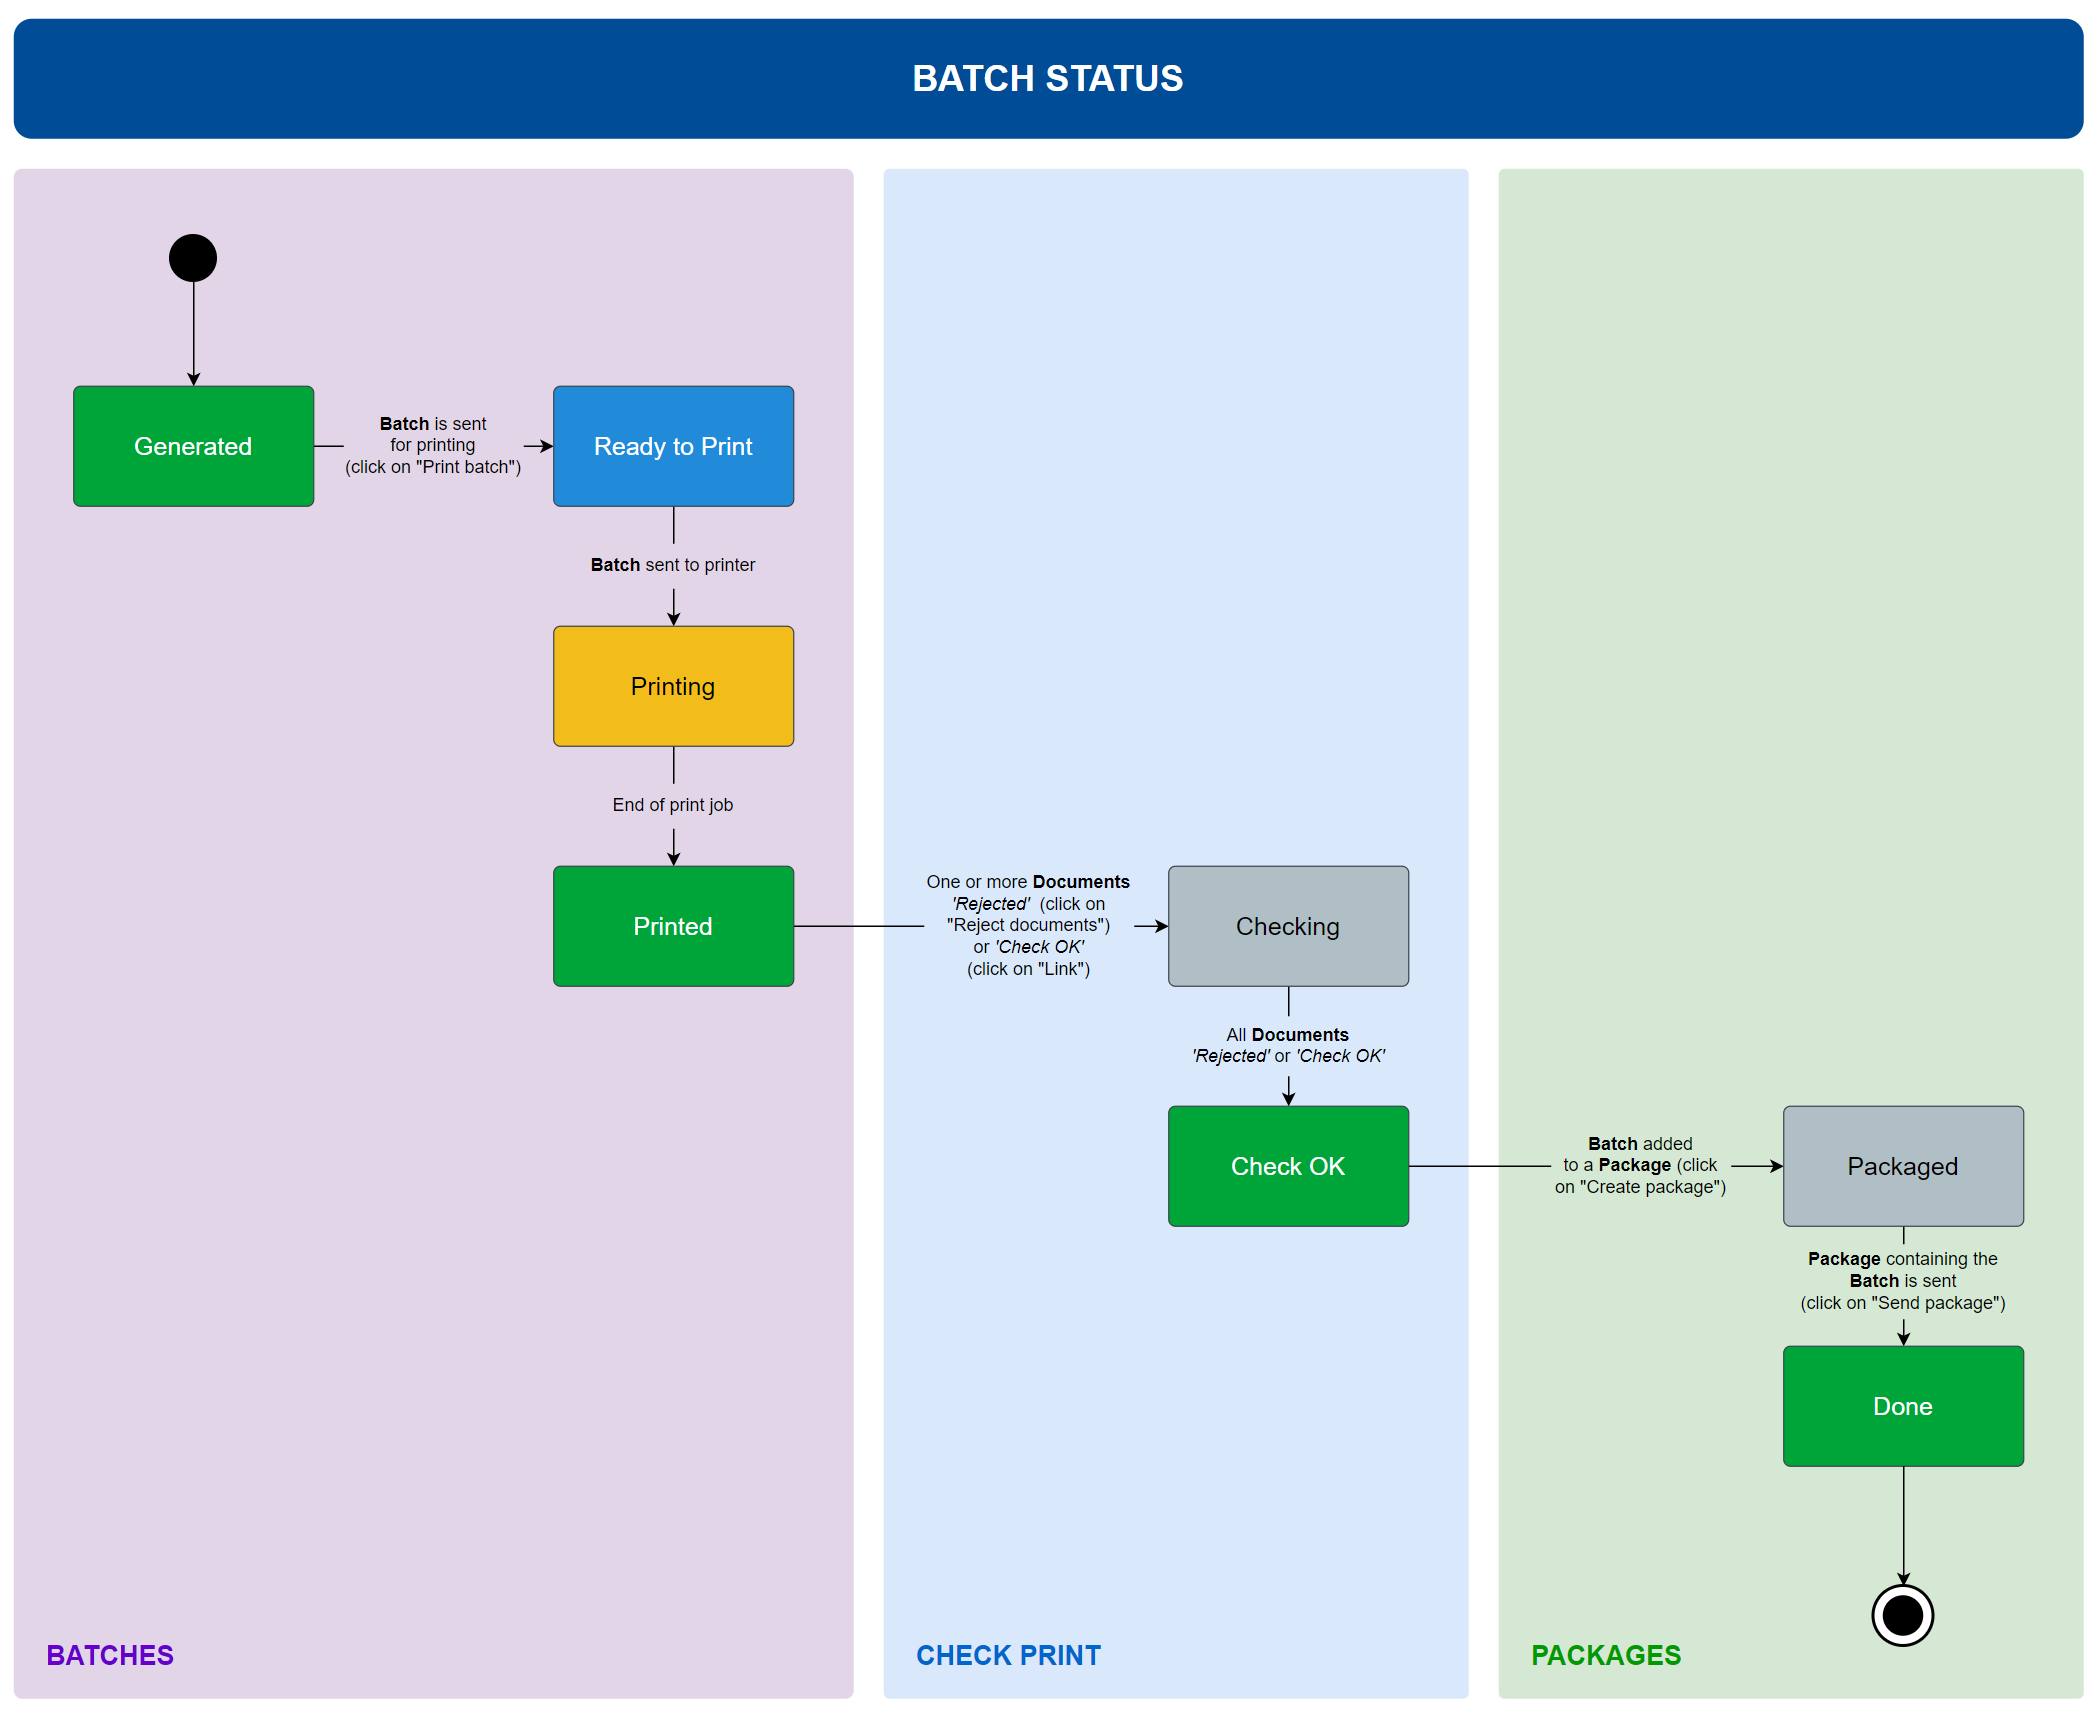
The status of a batch is affected by user actions in the Batches, Check Print, and Packages tabs. It is also be affected by automatic actions.
Generated
Generated is always the initial status of any batch in GBS Print. The batch was created and the documents are waiting to be printed. A batch in this status may receive new documents until it is full (the size of the batch is configurable). If a new document is received and there is an available batch with the same layout and station, the document will be added to that batch. Otherwise, a new batch will be created.
The batch remains in this status until the user sends the printing command by clicking on Print batch. After that, the batch status will change to Ready to print and the status of the documents in the batch will change to Printing.
Ready to print
After clicking on Print batch, the batch status changes to Ready to print. It means that the printing command has been registered and the documents are ready to be printed. GBS Print will automatically send the documents to the printer configured for the station the batch is attributed to and update the batch status to Printing.
Printing
While the documents are being printed, the batch status will be Printing. After all documents have been printed, the status will automatically change to Printed.
Printed
This status indicates that all documents in the batch have been printed. The user can now check the documents and, if necessary, reject or reprint them.
The batch will remain in this status until any of the documents in the batch are either rejected (by clicking on Reject documents - document status changes to Rejected) or checked successfully (by clicking on Link in the
Check Printtab - document status changes to Check OK).
Checking
This status indicates that the documents in the batch are being checked, that is, that at least one of the documents in the batch have status Rejected or Check OK.
The batch will remain in this status until all the documents in the batch have status Rejected (by clicking on Reject documents) or Check OK (by clicking on Link in the
Check Printtab).
Check OK
This status indicates that all documents in the batch have been checked. The user can now package the batch. Only batches with status Check OK can be added to a package.
The batch will remain in this status until the user creates a package and add the batch to it (by clicking on Create package in the
Packagestab). After the batch is added to a package, its status will change to Packaged
Packaged
This status indicate that the batch has been added to a package and is waiting to be sent to its station.
The batch will remain in this status until the user sends the package that contains the batch (by clicking on Send package in the
Packagestab). After the package is sent, the status will change to Done.
Done
This status indicates that the batch has been sent to its designated station. This is a final status.
3.3.2. Document Status
There are eight possible statuses for a document in a batch:
- Print (blue)
- Printing (yellow)
- Printed (green)
- Fail (red)
- Rejected (orange)
- Check OK (green)
- Cancelled (gray)
- Done (green)
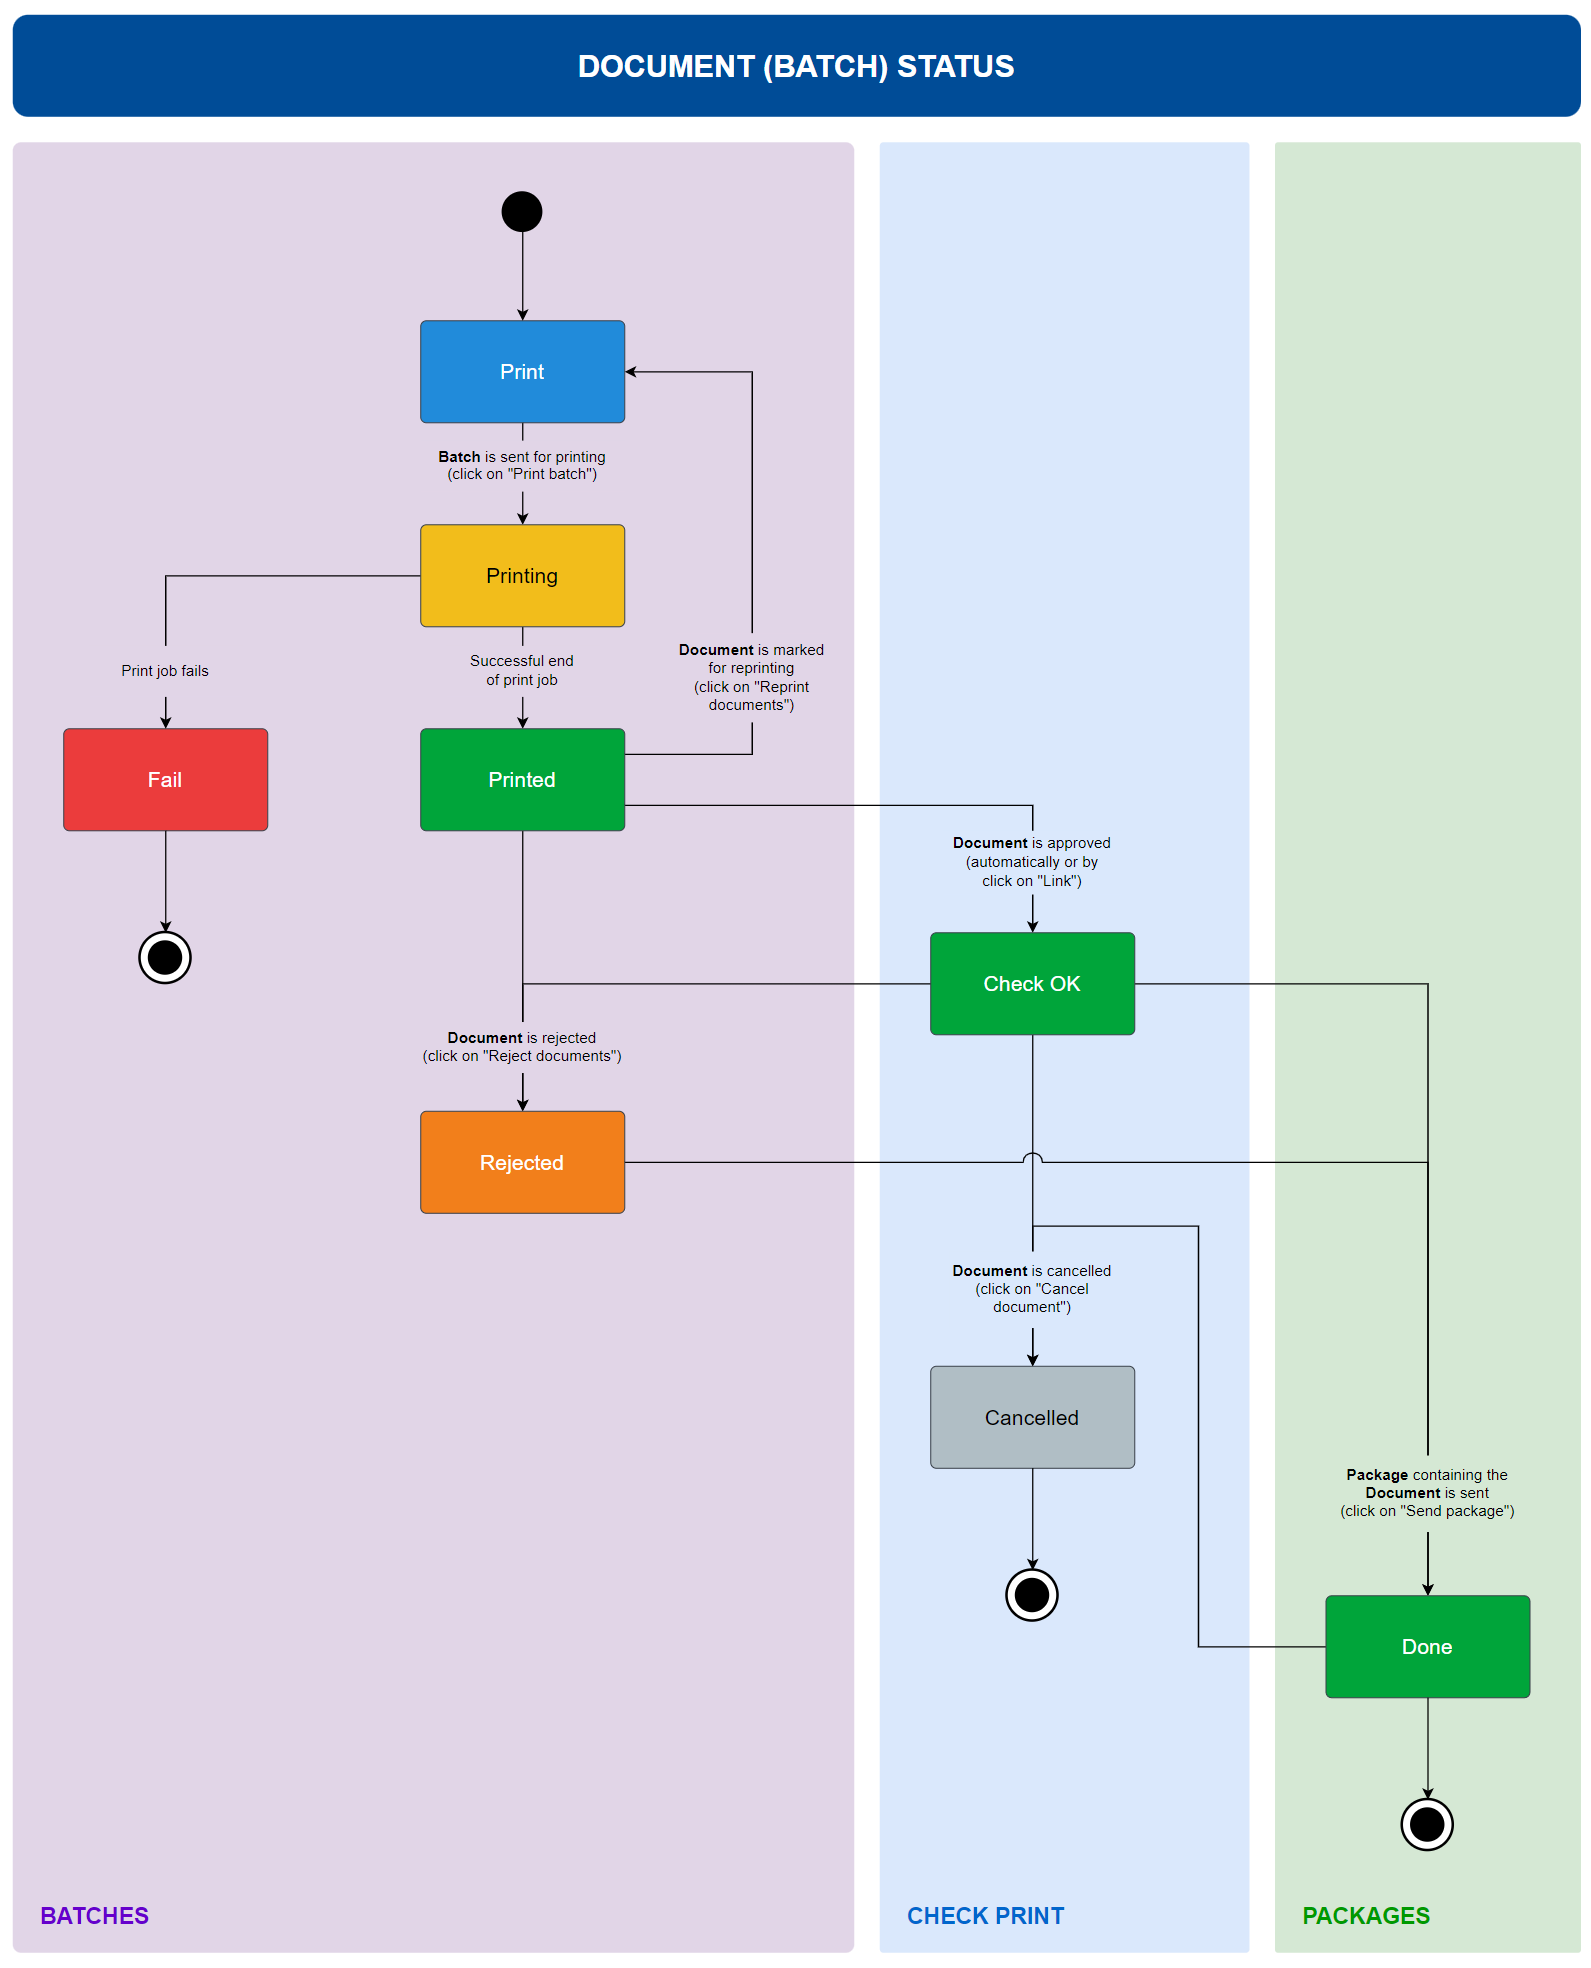
The status of a document is affected by user actions in the Batches, Check Print, and Packages tabs. It is also be affected by automatic actions.
Print is always the initial status of any document in a batch. The document was added to the batch and is waiting to be printed. If a new document is received and there is an available batch with the same layout and station, the document will be added to that batch. Otherwise, a new batch will be created.
The document will remain in this status until the user sends for printing the batch that contains it (by clicking on Print batch in the
Batchestab). After that, the status of the document will change to Printing.
Printing
This status indicates that the document is being printed. After the document is printed, its status will automatically change to Printed. If the print job fails, its status will change to Fail.
Printed
If the print job of a document ends successfully, its status will automatically change to Printed. At this point, the user should check the printed document and assess its quality.
The document will remain in this status until the user takes one of the following actions:
- Mark document for reprinting by selecting it and clicking on Reprint documents. The document will be removed from the current batch and restart the workflow in another batch (new or existing with same layout and station). The status of the document will reset to Print.
- Reject document by selecting it and clicking on Reject documents. The document will remain in the current batch, but its status will change to Rejected.
- Check document with OK. This process is done by scanning the document and verifying its status in the
Check Printtab. It may automatically change to Check OK if the document and the typographic are successfully read and linked (it will have status OK in theCheck Printtab). If the document is not automatically linked, the user must manually link it to the typographic code (by filling the necessary fields and clicking on Link in theCheck Printtab). The status of the document will change to Check OK.
Fail
If print job of a document fails, its status will automatically change to Fail. This is a final status.
Rejected
This status indicated that there was an issue with the document after printing and it was rejected by the user.
The document will remain in this status until the batch that contains it added to a package (by clicking on Create package in the
Packagestab) and the package is sent (by clicking on Send package in thePackagestab). After the package is sent, the document status will change to Done.
Check OK
This status indicates that the document was successfully checked in the
Check Printtab.The document will remain in this status until the user takes one of the following actions:
- Reject document by selecting it and clicking on Reject documents. The document will remain in the current batch, but its status will change to Rejected.
- Cancel document (by, in the
Check Printtab, clicking on the document line to open the document details and clicking on Cancel document). The document will remain in the current batch, but its status will change to Cancelled.- Send the package. The batch that contains the document is added to a package (by clicking on Create package in the
Packagestab) and the package is sent (by clicking on Send package in thePackagestab). After the package is sent, the document status will change to Done.
Cancelled
This status indicates that the document was cancelled by the user. A document can be cancelled at any time after it is checked (status Check OK). In special circumstances (such as fraud detection), a document may be cancelled after being sent to a station (status Done). This is a final status.
Done
This status indicates that the document was sent to its designated station.
In a regular workflow, this is usually a final status, but in special circumstances (such as fraud detection), it may change to Cancelled (by clicking on Cancel document in the
Check Printtab).
3.4. Step 2: Check Print Tab
There are seven possible statuses for a document in the Check Print tab:
- OK (green)
- Cancelled (gray)
- Document not read (red)
- Document does not exist (red)
- Typographic not read (red)
- Update fail (red)
- Fail (red)
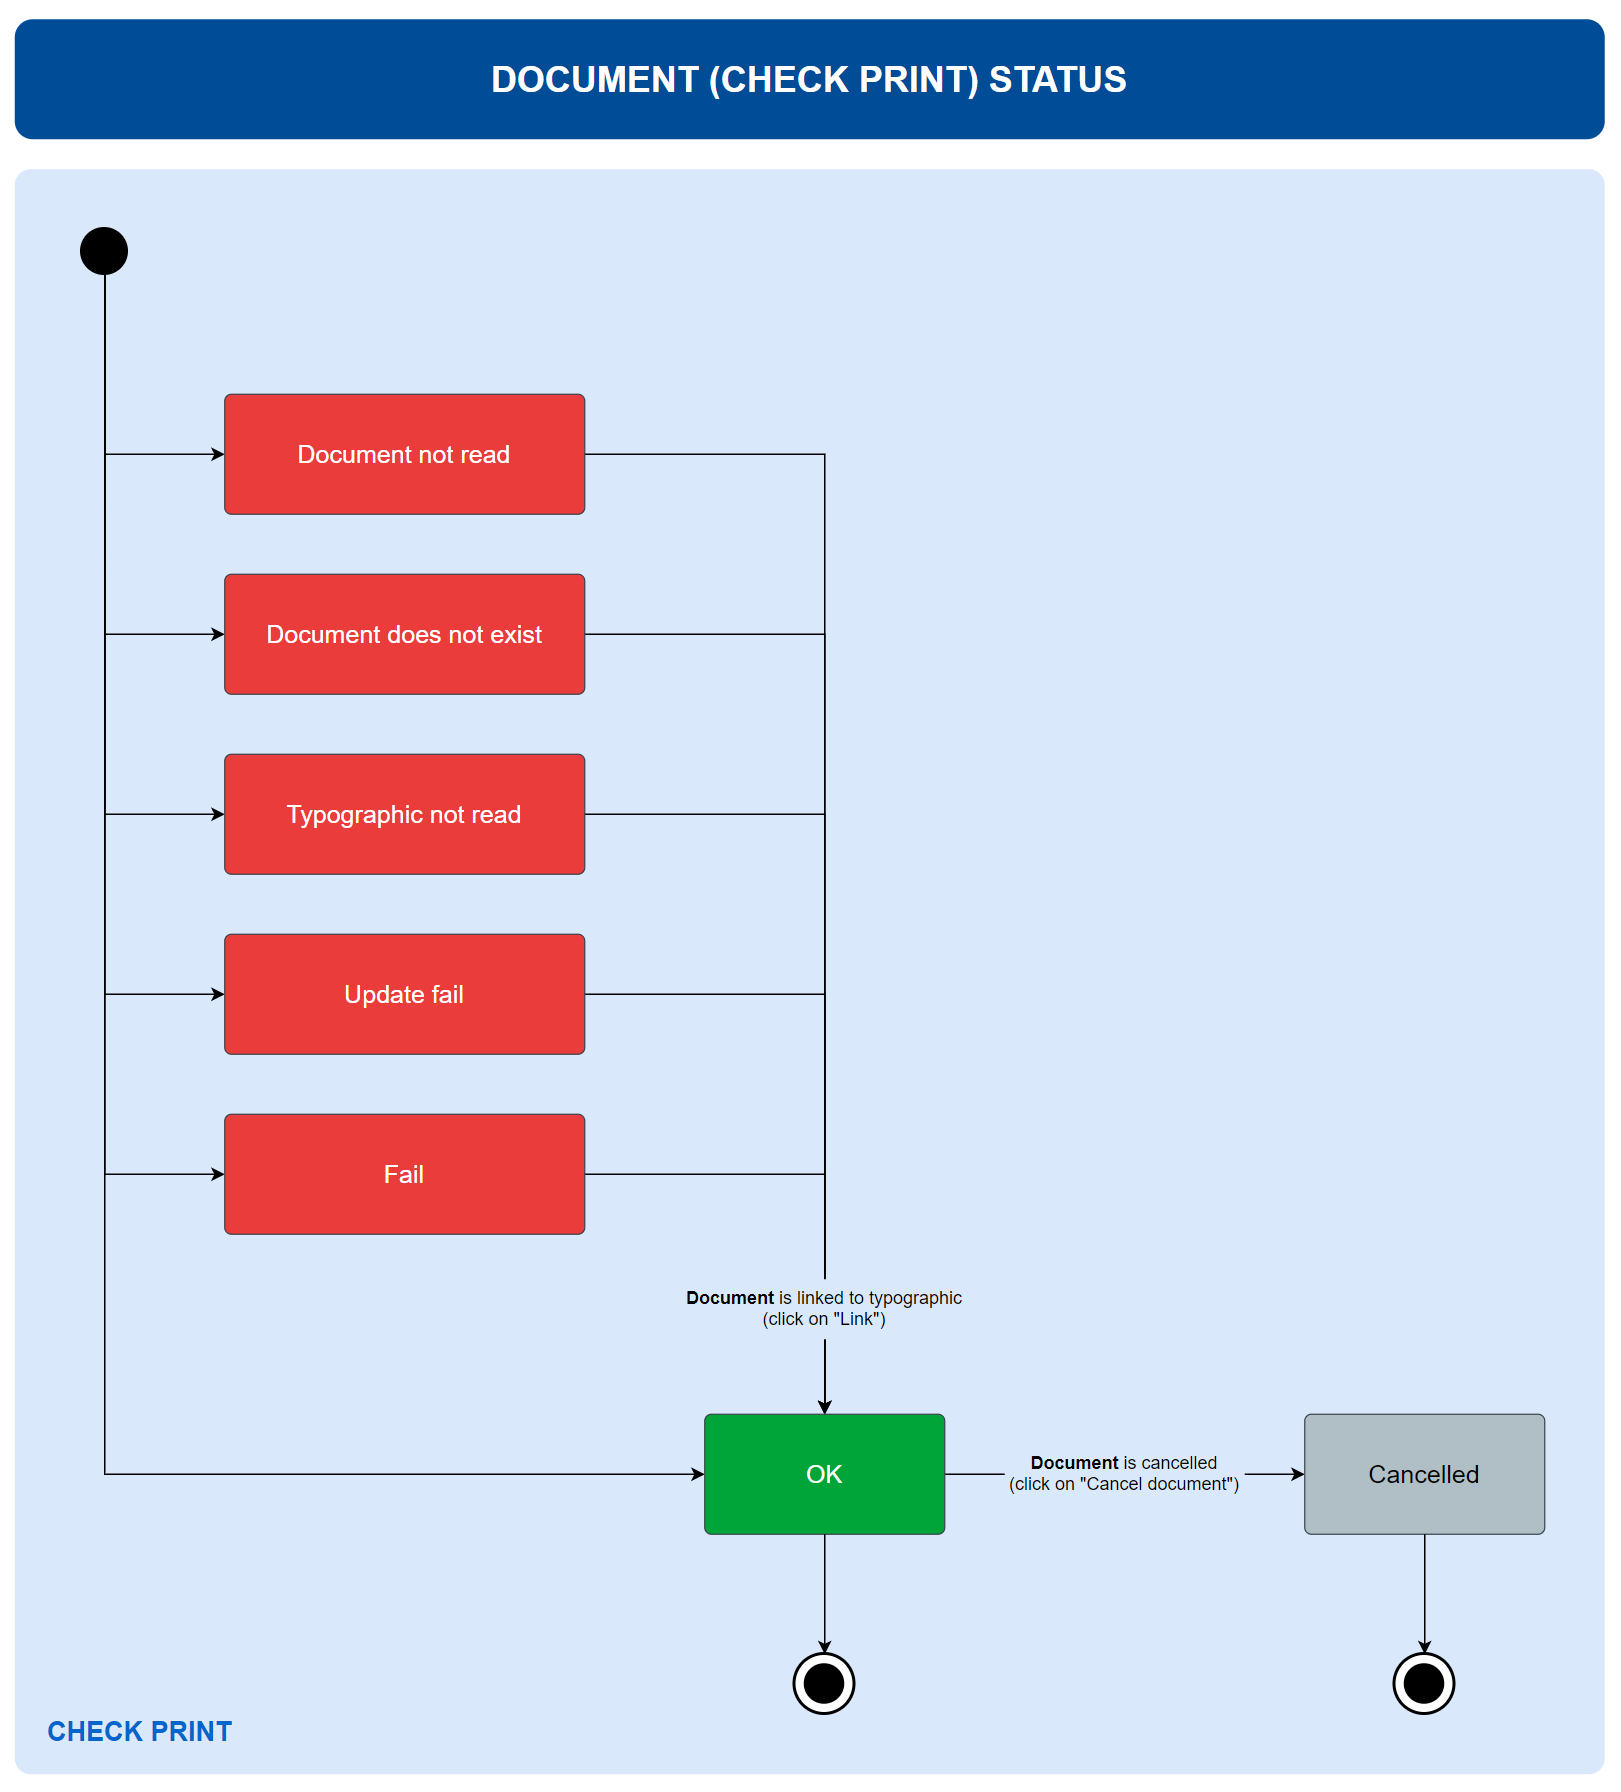
The status of a document in the Check Print tab is only affected by user actions in the Check Print tab.
OK
This is one of the possible initial status of a document in the
Check Printtab.OK is also a possible final status, and it indicates that the document was successfully automatically checked and linked to the typographic. No further action is required, but a manual review is recommended.
The only scenario in which the status of a document in the
Check Printtab will change from OK is an exceptional circumstance (such as fraud detection). In this case, the user manually cancels it by clicking on the document line to open the document details and clicking on Cancel document. Then, the status will change to Cancelled.
Cancelled
This status indicates that the document was cancelled by the user. A document can be cancelled at any time after it is checked (status OK). This is a final status.
Document not read
This is one of the possible initial status of a document in the
Check Printtab. It indicates that the document number could not be automatically read from the scanned document QR code.The user must manually enter the document number and the typographic code and link them by clicking on Link. After the link is successful, the status will change to OK.
Document does not exist
This is one of the possible initial status of a document in the
Check Printtab. It indicates that the document number read from the scanned document QR code does not exist in GBS Print records. This may happen if the automatic document reading fails to obtain the correct information.The user must manually enter the document number and the typographic code and link them by clicking on Link. After the link is successful, the status will change to OK.
Typographic not read
This is one of the possible initial status of a document in the
Check Printtab. It indicates that the document was successfully read, but the typographic code could not be automatically read from the scanned document barcode.The user must manually enter the typographic code and link it tot he document by clicking on Link. After the link is successful, the status will change to OK.
Update fail
This is one of the possible initial status of a document in the
Check Printtab. This status indicates that there was an issue while updating the document information in GBDS. It may happen if the server is down or if there is a network issue.The user must manually enter the document number and the typographic code and link them by clicking on Link. After the link is successful, the status will change to OK.
Fail
This is one of the possible initial status of a document in the
Check Printtab. It indicates that there was an internal error while processing.The user must manually enter the document number and the typographic code and link them by clicking on Link. After the link is successful, the status will change to OK.
3.5. Step 3: Packages Tab
There are only two possible statuses for a package:
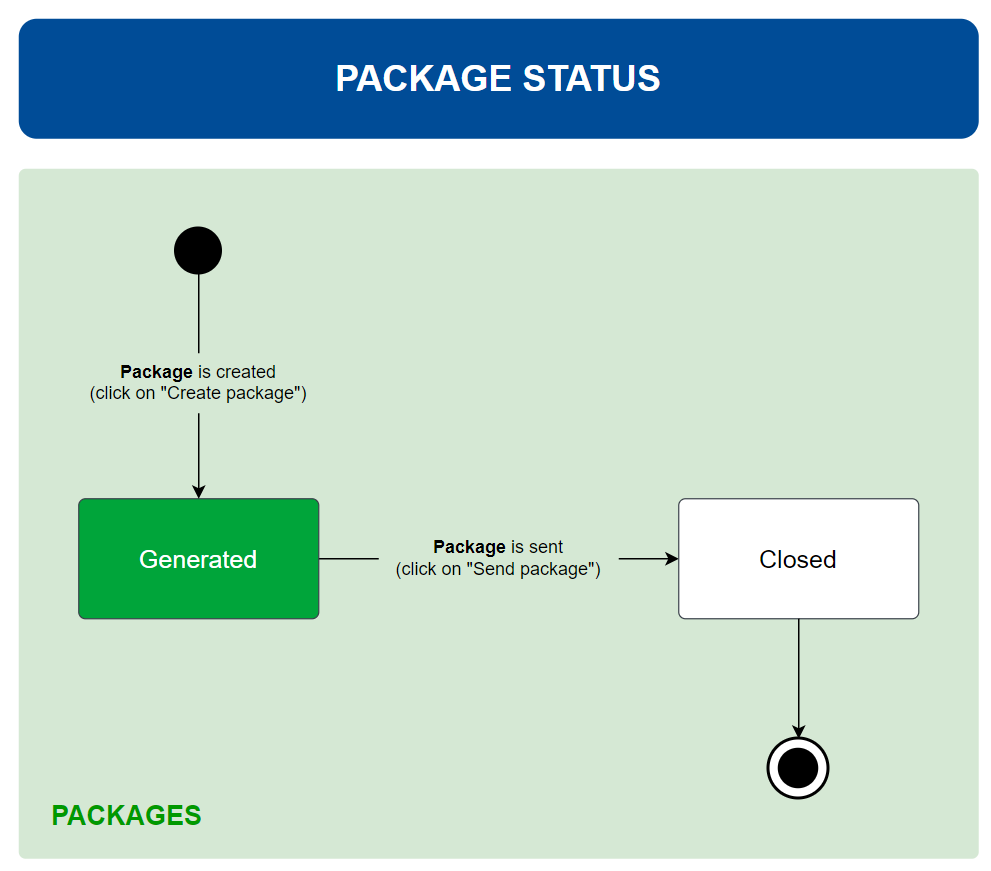
The status of a package is only affected by user actions in the Packages tab.
Generated
Generated is the initial status of a package. After selecting the batches to be added to the package and clicking on Create package, the package status will be Generated. Only batches with status Check OK can be added to a package. This action will also change the status of the selected batches to Packaged.
The package will remain in this status until the user clicks on Send package. After clicking on Send package, the package status will change to Closed. This action will also change the status of the batches to Done, and the documents in them to Done.
Closed
Closed is the final status of a package.
4. Appendices
4.1. Procedure for Document Scanning and Check Print
- Detach documents from the paper sheet.
- Place the documents (maximum of 50) in the scanner for digitization. The documents should be placed face up and should not be placed upside down.
- Scan with the following settings:
color,600 DPI,PNGformat, scanboth sides(front and back). - The file names should follow the pattern:
00000001.png,00000002.png, and so on (8 digits, incremental numbering). - The files should be placed in the folder that Check Print will scan (set in the Settings menu).
- The number of files must be even. Otherwise, an error will be generated.
- When processed successfully, the file is moved to the
SUCCESSfolder within the root folder. - When processed with error, the file is moved to the
ERRORfolder within the root folder.