1. Introduction
This manual describes the configuration of the server-side components of the GBS Print application.
The configuration procedure should be performed only after the installation step. For more information, refer to GBS Apps Setup Manual.
2. Configuration
The configurations steps are:
- Configure Tomcat;
- Configure Certificates;
- Generate encrypted password;
- Configure the config.properties file;
- Install and Configure the Printing Systems;
- Install fonts;
All steps are described below. An example config.properties file can be found in the Configuration File Example section.
Danger
All lines must be present in the configuration file. Commenting or deleting lines may cause unexpected behavior. For further information, contact the Griaule Support Team.
2.1. Tomcat Configuration
Edit the Tomcat configuration file to configure the certificates and port that the application will use.
vi /var/lib/tomcats/print/conf/server.xml
To change the port, look for Connector port=. This is the port for the backend operations.
The default port for GBS Print is 8127.
2.2. Certificates Configuration
To enable SSL authentication, search for Connector port= in the file /conf/server.xml.
There are multiple entries. Look for the one related defining an SSL HTTP/1.1 Connector. If necessary, remove the comment delimiters <!-- and -->. Then, adjust these settings:
port="58194"
keystoreFile="/home/griaule/keystore"
keystorePass="password"
keyAlias="1"
clientAuth="true"
truststoreFile="/home/griaule/keystore"
truststorePass="password"
The parameter port should be the desired network port for the application.
Change the path of keystoreFile and truststoreFile to the proper values. Do the same for keystorePass and truststorePass.
The parameter clientAuth="true" will require authentication from server-side to client-side and from client-side to server-side. This means that the client will need to import the certificate in the browser to be able to access the application.
Warning
When clientAuth is set to true, the system administrator must provide the certificate.pfx file for the end-users.
2.3. Database Password Encryption
In the config.properties file, the jdbc.password parameter is an encrypted password. To generate the encrypted password, perform the following steps:
Go to the following directory:
cd /var/lib/tomcats/print/webapps/gbs-print-server/WEB-INF/lib
Execute the command:
java -cp gbs-common-db-<version>.jar com.griaule.commons.util.EncryptUtil <desiredPassword>
The encrypted password will be displayed after the message: “Encrypted password is:”
Note
Store this encrypted password. It will be used in the next step.
2.4. Application Properties File
To configure the application properties file, open with:
vi /var/lib/tomcats/print/conf/config.properties
The most important changes in this configuration file are the jdbc.url, jdbc.username, jdbc.password, and gbds.url properties. Configure the parameters according to the environment.
The complete configuration file is shown in the Configuration File Example section.
Note
Remember to substitute the correct encrypted password generated in the Database password encryption section in the file.
2.4.1. Print Configuration
The last step is configuring IP and port of the application that the end-user will access. It must be the same IP and port configured in the Tomcat Configuration section.
print.ip=<ip>
print.port=<port>
print.protocol=<protocol>
Important
Make sure that the print.ip, print.port, and print.protocol configuration parameters are correctly specified in the config.properties file. In many cases, the IP will be the same for various applications. However, each application will have a different and unique port.
Attention
Make sure that the configuration parameter resizeFloat=0.3 is present in the configuration file (config.properties). It determines the percentage of compression of the document image to be saved in the database at the end of the process. The default value is 0.3 (30% compression).
2.5. Printing Systems
2.5.1. CUPS Installation
The Common UNIX Printing System (CUPS) is a printing system for UNIX-like operating systems. It allows a computer to act as a print server, receiving print jobs from client computers and sending them to the appropriate printer. To install CUPS, perform the following steps:
Install CUPS:
sudo yum install cups -y
Enable and start CUPS service:
sudo systemctl enable cups
sudo systemctl start cups
Then, install the graphical user interface for CUPS:
sudo yum install system-config-printer -y
Tip
If the install command fails, try cleaning the yum cache:
sudo yum clean all
2.5.2. CUPS Configuration
To configure CUPS, edit the configuration file:
sudo vim /etc/cups/cupsd.conf
To allow access to the CUPS server from other computers, change the following line from:
Listen localhost:631
To:
Listen 0.0.0.0:631
Then, to allow access to the server, add the Allow from all permission to <Location />. To do so, look for the following lines and change them as follows:
# Restrict access to the server...
<Location />
   Order allow,deny
   Allow from all
</Location>
Also, to allow access to the admin pages, add the Allow from all permission to <Location /admin>. To do so, look for the following lines and change them as follows:
# Restrict access to the admin pages...
<Location /admin>
   Order allow,deny
   Allow from all
</Location>
Then, save and close the configuration file.
Finally, to apply the changes, restart the CUPS service:
sudo systemctl restart cups
2.5.3. HPLIP Installation (HP Printer Driver)
The HP Linux Imaging and Printing (HPLIP) is a free, open-source HP-developed solution for printing using HP printers in Linux. To install HPLIP, run:
sudo yum install hplip -y
Then, create a group for printer administration:
sudo groupadd lpadmin
Finally, add the root user to the lpadmin group:
sudo usermod -a -G lpadmin root
2.5.4. Printer Configuration
First, start the service for browsing the network for printers running:
sudo systemctl enable cups-browsed.service
sudo systemctl start cups-browsed.service
sudo systemctl status cups-browsed.service
Then, access the CUPS web interface at http://<server_ip>:631 using a web browser.
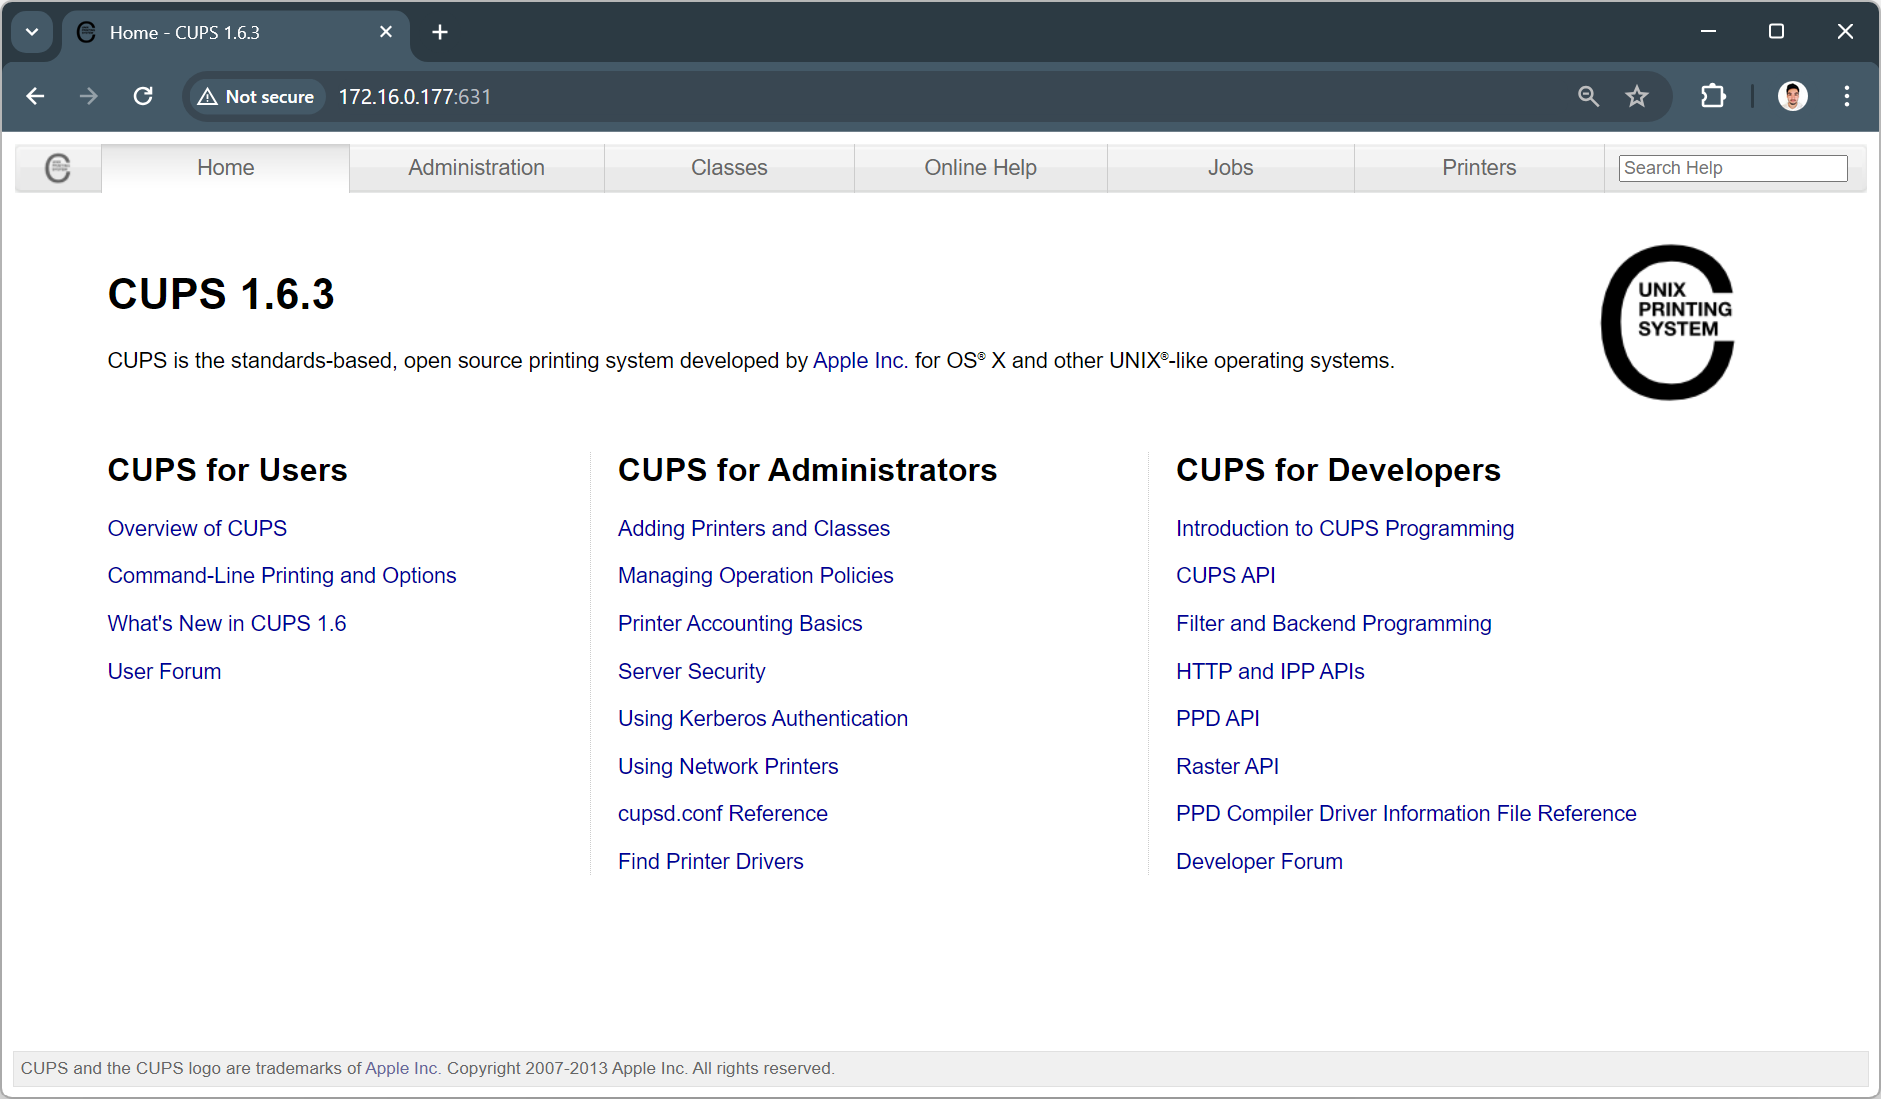
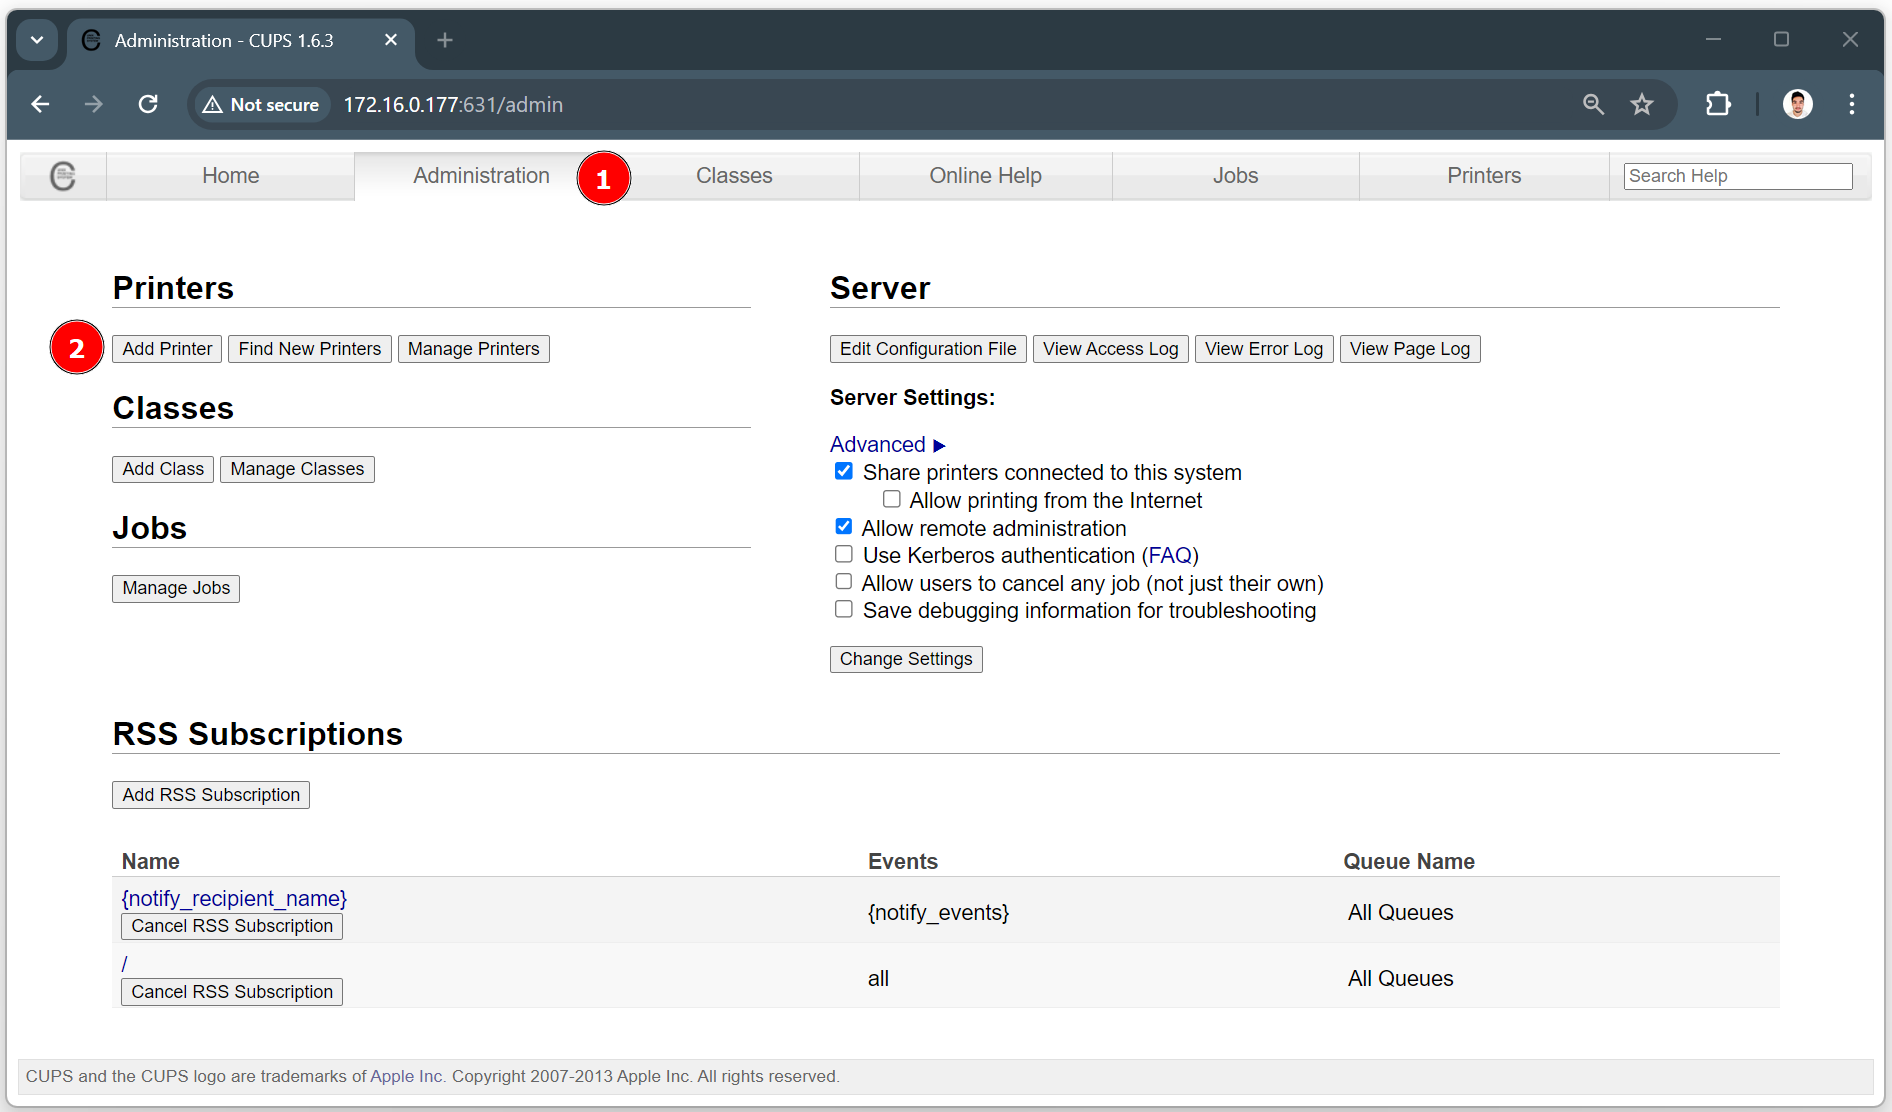
On the top menu bar, click on the Administration tab and then on the Add Printer button.
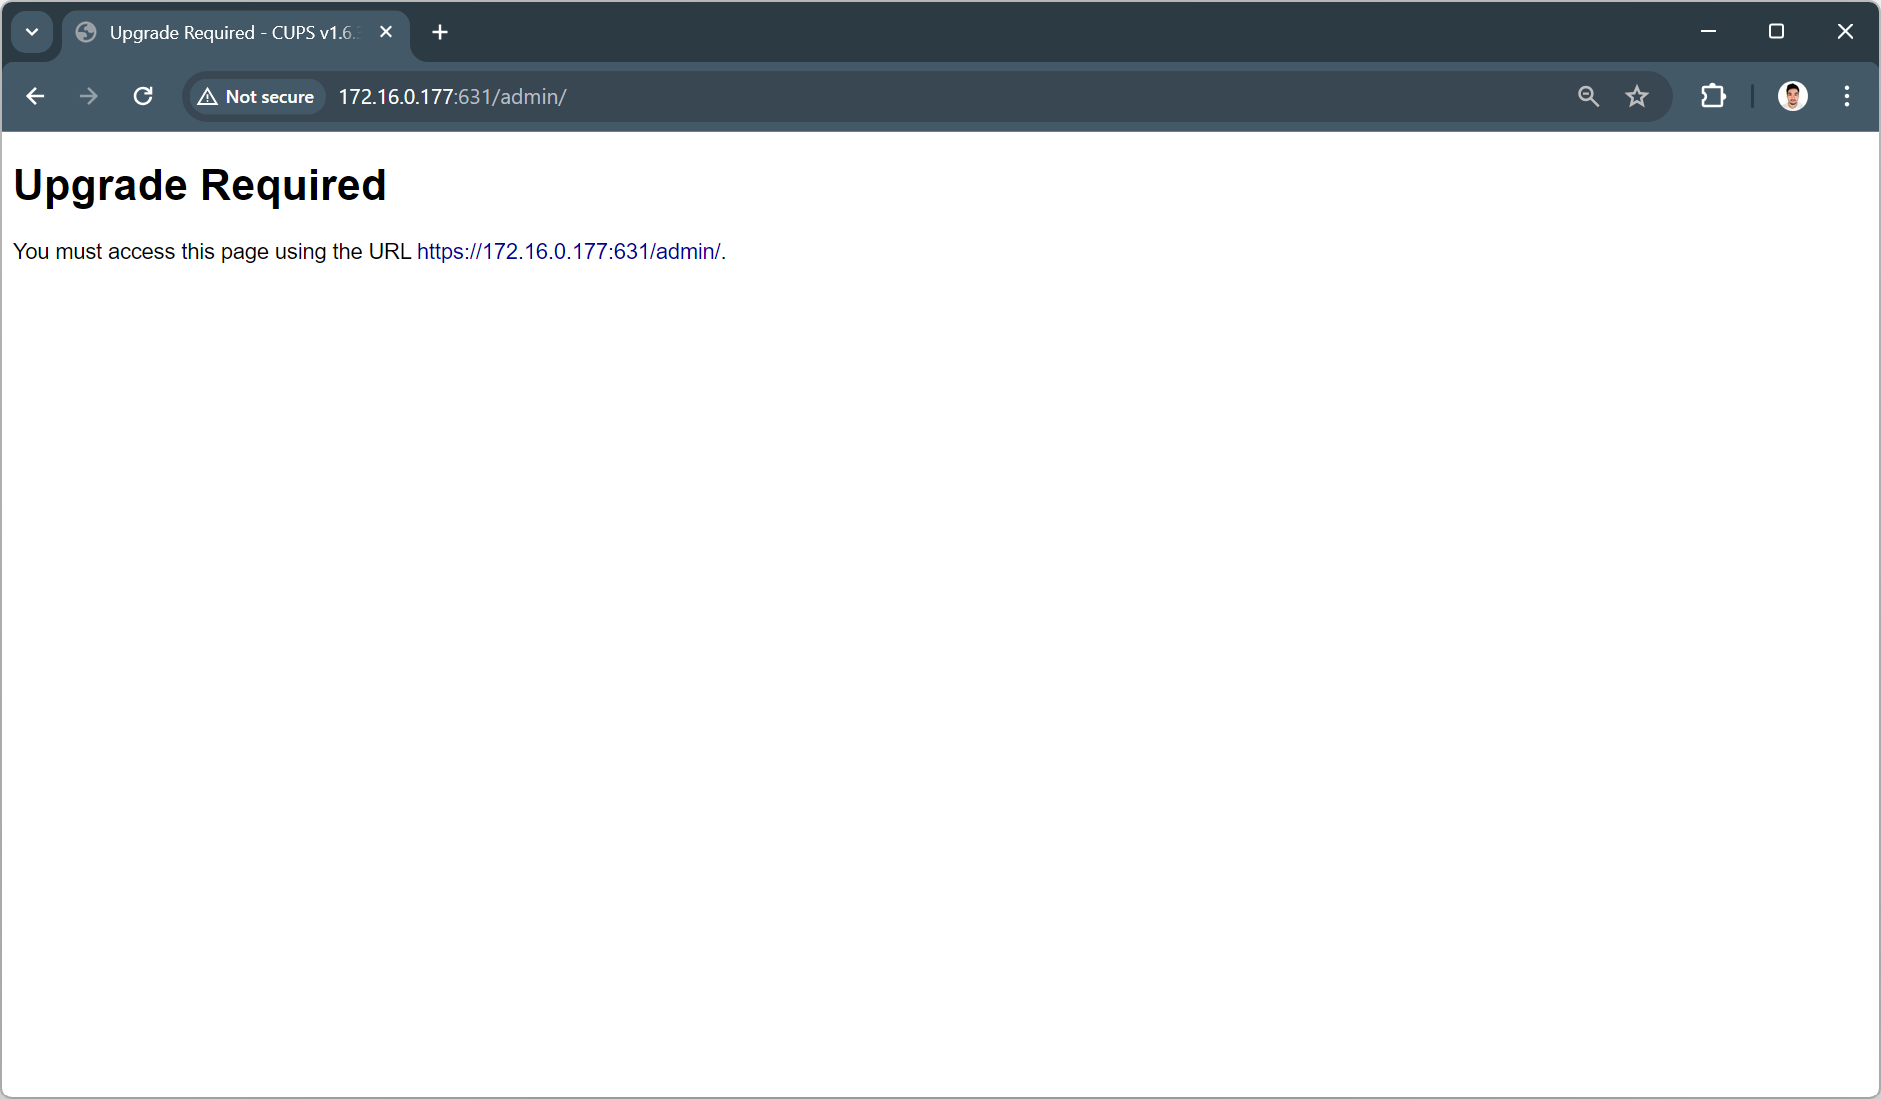
If a message appears saying that an upgrade is required, click on the displayed URL, then on the Advanced button and on Proceed to https://<server_ip>:631 (unsafe).
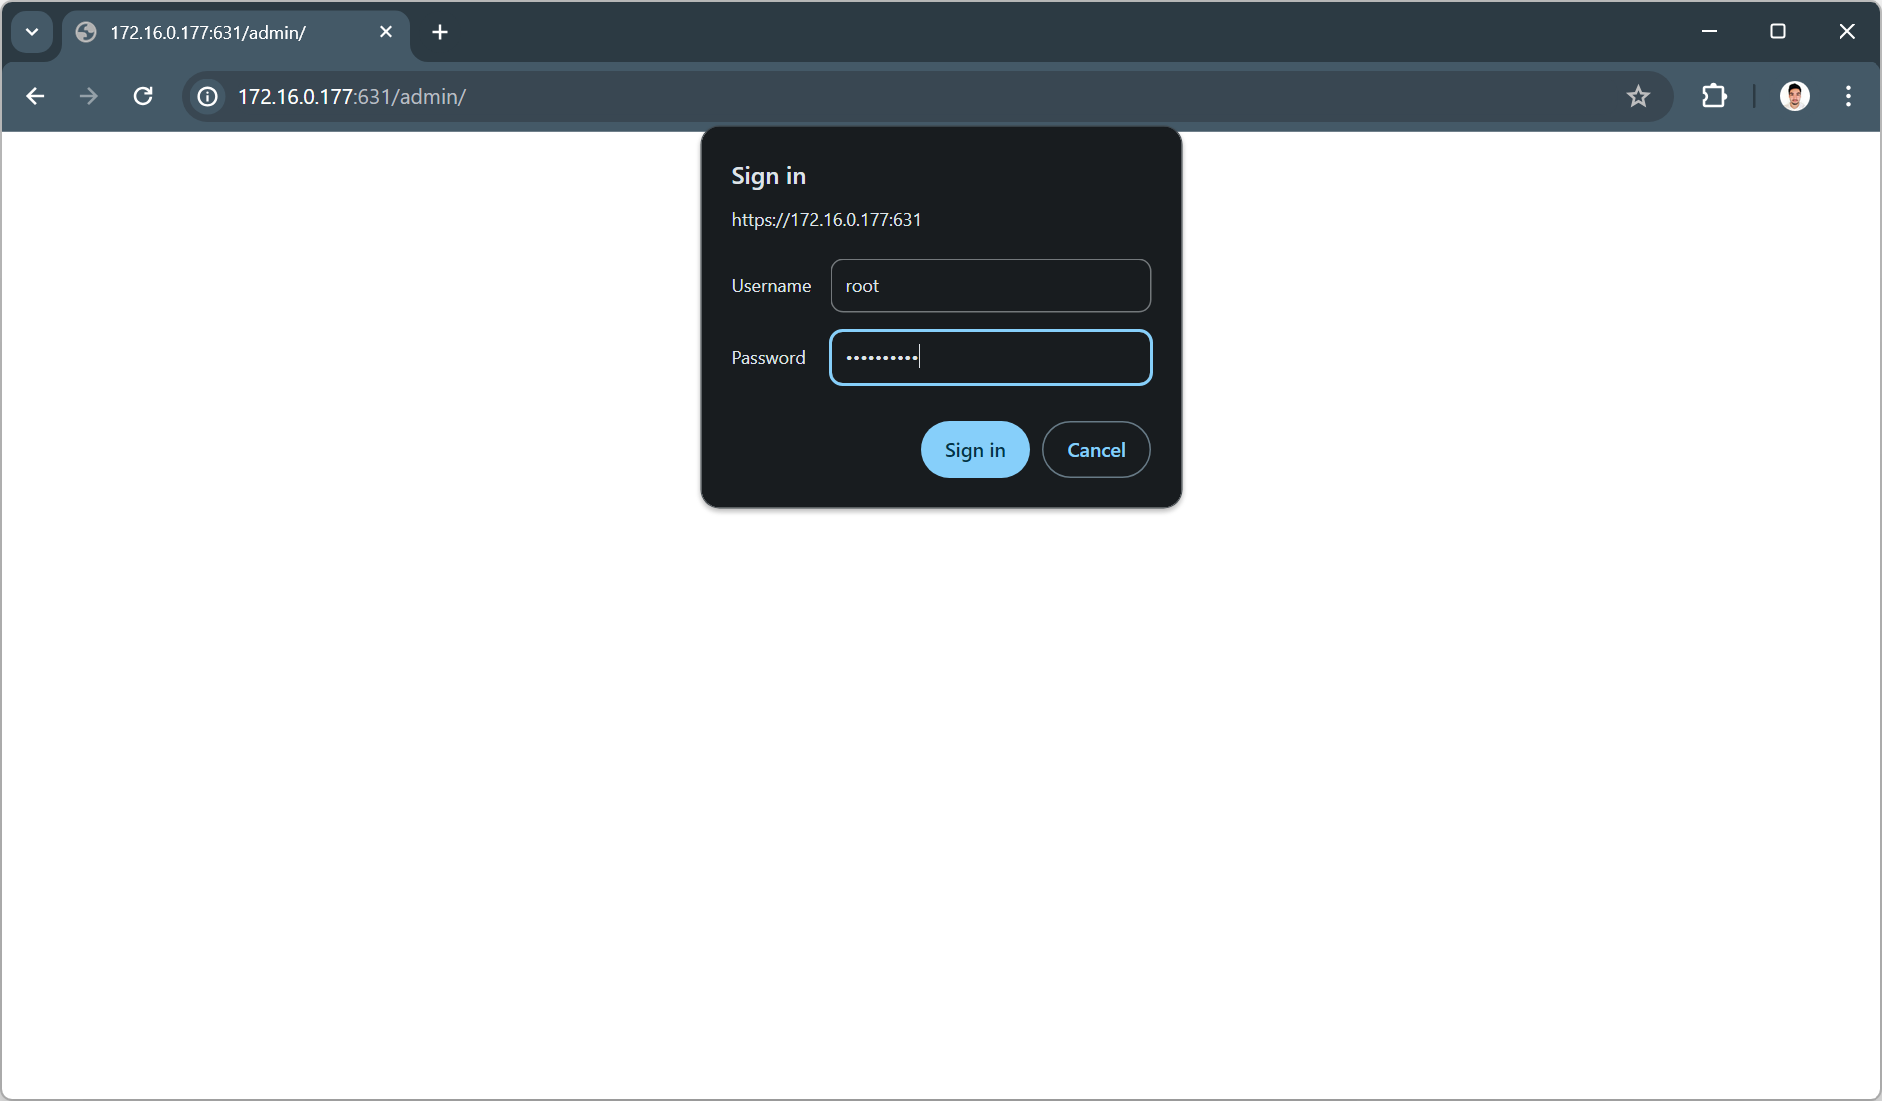
Upon returning to the CUPS web interface, click on the Add Printer button again and, if prompted, log in with the root username and password credentials of the server.
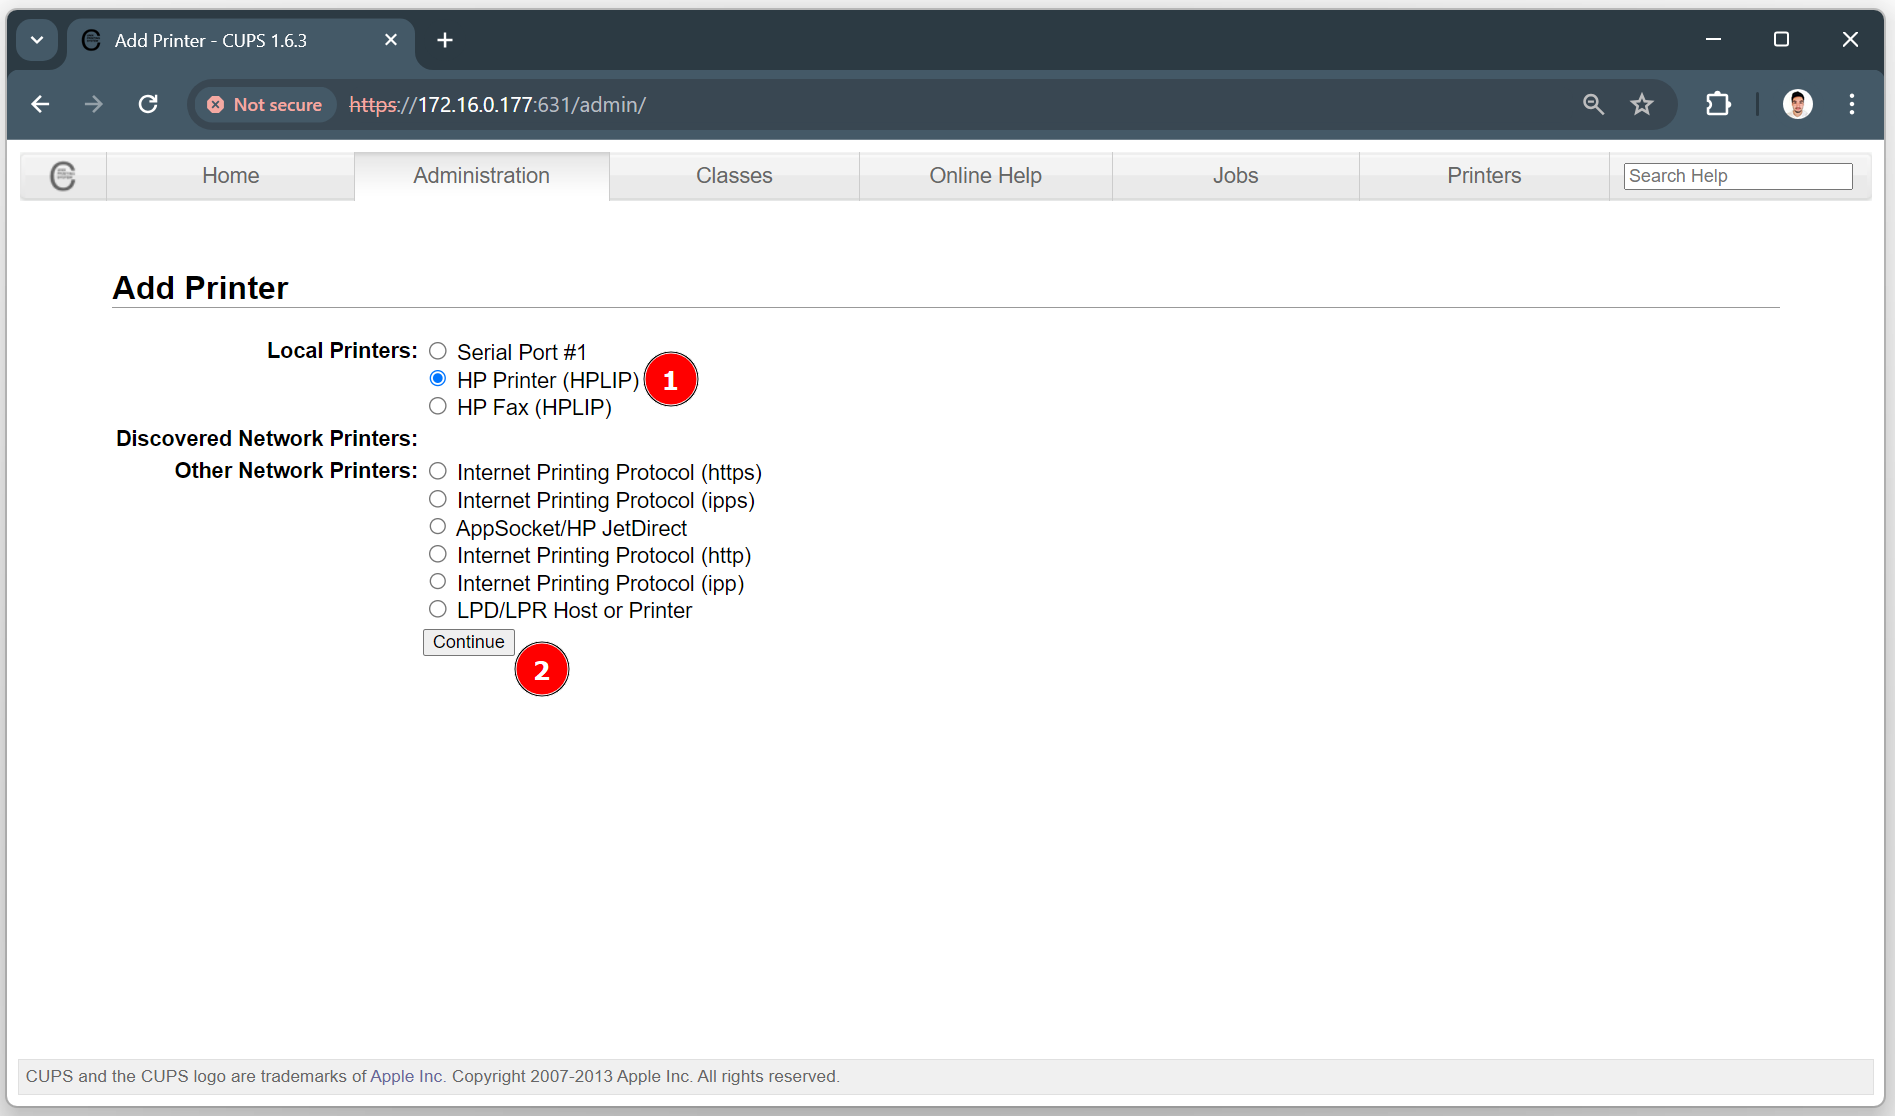
On the Add Printer page, in the Local Printers section, select HP Printer (HPLIP) and click on the Continue button.
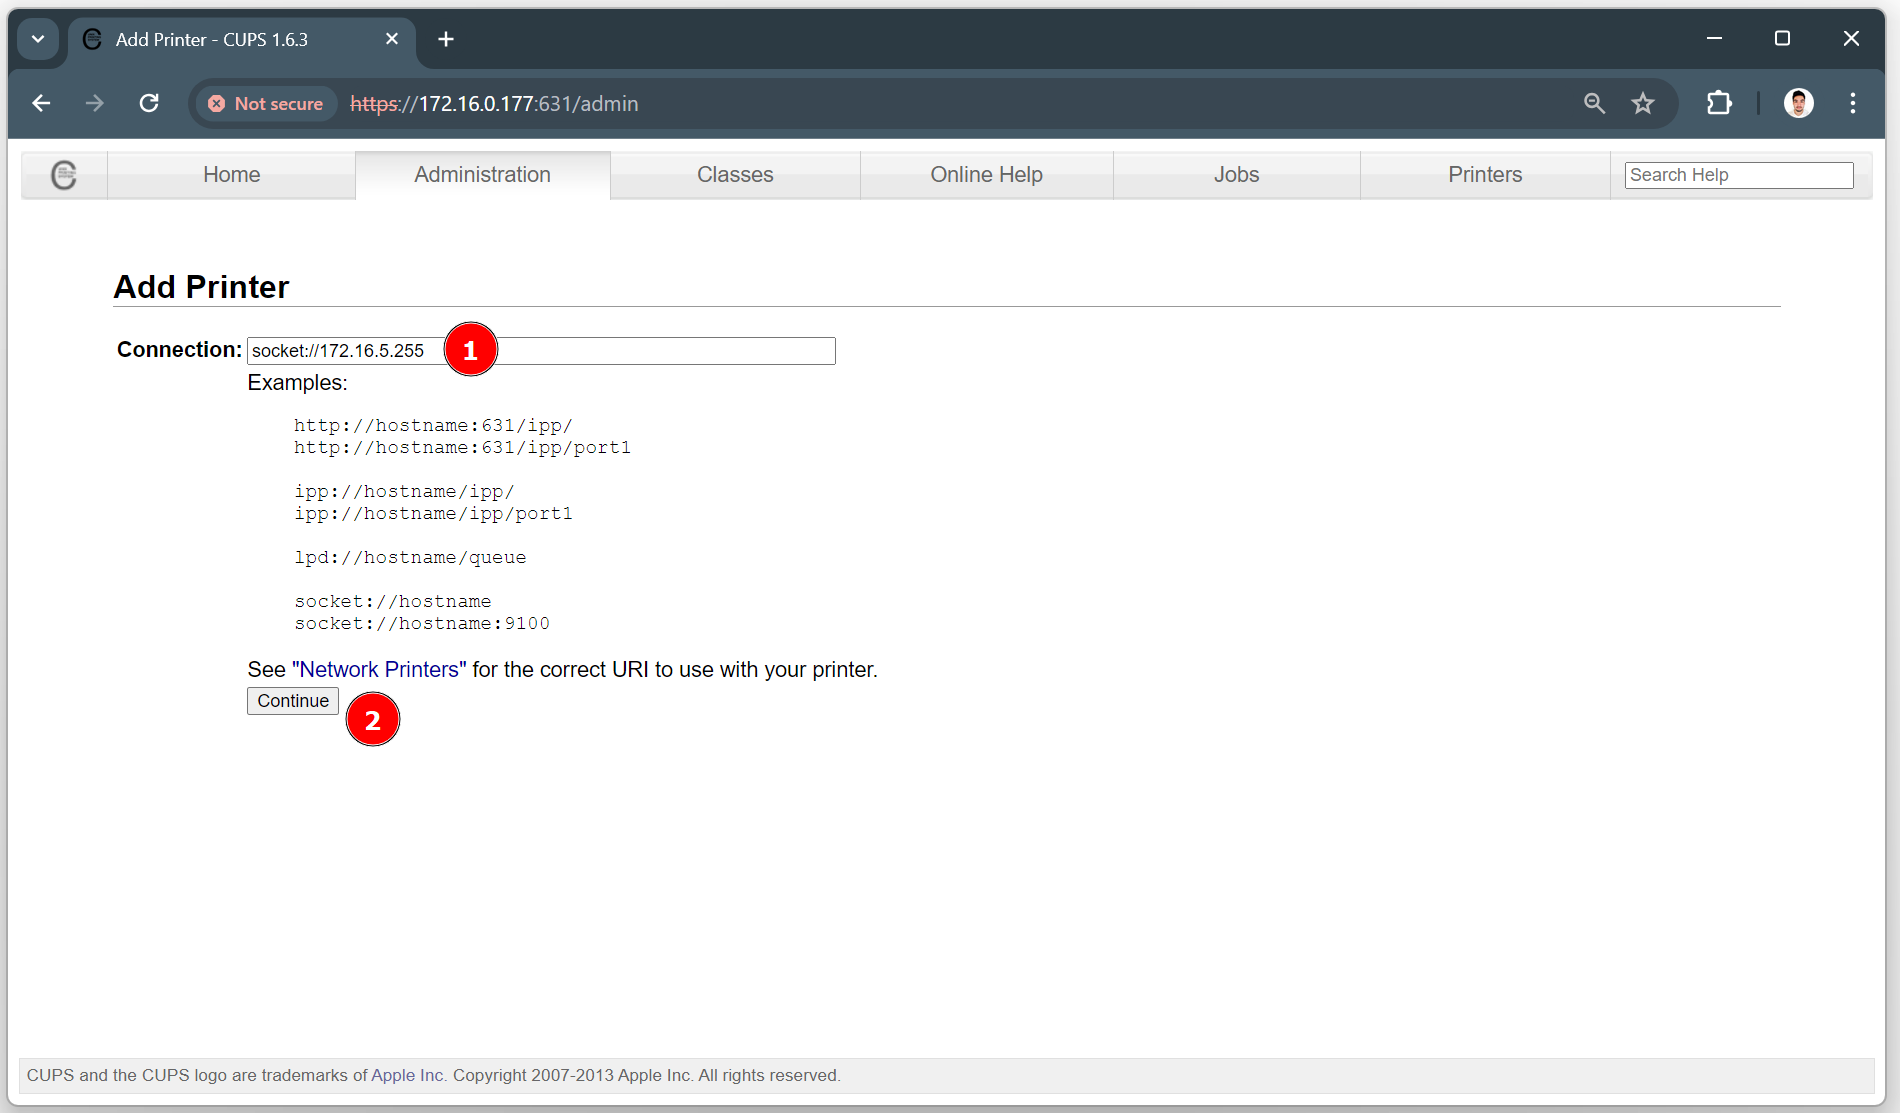
Next, in the Connection section, enter socket://<printer_IP> and click on the Continue button.
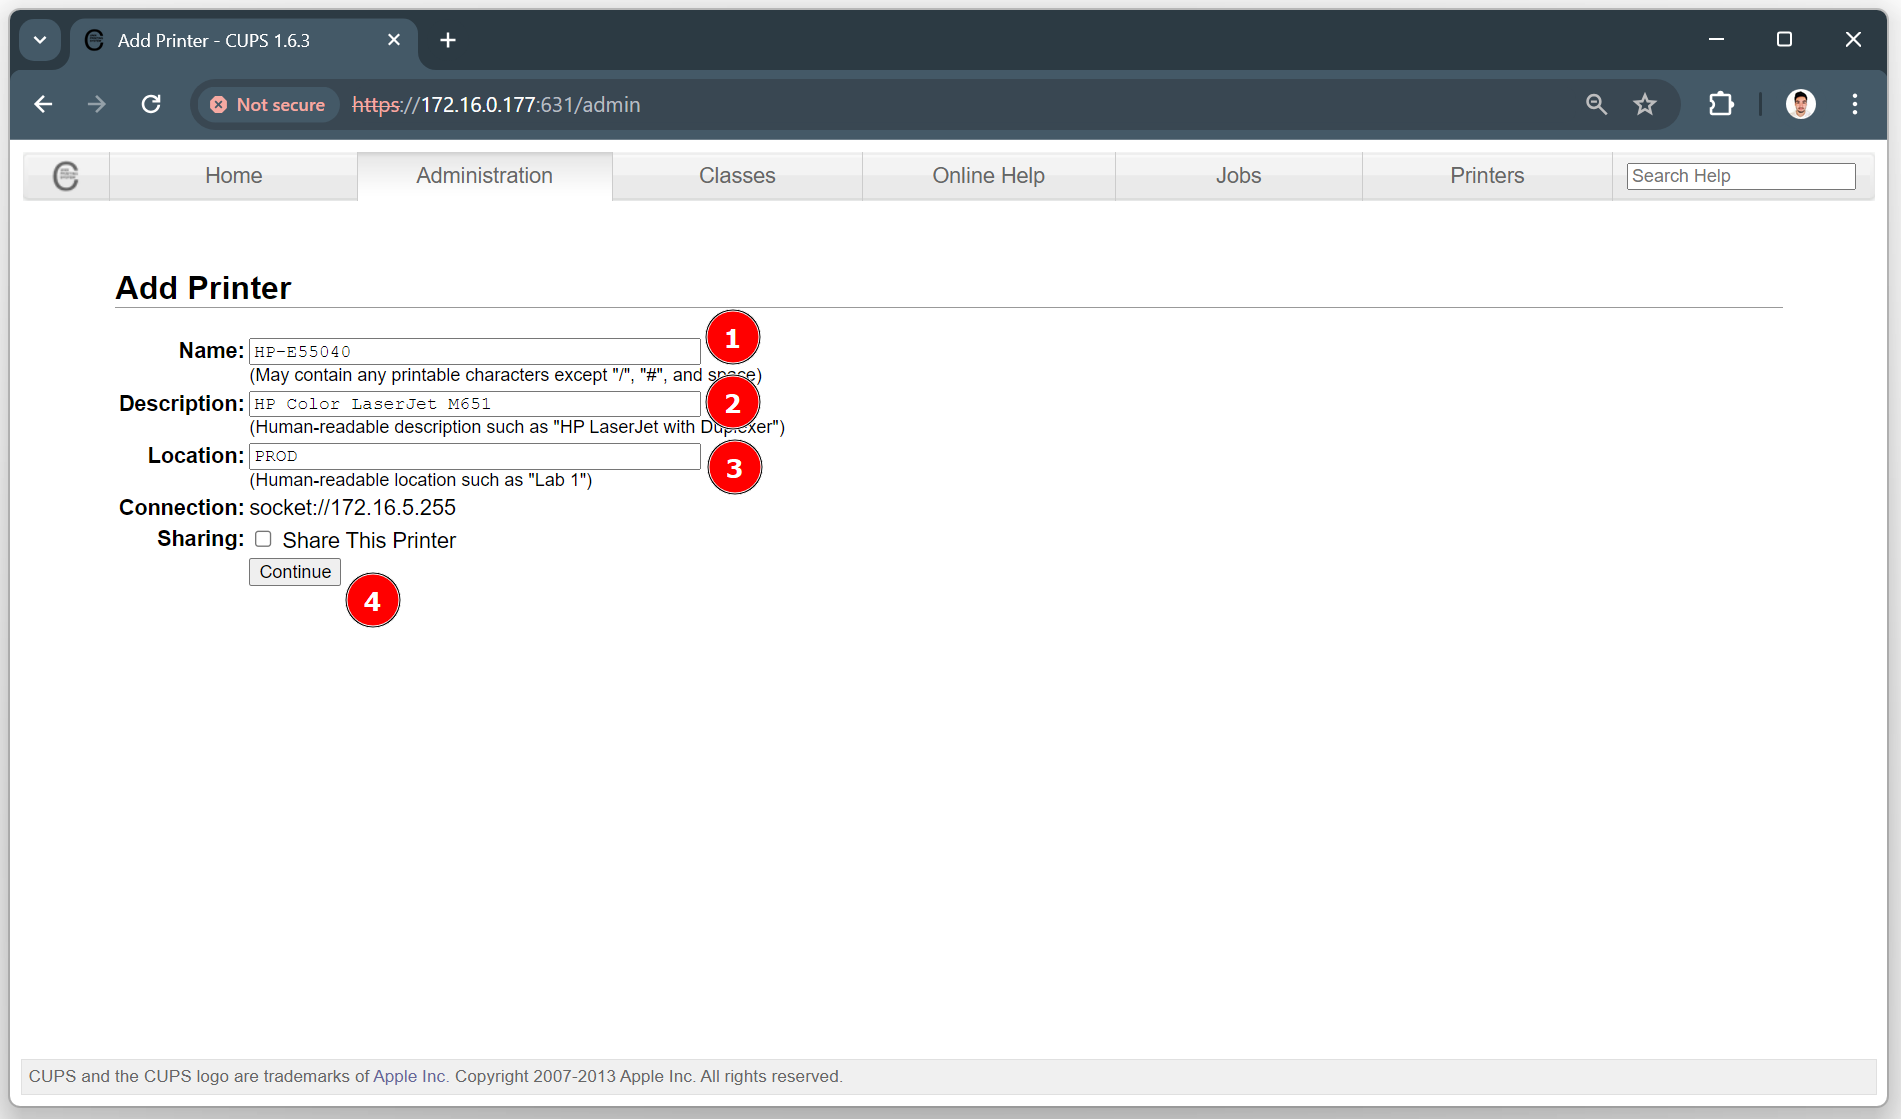
Then, enter a Name, Description and Location for the printer, following the instructions on the page for each field, and click on the Continue button.
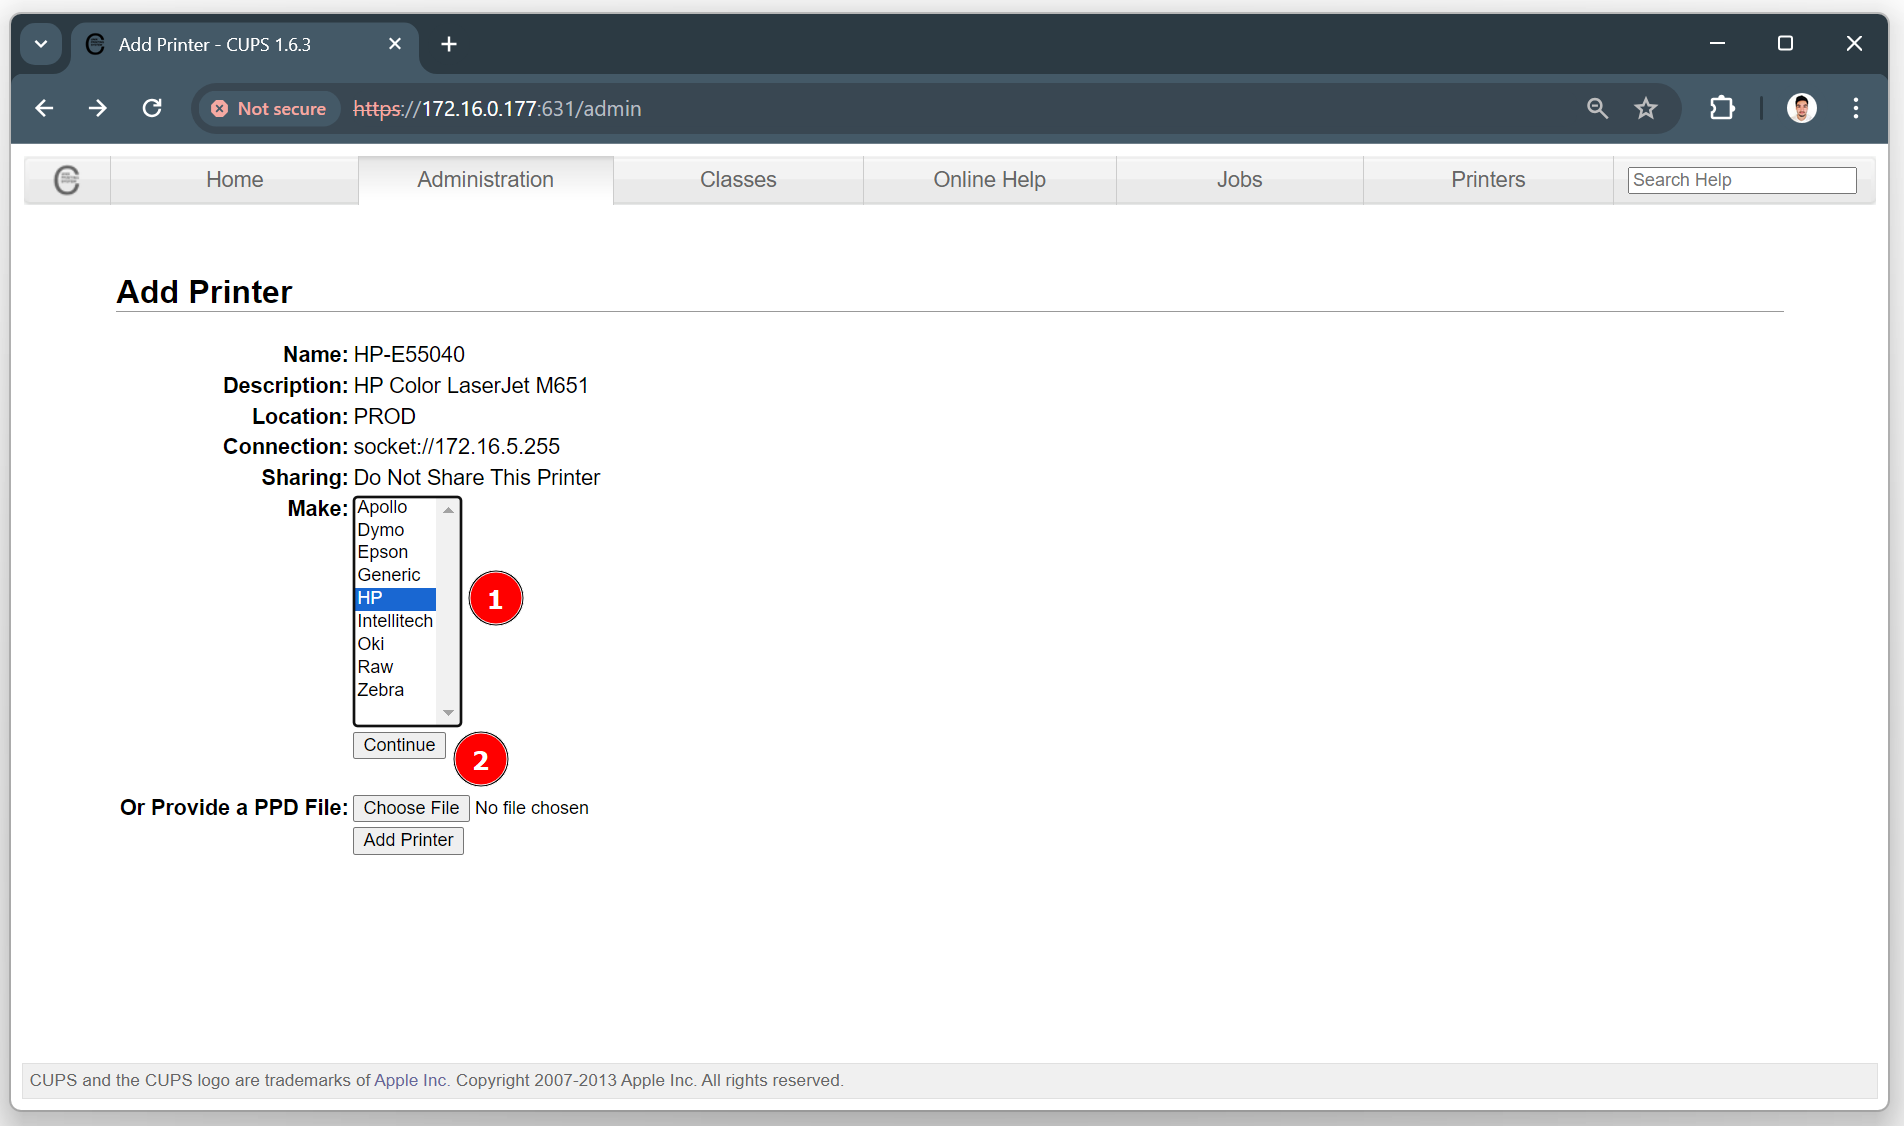
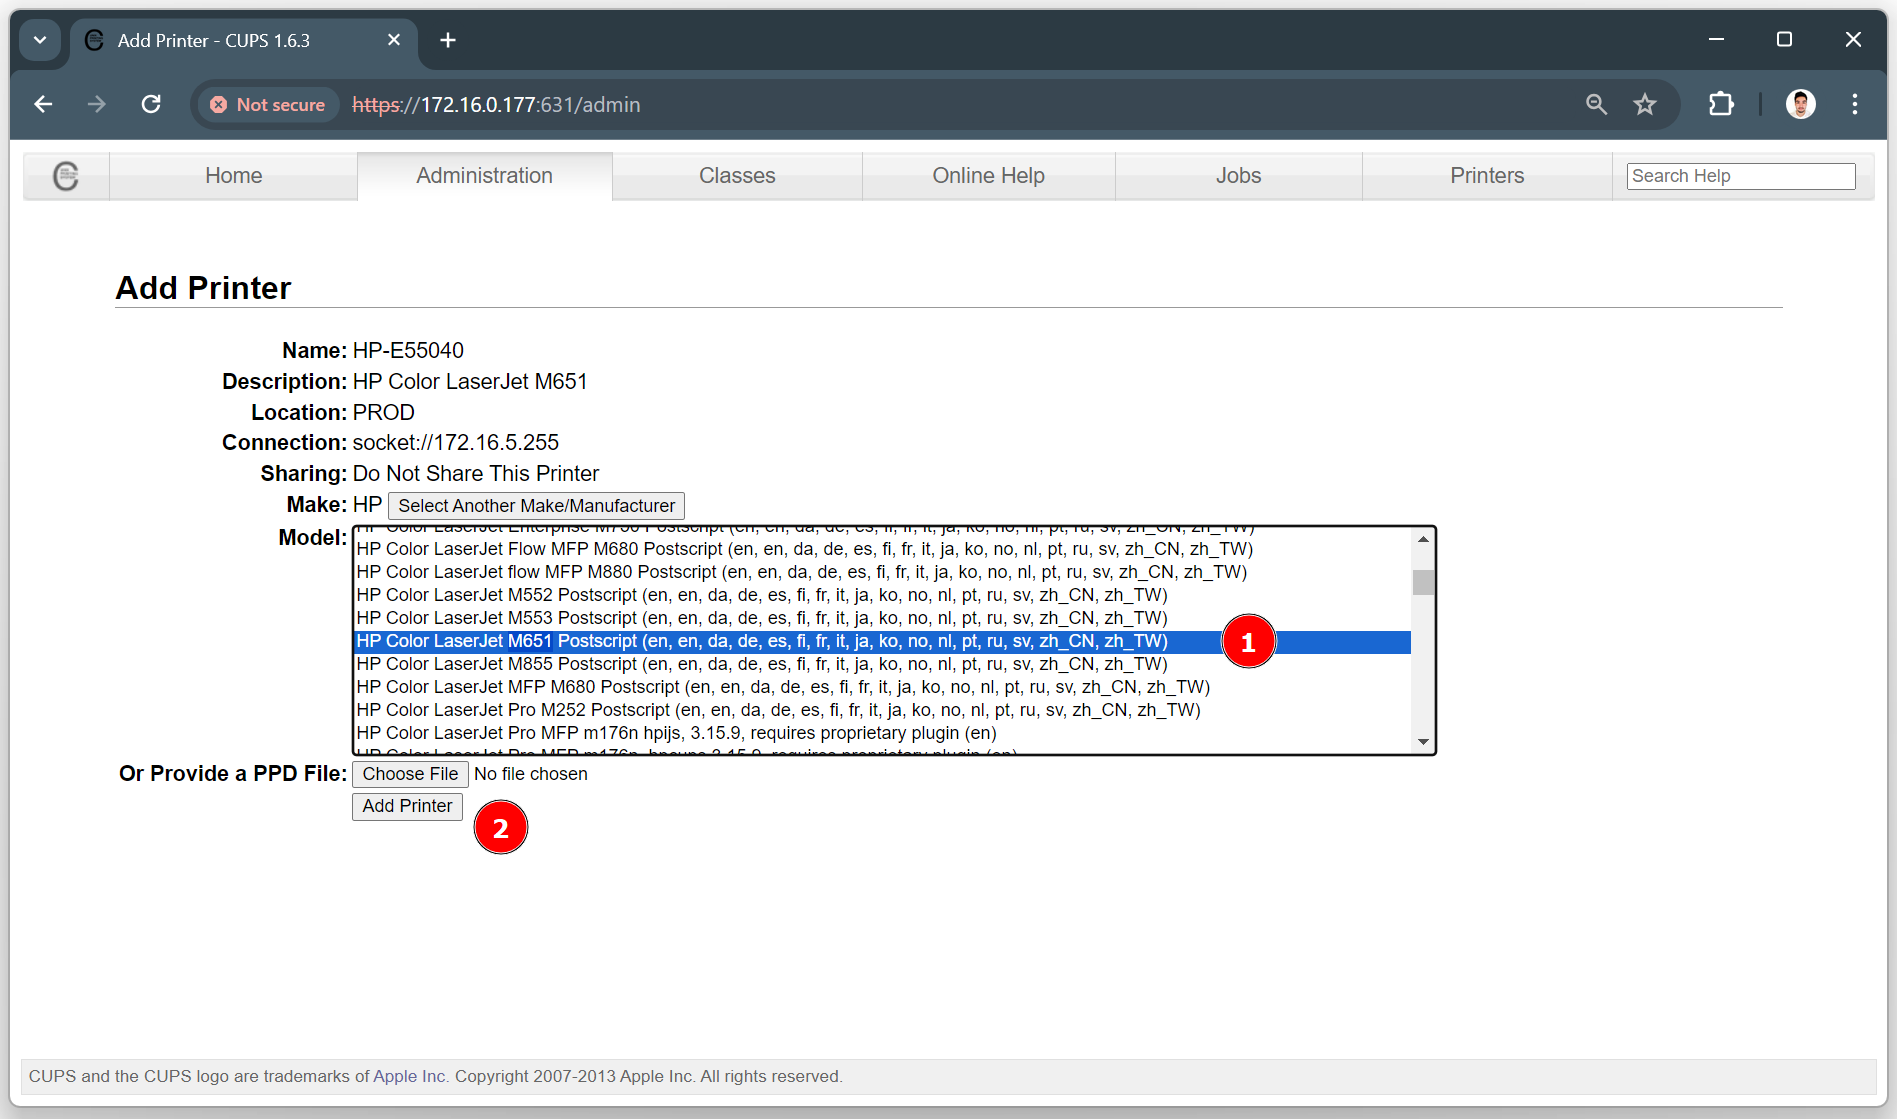
In the Make section, select the manufacturer of the printer and click on the Continue button.
Then, in the Model section, select the model of the printer from the list and click on the Add Printer button.
Next, check the default settings of the printer and make sure they suit the environment.
Tip
Make sure to select the correct paper size in the General / Media Size section.
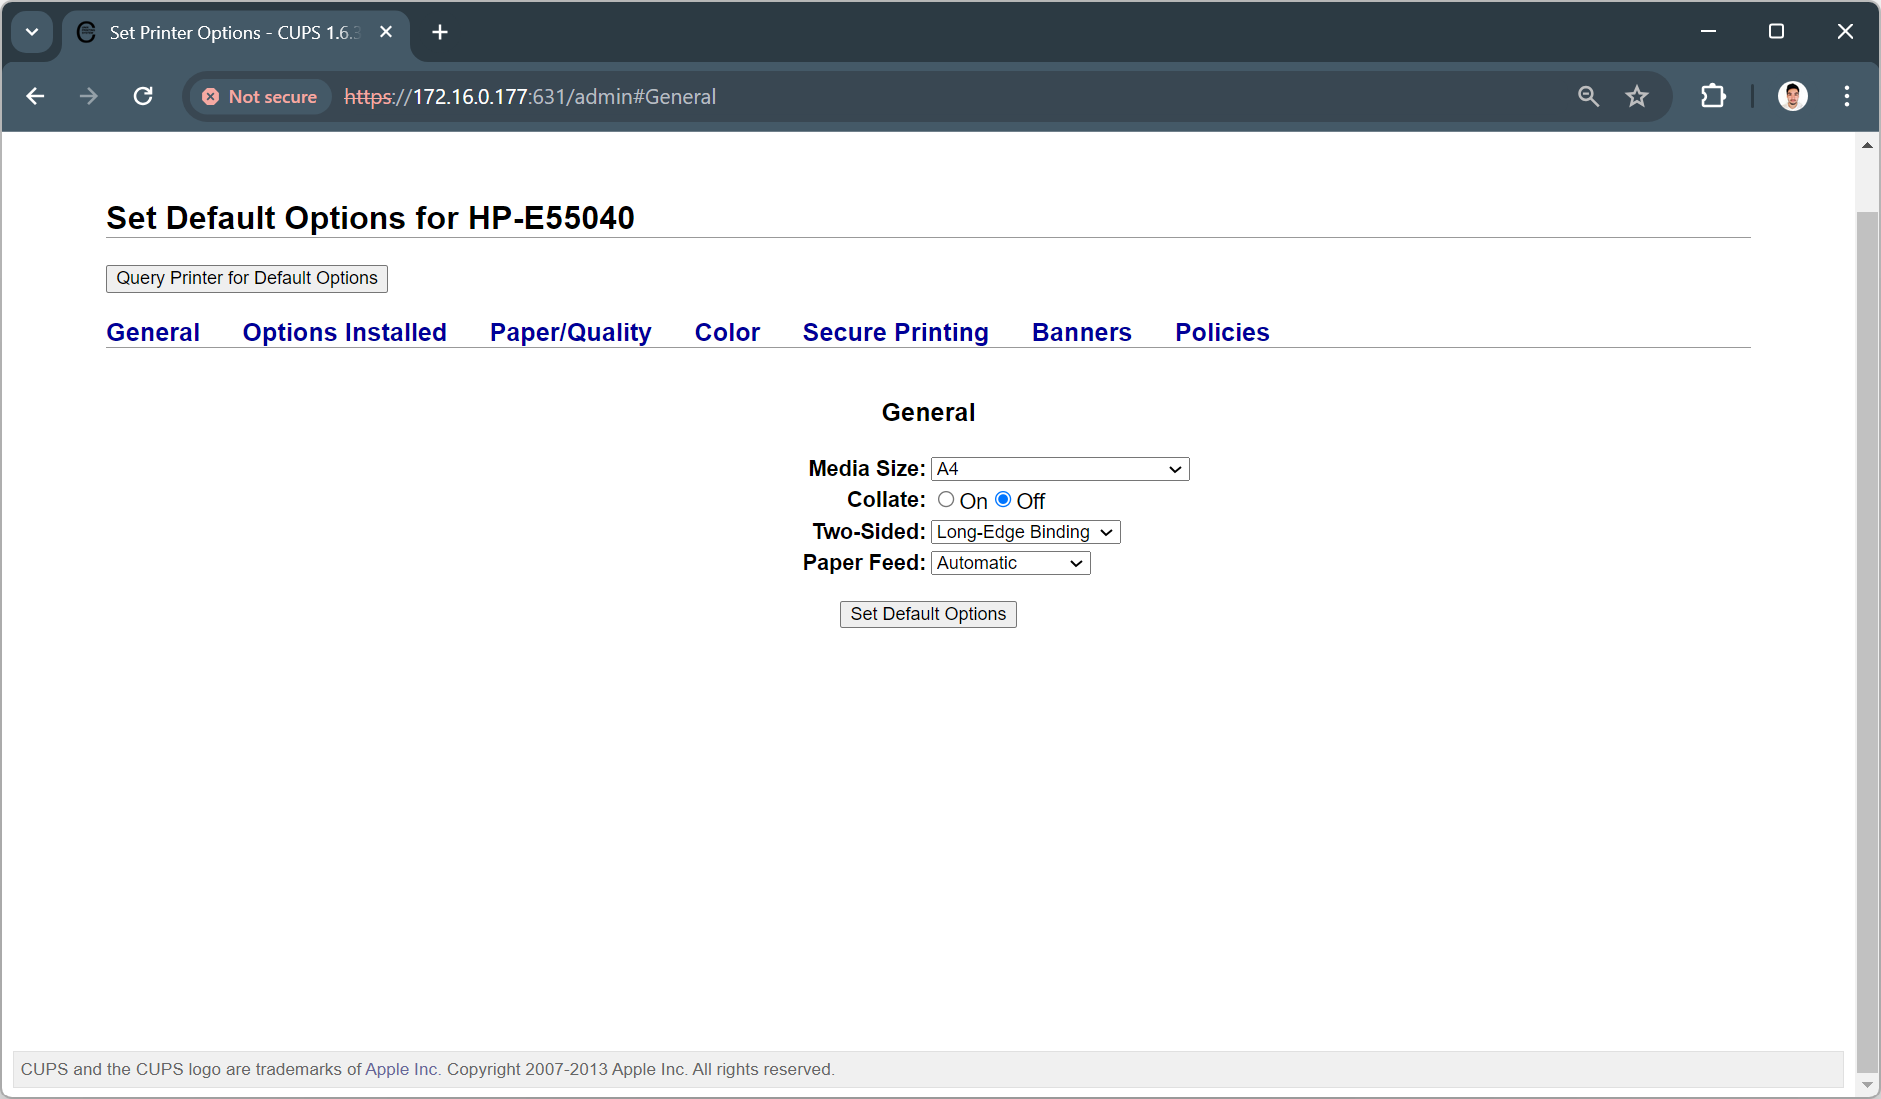
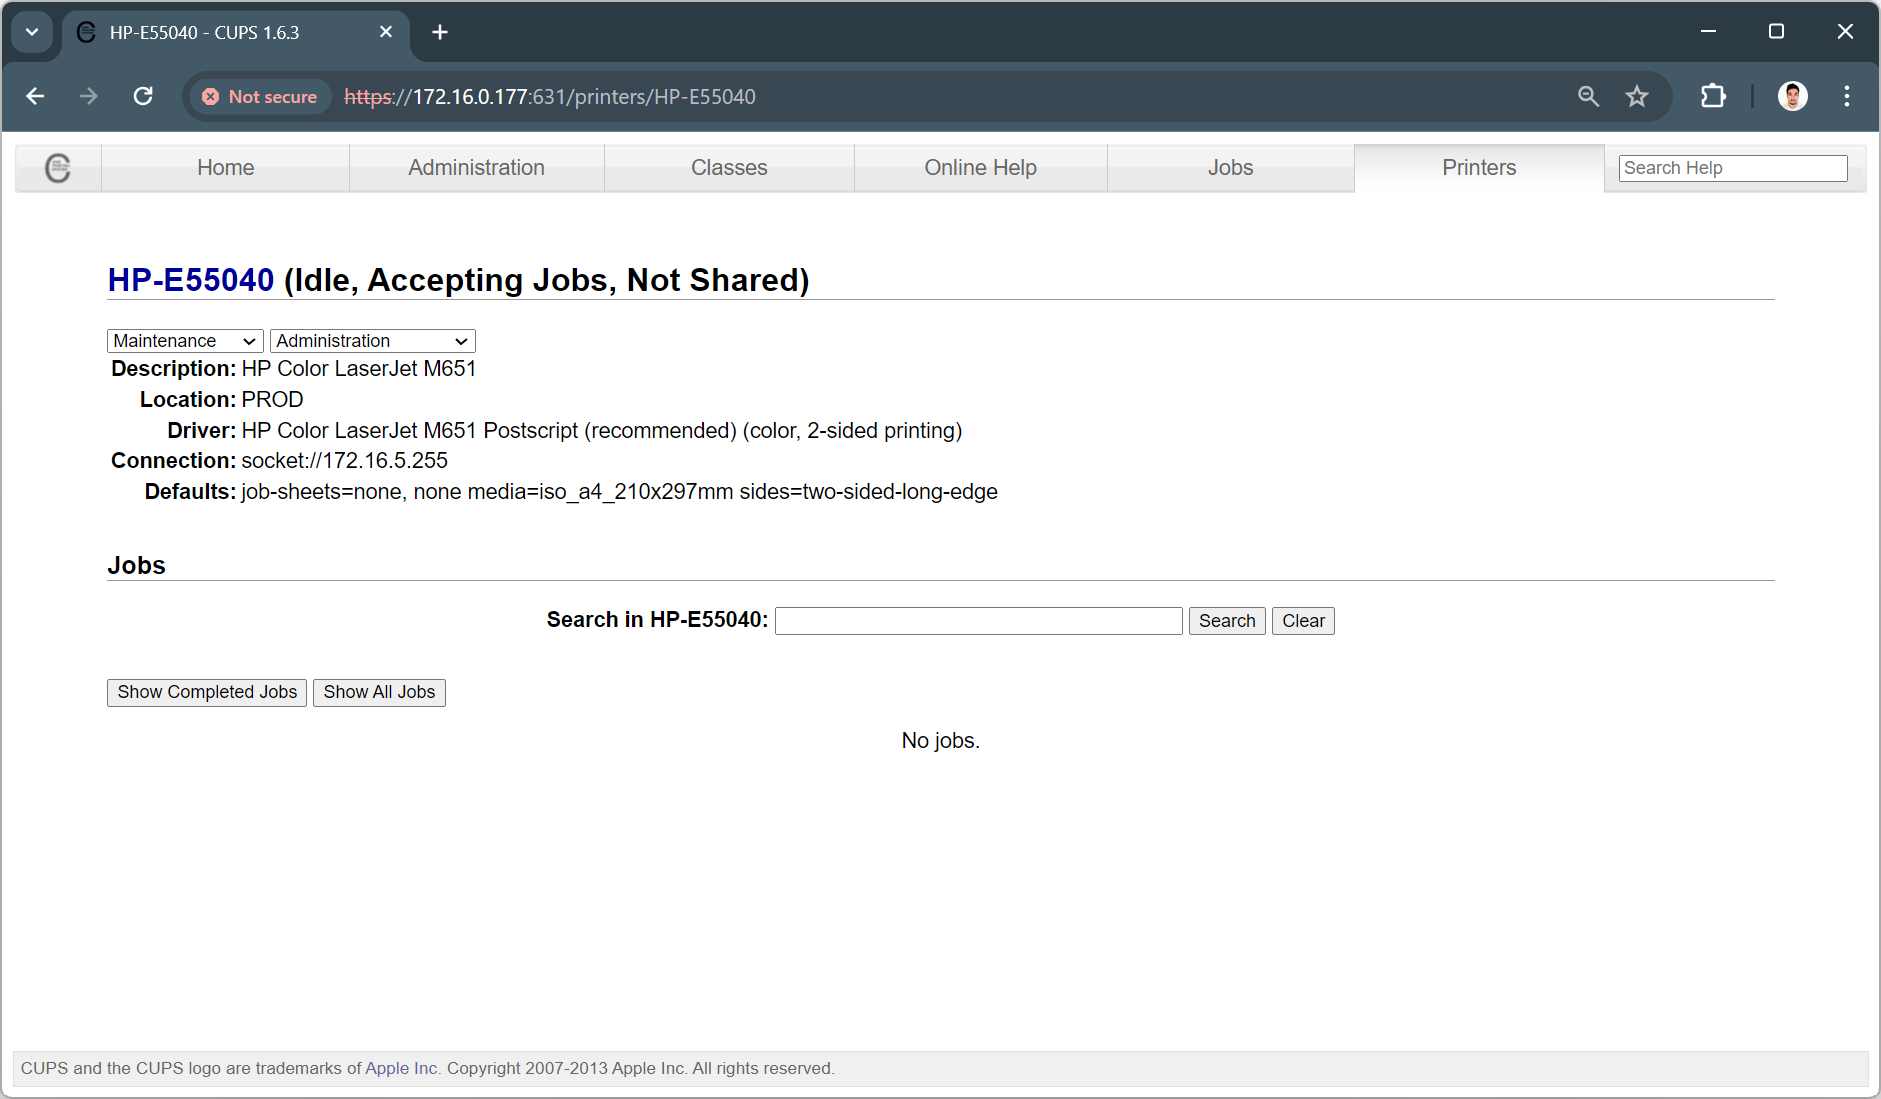
Finally, click on the Set Default Options button to save the printer settings. If everything works as expected, a message will appear saying that the printer was added successfully and you will be redirected to the printer page.
2.5.5. CUPS PDF (optional)
The CUPS PDF printer provides a way to print to a PDF file. It is recommended for testing purposes.
To install CUPS PDF, run:
sudo yum install cups-pdf -y
The default path for saving the PDF files is /root. To change the path, edit the CUPS PDF configuration file:
Then, edit the CUPS PDF configuration file:
vim /etc/cups/cups-pdf.conf
In the Path Settings section, change the Out <path> parameter to the desired path.
Then, access the CUPS web interface at http://<server_ip>:631 using a web browser.
On the top menu bar, click on the Administration tab and then on the Add Printer button.

On the Add Printer page, in the Local Printers section, select CUPS-PDF (Virtual PDF Printer) and click on the Continue button.
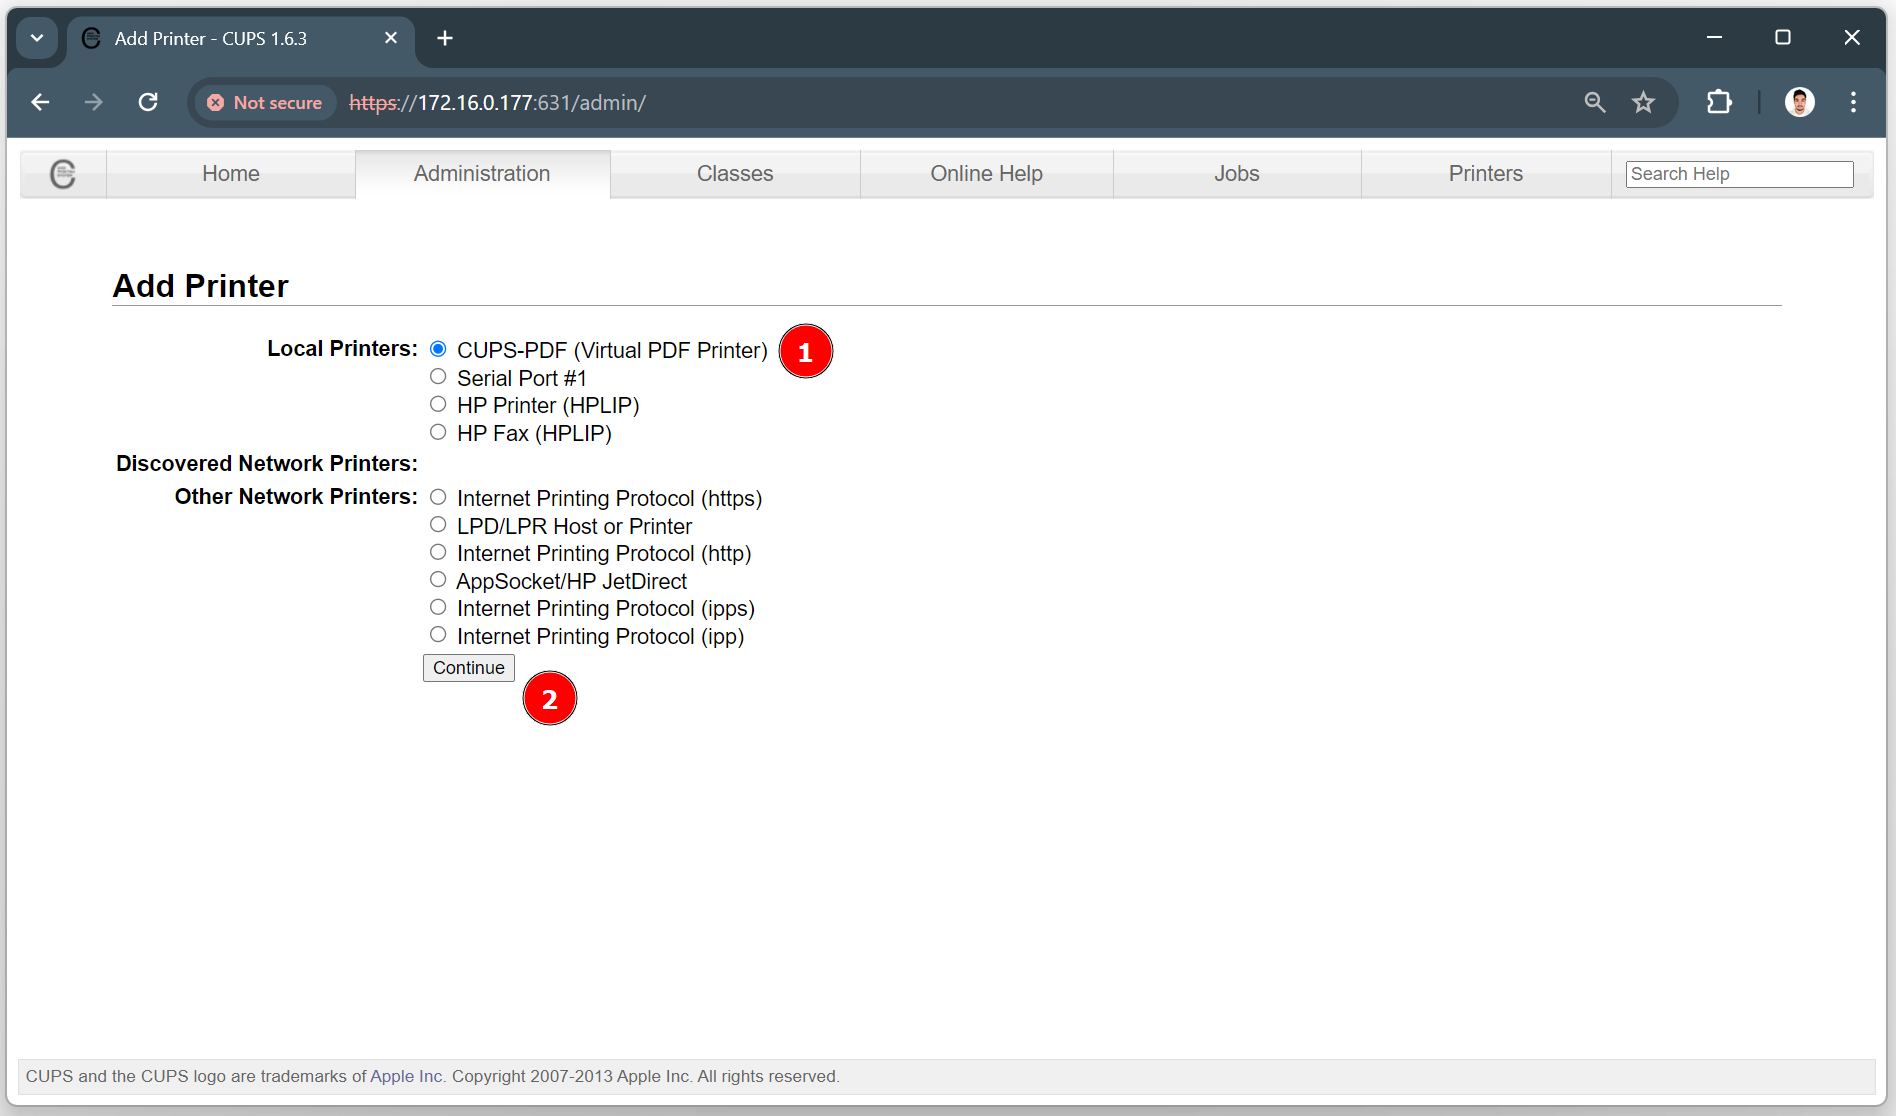
Then, enter a Name, Description and Location for the printer, following the instructions on the page for each field, and click on the Continue button.
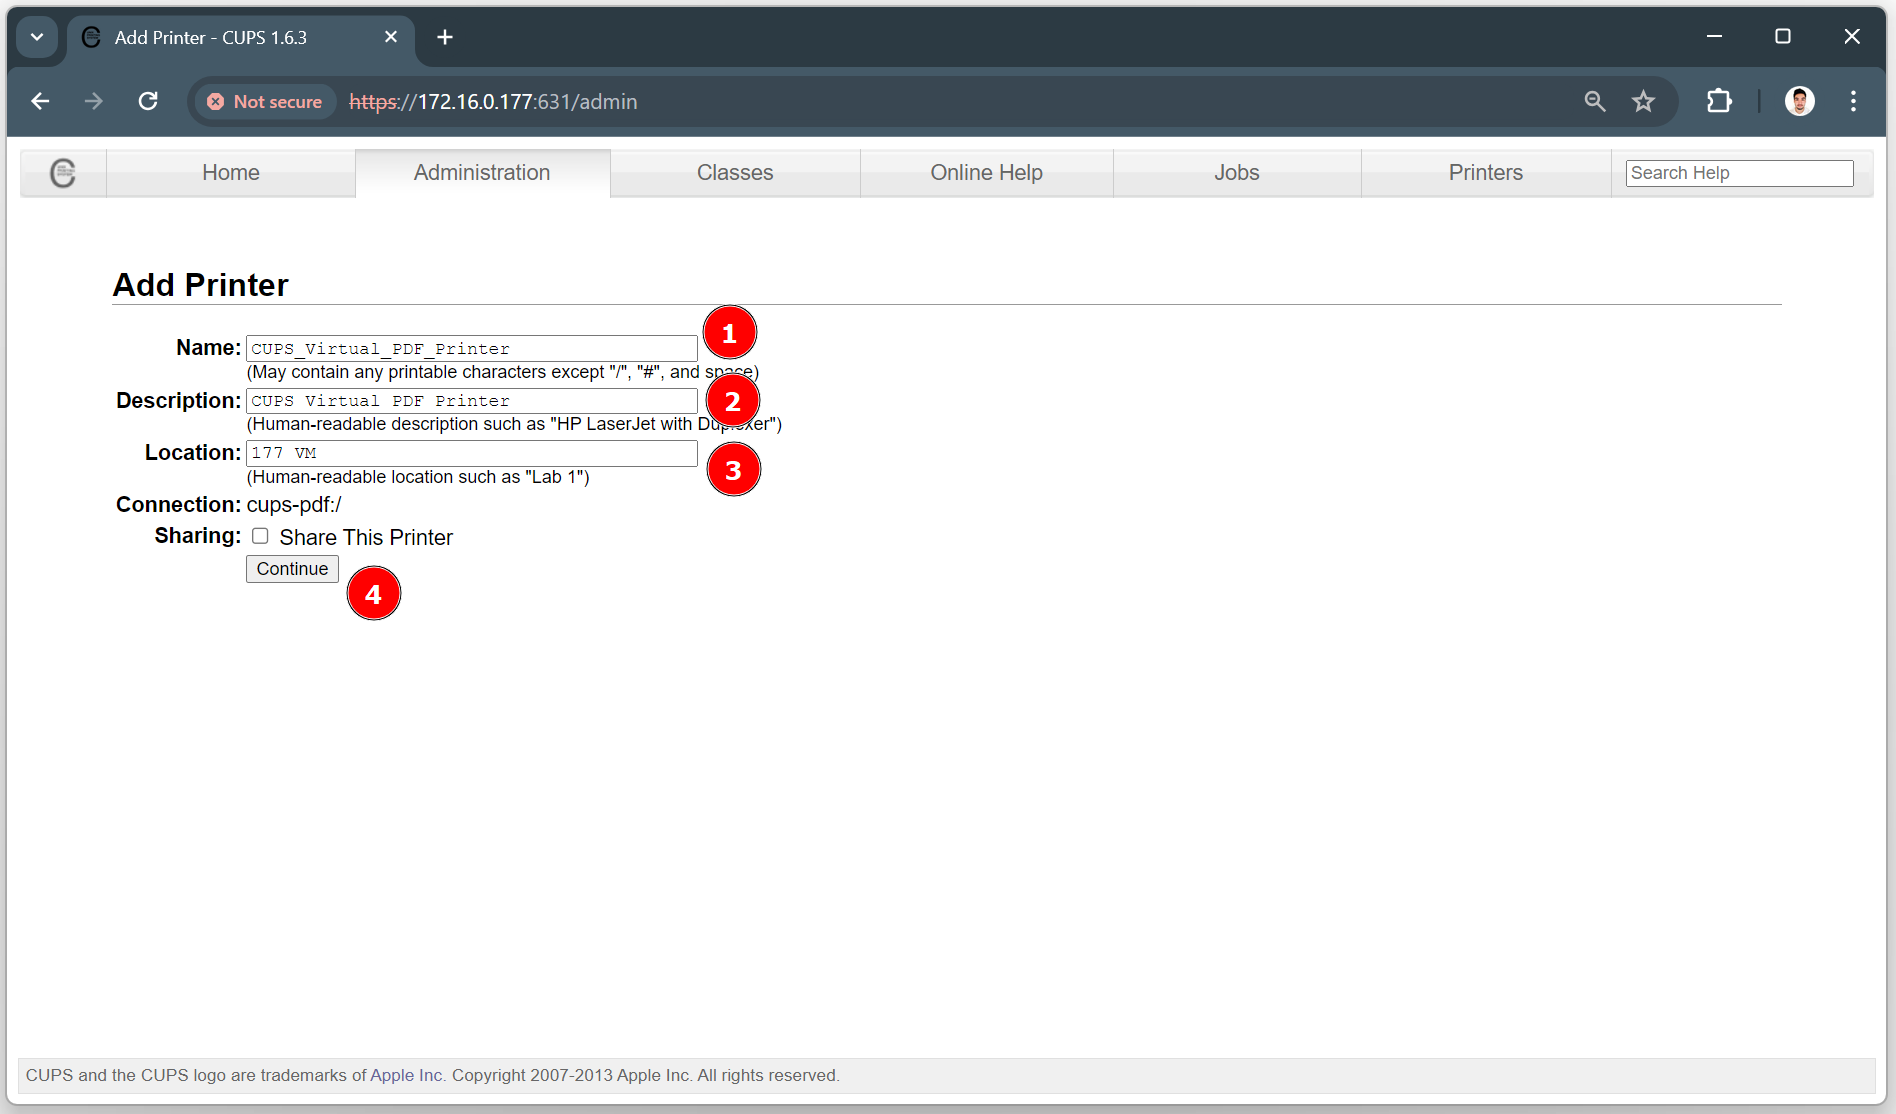
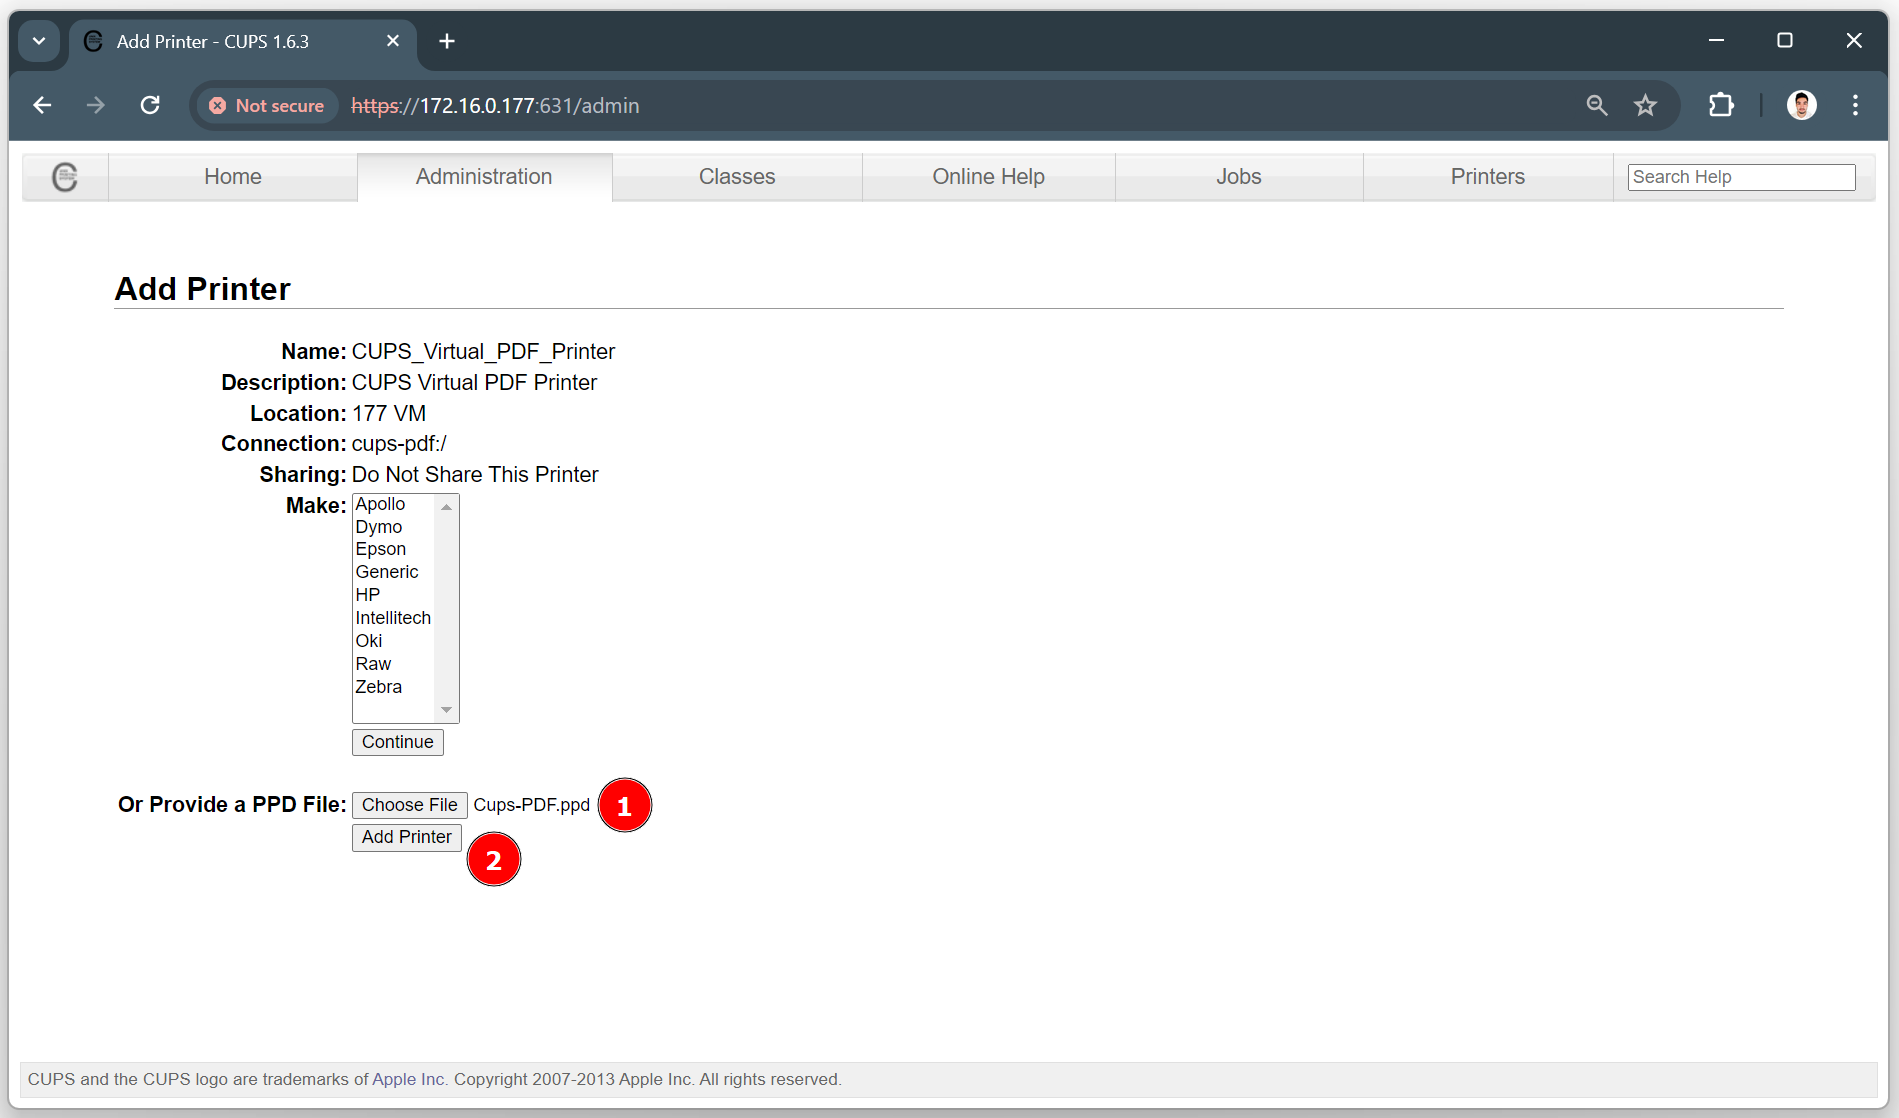
Next, in the Or Provide a PPD File section, click on the Choose File button and select the Cups-PDF.ppd file. This .ppd file can be found in the /etc/cups/ppd/ directory of the server where CUPS PDF is installed. Then, click on the Add Printer button.
Next, check the default settings of the printer and make sure they suit the environment.
Tip
Make sure to select the correct paper size in the General / Page Size section.
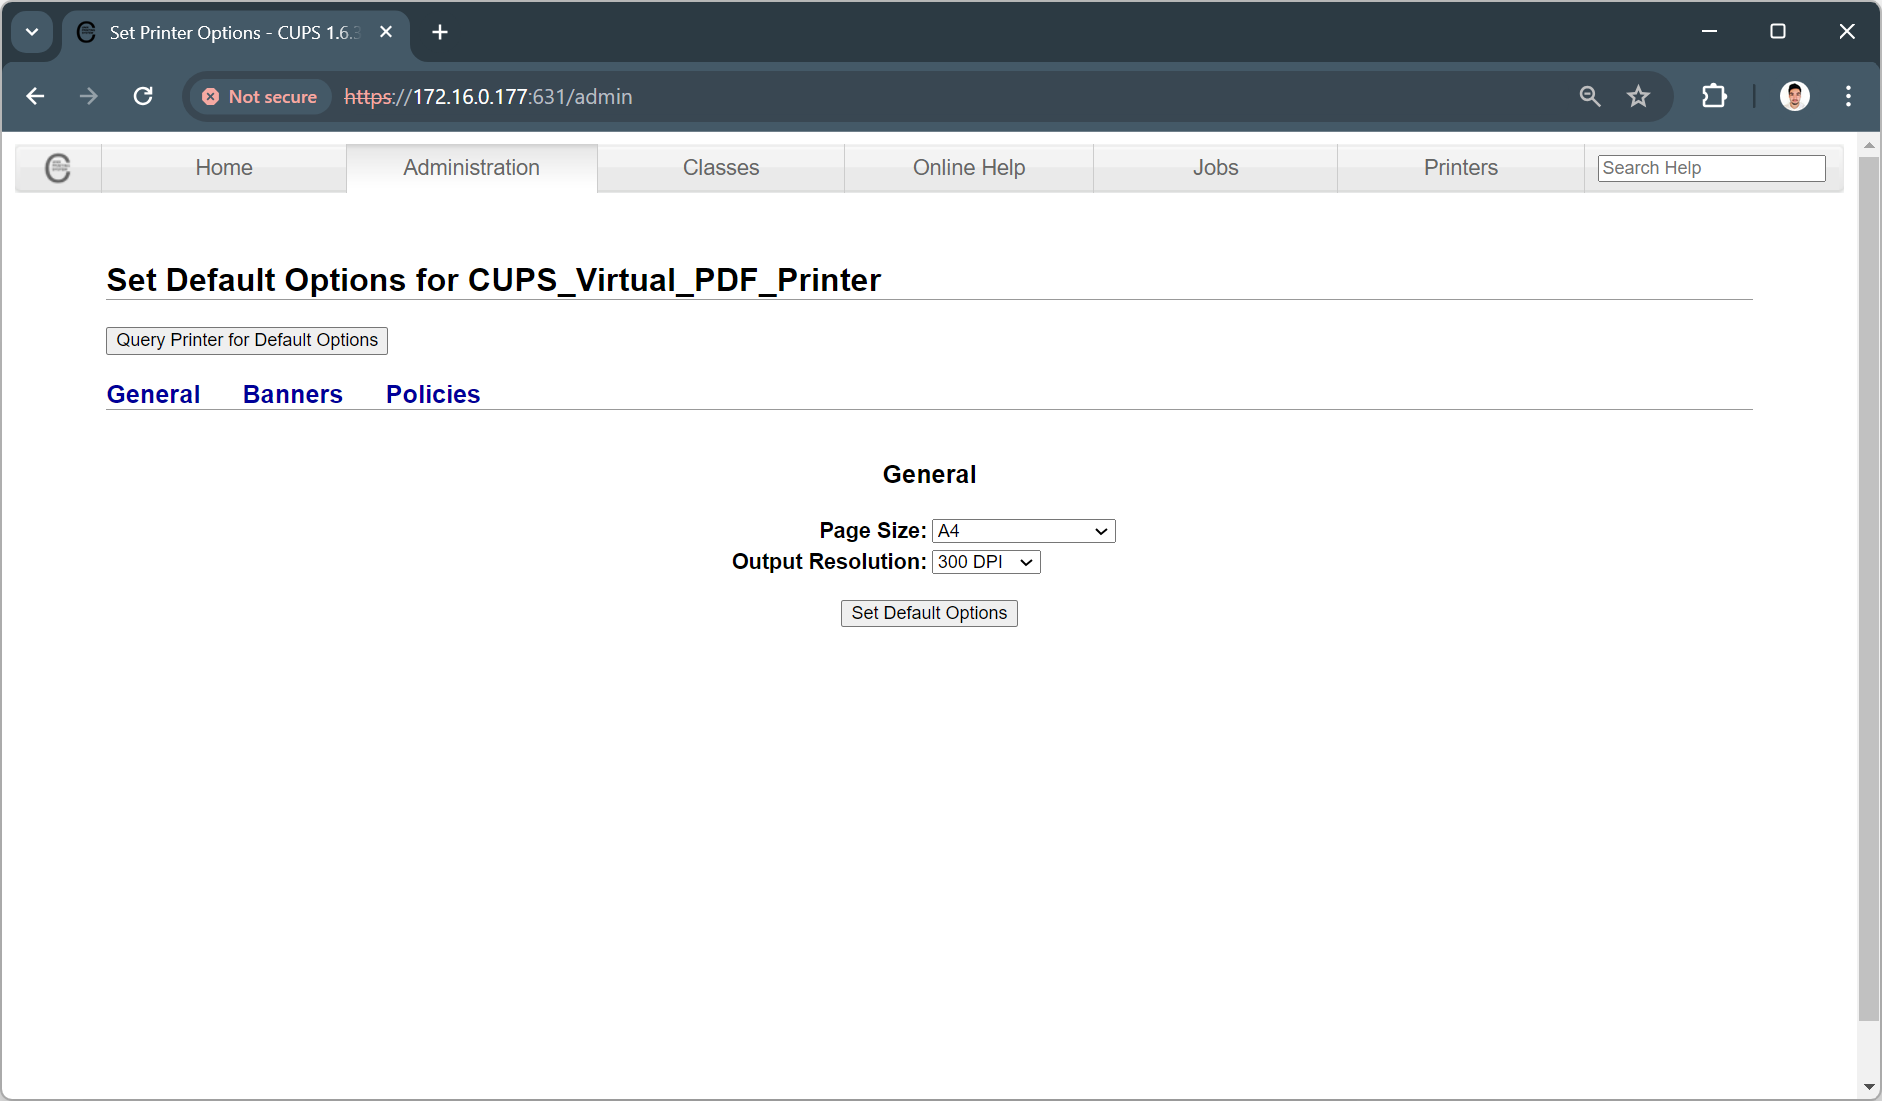
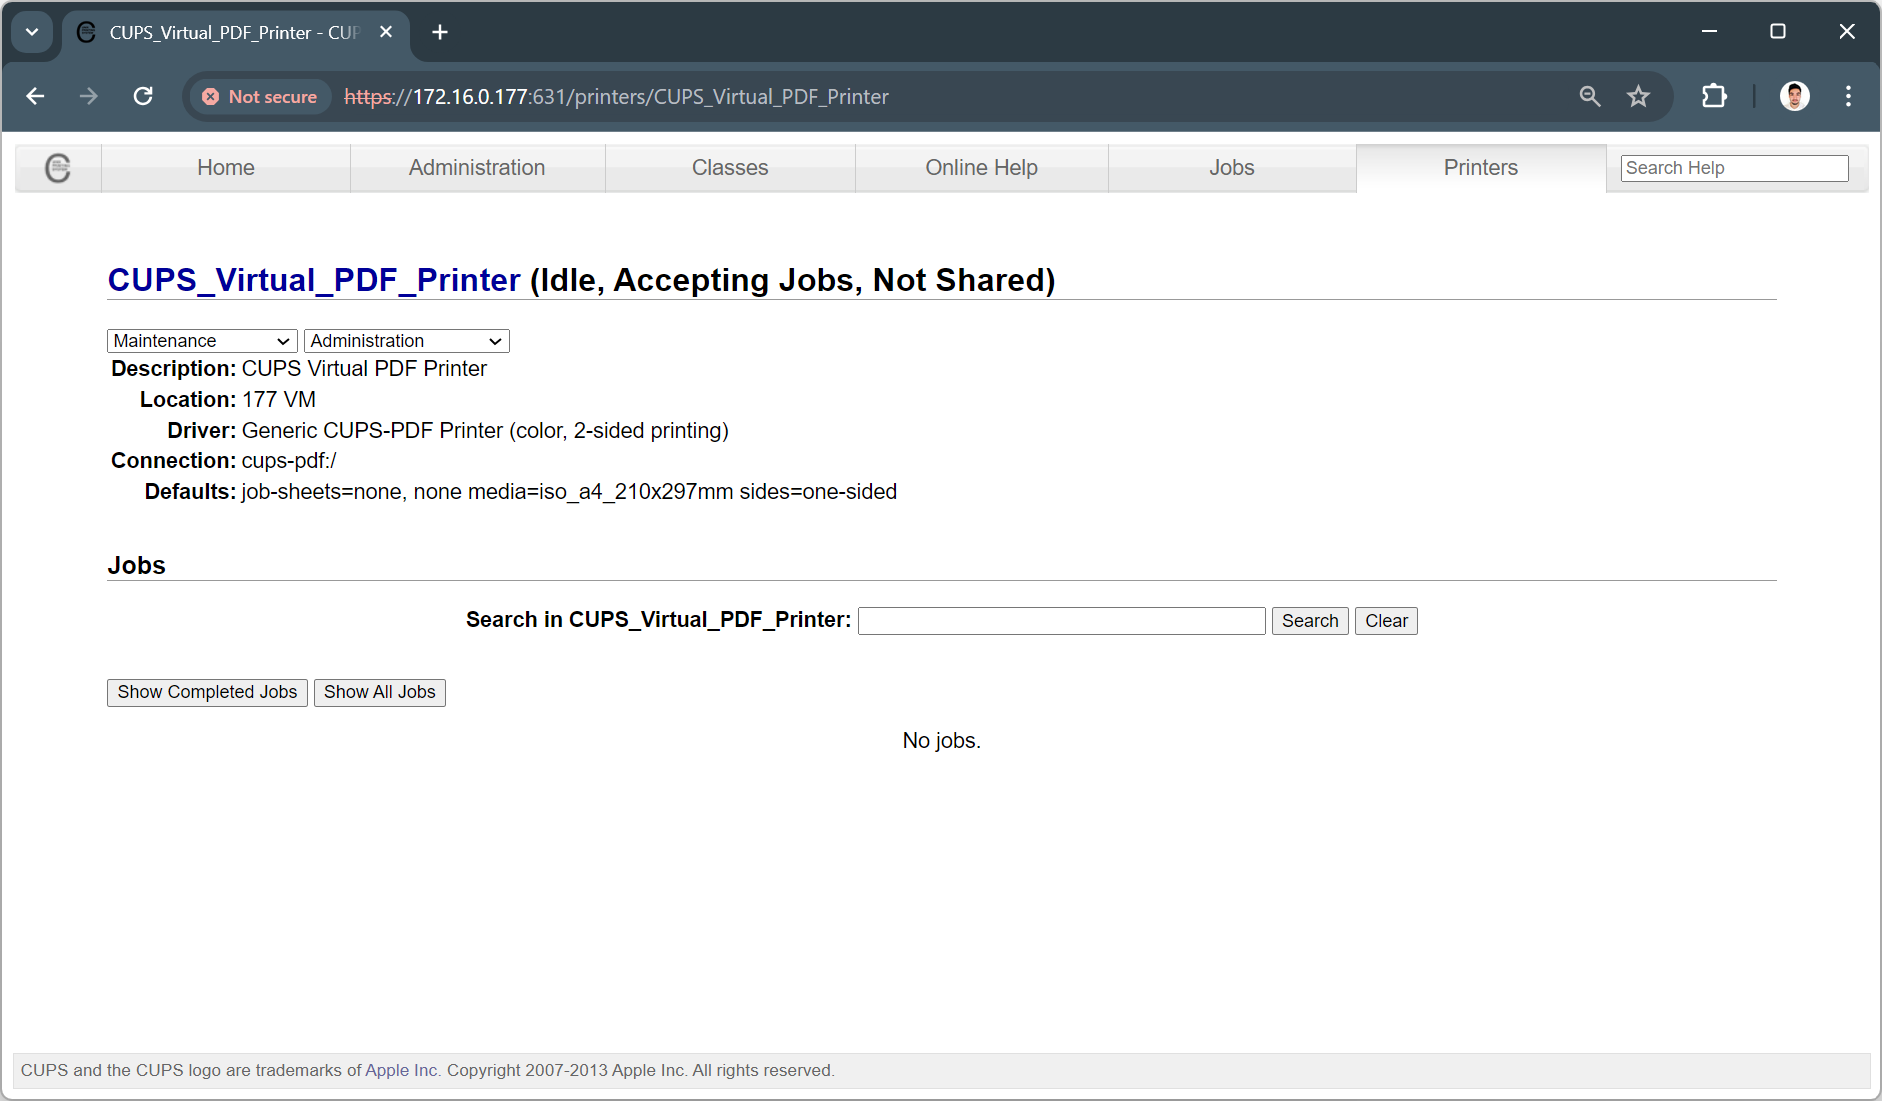
Finally, click on the Set Default Options button to save the printer settings. If everything works as expected, a message will appear saying that the printer was added successfully and you will be redirected to the printer page.
2.6. Font Installation
The application uses three fonts that must be installed: Arial, OCR-B-10 BT, and Tahoma Bold.
2.6.1. Arial
First, check if the font is already installed:
fc-list | grep arial
If the font is not installed (empty result), download the font:
wget http://www.itzgeek.com/msttcore-fonts-2.0-3.noarch.rpm
Then, install it:
rpm -Uvh msttcore-fonts-2.0-3.noarch.rpm
Check if the font was successfully installed:
fc-list | grep arial
You can then remove the downloaded .rpm file:
rm msttcore-fonts-2.0-3.noarch.rpm
2.6.2. OCR-B-10 BT
First, make sure to be logged in as root.
Then, check if the font is already installed:
fc-list | grep ocr
If the font is not installed (empty result), create a ocrb directory in /usr/share/fonts/:
mkdir /usr/share/fonts/ocrb
Important
For the following steps, you must have the OCR-B-10 BT font .ttf file. Download it from a trusted source or copy it from another machine.
Transfer the font file to the server and move it to the /usr/share/fonts/ocrb directory.
Then, run:
fc-cache -f /usr/share/fonts/
Finally, check if the font was successfully installed:
fc-list | grep ocr
2.6.3. Tahoma Bold
First, make sure to be logged in as root.
Then, check if the font is already installed:
fc-list | grep tahoma
The result must include Tahoma:style=Bold. If the font is not installed, create a tahomabd directory in /usr/share/fonts/:
mkdir /usr/share/fonts/tahomabd
Important
For the following steps, you must have the Tahoma Bold font .ttf file. Download it from a trusted source or copy it from another machine.
Transfer the font file to the server and move it to the /usr/share/fonts/tahomabd directory.
Then, run:
fc-cache -f /usr/share/fonts/
Finally, check if the font was successfully installed:
fc-list | grep tahoma
The result must include Tahoma:style=Bold.
3. Finish Configuration
After all configuration steps are complete, go back to the GBS Apps Setup Manual - Configuration Section.
4. Configuration File Example
This section shows an example of the config.properties file.
Warning
The parameters <rdb_ip>, <rdb_username>, <rdb_encrypted_password>, <gbds_ip>, <gbds_username>, <gbds_password>, <ldap_ip>, <ldap_username>, <ldap_password>, <email_password>, <print_ip>, and <print_service_ip> must be replaced with the correct values.
# ************************************************************
#
#        /$$$$$$$  /$$$$$$$  /$$$$$$ /$$   /$$ /$$$$$$$$
#       | $$__  $$| $$__  $$|_  $$_/| $$$ | $$|__  $$__/
#       | $$  \ $$| $$  \ $$  | $$  | $$$$| $$   | $$
#       | $$$$$$$/| $$$$$$$/  | $$  | $$ $$ $$   | $$
#       | $$____/ | $$__  $$  | $$  | $$  $$$$   | $$
#       | $$      | $$  \ $$  | $$  | $$\  $$$   | $$
#       | $$      | $$  | $$ /$$$$$$| $$ \  $$   | $$
#       |__/      |__/  |__/|______/|__/  \__/   |__/
#
# ************************************************************

# GBS Print Server

jdbc.driverClassName=com.mysql.jdbc.Driver
jdbc.url=jdbc:mysql://<rdb_ip>:3306/print
jdbc.username=<rdb_username>
jdbc.password=<rdb_encrypted_password>
jdbc.dialect=org.hibernate.dialect.MySQLDialect
jdbc.showSql=false

locale=en_us

gbds.url=http://<gbds_ip>:8085
gbds.user=<gbds_username>
gbds.key=<gbds_password>
gbds.logLevel=INFO
gbds.additionalHeaders={}
gbds.flushDebugRequests=false
gbds.timeout=300
gbds.listExceptions.labels=

gbds.latent.search.url=null
gbds.proxy.url=null
gbds.proxy.port=0

keystore.path=null
keystore.password=null
truststore.path=null
truststore.password=null

same.user.simultaneous.login=true
fingerprint.useSDK=false
image.convert.useJnbis=false
filter.people.pguid=ALL
faceQuality.qtdeMinErrors=2

session.expirationTime.server=8h
session.expirationTime.web=8h

notification.last.timestamp=15

ldap.url=ldap://<ldap_ip>:389
ldap.user=<ldap_username>
ldap.password=<ldap_password>

codeValidTime=10
deviceTime=6

email.host=smtp.gmail.com
email.host.port=587
email.password=<email_password>
email.from=bravonotifier@gmail.com
email.python.path=python
email.use.script.python=true

# Print back on front/back layouts
ci.printBack=true

# Timeout in seconds to force a print job even if queue has not enough cis to print
queue.timeout=-1

# Station
station.initials=SEDE

batchSizes=FOUR_CI:8

defaultStation=SEDE
forceDefaultStationPrinting=true
print.service.on=true
print.mirror.page=true

#printService.url=http://<print_service_ip>:8090/gbs-print-service/service/
printService.logLevel=DEBUG
printService.timeout=300

#autoPrint=FOUR_CI:true,TWO_CF:false,ONE_CI:true,TWO_CA:false,TWO_CC:false,ONE_CS:false

print.ip=<print_ip>
print.port=8127
print.protocol=http

resizeFloat=0.3