1. Introduction
This manual briefly describes each standard GBDS 4 flow as a sequence of API calls, which are HTTP/HTTPS requests to a GBDS server. For full reference to the GBDS API calls, see GBDS API specification.
GBDS 4 provides asynchronous notifications for lengthy operations. The notification flows are described in detail in the Notification Flows Manual.
Authentication for all API calls is performed by providing a valid token. A new token can be created with the createToken call. A token can and should be used for multiple calls. Creating a new authentication token before each call negatively impacts system performance.
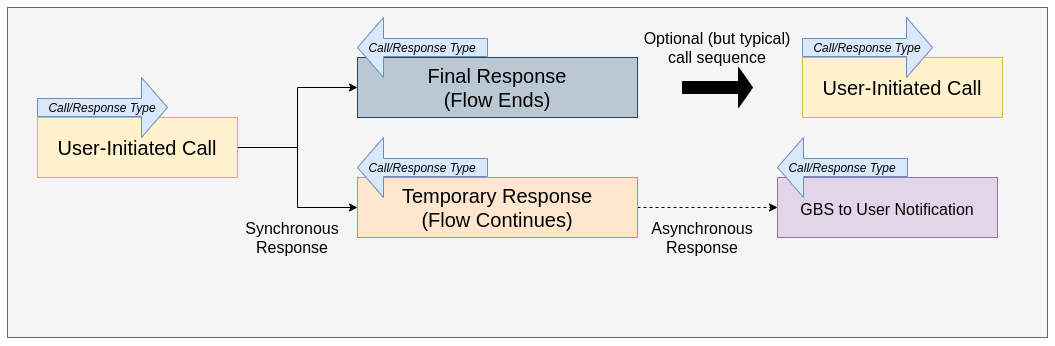
All diagrams in this manual follow this convention:
Also, GBDS follows a index for biometrics identification, as represented in the table below:
| Index | Biometrics |
|---|---|
| 0 | Left Little |
| 1 | Left Ring |
| 2 | Left Middle |
| 3 | Left Index |
| 4 | Left Thumb |
| 5 | Right Thumb |
| 6 | Right Index |
| 7 | Right Middle |
| 8 | Right Ring |
| 9 | Right Little |
| 10 | Face |
| 13 | Left Iris |
| 14 | Right Iris |
| 20 | Signature |
| 31 | Palm Left Interdigital |
| 32 | Palm Left Thenar |
| 33 | Palm Left Hypothenar |
| 34 | Palm Right Interdigital |
| 35 | Palm Right Thenar |
| 36 | Palm Right Hypothenar |
| 40 | Full Left Palm |
| 41 | Palm Left Writer |
| 45 | Full Right Palm |
| 46 | Palm Right Writer |
| 200 | Newborn Left Palm |
| 210 | Newborn Right Palm |
| 900 | Sequence Control - Left Little |
| 901 | Sequence Control - Left Ring |
| 902 | Sequence Control - Left Middle |
| 903 | Sequence Control - Left Index |
| 904 | Sequence Control - Left Thumb |
| 905 | Sequence Control - Right Thumb |
| 906 | Sequence Control - Right Index |
| 907 | Sequence Control - Right Middle |
| 908 | Sequence Control - Right Ring |
| 909 | Sequence Control - Right Little |
| 940 | Sequence Control - Left Four Finger |
| 941 | Sequence Control - Right Four Finger |
| 942 | Sequence Control - Two Thumbs |
2. Enrollment Workflow
In this case, the user wants to insert a new person into the ABIS. To do so, the user performs an enroll call (a POST request to the /gbds/v2/people endpoint).
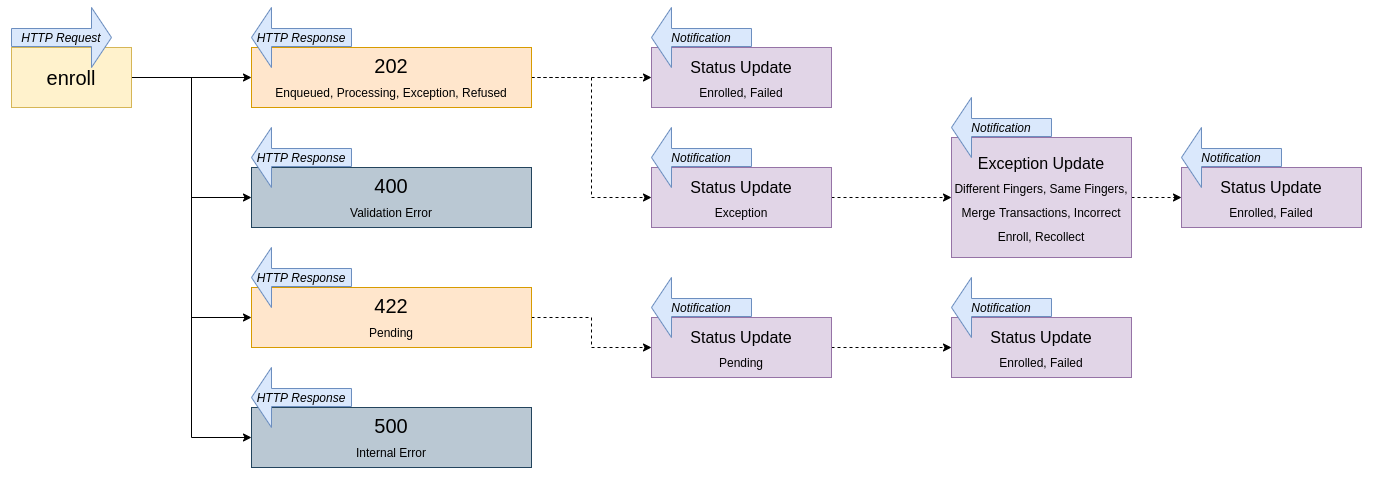
A well-formed enroll call will return an HTTP response with a unique transaction ID (tguid) as data.tguid and a status string in data.status.
The tguid will be used to identify this transaction in future calls and asynchronous notifications.
The user will be notified when the transaction has been processed by GBDS. The user can also poll the transaction status with the getTransaction call (a GET request to the /gbds/v2/people/transactions/{tguid} endpoint).
If the transaction completes successfully (ENROLLED status), a unique person ID (pguid) will be available for retrieval operations such as getPerson.
The status of an enroll transaction can be:
ENQUEUED
The transaction has been successfully queued for processing.
PROCESSING
The transaction is currently being processed.
FAILED
The enroll transaction could not be completed. This is the consequence of either exception treatment or quality analysis treatment.
EXCEPTION
The enroll generated at least one exception, and the transaction will remain in this state until the exception is treated (either in the GBS ETR application or programmatically).
PENDING
The enroll failed automatic quality analysis, and the transaction will remain in this state until the quality analysis is performed (either in the GBS MIR application or programmatically).
ENROLLED
The enroll was performed successfully, and the transaction is associated with a valid unique person ID (pguid) which can be obtained by the getTransaction call.
REFUSED
An enrollment transaction concludes as REFUSED when the entrant transaction has biometric matches with another transaction that is already associated with an active biometric exception.
RESENT_ENROLL
The transaction was initially refused and then resent for enrollment by ETR.
3. Update Workflow
In this case, the user wants to update the data associated with an existing person in the ABIS. If the user does not have the person ID (pguid), he needs to retrieve it using either a biographical key or a known transaction ID (tguid):
- To obtain a pguid from biographical keys, the user should perform a getPGuidUsingKeys call (a GET request to the /gbds/v2/people/pguid endpoint).
- To obtain a pguid associated with a known tguid, the user should perform a getTransaction call.
To perform the update, the user should use the update call (a PUT request to the /gbds/v2/people/{pguid} endpoint).
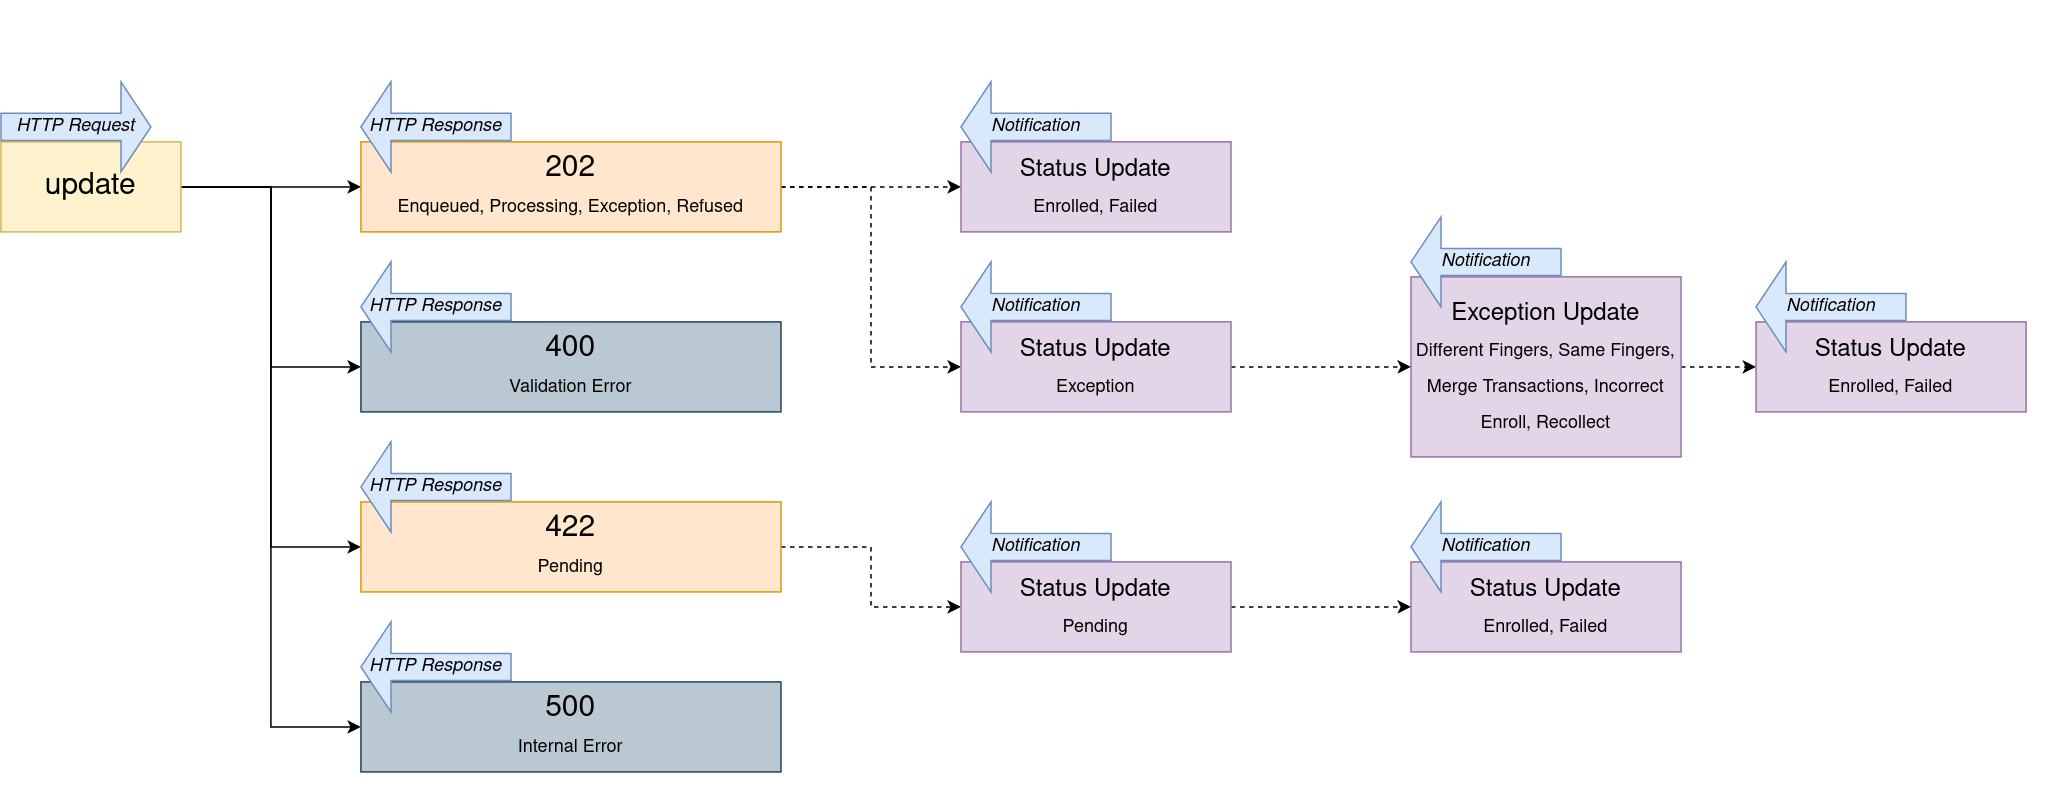
A well-formed update call will return an HTTP response with a unique transaction ID (tguid) as data.tguid and a status string in data.status.
Update calls that modify biometric data will be processed in a similar way to Enroll transactions, may generate exceptions and quality analysis (EXCEPTION and PENDING status) and will generate notifications to the caller. The status of the transaction can also be polled with getTransaction calls.
Update calls that modify only biographic data will be processed synchronously. The HTTP response will contain either an OK or ERROR status.
4. Verification Workflow
In this case, the user wants to perform a Verification search (1:1), comparing biometric data to one specific person in the ABIS. The search target should be identified either by a pguid or by a biographical key.
The perform the verification, the user should use the search call (a POST request to the /gbds/v2/people/searches endpoint). The target profile for comparison must be determined either by a biographical key in the data.keys parameter or by a person ID in data.pguids.
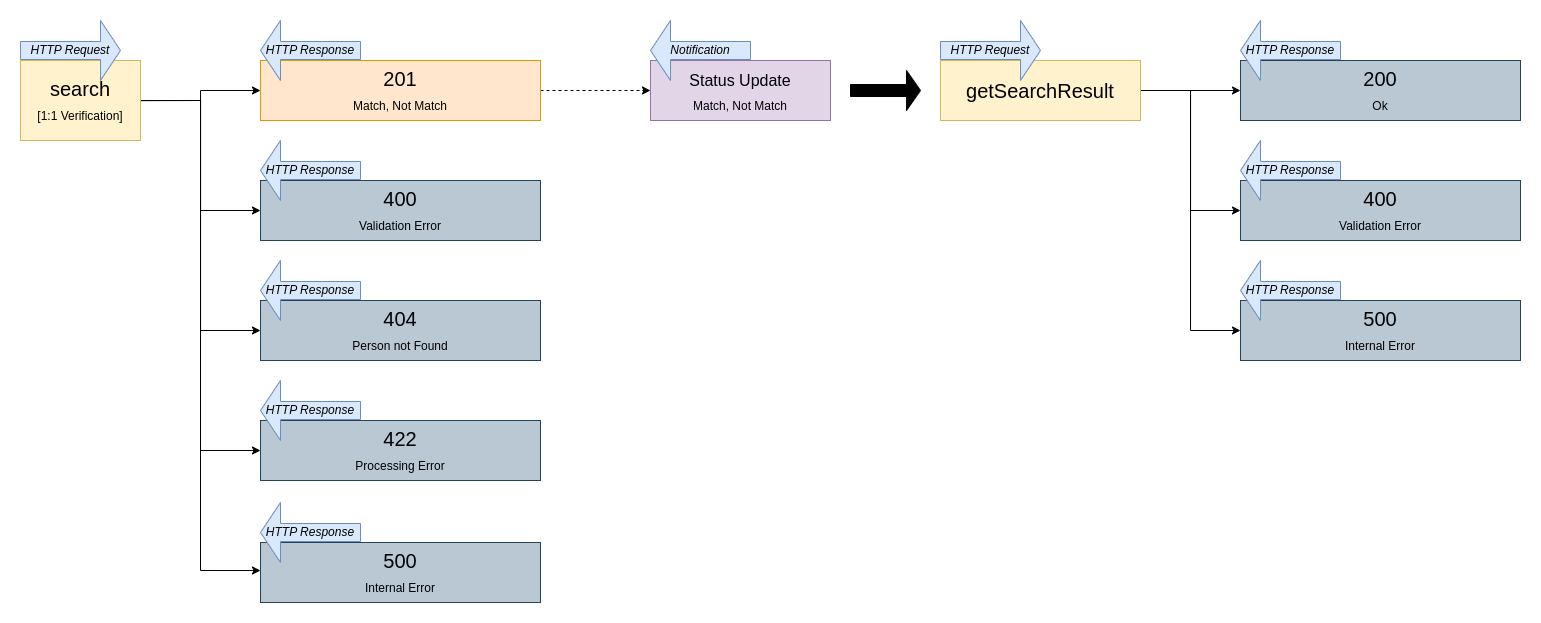
The HTTP response will have the verification result in data.status, which can be:
MATCH
The biometric query data matched the biometric data of the specified person.
NOT_MATCH
The biometric query data did not match the biometric data of the specified person.
PERSON_NOT_FOUND
The person specification (pguid or biographical key) was not found in the database.
A transaction ID (data.tguid) will also be returned, and further details about the verification operation can be retrieved with the getSearchResult call (a GET request to the /gbds/v2/people/searches/{tguid} endpoint).
4.1. Verification with Multiple GUIDs
The /gbds/v2/people/searches endpoint allow verify request with
multiple PGUIDS or UL verify search with multiple UGUIDS.
This allow some new features:
- Verify multiple PGUIDS
- Validate verify with pguid list, valid only if
isUlSearchis set tofalse. - Validate verify with key list, using the attribute
keys.- The list filters only one person
- This feature is valid only if
isUlSearchis set tofalse.
- Validate verify with pguid list, valid only if
- Verify multiple uguids using
isUlSearch=true.- Uses the attribute
uguidsas a string list. - Validate verify with this uguid list. Valid only if
isUlSearchis set totrue.
- Uses the attribute
- Latent search on pguids/uguids
- Latent search is turned on with
isLatentSearchset totruefor pguids search. For uguids search latent search is alwaystrue.
- Latent search is turned on with
5. Identification Workflow
In this case, the user wants to perform an Identification search (1:N), comparing biometric data to many (possibly all) records in the ABIS.
The perform the identification, the user should use the search call (a POST request to the /gbds/v2/people/searches endpoint) with empty data.keys, and data.pguids parameters.
Warning
In the case of a identification search, the matcher attribute value MUST be DEFAULT.
Using MOBILE as the attribute value will return an error in identification flows.
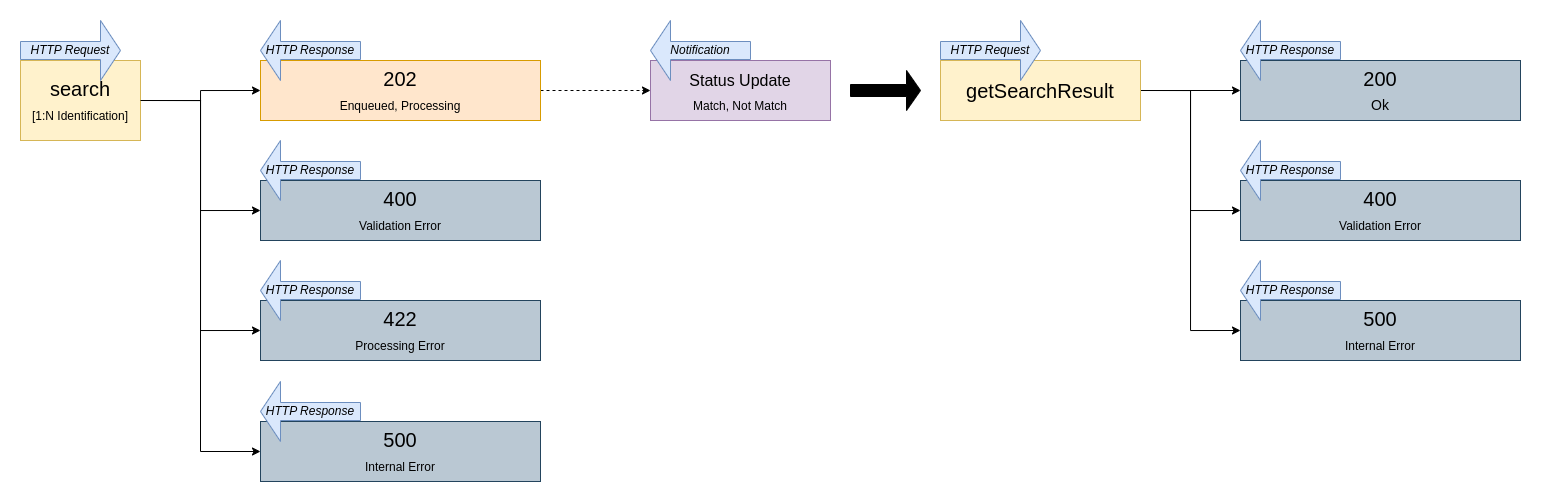
Identification searches are performed asynchronously. A successful call to search will return an HTTP response with a transaction ID (data.tguid) and a status (data.status).
The user will receive a notification when the search is completed. The user can also poll the transaction status with the getSearchResult call (a GET request to the /gbds/v2/people/searches/{tguid} endpoint).
The search transaction status can be:
ENQUEUED
The search is queued and has not started being processed yet.
PREPARED, PROCESSING
These status values indicate that the search is being processed.
MATCH
The search has been processed, and at least one match was found. The matches are returned in the data.candidates field of the response to getSearchResult.
NOT_MATCH
The search has been processed, and no matches were found.
PERSON_NOT_FOUND
The search domain was empty: specified filters such as list of pguids and/or labels filters resulted in an empty search domain.
6. Profile Retrieval Flows
This section will present the flows to retrieve profile information using GBDS. For advanced
filtering options in listPeople and listTransactions call, consult Using Wildcards to Retrieve Data from GBDS Manual.
6.1. Single Person Profile Retrieval
To obtain the most up-to-date information associated with a specific person, the user should perform the getPerson call (a GET request to the /gbds/v2/people/{pguid} endpoint).
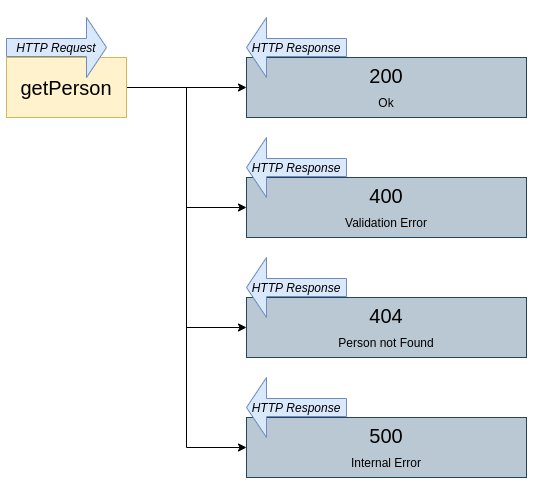
The HTTP response will contain the person’s biographical data and the most recent enroll transaction associated with it.
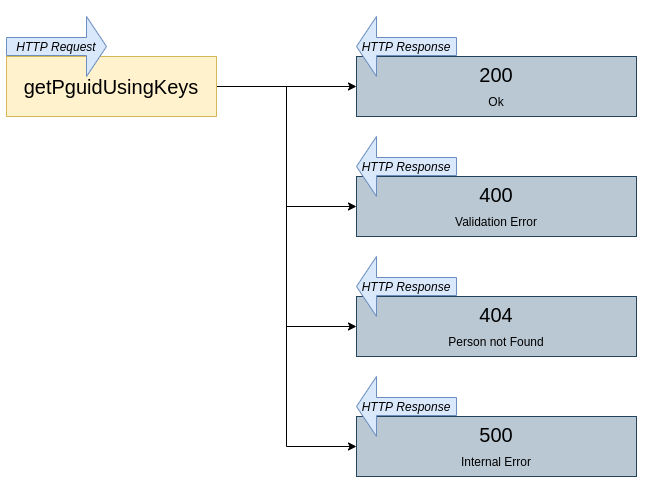
6.2. Pguid Retrieval from Biographical Keys
To obtain a person’s ID (pguid) from a biographical key, the user should perform the getPguidUsingKeys call (a GET request to the /gbds/v2/people/pguid endpoint).
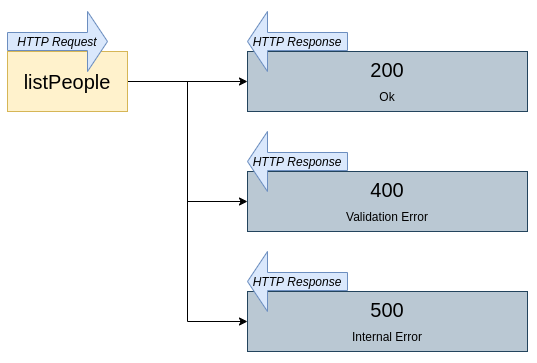
6.3. Pguid Retrieval from Biographical Data
To obtain a list of person IDs (pguids) that match biographical data (not just unique keys), the user can perform the listPeople call (a POST request to the /gbds/v2/people/list endpoint).
Note
It is possible to perform a listPeople call providing only the “value” that will be used to filter by key or biographic.
Warning
This request format can only be used for lists filtered by keys or biographics. Should the filter criteria be any other field, it must be specificed in a “field:value” format.
6.3.1. Restriction Criteria
It is possible to perform a listPeople call
providing criteria to filter the returned list. The restriction field must
contain an array of objects that vary according to the data type used as a filter
parameter. Each call can contain one or more restrictions, and the accepted types are
BIOGRAPHIC, DATE, KEY, and LABEL. The objects for each type are listed below:
- BIOGRAPHIC:
| Fields | Required | Type |
|---|---|---|
| type | Yes. Value must be BIOGRPAHIC | String |
| id | Yes | String |
| value | Yes | String |
| exists | Yes. Default true. | Boolean |
matchMode
|
Default EXACT. Enum:
- START
- EXACT
- ANYWHERE
- END
- NOT_EQUALS
|
String
|
- DATE:
| Fields | Required | Type |
|---|---|---|
| type | Yes. Value must be DATE | String |
| startTime | Yes. Must be in milliseconds. | String |
| endTime | No. Must be in milliseconds. | String |
- KEY:
| Fields | Required | Type |
|---|---|---|
| type | Yes. Value must be KEY | String |
| id | Yes | String |
| value | Yes | String |
| exists | Yes. Default true. | Boolean |
matchMode
|
Default EXACT. Enum:
- START
- EXACT
- ANYWHERE
- END
- NOT_EQUALS
|
String
|
- LABEL:
| Fields | Required | Type |
|---|---|---|
| type | Yes. Value must be KEY | String |
| label | Yes | String |
| exists | Yes. Default true. | Boolean |
7. Refused Transactions Flow
The REFUSED result will occur in updates and enrollments when the new transaction matches an existing transaction that is associated with a pending biometric exception.
7.1. Synchronous Transactions
Whenever a transaction is submitted as a synchronous operation, the
response will contain a data.status field with the value REFUSED:
{
  "data":
  {
         "status":"REFUSED",
         "tguid": "string"
  }
}
7.2. Asynchronous Transactions
In the case of enrollment transactions submitted as asynchronous
operations, their responses will contain a data.status field with
the value ENQUEUED:
{
  "data":
  {
         "status":"ENQUEUED",
         "tguid": "string"
  }
}
7.2.1. Receiving a Notification
Whenever GBDS finishes processing a transaction, GBS Notifier sends a notification to a configured endpoint with its TGUID and processing result (status). If a transaction is refused, the notifier will send a notification as follows:
{
   "operation": "ENROLL",
   "tguid": "string",
   "status": "REFUSED"
}
or
{
   "operation": "UPDATE",
   "tguid": "string",
   "status": "REFUSED"
}
Important
After receiving a notification for a REFUSED transaction, a getTransaction call must be submitted to GBDS with its TGUID as the parameter to obtain the details of the involved transactions and exceptions.
The getTransaction operation is described in the next section, while the information on handling a REFUSED transaction is shown in Handling a REFUSED Transaction section.
7.2.2. Performing Active Polling
To perform the active polling for a transaction result, a get transaction call must be sent to GBDS with the enrollment TGUID as the parameter to the following endpoint:
http://<ip>:8085/gbds/v2/people/transactions/{tguid}
The result for this call will contain a data.status field with the value REFUSED, as shown in the example below:
{
   "data":
   {
         "tguid": "string",
         "pguid": "string",
         "status": "REFUSED",
         "timestamp": 0,
         "progress": 0,
         "Candidates": [],
         "Person": {},
         "qualityAnalysis": {},
         "failReason": "Enroll matches 2 person(s) that are already involved in a pending exception. PGUIDs: 75ABF575-6825-41D7-A2A7-2C0D64CF9FE7, B393C481-C0AF-456C-9155-1510AFDC7D86",
         "isCurrentTransaction": false
   }
 }
7.3. Handling a REFUSED Transaction
As previously mentioned, a REFUSED transaction occurs when the entrant profile matches with an existing one that is linked to an active exception. When a transaction finishes with this status, the entrant profile is discarded and a new transaction must be submitted for this profile after the pending active exception has been treated.
After identifying the REFUSED enrollment and performing the getTransactions calls, the “failReason” field of the getTransaction response will contain the PGUIDs of the reference profiles that the entrant profile matched with. The amount of PGUIDs returned is unbounded and separated by commas.
After all the exceptions have been treated, the REFUSED enrollment can be re-submitted.
This is the complete workflow for dealing with REFUSED enrollments:
Important
The same workflow can be used to deal with refused updates, using the equivalent commands.
Example:
Enrollment 1 - Generates TGUID 1 and PGUID 1;
- TGUID 1 - creates a biometric exception with an already existing PGUID 0;
- Application is notified with:
{
    "operation": "ENROLL",
    "tguid": "<TGUID 1>",
    "status": "EXCEPTION"
}
- Save TGUID 1 and PGUID 1
Application performs GET /gbds/v2/exceptions/{tguid}
- And the response is:
{
   "data": [
   {
      "transactionTimestamp": 0,
      "match": {
         "matchedPersonPguid": "PGUID 0",
         "matchedPersonTguid": "TGUID 0",
         "biometricMatches": []
      }
   }
   ],
   "pagination": {
   "total": 0,
   "count": 0,
   "pageSize": 0,
   "currentPage": 0,
   "totalPages": 0
   }
}
- Create and save an artificial mapping of PGUID 0 to PGUID 1 / TGUID 1
Enrollment 2 - TGUID 2;
- TGUID 2 matches against PGUID 0;
- TGUID 2 - receives REFUSED status because it matched with PGUID 0 already in exception;
{
    "data":
    {
        "tguid": "string",
        "pguid": "string",
        "status": "REFUSED",
        "timestamp": 0,
        "progress": 0,
        "Candidates": [],
        "Person": {},
        "qualityAnalysis": {},
        "failReason": "Enroll matches 1 person(s) that are already involved in a pending exception. PGUIDs: PGUID 0",
        "isCurrentTransaction": false
    }
}
Save the matched PGUID <PGUID 0> associated with TGUID 2;
- Update the mapping to indicate that PGUID 0 / PGUID 1 / TGUID 1 / TGUID 2 are all linked
An examiner solves exception generated in Step 1: a. Application is notified with:
{
    "operation": "TREAT_EXCEPTION",
    "tguid": "<TGUID 1>",
    "status": "OK",
    "treatment": "TREATMENT_OPTION"
}
Send a new enrollment for TGUID 2.
- This will generate a TGUID 3. Save TGUID 2 and 3 for the next step.
Warning
It is possible for a matched PGUID to have multiple exceptions linked to it. In this scenario, all the exceptions for the given PGUID must be treated before trying to re-submit the refused enrollment or update.
See also
Observe that to obtain the TGUID 2, it is required to wait for notification from GBS Notifier informing the exception treatment for the already existing exception (TGUID 1) and perform a get transaction call to retrieve the information about the matched PGUIDs from GBDS (see sections Receiving a Notification and Performing Active Polling).
- Call linkEnroll endpoint and link the old TGUID (TGUID 2) with the new generated TGUID (TGUID 3).
It is worth mentioning that the above workflow should be implemented to automatically complete the transactions without any manual intervention.