1. GBDS 4 Security Overview
GBDS has a security module that uses JWT tokens to enforce user authentication and authorization. GBDS can be integrated with any LDAP-compliant user store for authentication, and with ranger to provide authorization and access auditing.
1.1. Components
There are four main components that work together to provide security for GBDS operation: API Security Module, LDAP Credential Store, Ranger and Solr.
API Security Module
All API requests first go through the security module, which enforces authentication and authorization for protected resources.
LDAP Credential Store
An LDAP instance (e.g. Active Directory, OpenLDAP) maintains information about users and user groups, and provides authentication to access the GBDS API and authorize API requests.
Ranger
Apache Ranger is a security framework that provides fine-grained access control to the GBDS API. Security policies can be created to deny or allow access to API endpoints based on criteria such as user name, user groups, resource requested, HTTP method used, and IP address.
Solr
GBDS uses Solr to store access logs for every API request, enabling auditing. Through the Ranger control panel, these logs can be viewed, searched and exported.
1.2. Security-enabled Workflows
1.2.1. Authentication
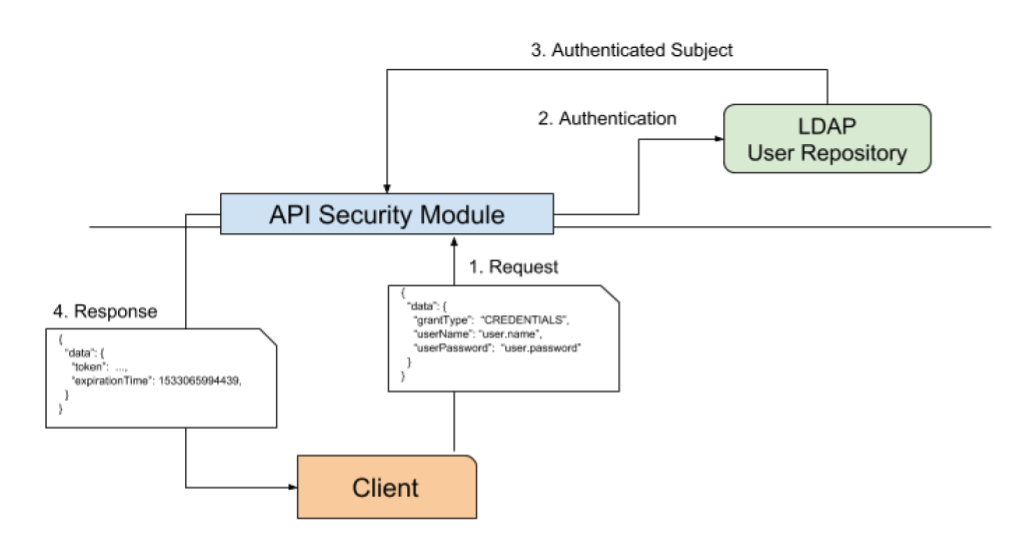
There are two methods for authenticating with the API. When the client does not have a valid token, it must use authentication by credentials. In this case, the client makes a request to the create token endpoint, passing a JSON payload with valid credentials for an user in the LDAP Credential store. Then, the Security Module binds to the LDAP Credential store, using the bind user credentials (see below), and performs the authentication. Then, it creates an Authenticated Subject: a user associated with all the groups it belongs to. Finally, the Security Module builds a JWT token, digitally signs it and sends it back to the client. This token can then be used to perform requests to the GBDS API.
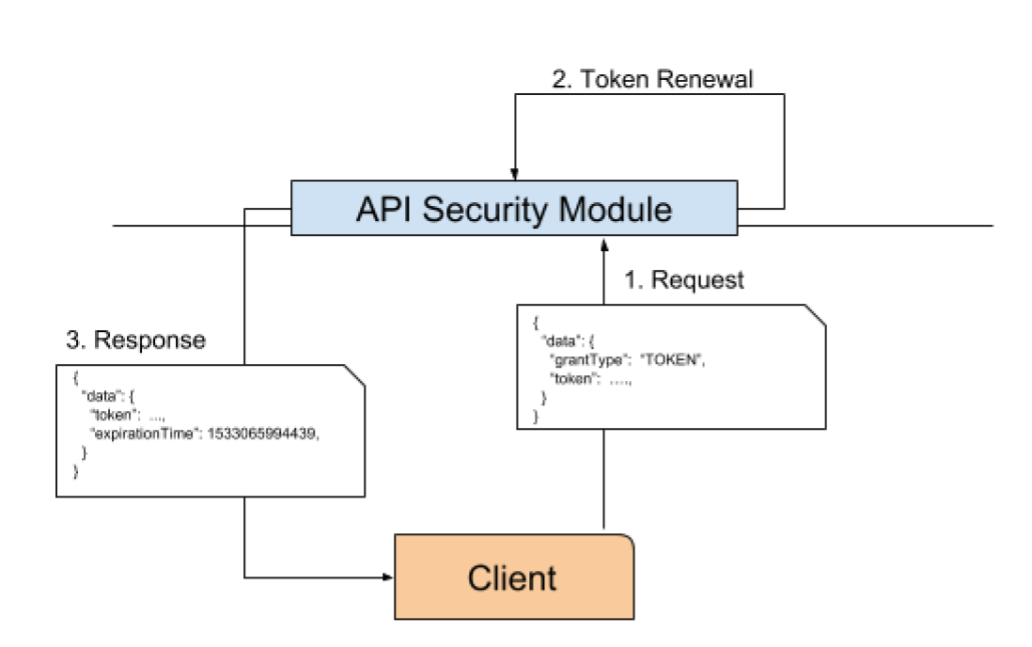
When the client already has a valid token but that is close to expiring, it can use that token to create a new one with a later expiration time. First, the client makes a request to the create token endpoint with the valid token. Then, the Security Module will validate the token and create a new one, using the same Authenticated Subject, but with a new expirationTime. Next, the new token will be sent to the user. Since this workflow does not require querying the Ldap Credential store, it is much faster. Client applications should be designed to use token renewal whenever possible.
1.2.2. Making an API Request
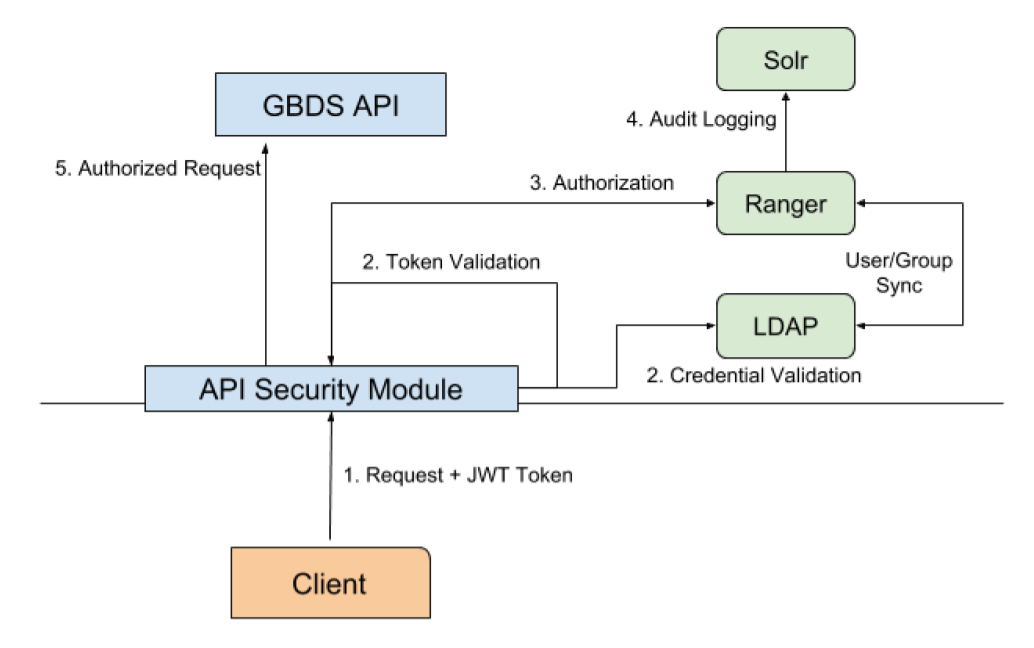
Once a valid JWT token is acquired, it will be sent to the GBDS API with every request, following the JWT standard. The requests will have an Authorization header with the Bearer schema, i.e., Authorization: Bearer <token>. For protected resources, the Security Module will extract the token from the header and validate its signature using the original Signing Key. If the token is valid, the request is authenticated. Next, the Security Module will build an AuthorizationContext with subject name, subject groups, requested resource, IP address and HTTP Method. This AuthorizationContext will be sent to ranger to authorize or deny the request and it will also be recorded in Solr, along with its outcome: Allowed or Denied. Finally, if the request was authorized, it will be forwarded to the GBDS API for processing.
1.3. Configuration
1.3.1. Files
The security module uses four different configuration files:
/etc/griaule/conf/gbscluster.properties: Main GBDS configuration file. When security is enabled, security options are configured through this file/etc/griaule/conf/gbsapi/keystore.jks: Password-protected keystore containing the Ldap Bind User Password and JWT Signing Key. Only accessible by the griaule user./etc/griaule/conf/gbsapi/truststore: Password-protected truststore containing the Ldap Server Certificate for allowing ldaps connections. Only accessible by the griaule user./etc/griaule/conf/gbsapi/.password: Password file containing the passwords of both keystore and truststore. The passwords are stored in clear text, and thus this file should be accessible by only the griaule user.
1.3.2. Security Options
GBDS can run with or without security enabled and that is controlled by the boolean configuration key:
gbscluster.api.security.enabled. When this key is set to false, the whole security is disabled and
all the other security keys are ignored. If set to true, there following configuration keys MUST also
be configured:
General
gbscluster.api.security.keystore: path to the keystore generated by the keystore generation scriptgbscluster.api.security.truststore: path to the truststore that holds the certificate of the ldap server. Required when using ldaps.gbscluster.api.security.passwords: path to file containing keystore and truststore passwords. This file should have restricted access to the griaule user.
Authentication
gbscluster.api.security.ldap.url: connection url to the ldap user store servergbscluster.api.security.ldap.userSearchBase: Distinguished name (DN) of the repository of users in the ldap server. E.g.,ou=Users,dc=pd,dc=griaulegbscluster.api.security.ldap.userSearchAttribute: User attribute that will be used as username during authentication. E.g.,sAMAccountName,uidgbscluster.api.security.ldap.userGroupMembershipAttribute: User attribute that contains its group membership information. E.g.,memberOfgbscluster.api.security.ldap.bindUserDNDistinguished name of the bind user. The bind user is an user account used by GBDS to bind to the ldap server, authenticate users and fetch their groups.
Token
gbscluster.api.security.token.ttlInMilliseconds: Time-to-live, in milliseconds, of the jwt token. Valid values: between 30 minutes and 3 hours.
Authorization
gbscluster.api.security.authorization.ranger.configurationDirectory: Directory with gbds-specific ranger configuration.
2. Integrating with Active Directory
2.1. Verify DNS resolution
Before beginning, make sure the name resolution for the domain to which the cluster machines will be integrated to is working correctly. For a domain called pd.griaule, use the following command:
dig -t SRV _ldap._tcp.pd.griaule
Note
Make sure the ANSWER SECTION is present and that it contains the hostname and IP address of the domain controller.
Warning
Fix any DNS resolution issues before continuing.
2.2. Install required packages
sudo yum install realmd sssd oddjob oddjob-mkhomedir adcli sssd-ad sssd-tools
2.3. Integrate with AD
Using the utility realm, is the most convenient way to integrate SSSD with AD. Run the following command to display basic information about the domain:
realm discover <domain_name>
2.3.1. Join the Domain
To join, you will need an account that belongs to the Domain Admins group:
sudo realm join -U <username> <domain_name>
Next, enable NSS and PAM with:
authconfig --enablesssd --update
And finally, check if the machine joined the domain successfully by querying a user on the domain:
id <username>@<domain_name>
2.3.2. Troubleshooting
If any problems arise, use the following tips:
- Double check the DNS name resolution. This is the cause of most issues.
- Ensure directory
/etc/sssd/and/etc/sssd/conf.dexist and both have permission 0600 - Increase the debug_level in the
/etc/sssd/sssd.confin all the sections, i.e.,[sssd],[nss],[pam],[domain]. Then, restart the sssd service:sudo service sssd restart. The logs will be in the folder/var/log/sssd/ - In case of error
Insufficient permission to join the domain ...: The user used to join the domain does not have permission. Check if it belongs to theDomain Admins group
3. Integrating with OpenLdap
This guide explains how to perform a minimal install of OpenLdap that will be compatible with GBDS for both authentication and authorization.
3.1. Install OpenLdap
3.1.1. Dependencies
Connect to the ldap host and install the necessary packages:
sudo yum -y install openldap compat-openldap openldap-clients openldap-servers openldap-servers-sql openldap-devel
3.1.2. Start Ldap Daemon
Next, start the ldap daemon and configure it to auto-start on system boot
systemctl start slapd.service

systemctl enable slapd.service

systemctl status slapd.service
3.1.3. Generate Root Password
Run the ldappasswd command to create an Ldap root password. Write down both the password and the
hashed version, returned by ldappasswd.
sudo slappasswd
3.1.4. Create hdb-database
hdb s a Hierarchical variant of the bdb database backend. In the template configuration bellow set the following variables according to your use case:
- olcSuffix: represents the domain name for which the Ldap will serve account information. Additionally, this distinguished name will be added to queries that are sent to the backend
- olcRootDN: is the distinguished name of the user that will have administrative access to the Ldap server
- olcRootPW: Set the password for the admin user. This password will be the hashed output of the command
slappasswd, which was executed previously
Put the following configuration inside a file called db.ldif.
Warning
MAKE SURE TO REPLACE olcRootPW, olcRootDN and olcSuffix.
dn: olcDatabase={2}hdb,cn=config
changetype: modify
replace: olcSuffix
olcSuffix: dc=oldap,dc=pd,dc=griaule

dn: olcDatabase={2}hdb,cn=config
changetype: modify
replace: olcRootDN
olcRootDN: cn=ldapadm,dc=oldap,dc=pd,dc=griaule

dn: olcDatabase={2}hdb,cn=config
changetype: modify
replace: olcRootPW
olcRootPW: {SSHA}theHashedPasswordValueFromSlapPasswd
Warning
Make sure there are no trailing spaces in the empty lines, otherwise it will cause issues. See: https://serverfault.com/questions/578710/wrong-attributetype-when-using-ldapadd
3.1.4.1. Push the changes to the server
sudo ldapmodify -Y EXTERNAL -H ldapi:/// -f db.ldif
Warning
If you do not use sudo you will run into permission issues: ldap_modify: Insufficient access (50)
3.1.5. Restrict Monitor Access to the ldapadm
Put the following config into a file called monitor.ldif and update the dn.base, which says UPDATE ME,
with the DN of the value set to oclRootDN previously
dn: olcDatabase={1}monitor,cn=config
changetype: modify
replace: olcAccess
olcAccess: {0}to * by dn.base="gidNumber=0+uidNumber=0,cn=peercred,cn=external, cn=auth" read by dn.base="UPDATE ME" read by * none
3.1.5.1. Push the changes to the server
sudo ldapmodify -Y EXTERNAL -H ldapi:/// -f monitor.ldif
Warning
If you do not use sudo you will run into permission issues: ldap_modify: Insufficient access (50)
3.1.6. Add hdb-backend Configuration File
This file will set basic configuration options for the hdb back-end
sudo cp /usr/share/openldap-servers/DB_CONFIG.example /var/lib/ldap/DB_CONFIG
sudo chown ldap:ldap /var/lib/ldap/DB_CONFIG
3.1.7. Add Essential Ldap Schemas
sudo ldapadd -Y EXTERNAL -H ldapi:/// -f /etc/openldap/schema/cosine.ldif
sudo ldapadd -Y EXTERNAL -H ldapi:/// -f /etc/openldap/schema/nis.ldif
sudo ldapadd -Y EXTERNAL -H ldapi:/// -f /etc/openldap/schema/inetorgperson.ldif
3.1.8. Enable memberOf Module
Warning
THIS NEEDS TO BE DONE BEFORE ANY GROUP IS CREATED. THE MEMBEROF ATTRIBUTE IS AN OPERATIONAL ATTRIBUTE AND IT IS NOT CREATED RETROACTIVELY
This module is necessary for querying the groups of an user. Put the following config in a file named memberof_config.ldif
dn: cn=module,cn=config
cn: module
objectclass: olcModuleList
objectclass: top
olcmoduleload: memberof.la
olcmodulepath: /usr/lib64/openldap

dn: olcOverlay={0}memberof,olcDatabase={2}hdb,cn=config
objectClass: olcConfig
objectClass: olcMemberOf
objectClass: olcOverlayConfig
objectClass: top
olcOverlay: memberof
olcMemberOfDangling: ignore
olcMemberOfRefInt: TRUE
olcMemberOfGroupOC: groupOfNames
olcMemberOfMemberAD: member
olcMemberOfMemberOfAD: memberOf
To push the changes to the server, run the command:
sudo ldapadd -Y EXTERNAL -H ldapi:/// -f memberof_config.ldif
3.1.9. Generate the database for your domain
Finally, we specify a database, which uses the configuration created previously, to serve all requests to our domain (value of olcSuffix).
Update the DN for Users and Groups to match your configured domain. Put the configuration in db_structure.ldif
# Create entry for domain
dn: dc=oldap,dc=pd,dc=griaule
objectClass: domain
objectClass: top
dc: oldap

# Create an OU for Users
dn: ou=Users,dc=oldap,dc=pd,dc=griaule
objectClass: organizationalUnit
ou: Users

# Create an OU for Groups
dn: ou=Groups,dc=oldap,dc=pd,dc=griaule
objectClass: organizationalUnit
ou: Groups
To push the changes to the server, use the configured admin account (olcRootDN) after the -D parameter. The ldapadd utility will prompt
you for the adm account password set previously.
sudo ldapadd -x -D 'cn=ldapadm,dc=oldap,dc=pd,dc=griaule' -W -H ldapi:/// -f db_structure.ldif
3.2. Troubleshooting
Note the error messages returned by OpenLdap can be quite confusing. So a good tip if you are having any
trouble making the installation work is to enable debug mode. Stop the slapd service and then restart
the process directly, with the debug flag -d -1:
slapd -d -1 -u ldap -h "ldap:/// ldapi:///"
If TLS is enabled, also include the string for the ldaps endpoint:
slapd -d -1 -u ldap -h "ldap:/// ldapi:/// ldaps:///"
3.3. Encrypt OpenLdap Passwords
By default, OpenLdap stores passwords in clear text. To change this behavior we need to: (i) set a global password hash algorithm and (ii) enable password policy to automatically encrypt any incoming cleartext passwords.
3.3.1. Configure Hash Algorithm
We will be using SHA-512 algorithm with 50k rounds and 16 byte salt. Create a file called hash_algorithm.ldif
dn: cn=config
replace: olcPasswordHash
olcPasswordHash: {CRYPT}

dn: cn=config
replace: olcPasswordCryptSaltFormat
olcPasswordCryptSaltFormat: $6$rounds=50000$%.16s
To push the changes to the server:
sudo ldapmodify -Y EXTERNAL -H ldapi:/// -f hash_algorithm.ldif
3.3.2. Import the Password Policy Schema
sudo ldapadd -Y EXTERNAL -H ldapi:/// -f /etc/openldap/schema/ppolicy.ldif
3.3.3. Load Password Policy Module
Create a file called password_policy_config.ldif with content:
# load password policy module
dn: cn=module,cn=config
cn: module
objectClass: top
objectClass: olcModuleList
olcModuleLoad: ppolicy.la
olcModulePath: /usr/lib64/openldap

# apply the password policy overlay our database
dn: olcOverlay={1}ppolicy,olcDatabase={2}hdb,cn=config
objectClass: olcPPolicyConfig
objectClass: olcOverlayConfig
olcOverlay: ppolicy
olcPPolicyDefault: cn=Password Policy,ou=Policies,dc=oldap,dc=pd,dc=griaule
olcPPolicyForwardUpdates: FALSE
olcPPolicyHashCleartext: TRUE
olcPPolicyUseLockout: FALSE
Then push these changes with:
sudo ldapadd -Y EXTERNAL -H ldapi:/// -f password_policy_config.ldif
If you encounter an error complaining that pwdAttribute does not exist, it means the Password Policy schema was not imported.
3.3.4. Create Default Password Policy
Create a file named password_policy.ldif
# create default password policy
dn: cn=Password Policy,ou=Policies,dc=oldap,dc=pd,dc=griaule
objectClass: top
objectClass: device
objectClass: pwdPolicy
cn: Password Policy
pwdAttribute: userPassword
Then push the changes with command below
sudo ldapadd -Y EXTERNAL -H ldapi:/// -f password_policy_config.ldif
3.4. Improve Security
3.4.1. Disable Anonymous Binding
Create a file with name disable_anon_binding.ldif:
dn: olcDatabase={-1}frontend,cn=config
add: olcRequires
olcRequires: authc

dn: olcDatabase={2}hdb,cn=config
add: olcRequires
olcRequires: authc
Then push the changes:
sudo ldapmodify -Y EXTERNAL -H ldapi:/// -f disable_anon_binding.ldif
To test whether the changes worked, run the following anonymous search:
# without TLS
ldapsearch -x -LLL -H ldapi:/// "(cn=*)"
# Or with TLS
ldapsearch -x -LLL -H ldaps:/// "(cn=*)"
3.4.2. Disable Read Access to User Passwords
Finally, any user can retrieve the password of another user. Even though the passwords are hashed, this should be
avoided. Even more so if you decided to store the passwords in plaintext. So, create a file called
disabled_password_read.ldif.
Warning
MAKE SURE THERE IS NO LINE BREAK FOR olcAccess
dn: olcDatabase={2}hdb,cn=config
add: olcAccess
olcAccess: to attrs=userPassword by dn="<olcRootDN>" write by self write by * auth
-
add: olcAccess
olcAccess: to * by dn="<olcRootDN>" write by users read by self write by * auth
Push the changes
sudo ldapmodify -Y EXTERNAL -H ldapi:/// -f disabled_password_read.ldif
If you run a binded search with any user that is not the olcRootDN, the only password that will be returned is the user’s own.
ldapsearch -x -D '<non_root>' -LLL -H ldapi:/// "(cn=*)"
3.5. Enable LDAPS
Before continuing, make sure that the your OpenLdap instance is working and that it has two organizational units: one for users and one for groups. You can do this by using Apache Directory Studio to connect to your server using its ldap connection url, e.g., ldap://192.168.0.100:389, and with your configured admin account (olcRootDN).
To enable LDAPS, you will need a valid certificate signed by a trusted authority. Alternatively, we provide a guide on how to setup your own certification authority and how to use it to sign certificates for your server.
3.5.1. Create your own Certificates
3.5.1.1. Create your CA
If you already have a valid certificate, you can skip this step
In CentOS, you will find the openssl.cnf file, which contains the main configuration for our CA, in the directory
/etc/pki/tls. However, our CA will live under /etc/pki/CA.
First, create the index.txt and serial files, which will store information on the signed certificates and the
certificate serial number to be used, respectively.
touch /etc/pki/CA/index.txt
echo '01' > /etc/pki/CA/serial
Next, add the following policies to /etc/pki/tls/openssl.cnf:
# For the CA policy
[ policy_match ]
countryName             = match
stateOrProvinceName     = match
organizationName        = match
organizationalUnitName  = optional
commonName              = supplied
emailAddress            = optional

[ signing_policy ]
countryName             = match
stateOrProvinceName     = match
organizationName        = match
organizationalUnitName  = optional
commonName              = supplied
emailAddress            = optional

[ signing_req ]
subjectKeyIdentifier    = hash
authorityKeyIdentifier  = keyid,issuer
Now, switch into the CA directory
cd /etc/pki/CA
We will generate the CA certificate, valid for 10 years, with the following command. You will be prompted for the private key password and information about the Subject of the certificate (the CA in this case). Take note of you password, as you will need it for signing certificates.
openssl req -config /etc/pki/tls/openssl.cnf -new -x509 -extensions v3_ca -keyout private/cakey.pem -out cacert.pem -days 3650
Then limit the access rights of the CA private key
chmod 0400 private/cakey.pem
3.5.1.2. Create the Ldap Server Certificate
We first create a certificate signing request for the ldap server
openssl req -config /etc/pki/tls/openssl.cnf -newkey rsa:2048 -nodes -sha256 -out ldap_cert.csr -outform PEM -keyout ldap_key.pem
Next, we sign the server.csr using the CA private key
openssl ca -config /etc/pki/tls/openssl.cnf -policy signing_policy -extensions signing_req -out ldap_cert.pem -infiles ldap_cert.csr
That is it, now ldap_cert.pem is the certificate for your server and its private key is in the file ldap_key.pem.
Note
the private key of the server is not encrypted (-nodes parameter). This is less secure but OpenLdap does NOT support
encrypted keys. So, it is paramount to restrict all access to this file, as we will do in the next steps.
3.5.2. Configure OpenLdap to use certificate and key
First copy the CA certificate into /etc/openldap/cacerts. This will make OpenLdap trust the certificates signed by your CA.
mkdir /etc/openldap/cacerts
cp /etc/pki/CA/cacert.pem  /etc/openldap/cacerts
chown -R ldap:ldap /etc/openldap/cacerts/
Then, install your ldap server’s certificate into /etc/openldap/certs
mv /etc/pki/CA/ldap_cert.pem /etc/openldap/certs
chown ldap:ldap /etc/openldap/certs/ldap_cert.pem

mv /etc/pki/CA/ldap_key.pem /etc/openldap/certs
chown ldap:ldap /etc/openldap/certs/ldap_key.pem
chmod 400 /etc/openldap/certs/ldap_key.pem
Setting the permission 400 to the server private key IS PARAMOUNT.
Create a file called enable_ldaps.ldif with the following configs
dn: cn=config
changetype: modify
replace: olcTLSCACertificateFile
olcTLSCACertificateFile: /etc/openldap/cacerts/cacert.pem
-
replace: olcTLSCertificateFile
olcTLSCertificateFile: /etc/openldap/certs/ldap_cert.pem
-
replace: olcTLSCertificateKeyFile
olcTLSCertificateKeyFile: /etc/openldap/certs/ldap_key.pem
Then, push the changes to server and test the configuration files
sudo ldapmodify -Y EXTERNAL -H ldapi:/// -f enable_ldaps.ldif
3.5.3. Enable TLS Endpoint
In the file /etc/sysconfig/slapd, add ldaps:/// to the line starting with SLAPD_URLS=. After that, the line should look like:
SLAPD_URLS="ldapi:/// ldap:/// ldaps:///"
3.5.4. Force TLS
Create a file force_tls.ldif with the following content:
dn: olcDatabase={2}hdb,cn=config
changetype:  modify
add: olcSecurity
olcSecurity: tls=1
And then push the changes to the server
sudo ldapmodify -v -Y EXTERNAL -H ldapi:/// -f force_tls.ldif
Now test the TLS requirement by running the following search. It should be denied due to TLS requirement
ldapsearch -H ldap://<host> -D "cn=ldapadm,dc=oldap,dc=pd,dc=griaule" -W '(uid=ldapadm)'
Warning
FROM NOW ON, ANY CALL TO ldapi:/// THAT REQUIRES THE olcRootDN (i.e. those that create entity in the Directory Tree) NEEDS
TO BE PERFORMED AT ldaps:/// INSTEAD. CALLS THAT CAN USE -Y EXTERNAL (i.e., that modify cn=config) CAN STILL USE ldapi:///.
3.5.5. Client-side TLS Configuration
To allow utilities such as ldapsearch to connect via TLS, add TLS_REQCERT allow to /etc/openldap/ldap.conf
echo "TLS_REQCERT allow" >> /etc/openldap/ldap.conf
3.6. Create Bind user for Ranger and GBDS
Both GBDS and Ranger will require a user to bind to the LDAP server and perform queries and authentication. The only privilege this user needs is reading the Directory Tree.
Warning
Do not use the olcRootDN as a bind user.
Create a file bind_user.ldif with the following content. Replace the dn: for one that matches your installation. Additionally, set
the bind user password. If you enabled password encryption, write the password in plain text. Otherwise, use slappasswd to produce a hash of the
password and write the hash in the .ldif file (Similar to how we created the password for olcRootDN)
dn: cn=gbds_bind,ou=Users,dc=oldap,dc=pd,dc=griaule
objectClass: top
objectClass: person
objectClass: inetOrgPerson
cn: gbds_bind
uid: gbds.bind
sn: Bind User
userPassword: <password>
Push the changes with:
# for tls enabled
ldapadd -D "<olcRootDN>" -W -H ldaps:/// -f bind_user.ldif
# without tls
ldapadd -D "<olcRootDN>" -W -H ldapi:/// -f bind_user.ldif
To test if the user was created correctly, run the following search authenticating with the bind user credentials:his
ldapsearch -D "<bind_user_dn>" -W -H ldaps:/// "(cn=gbds_bind)"
3.7. LDAP API
LDAP API is an API provided by Griaule to help the user and group management. You can authenticate, create, delete, or modify user data, and list user data and group data through the API.
Note
If the API files were not provided, contact Griaule Support Team.
The complete API can be accessed at LDAP API.
Caution
The API works with SSL security and a truststore and keystore are required. For more information on creating these, see the Configuring GBDS Security section.
3.7.1. Configuring the API
To correctly install and configure the API, follow the steps
- Extract the downloaded package.
- At
/etc/griaulecreate theldapdirectory. - Move the
confdirectory from the extracted package to the/etc/griaule/ldapdirectory. - Move the
config.propertiesto the/etc/griaule/ldapdirectory. - Open the
config.propertiesfile and adjust the configuration parameters according to your environment. - At
/var/lib/griaulecreate theldapdirectory. - Move the
bs-ldap-api.jarfile and thekill-api.shandstart-api.shscript to the new directory. - Run the start script.
3.7.2. Creating New Users and Groups
To create a new user, call Create User. It will create the user, the password, and the groups the user belongs to.
If modifications to an existing user are needed, call Modify User Data.
To recover user data, call Get User Data.
To add, modify, or delete groups, access the /etc/griaule/ldap/conf/group-list.json and modify the file
accordingly. You can also see all groups by calling List Groups.
4. Installing Ranger
Once either OpenLdap or Active Directory are setup, you can proceed to install ranger.
4.1. Prerequisites
4.1.1. Install ambari-infra
Go to ambari and install service Ambari-infra. This will provide an instance of Solr for storing audit data for Ranger.
4.1.2. Install and Configure MySQL instance
Install an instance of MySQL
Create the user rangerdba and grant it the necessary privileges
CREATE USER 'rangerdba'@'localhost' IDENTIFIED BY 'Rangerdba$1';

GRANT ALL PRIVILEGES ON *.* TO 'rangerdba'@'localhost' IDENTIFIED BY 'Rangerdba$1' WITH GRANT OPTION;

CREATE USER 'rangerdba'@'%' IDENTIFIED BY 'Rangerdba$1';

GRANT ALL PRIVILEGES ON *.* TO 'rangerdba'@'%';

GRANT ALL PRIVILEGES ON *.* TO 'rangerdba'@'%' IDENTIFIED BY 'Rangerdba$1' WITH GRANT OPTION;

FLUSH PRIVILEGES;
Note
Note that Rangerdba$1 is the password of rangerdba user. Replace it with your desired password.
Test if the user rangerdba was created successfully:
mysql -u rangerdba -pInstall the MySQL connector:
yum install mysql-connector-java*Register the connector with ambari, by running the following command in the host with ambari-server installed:
ambari-server setup --jdbc-db=mysql --jdbc-driver=/usr/share/java/mysql-connector-java.jar
4.2. Installing Ranger Service
Go to ambari and add the Ranger service. Go through each of the following configuration tabs before finalizing the installation.
4.2.1. Ranger Admin
- Leave Ranger DB username as
rangeradmin. Put any password you want, but write it down for later - Make sure
Setup DatabaseandDatabase Useroption is set toYes - For DBA username, use the user account created in the previous step
4.2.2. Ranger User Info
This service will import both users and groups into ranger’s database.
Note
Below, we give SUGGESTIONS for values in various required configuration options. You should make sure they match your Ldap deployment.
- Change Sync Source to
Ldap/AD - In tab Common Config:
- LDAP/AD URL: If the url configured here is for LDAPS, the LDAPS certificate will have to be imported into usersync truststore as it is described in section Importing LDAPS certificate for usersync
- Bind User: Fill in the bind user DN and password. This user only needs read privilege to the Users and Groups repository
- In tab User Configs:
- Username Attribute: attribute that stores the userName for login. For AD, usually
sAMAccountNameand for OpenLdap,uid. - User Search Base: Distinguished name for the node that contains the users that need to be synced (AD Users)
- Username Attribute: attribute that stores the userName for login. For AD, usually
- In tab Group Configs:
- Group member Attribute: Attribute of the entity Group that stores which users belong to the group. information on user-group membership. It
is usually
member - Group Name Attribute: Attribute of group that contains the name of the group. Usually
cn - Group Object Class: Class of the group entity. For AD, it is usually
group, for OpenLdap it is usuallygroupOfNames - Group Search Base: with the node that contains the groups that need to be synced
- Group member Attribute: Attribute of the entity Group that stores which users belong to the group. information on user-group membership. It
is usually
4.2.3. Ranger Audit
- Check option
Audit to Solr - Check Option
Solr Cloud
4.3. Check Installation
4.3.1. User Sync
Go to Ranger wbsite at http://<host>:6080, login, and go to Settings, then, Users/Groups. All the users and groups of the User/Group
Search Base should be there. If that is not the case, a problem has occurred with the user sync. Check the log /var/log/ranger/usersync/usersync.log
for any errors
4.3.2. Solr Audit
Go to ambari-infra UI and check for the existence of the collection ranger_audits
4.4. Enabling Ldap Integration with TLS
To enable Ranger to use LDAPS instead of LDAP, two changes need to be made. First, we need to update the ldap connection url to the one protected by TLS. Second, we need to import the LDAPS certificate.
4.4.1. Change Ldap Connection URL
Go to Ambari, Ranger, Configs, Ranger User Info, Common Configs. Change the LDAP/AD URL to ldaps://<hostname>:636
4.4.2. Import Ldaps Certificate
If your Ldap Repository is using TLS, you have to import its certificate into ranger’s UserSync truststore.
To get the location of the truststore, go to Ambari, Ranger, Configs, Advanced, Advanced ranger-ugsync-site, ranger.usersync.truststore.file.
Then, use java’s keytool to import the Ldaps certificate into the truststore. If the truststore already exists, it will need its password. If it does not,
then take note of the password used. You will need it later.
sudo keytool -import -trustcacerts -alias $ALIAS -file $PATH_TO_YOUR_LDAPS_CERT -keystore /usr/hdp/current/ranger-usersync/conf/mytruststore.jks
Next, correct the truststore permissions and ownership:
sudo chmod 640 /usr/hdp/current/ranger-usersync/conf/mytruststore.jks
sudo chown ranger:ranger /usr/hdp/current/ranger-usersync/conf/mytruststore.jks
If the truststore is new, go to Ambari, Ranger, Configs, Advanced, Advanced ranger-ugsync-site and set the properties:
- ranger.usersync.truststore.file: with the absolute path to the truststore
- ranger.usersync.truststore.password: password of the truststore
4.4.3. Troubleshooting
4.4.3.1. Unable to create SSLContext for communication to policy manager
There is a problem with the credentials and keys of usersync. The only way I was able to solve this issue was to delete the truststore
/usr/hdp/current/ranger-usersync/conf/mytrustore.jks, re-creating it with the Ldaps certificate and updating its password config in Ambari, Ranger,
Configs, Advanced ranger-usersync-site
5. Configuring GBDS Security
Once Ranger, Solr and the Ldap server are installed and configured, we can go ahead and configure GBDS.
5.1. Create GBDS Keystore
The keystore will be used to save the bind user’s password and the signing key for the JWT tokens generated by the API.
Run the script /var/lib/griaule/gbsapi/scripts/create_keystore.py passing the path to the new keystore and the path to create the password file.
The script will then ask you for the bind user password to be saved. Next, the script will create a keystore with the bind user’s password and a random
signing key. The keystore will be protected by randomly generated password, which will be saved to the password file specified. Finally, both the keystore and
password files will be set to read-only permission.
python /var/lib/griaule/gbsapi/scripts/create_keystore.py --store_path /etc/griaule/conf/gbsapi/keystore.jks --password_file /etc/griaule/conf/gbsapi/.passwords
Note
The password file will contain passwords in clear text. Thus, it is paramount that it is kept in a safe location with access only for user griaule.
5.2. Create trustore for LDAPS
If you intend to connect to your Ldap server using SSL, you need to import the server’s certificate into a truststore and configure GBDS to use it.
Assuming the server’s certificate is called server_cert.pem, run the following command and use a strong password for the truststore.
sudo keytool -import -trustcacerts -alias ldap_server -file <certificate_file> -keystore /etc/griaule/conf/gbsapi/truststore
chown griaule:griaule /etc/griaule/conf/gbsapi/truststore
chmod 400 /etc/griaule/conf/gbsapi/truststore
Besides creating the truststore, these commands will also restrict access to it to only the griaule user. Next, save the truststore password into the passwords file
sudo -u griaule chmod u+w /etc/griaule/conf/gbsapi/.passwords && sudo -u griaule echo "truststore=<YOUR_PASSWORD>" >> /etc/griaule/conf/gbsapi/.passwords && sudo -u griaule chmod 400 /etc/griaule/conf/gbsapi/.passwords
5.3. Update Configuration File
Edit the file /etc/griaule/conf/gbscluster.properties and modify the following properties:
gbscluster.api.security.enabled: set to true to enable security
gbscluster.api.security.keystore: path to the keystore you just created (
/etc/griaule/conf/gbsapi/keystore.jks)gbscluster.api.security.truststore: path to the truststore you just created (
/etc/griaule/conf/gbsapi/truststore)gbscluster.api.security.passwords: path to password file. (
etc/griaule/conf/gbsapi/.passwords)gbscluster.api.security.ldap.url: Set the URL to the Ldap server. E.g.,
ldap://<host>:389. If you enabled Ldaps, it should beldaps://<host>:636gbscluster.api.security.ldap.userSearchBase: The DN of the tree node that holds the users that will be able to authenticate against GBDS. In our OpenLdap installation guide, this DN would be:
ou=Users,dc=oldap,dc=pd,dc=griauleWarning
THIS NEEDS TO BE THE SAME DN CONFIGURED IN RANGER
gbscluster.api.security.ldap.userSearchAttribute: Attribute of entity User that holds the
userName, that will be used during authentication.Warning
THIS NEEDS TO BE THE SAME CONFIGURED IN RANGER
gbscluster.api.security.ldap.userGroupMembershipAttribute: attribute of entity user that holds the DN of the groups it belongs to. Usually memberOf.
Warning
THIS NEEDS TO BE THE SAME CONFIGURED IN RANGER
gbscluster.api.security.ldap.bindUserDN: DN of the bind user. Use the same one configured for Ranger.
gbscluster.api.security.token.ttlInMilliseconds: Time to live, in milliseconds, for the JWT tokens generated by the API. Valid values are between 30 minutes to 3 hours. We recommend 1 hour.
6. Installing Ranger Authorization Service
To install and run Ranger Authorization service, it is needed a GBDS and an ADMIN users created.
To create the administrator user, open the administrator_group.ldif file in /etc/openldap
folder and add the following to the file:
dn: cn=administrator,ou=Groups,dc=oldap,dc=pd,dc=griaule
objectclass: groupofnames
cn: administrator
description: IT Security Group
# Add the group members all of which are assumed to exist under people
member: cn=gbds_bind,ou=Users,dc=oldap,dc=pd,dc=griaule
Then, in gbds_user.ldif file, create the GBDS user.
dn: cn=gbds_user,ou=Groups,dc=oldap,dc=pd,dc=griaule
objectclass: groupofnames
cn: gbds_user
description: IT Security Group
# Add the group members all of which are assumed to exist under people
member: cn=gbds_bind,ou=Users,dc=oldap,dc=pd,dc=griaule
Apply changes restarting Ranger Service via Ambar GUI.
sudo ldapadd -D "cn=ldapadm,dc=oldap,dc=pd,dc=griaule" -W -H ldapi:/// -f /etc/openldap/administrator_group.ldif
sudo ldapadd -D "cn=ldapadm,dc=oldap,dc=pd,dc=griaule" -W -H ldapi:/// -f /etc/openldap/gbds_user.ldif
Note
If TLS is active, remember to change the ldapi:/// to ldaps:///.
When changes are applied, run Ranger Authorization Policy.
java -jar /root/ranger-authorization-service-installer-1.0-SNAPSHOT-jar-with-dependencies.jar -admin_password 'Griaule.123' -admin_username admin -ranger_url \http://127.0.0.1:6080
To finish the process, update the Ranger XML Files. Go to /etc/griaule/conf/gbsapi/ and at
ranger-gbds-audit.xml file, modify accordingly
<name>xasecure.audit.jpa.javax.persistence.jdbc.url</name>
<value>jdbc:mysql://127.0.0.1:3306/ranger_audit</value>

<name>xasecure.audit.kafka.broker_list</name>
<value>localhost:9092</value>

<name>xasecure.audit.solr.solr_url</name>
<value>http://localhost:6083/solr/ranger_audits</value>

<name>xasecure.audit.destination.solr.urls</name>
<value>http://localhost:8886/solr/ranger_audits</value>
Do the same for the ranger-gbds-security.xml
<name>ranger.plugin.gbds.policy.rest.url</name>
<value>http://localhost:6080</value>
7. Configuring PHP LDAP Admin
PHP LDAP Admin is tool to manage OPENLDAP via GUI, it is an alternative to using CLI. The user can add/modify/delete users, groups, roles, etc. via GUI. Note that this is not required in order to LDAP operate.
First, install PHPLDAPAdmin dependencies
At /etc/httpd/conf.d, update phpldapadmin.conf file with
# Require local
Require all granted
And also update config.php file in /etc/phpldapadmin folder with
servers->setValue('server','name','Local LDAP Server');
servers->setValue('server','host','127.0.0.1');
servers->setValue('server','port',389);
servers->setValue('server','base',array('dc=oldap,dc=pd,dc=griaule'));
servers->setValue('login','attr','dn');
Run the following command to start and enable HTTPD Services
$ systemctl enable httpd.service && systemctl start httpd.service && systemctl status httpd.service
After enabling HTTPD, it is needed to specify possible updates. If firewall is enabled, run
firewall-cmd --permanent --zone=public --add-service=http
firewall-cmd --reload
And if SELinux is enabled, run
setsebool -P httpd_can_connect_ldap on
Validate PHP LDAP Admin GUI oppening the GUI at http://localhost/ldapadmin with the user (DN, e.g. cn=ldapadm,dc=oldap,dc=pd,dc=griaule) and password. Subsequently click in the dropdown buttons and confirm all users and groups are available.